centos fastdfs 多服务器 多硬盘 多组 配置详解
说正文前,先感谢happy_fish100提供的fastdfs,轻量级的分布式文件服务器。
随着用户量的变大,图片,视频等的量会不断的增大,这个时候一个硬盘可能不够用了,就要加硬盘。硬盘加不了时,就要增加服务器了。同一组服务器,文件服务器的东西是一样,不同组的服务器,有不同的文件,不同的组之间,共同组建了文件服务器的所有内容。
下面说一下,安装配置的过程,这里配置的方法,根开发者提供的方法不一样,我没有用到fastdfs-nginx-module,通过配置nginx实现了fastdfs-nginx-module的功能。
一,Fastdfs的下载
地址:http://sourceforge.net/projects/fastdfs/files/FastDFS%20Server%20Source%20Code/
二,服务器,以及系统
我用的centos 6.5 x86_64 ,fastdfs v5.01架构如下:
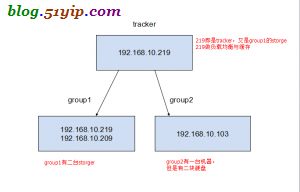
架构图
这里的tracker是单点的,如果出了故障就郁闷了,以前搞过一次多tracker,不过版本比较老了。请参考:fastdfs 多服务器 配置
三,安装fastdfs和nginx
1,安装nginx
- //安装,gcc,automake,autoconf等依赖包
- [root@localhost download]$ yum install gettext gettext-devel libXft libXft-devel libXpm libXpm-devel\
- automake autoconf libXtst-devel gtk+-devel gcc zlib-devel libpng-devel gtk2-devel glib-devel
- //安装FastDFS
- [root@localhost download]# tar zxf FastDFS_v5.01.tar.gz
- [root@localhost download]# cd FastDFS
- [root@localhost download]# ./make.sh
- [root@localhost download]# ./make.sh install
- //安装成功有以下内容
- [root@localhost fdfs]# ll /usr/local/bin/ |grep fdfs
- -rwxr-xr-x 1 root root 522870 7月 4 03:20 fdfs_appender_test
- -rwxr-xr-x 1 root root 522823 7月 4 03:20 fdfs_appender_test1
- -rwxr-xr-x 1 root root 513975 7月 4 03:20 fdfs_append_file
- -rwxr-xr-x 1 root root 513393 7月 4 03:20 fdfs_crc32
- -rwxr-xr-x 1 root root 513927 7月 4 03:20 fdfs_delete_file
- -rwxr-xr-x 1 root root 514329 7月 4 03:20 fdfs_download_file
- -rwxr-xr-x 1 root root 514093 7月 4 03:20 fdfs_file_info
- -rwxr-xr-x 1 root root 525024 7月 4 03:20 fdfs_monitor
- -rwxr-xr-x 1 root root 1179642 7月 4 03:20 fdfs_storaged
- -rwxr-xr-x 1 root root 529805 7月 4 03:20 fdfs_test
- -rwxr-xr-x 1 root root 527726 7月 4 03:20 fdfs_test1
- -rwxr-xr-x 1 root root 655761 7月 4 03:20 fdfs_trackerd
- -rwxr-xr-x 1 root root 514173 7月 4 03:20 fdfs_upload_appender
- -rwxr-xr-x 1 root root 514951 7月 4 03:20 fdfs_upload_file
2,安装nginx
- [root@localhost fdfs]# yum install nginx
所有机器的fastdfs和nginx安装方法都是一样。
四,配置192.168.10.219服务器
1,配置tracker和storage
- [root@localhost fdfs]# vim /etc/fdfs/tracker.conf
- port=22122 #设置tracker的端口号
- base_path=/var/www/fastdfs #设置tracker的数据文件和日志目录(需预先创建)
如果要调优,参考:http://bbs.chinaunix.net/forum.php?mod=viewthread&tid=1941456
- [root@localhost fdfs]# vim /etc/fdfs/storage.conf
- group_name=group1 #组名,根据实际情况修改
- port=23000 #设置storage的端口号
- base_path=/var/www/fastdfs #设置storage的日志目录(需预先创建)
- store_path_count=1 #存储路径个数,需要和store_path个数匹配
- store_path0=/var/www/fastdfs #存储路径
- tracker_server=192.168.10.219:22122 #tracker服务器的IP地址和端口号
2,tracker的nginx配置
- [root@localhost nginx]# cat /etc/nginx/nginx.conf #配置主配置文件
- user nginx;
- worker_processes 1;
- events {
- worker_connections 65535; #最大链接数
- use epoll; #新版本的Linux可使用epoll加快处理性能
- }
- error_log /var/log/nginx/error.log;
- pid /var/run/nginx.pid;
- http {
- server_names_hash_bucket_size 128;
- client_header_buffer_size 32k;
- large_client_header_buffers 4 32k;
- client_max_body_size 300m;
- sendfile on;
- tcp_nopush on;
- proxy_redirect off;
- proxy_set_header Host $http_host;
- proxy_set_header X-Real-IP $remote_addr;
- proxy_set_header X-Forwarded-For $proxy_add_x_forwarded_for;
- proxy_connect_timeout 90;
- proxy_send_timeout 90;
- proxy_read_timeout 90;
- proxy_buffer_size 16k;
- proxy_buffers 4 64k;
- proxy_busy_buffers_size 128k;
- proxy_temp_file_write_size 128k;
- log_format main '$remote_addr - $remote_user [$time_local] "$request" '
- '$status $body_bytes_sent "$http_referer" '
- '"$http_user_agent" "$http_x_forwarded_for"';
- access_log /var/log/nginx/access.log main;
- #设置缓存存储路径、存储方式、分配内存大小、磁盘最大空间、缓存期限
- proxy_cache_path /var/cache/nginx/proxy_cache levels=1:2 keys_zone=http-cache:500m max_size=10g inactive=30d;
- proxy_temp_path /var/cache/nginx/proxy_cache/tmp;
- upstream fdfs_group1 { #设置group1的服务器
- server 192.168.10.209:8080 weight=1 max_fails=2 fail_timeout=30s;
- server 192.168.10.219:8080 weight=1 max_fails=2 fail_timeout=30s;
- }
- upstream fdfs_group2 { #设置group2的服务器
- server 192.168.10.103:10000 weight=1 max_fails=2 fail_timeout=30s;
- }
- include /etc/nginx/conf.d/*.conf;
- }
- [root@localhost fdfs]# cat /etc/nginx/conf.d/tracker.conf #配置nginx的tracker
- server {
- listen 80; #设置服务器端口
- server_name 192.168.10.219;
- location /group1/M00 { #设置group1的负载均衡参数
- proxy_next_upstream http_502 http_504 error timeout invalid_header;
- proxy_cache http-cache;
- proxy_cache_valid 200 304 12h;
- proxy_cache_key $uri$is_args$args;
- proxy_pass http://fdfs_group1;
- expires 30d;
- }
- location ~* /group2/(M00|M01) { #设置group2的负载均衡参数
- proxy_next_upstream http_502 http_504 error timeout invalid_header;
- proxy_cache http-cache;
- proxy_cache_valid 200 304 12h;
- proxy_cache_key $uri$is_args$args;
- proxy_pass http://fdfs_group2;
- expires 30d;
- }
- }
- [root@localhost conf.d]# cat /etc/nginx/conf.d/storage.conf #配置nginx的storage
- server
- {
- listen 8080;
- server_name 192.168.10.219;
- location /group1/M00/ {
- root /var/www/fastdfs/data;
- rewrite ^/group1/M00/(.*) /$1 break;
- }
- }
3,启动tracker,storage和nginx
- //启动
- [root@localhost fdfs]# /usr/local/bin/fdfs_trackerd /etc/fdfs/tracker.conf restart
- [root@localhost fdfs]# /usr/local/bin/fdfs_storaged /etc/fdfs/storage.conf restart
- [root@localhost fdfs]# /etc/init.d/nginx start
在这里有一点要注意,就是要先启动tracker在启动storage,如果nginx报目录没有建,创建一下,在重新启动
五,配置192.168.10.209服务器
1,配置storage
- [root@localhost fdfs]# vim /etc/fdfs/storage.conf
- group_name=group1 #组名,根据实际情况修改
- port=23000 #设置storage的端口号
- base_path=/var/www/fastdfs #设置storage的日志目录(需预先创建)
- store_path_count=1 #存储路径个数,需要和store_path个数匹配
- store_path0=/var/www/fastdfs #存储路径
- tracker_server=192.168.10.219:22122 #tracker服务器的IP地址和端口号
2,nginx配置
- [root@localhost conf.d]# cat /etc/nginx/conf.d/storage.conf #配置storage
- server
- {
- listen 8080;
- server_name 192.168.10.209;
- location /group1/M00/ {
- root /var/www/fastdfs/data;
- rewrite ^/group1/M00/(.*) /$1 break;
- }
- }
3,启动
- //启动
- [root@localhost fdfs]# /usr/local/bin/fdfs_storaged /etc/fdfs/storage.conf restart
- [root@localhost fdfs]# /etc/init.d/nginx start
六,配置192.168.10.103服务器
1,配置storage
- [root@localhost fdfs]# vim /etc/fdfs/storage.conf
- group_name=group2 #组名,根据实际情况修改
- port=23000 #设置storage的端口号
- base_path=/var/www/fastdfs #设置storage的日志目录(需预先创建)
- store_path_count=2 #存储路径个数,需要和store_path个数匹配
- store_path0=/var/www/fastdfs #存储路径
- store_path1=/mnt/usb/fastdfs2 #硬盘2的存储路径
- tracker_server=192.168.10.219:22122 #tracker服务器的IP地址和端口号
在这里有一点要注意,就是有二块硬盘,存文件的目录也有二个
2,配置nginx
- [root@localhost conf.d]# cat /etc/nginx/conf.d/storage.conf #配置storage
- server
- {
- listen 10000;
- server_name 192.168.10.103;
- location /group2/M01/ {
- root /mnt/usb/fastdfs2/data;
- rewrite ^/group2/M01/(.*) /$1 break;
- }
- location /group2/M00/ {
- root /var/www/fastdfs/data;
- rewrite ^/group2/M00/(.*) /$1 break;
- }
- }
3,启动
- //启动
- [root@localhost fdfs]# /usr/local/bin/fdfs_storaged /etc/fdfs/storage.conf restart
- [root@localhost fdfs]# /etc/init.d/nginx start
到这儿就安装配置好了,有一点要注意:
就是访问文件服务器的文件时,地址要用tracker的地址,例如:
http://192.168.10.219/group2/M01/00/00/wKgKZ1PAEquAbLj1AAK4TxGeCvM649.jpg
centos fastdfs 多服务器 多硬盘 多组 配置详解的更多相关文章
- 最简单实用的MongoDB安装教程:在CentOS中使用 yum 安装MongoDB及服务器端配置详解
一.准备工作: 运行yum命令查看MongoDB的包信息 [root@vm ~]# yum info mongo-10gen (提示没有相关匹配的信息,) 说明你的centos系统中的yum源不包含M ...
- Linux服务器access_log日志分析及配置详解(二)
默认nginx / Linux日志在哪个文件夹? 一般在 xxx.xxx.xxxx.com/home/admin 路径下面的error.log文件和access.log文件error_log logs ...
- Linux服务器access_log日志分析及配置详解(一)
nginx的log日志分为access log 和 error log 其中access log 记录了哪些用户,哪些页面以及用户浏览器.ip和其他的访问信息 error log 则是记录服务器错误日 ...
- FastDFS学习总结(2)--Tracker与Storage配置详解
1.Tracker基本配置 # is this config file disabled # false for enabled # true for disabled disabled=false ...
- Linux NFS服务器的安装与配置详解
一.NFS服务简介 NFS是Network File System(网络文件系统).主要功能是通过网络让不同的服务器之间可以共享文件或者目录.NFS客户端一般是应用服务器(比如web,负载均衡等),可 ...
- Netsuite Formula > Oracle函数列表速查(PL/SQL单行函数和组函数详解).txt
PL/SQL单行函数和组函数详解 函数是一种有零个或多个参数并且有一个返回值的程序.在SQL中Oracle内建了一系列函数,这些函数都可被称为SQL或PL/SQL语句,函数主要分为两大类: 单行函数 ...
- Linux - CentOS6.5服务器搭建与初始化配置详解(上)
1.新建一个虚拟机 选择典型 单机下一步 p.MsoNormal,li.MsoNormal,div.MsoNormal { margin: 0cm 0cm 0.0001pt; text-align: ...
- ASP.NET Core Web服务器 Kestrel和Http.sys 特性详解
ASP.NET Core Web服务器 Kestrel和Http.sys 特性详解 1.1. 名词解释 1.2. Kestrel基本工作原理 1.2.1. Kestrel的基本架构 1.2.2. Ke ...
- Linux服务器,服务管理--systemctl命令详解,设置开机自启动
Linux服务器,服务管理--systemctl命令详解,设置开机自启动 syetemclt就是service和chkconfig这两个命令的整合,在CentOS 7就开始被使用了. 摘要: syst ...
随机推荐
- HDU 3833 YY's new problem ()
YY's new problem Time Limit: 12000/4000 MS (Java/Others) Memory Limit: 65536/65536 K (Java/Others ...
- Diablo3
1.装备 主手:元素弓 副手:精细箭袋 头: 胸:燃火外套 手:娜塔亚的手感 护腕:稳击护腕 戒指:罗盘玫瑰+布尔凯索的婚戒 颈部:旅者之誓 腰:科雷姆的强力腰带(速度加25%) 腿:深渊挖掘裤 脚: ...
- struts2 标签问题----escape="false" 这个属性
1.在编程过程中,会遇到这个动西,escape="false" eg: <s:fielderror escape="false"/>-------& ...
- hdu 5115 区间dp ***
题意:有n只狼,每只狼有两种属性,一种攻击力一种附加值,我们没杀一只狼,那么我们受到的伤害值为这只狼的攻击值与它旁边的两只狼的附加值的和,求把所有狼都杀光受到的最小的伤害值. 枚举中间k作为最后杀死的 ...
- iOS经典面试题
前言 写这篇文章的目的是因为前两天同学想应聘iOS开发,从网上找了iOS面试题和答案让我帮忙看看.我扫了一眼,倒吸了一口冷气,仔细一看,气的发抖.整篇题目30多个没有一个答案是对的,总结这篇面试题的作 ...
- loj 1026( tarjan + 输出割边 )
题目链接:http://lightoj.com/volume_showproblem.php?problem=1026 思路:Tarjan 算法简单应用.割边的特点:low[v]>dfn[u]( ...
- Android 在布局容器中动态添加控件
这里,通过一个小demo,就可以掌握在布局容器中动态添加控件,以动态添加Button控件为例,添加其他控件同样道理. 1.addView 添加控件到布局容器 2.removeView 在布局容器中删掉 ...
- Android Studio 获取 sha1-wangfeng520@
WIN+R 打开“运行” 输入 CMD 回车 2 CD C:\Program Files\Java\jdk1.7.0_71\bin (JDK安装路径) keytool -list -v ...
- 简单几何(直线求交点) POJ 2074 Line of Sight
题目传送门 题意:从一条马路(线段)看对面的房子(线段),问连续的能看到房子全部的最长区间 分析:自己的思路WA了:先对障碍物根据坐标排序,然后在相邻的障碍物的间隔找到区间,这样还要判断是否被其他障碍 ...
- UVa11732 "strcmp()" Anyone?(Trie树+孩子兄弟表示法)
我的做法是先建字典树,统计每个结点出现次数和相同字符串个数,每个结点对答案的贡献就是2*C(次数,2),然后再分别讨论相同字符串和不同字符串对答案的贡献. 另外这题主要就是Trie树的孩子兄弟表示法: ...