Android StickyListHeadersListView头部悬停 分组列表实现
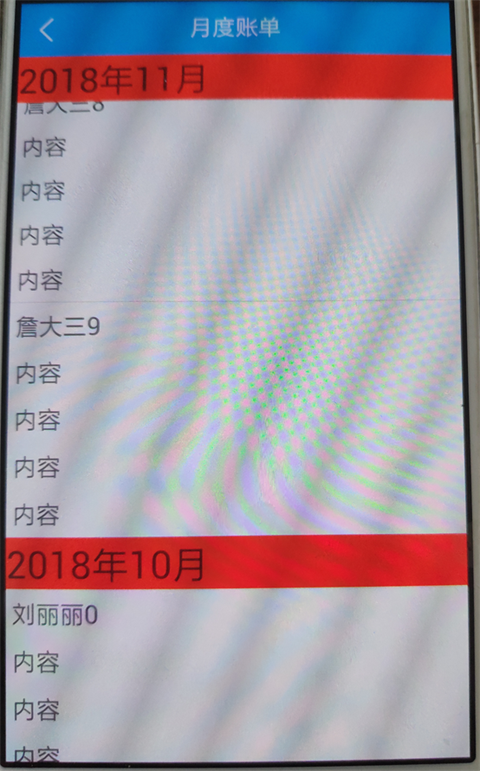
最近在做分组列表,头部悬停的效果,在github上就搜到了StickyListHeaders(https://github.com/emilsjolander/StickyListHeaders)这个库,自己动手实现了一个demo,实际效果图见文末。
引用类库:
implementation 'se.emilsjolander:stickylistheaders:2.7.0'
子布局item_pay_bill_month_body_list.xml:
<?xml version="1.0" encoding="utf-8"?>

<LinearLayout xmlns:android="http://schemas.android.com/apk/res/android"

    android:layout_width="match_parent"

    android:layout_height="match_parent"

    android:orientation="vertical">

    <TextView

        android:id="@+id/item_body_tv1"

        android:layout_width="match_parent"

        android:layout_height="wrap_content"

        android:layout_margin="5dp"

        android:text="内容"

        android:textSize="20sp" />

    <TextView

        android:id="@+id/item_body_tv2"

        android:layout_width="match_parent"

        android:layout_height="wrap_content"

        android:layout_margin="5dp"

        android:text="内容"

        android:textSize="20sp" />

    <TextView

        android:id="@+id/item_body_tv3"

        android:layout_width="match_parent"

        android:layout_height="wrap_content"

        android:layout_margin="5dp"

        android:text="内容"

        android:textSize="20sp" />

    <TextView

        android:id="@+id/item_body_tv4"

        android:layout_width="match_parent"

        android:layout_height="wrap_content"

        android:layout_margin="5dp"

        android:text="内容"

        android:textSize="20sp" />

    <TextView

        android:id="@+id/item_body_tv5"

        android:layout_width="match_parent"

        android:layout_height="wrap_content"

        android:layout_margin="5dp"

        android:text="内容"

        android:textSize="20sp" />

</LinearLayout>
头部布局item_pay_bill_month_header_list.xml:
<?xml version="1.0" encoding="utf-8"?>

<LinearLayout xmlns:android="http://schemas.android.com/apk/res/android"

    android:layout_width="match_parent"

    android:layout_height="match_parent"

    android:orientation="vertical">

    <TextView

        android:id="@+id/item_head_tv"

        android:layout_width="match_parent"

        android:layout_height="wrap_content"

        android:background="#f00"

        android:text="头部"

        android:textSize="30sp" />

</LinearLayout>
列表适配器PayBillMonthListAdapter.java:
package com.aldx.hccraftsman.adapter;

import android.content.Context;

import android.view.LayoutInflater;

import android.view.View;

import android.view.ViewGroup;

import android.widget.BaseAdapter;

import android.widget.TextView;

import com.aldx.hccraftsman.R;

import com.aldx.hccraftsman.model.PayBillMonth;

import java.util.ArrayList;

import java.util.List;

import se.emilsjolander.stickylistheaders.StickyListHeadersAdapter;

/**

 * author: chenzheng

 * created on: 2018/11/3 11:24

 * description:

 */

public class PayBillMonthListAdapter extends BaseAdapter implements StickyListHeadersAdapter {

    private Context context;

    private List<PayBillMonth> monthList = new ArrayList<>();

    public PayBillMonthListAdapter(Context context) {

        this.context = context;

    }

    public void setItems(List<PayBillMonth> monthList) {

        this.monthList = monthList;

        notifyDataSetChanged();

    }

    //设置数据的个数

    @Override

    public int getCount() {

        return monthList.size();

    }

    //设置item的条数

    @Override

    public Object getItem(int i) {

        return monthList.get(i);

    }

    //获得相应数据集合中特定位置的数据项

    @Override

    public long getItemId(int i) {

        return i;

    }

    //获得头部相应数据集合中特定位置的数据项

    @Override

    public long getHeaderId(int position) {

        return monthList.get(position).yearmonth;

    }

    //绑定内容的数据

    @Override

    public View getView(int i, View view, ViewGroup viewGroup) {

        BodyHolder bodyHolder = null;

        if (view == null) {

            view = LayoutInflater.from(context).inflate(R.layout.item_pay_bill_month_body_list, viewGroup, false);

            bodyHolder = new BodyHolder(view);

            view.setTag(bodyHolder);

        } else {

            bodyHolder = (BodyHolder) view.getTag();

        }

        //设置数据

        bodyHolder.bodyTv.setText(monthList.get(i).name);

        return view;

    }

    //绑定头部的数据

    @Override

    public View getHeaderView(int position, View convertView, ViewGroup parent) {

        HeadHolder headHolder = null;

        if (convertView == null) {

            convertView = LayoutInflater.from(context).inflate(R.layout.item_pay_bill_month_header_list, parent, false);

            headHolder = new HeadHolder(convertView);

            convertView.setTag(headHolder);

        } else {

            headHolder = (HeadHolder) convertView.getTag();

        }

        //设置数据

        headHolder.headTv.setText(monthList.get(position).monthName);

        return convertView;

    }

    //头部的内部类

    class HeadHolder {

        private TextView headTv;

        public HeadHolder(View itemHeadView) {

            headTv = (TextView) itemHeadView.findViewById(R.id.item_head_tv);

        }

    }

    //内容的内部类

    class BodyHolder {

        private TextView bodyTv;

        public BodyHolder(View itemBodyView) {

            bodyTv = (TextView) itemBodyView.findViewById(R.id.item_body_tv1);

        }

    }

}
PayBillMonthListActivity.java:
package com.aldx.hccraftsman.activity;

import android.content.Context;

import android.content.Intent;

import android.os.Bundle;

import android.view.View;

import android.widget.ImageView;

import android.widget.LinearLayout;

import android.widget.TextView;

import com.aldx.hccraftsman.R;

import com.aldx.hccraftsman.adapter.PayBillMonthListAdapter;

import com.aldx.hccraftsman.model.PayBillMonth;

import java.util.ArrayList;

import java.util.List;

import butterknife.BindView;

import butterknife.ButterKnife;

import butterknife.OnClick;

import se.emilsjolander.stickylistheaders.StickyListHeadersListView;

/**

 * author: chenzheng

 * created on: 2018/11/3 14:36

 * description:  月度账单

 */

public class PayBillMonthListActivity extends BaseActivity {

    @BindView(R.id.back_iv)

    ImageView backIv;

    @BindView(R.id.layout_back)

    LinearLayout layoutBack;

    @BindView(R.id.title_tv)

    TextView titleTv;

    @BindView(R.id.right_tv)

    TextView rightTv;

    @BindView(R.id.layout_right)

    LinearLayout layoutRight;

    @BindView(R.id.stickyListView)

    StickyListHeadersListView stickyListView;

    private String companyId;

    private List<PayBillMonth> list = new ArrayList<>();

    private PayBillMonthListAdapter payBillMonthListAdapter;

    @Override

    protected void onCreate(Bundle savedInstanceState) {

        super.onCreate(savedInstanceState);

        setContentView(R.layout.activity_pay_bill_month_list);

        companyId = getIntent().getStringExtra("companyId");

        ButterKnife.bind(this);

        initView();

        initData();

    }

    private void initData() {

        for (int i = 0; i < 10; i++) {

            PayBillMonth p1 = new PayBillMonth();

            p1.yearmonth = 201811;

            p1.monthName = "2018年11月";

            p1.name = "詹大三" + i;

            list.add(p1);

        }

        for (int i = 0; i < 7; i++) {

            PayBillMonth p1 = new PayBillMonth();

            p1.yearmonth = 201810;

            p1.monthName = "2018年10月";

            p1.name = "刘丽丽" + i;

            list.add(p1);

        }

        for (int i = 0; i < 2; i++) {

            PayBillMonth p1 = new PayBillMonth();

            p1.yearmonth = 201809;

            p1.monthName = "2018年09月";

            p1.name = "姜大成" + i;

            list.add(p1);

        }

        payBillMonthListAdapter.setItems(list);

    }

    private void initView() {

        titleTv.setText("月度账单");

        payBillMonthListAdapter = new PayBillMonthListAdapter(this);

        stickyListView.setAdapter(payBillMonthListAdapter);

    }

    @OnClick({R.id.layout_back, R.id.layout_right})

    public void onViewClicked(View view) {

        switch (view.getId()) {

            case R.id.layout_back:

                finish();

                break;

            case R.id.layout_right:

                break;

        }

    }

    public static void startActivity(Context context, String companyId) {

        Intent intent = new Intent(context, PayBillMonthListActivity.class);

        intent.putExtra("companyId", companyId);

        context.startActivity(intent);

    }

}
页面布局activity_pay_bill_month_list.xml:
<?xml version="1.0" encoding="utf-8"?>

<LinearLayout xmlns:android="http://schemas.android.com/apk/res/android"

    android:layout_width="match_parent"

    android:layout_height="match_parent"

    android:orientation="vertical">

    <include

        android:id="@+id/include_id"

        layout="@layout/titlelayout_theme"

        android:layout_width="match_parent"

        android:layout_height="wrap_content" />

    <se.emilsjolander.stickylistheaders.StickyListHeadersListView

        android:id="@+id/stickyListView"

        android:layout_width="match_parent"

        android:layout_height="match_parent" />

</LinearLayout>
实体类PayBillMonth:
package com.aldx.hccraftsman.model;

/**

 * author: chenzheng

 * created on: 2018/11/3 14:18

 * description:

 */

public class PayBillMonth {

    public long yearmonth;

    public String monthName;

    public String name;

    public String money;

    public String time;

}
效果图:

Android StickyListHeadersListView头部悬停 分组列表实现的更多相关文章
- Android ExpandableListView BaseExpandableListAdapter (类似QQ分组列表)
分组列表视图(ExpandableListView) 和ListView不同的是它是一个两级的滚动列表视图,每一个组可以展开,显示一些子项,类似于QQ列表,这些项目来至于ExpandableListA ...
- 史上最易懂——ReactNative分组列表SectionList使用详情及示例详解
React Native系列 <逻辑性最强的React Native环境搭建与调试> <ReactNative开发工具有这一篇足矣> <解决React Native un ...
- Android学习系列(11)--App列表之拖拽ListView(下)
接着上篇Android学习系列(10)--App列表之拖拽ListView(上)我们继续实现ListView的拖拽效果. 7.重写onTouchEvent()方法. 在这个方法中我们主要是处理 ...
- Android学习系列(10)--App列表之拖拽ListView(上)
研究了很久的拖拽ListView的实现,受益良多,特此与尔共飨. 鉴于这部分内容网上的资料少而简陋,而具体的实现过程或许对大家才有帮助,为了详尽而不失真,我们一步一步分析,分成两篇文章. ...
- [WP8.1UI控件编程]SemanticZoom控件实现分组列表
11.1.5 SemanticZoom实现分组列表 SemanticZoom控件可以让用户实现一种更加高级的列表,这种列表可以对列表的项目进行分组,同时这个SemanticZoom控件会提供两个具有相 ...
- Android Studio鼠标悬停显示注释
Android Studio鼠标悬停显示注释 在AS中配置 如果你想从网上查看注释,到这一步就操作完成. 下面说明让软件使用本地注释: 使用本地注释 以Windows为例: 找到下面文件 C:\Use ...
- Android实现SQLite数据库联系人列表
Android实现SQLite数据库联系人列表 开发工具:Andorid Studio 1.3 运行环境:Android 4.4 KitKat 工程内容 实现一个通讯录查看程序: 要求使用SQLite ...
- Android水平(横向)翻页列表,类似水平GridVIew
Android水平(横向)翻页列表,类似于水平方向的GridView,行列自定义,但要翻页切换,考虑加载性能,当Item数据很多时加载和翻页要流畅,翻页时要有动画效果,效果图如下: 实现方式: 1:翻 ...
- Android学习系列(15)--App列表之游标ListView(索引ListView)
游标ListView,提供索引标签,使用户能够快速定位列表项. 也可以叫索引ListView,有的人称也为Tweaked ListView,可能更形象些吧. 一看图啥都懂了: 1. ...
随机推荐
- 布局 Bootstrap Table的 文本内容 垂直居中
原文:https://blog.csdn.net/peng_hong_fu/article/details/70662979 样式(注意样式优先级): #div-component-info .tab ...
- <c:choose>
备注一下属性 DIV没有VALUE属性 <c:choose> <c:when test="${yggModel.type=='0'}">食品< ...
- k8s概念入门
k8s是一个编排容器的工具,其实也是管理应用的全生命周期的一个工具,从创建应用,应用的部署,应用提供服务,扩容缩容应用,应用更新,都非常的方便,而且可以做到故障自愈,例如一个服务器挂了,可以自动将这个 ...
- shell脚本编程——生产实战案例
生产实战案例 在日常的生产环境中,可能会遇到需要批量检查内网目前在线的主机IP地址有哪些,还可能需要检查这些在线的主机哪些端口是开放状态,因此依靠手工来检查是可以实现,但比较费时费力,所以需要 ...
- DB2 sqlCode-668
客户端调用命令 CALL SYSPROC.ADMIN_CMD('reorg table tablename')
- selenium之 下拉选择框Select
今天总结下selenium的下拉选择框.我们通常会遇到两种下拉框,一种使用的是html的标签select,另一种是使用input标签做的假下拉框. 后者我们通常的处理方式与其他的元素类似,点击或使用J ...
- 深度学习面试题12:LeNet(手写数字识别)
目录 神经网络的卷积.池化.拉伸 LeNet网络结构 LeNet在MNIST数据集上应用 参考资料 LeNet是卷积神经网络的祖师爷LeCun在1998年提出,用于解决手写数字识别的视觉任务.自那时起 ...
- ubuntu16.04安装python3.7
1.安装依赖包 sudo apt-get update sudo apt-get install build-essential python-dev python-setuptools python ...
- https://suchprogramming.com/epoll-in-3-easy-steps/
https://suchprogramming.com/epoll-in-3-easy-steps/ https://www.quora.com/What-are-the-key-difference ...
- PEP 476 -- Enabling certificate verification by default for stdlib http clients
SSL: CERTIFICATE_VERIFY_FAILED] certificate verify failed: self signed certificate in certificate ch ...
