Asp.net Core 系列之--1.事件驱动初探:简单事件总线实现(SimpleEventBus)
ChuanGoing 2019-08-06
前言
开篇之前,简单说明下随笔原因。在园子里游荡了好久,期间也起过要写一些关于.NET的随笔,因各种原因未能付诸实现。
前段时间拜读daxnet的系列文章,感受颇深,犹豫好久,终于决定开始记录本人的学习点滴。
系列说明
本系列目的是构建一套基于领域驱动设计(DDD)的基础架构,渐进式实现CQRS/消息事件驱动型业务基础框架,中间会夹杂着其他的中间件的学习介绍,仅供学习交流用(.NET CORE/Standard 2.0)。
因为接触领域驱动设计时间不长,现实上述目标可能会比较曲折,有不规范的地方望读者指正。
构建开始前,简单介绍下本篇的学习曲线:
1.引入Ioc/DI
2.简单型事件驱动总线(EventBus)实现(事件定义/订阅及派发,事件处理器等)
注:篇尾我会附上Github源码地址(开发工具是VS2017/19,.NET CORE 2.2)
Ioc/DI
Asp.net Core 自带的Ioc容器用起来不大方便,本系列引入Autofac作为Ioc/DI容器,先简单介绍下几个常规用法
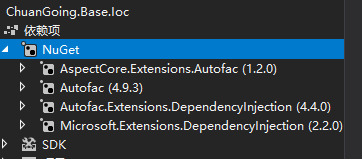
首先创建一个Asp.net core web api应用程序,新建一个.Net Standard项目Base.Ioc用于管理Ioc/DI操作,并添加下图的Nuget依赖
添加扩展类AutofacExtensions,添加如下方法(这里引入了AspectCore动态代理后续实现Aop会用到)
public static IServiceProvider UseAutofac<TModule>(this IServiceCollection services)

           where TModule : Module, new()

        {

            ContainerBuilder builder = new ContainerBuilder();

            builder.Populate(services);

            builder.RegisterModule<TModule>();
       //引入AspectCore.Extensions.Autofac

            builder.RegisterDynamicProxy();

            IContainer container = builder.Build();

            return new AutofacServiceProvider(container);

        }
在Startup.cs文件的ConfigureServices中替换Asp.net Core自带Ioc容器:
// This method gets called by the runtime. Use this method to add services to the container.

        public IServiceProvider ConfigureServices(IServiceCollection services)

        {

            services.AddMvc().SetCompatibilityVersion(CompatibilityVersion.Version_2_2);

            //替换Ioc容器,并扩展Autofac模块注册

            return services.UseAutofac<WebModule>();

        }
上面替换Ioc容器的时候,引入了Autofac的模块自动注入功能
 public class WebModule : Module

    {

        protected override void Load(ContainerBuilder builder)

        {

            //builder.RegisterType<AutoFacManager>();

            //builder.RegisterType<Worker>().As<IPerson>();
        //扫描程序集自动注册

            builder.RegisterAssembly(ThisAssembly);
        }

    }
在Base.Ioc项目中添加AutofacInjectionExtensions.cs文件
/// <summary>

        /// Autofac自动注入

        /// </summary>

        /// <param name="builder"></param>

        /// <param name="assembly"></param>

        public static void RegisterAssembly(this ContainerBuilder builder, Assembly assembly)

        {

            foreach (var type in assembly.ExportedTypes)

            {

                if (type.IsPublic && !type.IsAbstract && type.IsClass)

                {

                    var interfaces = type.GetInterfaces();

                    IList<Type> transientList = new List<Type>();

                    IList<Type> scopeList = new List<Type>();

                    IList<Type> singletonList = new List<Type>();

                    foreach (var intrType in interfaces)

                    {

                        if (intrType.IsGenericType)

                        {

                            if (intrType.IsAssignableTo<IDependencyInstance>())

                            {

                                transientList.Add(intrType);

                            }

                            else if (intrType.IsAssignableTo<IScopeInstance>())

                            {

                                scopeList.Add(intrType);

                            }

                            else if (intrType.IsAssignableTo<ISingletonInstance>())

                            {

                                singletonList.Add(intrType);

                            }

                        }

                        else

                        {

                            if (intrType.IsAssignableTo<IDependencyInstance>())

                            {

                                transientList.Add(intrType);

                            }

                            else if (intrType.IsAssignableTo<IScopeInstance>())

                            {

                                scopeList.Add(intrType);

                            }

                            else if (intrType.IsAssignableTo<ISingletonInstance>())

                            {

                                singletonList.Add(intrType);

                            }

                        }

                    }

                    if (type.IsGenericType)

                    {

                        if (transientList.Count > )

                        {

                            builder.RegisterGeneric(type).As(transientList.ToArray()).InstancePerDependency();

                        }

                        if (scopeList.Count > )

                        {

                            builder.RegisterGeneric(type).As(scopeList.ToArray()).InstancePerLifetimeScope();

                        }

                        if (singletonList.Count > )

                        {

                            builder.RegisterGeneric(type).As(singletonList.ToArray()).SingleInstance();

                        }

                        //泛型

                        if (type.IsAssignableTo<IDependencyInstance>())

                        {

                            builder.RegisterGeneric(type).AsSelf().InstancePerDependency();

                        }

                        else if (type.IsAssignableTo<IScopeInstance>())

                        {

                            builder.RegisterGeneric(type).AsSelf().InstancePerLifetimeScope();

                        }

                        else if (type.IsAssignableTo<ISingletonInstance>())

                        {

                            builder.RegisterGeneric(type).AsSelf().SingleInstance();

                        }

                    }

                    else

                    {

                        if (transientList.Count > )

                        {

                            builder.RegisterType(type).As(transientList.ToArray()).InstancePerDependency();

                        }

                        if (scopeList.Count > )

                        {

                            builder.RegisterType(type).As(scopeList.ToArray()).InstancePerLifetimeScope();

                        }

                        if (singletonList.Count > )

                        {

                            builder.RegisterType(type).As(singletonList.ToArray()).SingleInstance();

                        }

                        //

                        if (type.IsAssignableTo<IDependencyInstance>())

                        {

                            builder.RegisterType(type).AsSelf().InstancePerDependency();

                        }

                        else if (type.IsAssignableTo<IScopeInstance>())

                        {

                            builder.RegisterType(type).AsSelf().InstancePerLifetimeScope();

                        }

                        else if (type.IsAssignableTo<ISingletonInstance>())

                        {

                            builder.RegisterType(type).AsSelf().SingleInstance();

                        }

                    }

                }

            }

        }
上面一段代码用到了IDependencyInstance/IScopeInstance/ISingletonInstance三个接口,分别用于瞬时/Scope/单例的服务标识。
大概说明下这段代码的作用:通过扫描传入的程序集获取外部可见的Public类型的Type(这里我们指的是类),扫描该类的所有继承了服务标识接口,并注册为对应的服务
至此,Ioc容器已替换为Autofac
EventBus
事件总线实现发布/订阅功能,首先定义IEvent/IEventHandler,IEventHandler 定义了事件处理方法
public interface IEvent

    {

        Guid Id { get; }

        /// <summary>

        /// 时间戳

        /// </summary>

        long Timestamp { get; }

    }
public interface IEventHandler

    {

        /// <summary>

        /// 处理事件

        /// </summary>

        /// <param name="event"></param>

        /// <param name="cancellationToken"></param>

        /// <returns></returns>

        Task<bool> HandleAsync(IEvent @event, CancellationToken cancellationToken = default(CancellationToken));
/// <summary>
/// 可否处理
/// </summary>
/// <param name="event"></param>
/// <returns></returns>
bool CanHandle(IEvent @event);
}
接着定义发布/订阅及事件总线接口
public interface IEventPublisher

    {

        /// <summary>

        /// 发布事件

        /// </summary>

        /// <typeparam name="TEvent"></typeparam>

        /// <param name="event"></param>

        /// <param name="cancellationToken"></param>

        /// <returns></returns>

        Task PublishAsync<TEvent>(TEvent @event, CancellationToken cancellationToken = default(CancellationToken))

            where TEvent : IEvent;

    }
public interface IEventSubscriber

    {

        /// <summary>

        /// 事件订阅

        /// </summary>

        void Subscribe();

    }
public interface IEventBus : IEventSubscriber, IEventPublisher

    {

    }
EventBus实现发布/订阅器,并在事件发布的同时通知相应的事件处理器进行相关处理。
这里引入了"消息队列"的概念(当然目前我们只是用来模拟消息队列,后续会引入RabbitMQ来实现)
相关代码如下:
 internal sealed class EventQueue

    {

        public event EventHandler<EventProcessedEventArgs> EventPushed;

        public EventQueue()

        {

        }

        public void Push(IEvent @event)

        {

            OnMessagePushed(new EventProcessedEventArgs(@event));

        }

        private void OnMessagePushed(EventProcessedEventArgs e)

        {

            this.EventPushed?.Invoke(this, e);

        }

    }
/// <summary>

    /// 消息事件参数

    /// </summary>

    public class EventProcessedEventArgs : EventArgs

    {

        public IEvent Event { get; }

        public EventProcessedEventArgs(IEvent @event)

        {

            Event = @event;

        }

    }
public class EventBus : IEventBus

    {

        private readonly EventQueue eventQueue = new EventQueue();

        private readonly IEnumerable<IEventHandler> eventHandlers;

        public EventBus(IEnumerable<IEventHandler> eventHandlers)

        {

            this.eventHandlers = eventHandlers;

        }

        /// <summary>

        /// 发布事件到队列时触发处理事件

        /// </summary>

        /// <param name="sendere"></param>

        /// <param name="e"></param>

        private void EventQueue_EventPushed(object sendere, EventProcessedEventArgs e)

        {

            (from eh in this.eventHandlers

             where

                eh.CanHandle(e.Event)

             select eh).ToList().ForEach(async eh => await eh.HandleAsync(e.Event));

        }

        public Task PublishAsync<TEvent>(TEvent @event, CancellationToken cancellationToken = default(CancellationToken))

            where TEvent : IEvent

        => Task.Factory.StartNew(() => eventQueue.Push(@event));

        /// <summary>

        /// 事件订阅(订阅队列上的事件)

        /// </summary>

        public void Subscribe()

        {

            eventQueue.EventPushed += EventQueue_EventPushed;

        }
上面的代码中EventQueue的Push方法被调用时,会触发EventPushed事件,在EventBus中,我们注册了EventQueue的EventPushed事件,即最终会触发EventBus的EventQueue_EventPushed事件,进而通过事件处理器来处理(这块详细说明,请阅读DaxNet-事件驱动型架构实现一)
到此,消息总线机制处理完成,接下来我们创建一个Web API应用程序来演示消息发布/订阅及处理
上面我们定义了IEvent/IEventHandler,这里我们先在WebAPI 项目中来实现
public class CustomerCreatedEvent : IEvent

    {

        public CustomerCreatedEvent(string customerName)

        {

            this.Id = Guid.NewGuid();

            this.Timestamp = DateTimeOffset.Now.ToUnixTimeMilliseconds();

            this.CustomerName = customerName;

        }

        public Guid Id { get; }

        public long Timestamp { get; }

        public string CustomerName { get; }

    }
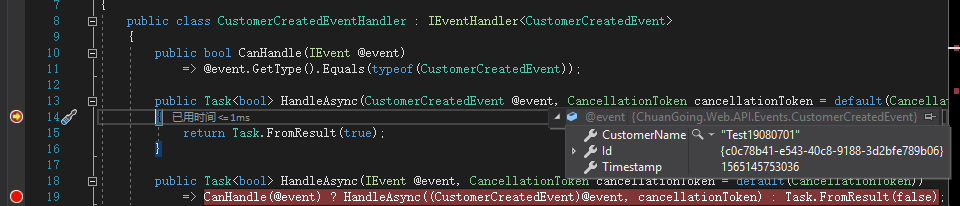
public class CustomerCreatedEventHandler : IEventHandler<CustomerCreatedEvent>

    {

        public bool CanHandle(IEvent @event)

            => @event.GetType().Equals(typeof(CustomerCreatedEvent));

        public Task<bool> HandleAsync(CustomerCreatedEvent @event, CancellationToken cancellationToken = default(CancellationToken))

        {

            return Task.FromResult(true);

        }

        public Task<bool> HandleAsync(IEvent @event, CancellationToken cancellationToken = default(CancellationToken))

            => CanHandle(@event) ? HandleAsync((CustomerCreatedEvent)@event, cancellationToken) : Task.FromResult(false);

    }
值得说明下的是,在实现IEventHandler的时候,利用了泛型接口IEventHandler<T>来建立IEventHandler对于IEvent的依赖,因为事件处理器最终处理的必然是某个事件。
OK,现在新建一个Controller
[Route("api/[controller]")]
public class CustomersController : Controller
{private readonly IEventBus _eventBus;
public CustomersController(IEventBus eventBus)
{
_eventBus = eventBus;
}
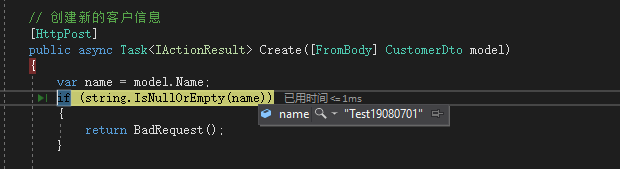
// 创建新的客户信息
[HttpPost]
public async Task<IActionResult> Create([FromBody] CustomerDto model)
{
var name = model.Name;
if (string.IsNullOrEmpty(name))
{
return BadRequest();
}
//这里其他业务处理...
await _eventBus.PublishAsync(new CustomerCreatedEvent(name));
} }
上面的CustomersController构造函数中由Ioc注入了eventBus,需要注意的是,引用eventBus前,需要在Startup.cs中注册对应的服务,我们这里用到的是Autofac的模块化注册。
利用Web API下的WebModule.cs引用SimpleEventBus中的EventBusModule
 public class WebModule : Module

    {

        protected override void Load(ContainerBuilder builder)

        {
        //扫描程序集自动注册

            builder.RegisterAssembly(ThisAssembly);
        //注册模块化EventBusModule

            builder.RegisterModule<EventBusModule>();

        }

    }
public class EventBusModule : Module

    {

        protected override void Load(ContainerBuilder builder)

        {
       //扫描程序集自动注册

            builder.RegisterAssembly(ThisAssembly);

        }

    }
关于扫描程序集自动注册,上面Ioc段落有详细说明,这里就不再啰嗦。
到此为止,编码工作告一段落,运行Web API,利用Postman或PowerShell 自带的命令 Invoke-WebRequest模拟http请求,结果如下图:
请求进来,数据加载到Dto中

EventBus的事件发布时调用EventQueue的Push函数,同时会触发EventPushed事件,通过对应的时间处理器处理事件
最终,消息在事件处理器中进行相关处理
回顾
回顾一下,本篇开头介绍了Autofac替换Asp.Net Core自带Ioc容器,Autofac的模块注册/泛型/服务注册等;然后介绍了事件总线的工作流程:事件发布到总线中,通过消息队列触发注册到总线中的事件处理器处理事件消息;最后,我们利用Web API 展示了程序的运行过程。
因为篇幅有限,代码中关于Storage的部分,涉及到了仓储的概念,我想到时放到领域设计部分一起介绍。
源码
本篇涉及的源码在Github的https://github.com/ChuanGoing/Start.git 的SimpleEventBus分支可以找到。
Asp.net Core 系列之--1.事件驱动初探:简单事件总线实现(SimpleEventBus)的更多相关文章
- Asp.net Core 系列之--2.ORM初探:Dapper实现MySql数据库各类操作
ChuanGoing 2019-09-10 距离上一篇近一个月时间,断断续续才把本篇码完,后面将加快进度,争取年度内把本系列基本介绍完成,同时督促本人持续学习. 本篇学习曲线: 1.初识Dapper ...
- Asp.net Core 系列之--4.事务、日志及错误处理
ChuanGoing 2019-11-17 这篇原本时想把事务处理.日志处理.错误处理.授权于鉴权一并介绍完的,授权和鉴权我想结合自定义权限来介绍,全部放到这里篇幅可能太长,因此权限部分将会在下篇来介 ...
- Asp.net Core 系列之--3.领域、仓储、服务简单实现
ChuanGoing 2019-11-11 距离上篇近两个月时间,一方面时因为其他事情耽搁,另一方面也是之前准备不足,关于领域驱动有几个地方没有想通透,也就没有继续码字.目前网络包括园子里大多领域驱 ...
- 重温.NET下Assembly的加载过程 ASP.NET Core Web API下事件驱动型架构的实现(三):基于RabbitMQ的事件总线
重温.NET下Assembly的加载过程 最近在工作中牵涉到了.NET下的一个古老的问题:Assembly的加载过程.虽然网上有很多文章介绍这部分内容,很多文章也是很久以前就已经出现了,但阅读之后 ...
- Asp.net Core 系列之--5.认证、授权与自定义权限的实现
ChuanGoing 2019-11-24 asp.net core系列已经来到了第五篇,通过之前的基础介绍,我们了解了事件订阅/发布的eventbus整个流程,初探dapper ORM实现,并且简单 ...
- 1.1专题介绍「深入浅出ASP.NET Core系列」
大家好,我是IT人张飞洪,专注于.NET平台十年有余. 工作之余喜欢阅读和写作,学习的内容包括数据结构/算法.网络技术.Linux系统原理.数据库技术原理,设计模式.前沿架构.微服务.容器技术等等…… ...
- asp.net core系列 30 EF管理数据库架构--必备知识 迁移
一.管理数据库架构概述 EF Core 提供两种主要方法来保持 EF Core 模型和数据库架构同步.一是以 EF Core 模型为基准,二是以数据库为基准. (1)如果希望以 EF Core 模型为 ...
- asp.net core系列 40 Web 应用MVC 介绍与详细示例
一. MVC介绍 MVC架构模式有助于实现关注点分离.视图和控制器均依赖于模型. 但是,模型既不依赖于视图,也不依赖于控制器. 这是分离的一个关键优势. 这种分离允许模型独立于可视化展示进行构建和测试 ...
- asp.net core系列 39 Web 应用Razor 介绍与详细示例
一. Razor介绍 在使用ASP.NET Core Web开发时, ASP.NET Core MVC 提供了一个新特性Razor. 这样开发Web包括了MVC框架和Razor框架.对于Razor来说 ...
随机推荐
- Redis分片机制
文章原创于公众号:程序猿周先森.本平台不定时更新,喜欢我的文章,欢迎关注我的微信公众号. 前两篇文章对Redis主从复制和主从切换的知识点进行了介绍,但是也很明显的有一点小弊端: 需要定时进行主从复制 ...
- ACM-图论-同余最短路
https://www.cnblogs.com/31415926535x/p/11692422.html 一种没见过的处理模型,,记录一下,,主要是用来处理一个多元一次方程的解的数量的问题,,数据量小 ...
- How to Get What You Want 如何得到你想要的
[1]If you want something, give it away. [2]When a farmer wants more seeds, he takes his seeds and gi ...
- 代码审计-MetInfo 6.0.0 sql注入漏洞
首先漏洞存在于app\system\message\web\message.class.php文件中,变量{$_M[form][id]} 直接拼接在SQL语句中,且验证码检测函数是在SQL语句查询之后 ...
- Sieve of Eratosthenes时间复杂度的感性证明
上代码. #include<cstdio> #include<cstdlib> #include<cstring> #define reg register con ...
- Cocos2d-x 学习笔记(11.6) Sequence
1. Sequence 动作序列.动作按参数顺序执行,动作总时长为每个动作的时长之和. 1.1 成员变量 FiniteTimeAction *_actions[]; float _split; // ...
- Django 官方推荐的姿势:类视图
作者:HelloGitHub-追梦人物 文中所涉及的示例代码,已同步更新到 HelloGitHub-Team 仓库 在开发网站的过程中,有一些视图函数虽然处理的对象不同,但是其大致的代码逻辑是一样的. ...
- python学习-面向对象(六)
1.类中的实例方法 self参数最大的作用是引用当前方法的调用者 类调用实例方法,python不会位为一个参数绑定调用者(因为实例方法的调用者应该是对象,而此时是类) 2.类方法与静态方法
- python2与3实际中遇到的区别
1.type(1/2) python2是向下取整,0,为int:python3是正常除法,0.5,为float 2.
- idea的各种牛逼插件
Translation : 一款免费的解决对话框的翻译插件 MyBatisCodeHelper-Pro: 功能类似mybatis plugin,我的文章有破解的教程 地址:破解