Django创建并连接数据库(实现增删改查)--第二版
注意点一:
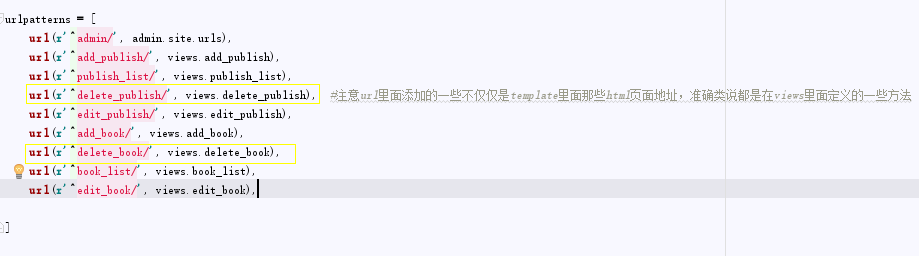
url里面的地址,不只是html页面,准确说是views视图里面对应的函数方法
<!DOCTYPE html>
<html lang="en">
<head>
<meta charset="UTF-8">
<link rel="stylesheet" href="/static/bootstrap-3.3.7-dist/css/bootstrap.css">
<title>出版社列表</title>
</head>
<body>
<div class="container">
<div class="row">
<div class="col-md-6 col-md-offset-3">
<h2>出版社列表</h2>
<table class="table table-condensed">
<thead>
<tr>
<th>ID</th>
<th>出版社名称</th>
<th>出版社地址</th>
<th>邮箱</th>
<th>操作</th>
</tr>
</thead>
<tbody>
{% for publish in publish_list %}
<tr>
<td>{{ forloop.counter }}</td>
<td>{{ publish.name}}</td>
<td>{{ publish.addr }}</td>
<td>{{ publish.email }}</td>
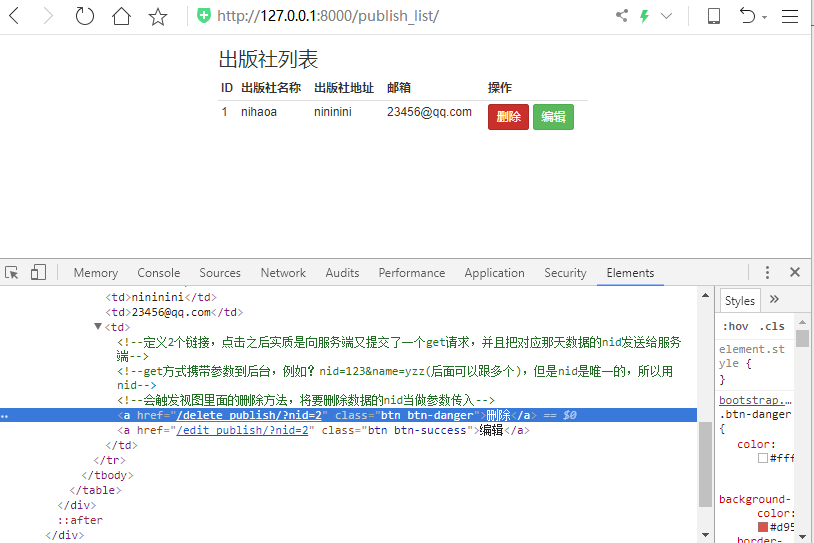
<td> <!--定义2个链接,点击之后实质是向服务端又提交了一个get请求,并且把对应那天数据的nid发送给服务端-->
<!--get方式携带参数到后台,例如?nid=123&name=yzz(后面可以跟多个),但是nid是唯一的,所以用nid-->
<!--会触发视图里面的删除方法,将要删除数据的nid当做参数传入-->
<a href="/delete_publish/?nid={{ publish.nid }}" class="btn btn-danger">删除</a>
<a href="/edit_publish/?nid={{ publish.nid }}" class="btn btn-success">编辑</a>
</td>
</tr> {% endfor %} </tbody>
</table> </div>
</div>
</div>
</body>
</html>
publish_list.py配置辅助理解
注意点二:
1.views.py里面配置的视图函数
2.注意get带参数的请求与post请求
3.多对多产生第三张表的方法,已经默认建好之后表的名字和字段的名字
from django.shortcuts import render,HttpResponse,redirect # Create your views here.
from app01.models import * #添加出版社
def add_publish(request):
if request.method=='POST':
name = request.POST.get('name')
addr = request.POST.get('addr')
email = request.POST.get('email')
Publish.objects.create(name=name,addr=addr,email=email) #点击添加后信息重定向到查看出版社列表的方法界面
return redirect('/publish_list/') #跳转到查看界面,可以完成编辑和删除操作 #如果是get请求默认就是添加出版社界面
return render(request,"add_publish.html") #查看出版社信息
def publish_list(request):
publish_list=Publish.objects.all()
return render(request,'publish_list.html',{'publish_list':publish_list}) #删除出版社信息
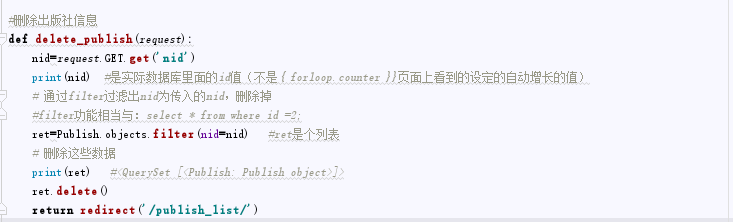
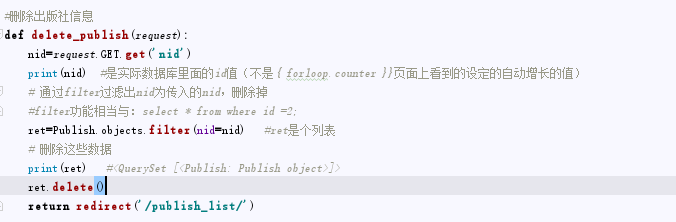
def delete_publish(request):
nid=request.GET.get('nid')
print(nid) #是实际数据库里面的id值(不是{ forloop.counter }}页面上看到的设定的自动增长的值)
# 通过filter过滤出nid为传入的nid,删除掉
#filter功能相当与:select * from where id =2;
ret=Publish.objects.filter(nid=nid) #ret是个列表
# 删除这些数据
print(ret) #<QuerySet [<Publish: Publish object>]>
ret.delete()
return redirect('/publish_list/') #编辑出版社信息
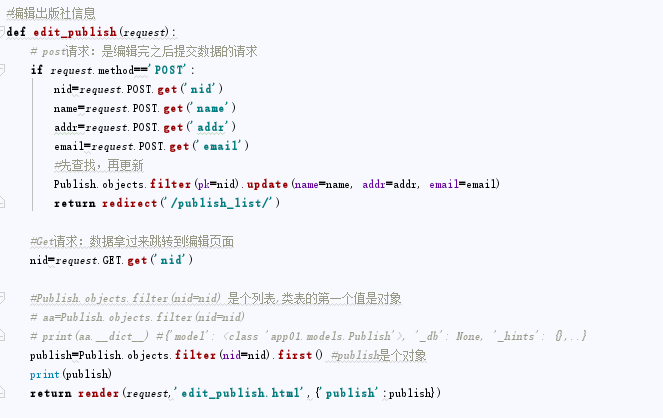
def edit_publish(request):
# post请求:是编辑完之后提交数据的请求
if request.method=='POST':
nid=request.POST.get('nid')
name=request.POST.get('name')
addr=request.POST.get('addr')
email=request.POST.get('email')
#先查找,再更新
Publish.objects.filter(pk=nid).update(name=name, addr=addr, email=email)
return redirect('/publish_list/') #Get请求:数据拿过来跳转到编辑页面
nid=request.GET.get('nid') #Publish.objects.filter(nid=nid) 是个列表,类表的第一个值是对象
# aa=Publish.objects.filter(nid=nid)
# print(aa.__dict__) #{'model': <class 'app01.models.Publish'>, '_db': None, '_hints': {},..}
publish=Publish.objects.filter(nid=nid).first() #publish是个对象
print(publish)
return render(request,'edit_publish.html',{'publish':publish}) #添加书名信息
def add_book(request):
if request.method=='POST':
name=request.POST.get('name')
price=request.POST.get('price')
pub_date=request.POST.get('pub_date')
#添加表示出版社的id字段
publish_id=request.POST.get('publish') #拿到对应的作者的列表,authors是个对象,传递的是每个对象对应的id号
authors=request.POST.getlist('authors') #authors是个列表
book=Book.objects.create(name=name,price=price,pub_date=pub_date,publish_id=publish_id) #会在书与作者多对多关系产生的第三张表book_authors里面添加表记录
book.authors.add(*authors) #把每个作者的类表id打乱传入 return redirect('/book_list/') #默认拿到出版社列表、作者列表
publish_list = Publish.objects.all()
author_list = Author.objects.all()
return render(request,'add_book.html',{'publish_list':publish_list,'author_list':author_list}) def book_list(request):
book_list=Book.objects.all()
return render(request,'book_list.html',{'book_list':book_list}) def delete_book(request):
nid = request.GET.get('nid')
ret = Book.objects.filter(nid=nid) # ret是个列表
ret.delete()
return redirect('/book_list/') def edit_book(request):
if request.method=='POST':
nid=request.POST.get('nid')
name=request.POST.get('name')
price=request.POST.get('price')
pub_date=request.POST.get('pub_date')
publish_id=request.POST.get('publish')
authors=request.POST.getlist('authors')
Book.objects.filter(pk=nid).update(name=name,price=price,pub_date=pub_date,publish_id=publish_id)
book=Book.objects.filter(pk=nid).first()
#重置authors的值(用于更新到第三张表里面),先删除原纪录再添加
book.authors.set(authors)
#相当于
# book.authors.clear()
# book.authors.add(*authors)
return redirect('/book_list/') nid = request.GET.get('nid')
book=Book.objects.filter(nid=nid).first()
publish_list=Publish.objects.all()
author_list=Author.objects.all()
return render(request,'edit_book.html',{'book':book,'publish_list':publish_list,'author_list':author_list})
views.py
from django.db import models # Create your models here. #出版社数据库指定的字段及类型
class Publish(models.Model):
nid=models.AutoField(primary_key=True)
name=models.CharField(max_length=32)
addr=models.CharField(max_length=64)
# 也是varchar类型
email=models.EmailField() #作者数据中指定的字段及类型
class Author(models.Model):
nid = models.AutoField(primary_key=True)
name=models.CharField(max_length=32)
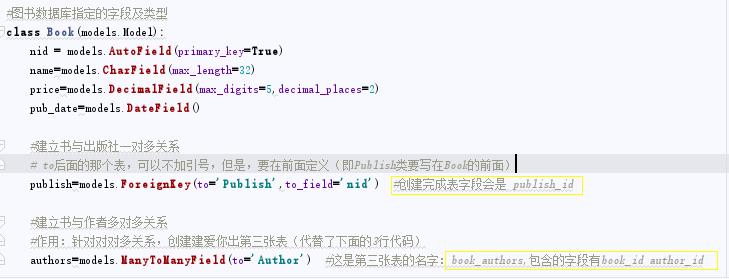
age=models.IntegerField() #图书数据库指定的字段及类型
class Book(models.Model):
nid = models.AutoField(primary_key=True)
name=models.CharField(max_length=32)
price=models.DecimalField(max_digits=5,decimal_places=2)
pub_date=models.DateField() #建立书与出版社一对多关系
# to后面的那个表,可以不加引号,但是,要在前面定义(即Publish类要写在Book的前面)
publish=models.ForeignKey(to='Publish',to_field='nid') #创建完成表字段会是 publish_id #建立书与作者多对多关系
#作用:针对对对多关系,创建建爱你出第三张表(代替了下面的3行代码)
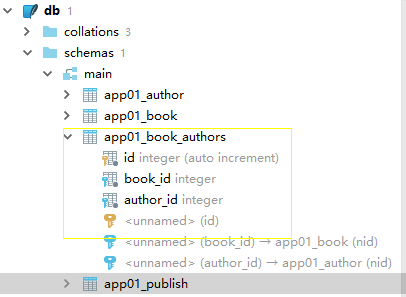
authors=models.ManyToManyField(to='Author') #这是第三张表的名字:book_authors,包含的字段有book_id author_id # class Book2Author(models.Model):
# nid=models.AutoField(primary_key=True)
# book=models.ForeignKey(to='Book',to_field='nid')
# author=models.ForeignKey(to='Author',to_field='nid')
models.py数据库表的建立
注意点三:templates模本文件下面的一些配置文件
1.注意页面格式的书写
2.注意里面for循环的一个取值
3.get方法传参的应用
<!DOCTYPE html>

<html lang="en">

<head>

    <meta charset="UTF-8">

    <title>新增图书</title>

    <link rel="stylesheet" href="/static/bootstrap-3.3.7-dist/css/bootstrap.css">

</head>

<body>

<div class="container">

    <div class="row">

        <div class="col-md-6 col-md-offset-3">

            <h2>新增图书</h2>

            <form action="/add_book/" method="post">

                <input type="hidden" name="nid" class="form-control" value="{{ publish.nid }}">

                <p>图书名称:<input type="text" name="name" class="form-control"></p>

                <p>价格:<input type="text" name="price" class="form-control" ></p>

                <p>出版日期:<input type="date" name="pub_date" class="form-control"></p>

                <p>出版社:

                    <!--循环出出版社列表,让那个让用户进行出版社名字,对应提交的就是对应出版社的id-->

                    <select name="publish" id="" class="form-control">

                        {% for publish in publish_list %}

                        <option value="{{ publish.nid }}">{{ publish.name }}</option>

                        {% endfor %}

                    </select>

                </p>

            <p>作者:

                <select name="authors" id="" multiple class="form-control">

                    {% for author in author_list %}

                        <option value="{{ author.nid }}">{{ author.name }}</option>

                    {% endfor %}

                </select>

            </p>

                <p><input type="submit" value="提交" class="form-control btn btn-success"></p>

            </form>

        </div>

    </div>

</div>

</body>

</html>
add_book.html
<!DOCTYPE html>

<html lang="en">

<head>

    <meta charset="UTF-8">

    <title>图书列表</title>

    <link rel="stylesheet" href="/static/bootstrap-3.3.7-dist/css/bootstrap.css">

</head>

<body>

<div class="container">

    <div class="row">

        <div class="col-md-6 col-md-offset-3">

            <h2>图书列表</h2>

            <table class="table table-condensed">

                <thead>

                <tr>

                    <th>ID</th>

                    <th>书名</th>

                    <th>价格</th>

                    <th>出版日期</th>

                    <th>出版社名称</th>

                    <th>作者</th>

                    <th>操作</th>

                </tr>

                </thead>

                <tbody>

                    {% for book in book_list %}

                        <tr>

                            <td>{{ forloop.counter }}</td>

                            <td>{{ book.name}}</td>

                            <td>{{ book.price }}</td>

                            <td>{{ book.pub_date|date:'Y-m-d' }}</td>

                            <td>{{ book.publish.name }}</td>

                            <td>

                                {% for author in  book.authors.all  %}

                                    {{ author.name }}|

                                {% endfor %}

                            </td>

                            <td>

                                <a href="/delete_book/?nid={{ book.nid }}" class="btn btn-danger">删除</a>

                                <a href="/edit_book/?nid={{ book.nid }}" class="btn btn-success">编辑</a>

                            </td>

                        </tr>

                    {% endfor %}

                </tbody>

            </table>

        </div>

    </div>

</div>

</body>

</html>
book_list.html
<!DOCTYPE html>

<html lang="en">

<head>

    <meta charset="UTF-8">

    <title>编辑图书</title>

    <link rel="stylesheet" href="/static/bootstrap-3.3.7-dist/css/bootstrap.css">

</head>

<body>

<div class="container">

    <div class="row">

        <div class="col-md-6 col-md-offset-3">

            <h2>新增图书</h2>

            <form action="/edit_book/" method="post">

                <input type="hidden" name="nid" value="{{ book.nid }}">

                <p>图书名称:<input type="text" name="name" class="form-control" value="{{ book.name }}"></p>

                <p>价格:<input type="text" name="price" class="form-control" value="{{ book.price }}"></p>

                <p>出版日期:<input type="date" name="pub_date" class="form-control" value="{{ book.pub_date|date:"Y-m-d" }}"></p>

                <p>出版社:

                    <select name="publish" id="" class="form-control">

                    <!--判断,编辑时让编辑状态下图书对应的出版社默认就是后台对应的-->

                        {% for publish in publish_list %}

                            {% if book.publish == publish %}

                                <option selected value="{{ publish.nid }}">{{ publish.name }}</option>

                            {% else %}

                                <option value="{{ publish.nid }}">{{ publish.name }}</option>

                            {% endif %}

                        {% endfor %}

                    </select>

                </p>

                <p>作者:

                    <select name="authors" id="" multiple class="form-control">

                    <!--判断,编辑时让作者一栏和初始状态的书对应-->

                        {% for author in author_list %}

                            {% if author in book.authors.all %}

                                <option selected value="{{ author.nid }}">{{ author.name }}</option>

                            {% else %}

                                <option value="{{ author.nid }}">{{ author.name }}</option>

                            {% endif %}

                        {% endfor %}

                    </select>

                </p>

                <p><input type="submit" value="提交" class="form-control btn btn-success"></p>

            </form>

        </div>

    </div>

</div>

</body>

</html>
edit_book.html
<!DOCTYPE html>

<html lang="en">

<head>

    <meta charset="UTF-8">

    <title>新增出版社</title>

    <link rel="stylesheet" href="/static/bootstrap-3.3.7-dist/css/bootstrap.css">

</head>

<body>

<div class="container">

    <div class="row">

        <div class="col-md-6 col-md-offset-3">

            <h2>添加出版社</h2>

            <form action="/add_publish/" method="post">

                <p>出版社名称:<input type="text" name="name" class="form-control"></p>

                <p>出版社地址:<input type="text" name="addr" class="form-control"></p>

                <p>出版社邮箱:<input type="text" name="email" class="form-control"></p>

                <p><input type="submit" value="添加" class="form-control btn btn-success"></p>

            </form>

        </div>

    </div>

</div>

</body>

</html>
add_publish.html
<!DOCTYPE html>

<html lang="en">

<head>

    <meta charset="UTF-8">

    <link rel="stylesheet" href="/static/bootstrap-3.3.7-dist/css/bootstrap.css">

    <title>出版社列表</title>

</head>

<body>

<div class="container">

    <div class="row">

        <div class="col-md-6 col-md-offset-3">

            <h2>出版社列表</h2>

            <table class="table table-condensed">

                <thead>

                <tr>

                    <th>ID</th>

                    <th>出版社名称</th>

                    <th>出版社地址</th>

                    <th>邮箱</th>

                    <th>操作</th>

                </tr>

                </thead>

                <tbody>

                    {% for publish in publish_list %}

                        <tr>

                            <td>{{ forloop.counter }}</td>

                            <td>{{ publish.name}}</td>

                            <td>{{ publish.addr }}</td>

                            <td>{{ publish.email }}</td>

                            <td>

                                <!--定义2个链接,点击之后实质是向服务端又提交了一个get请求,并且把对应那天数据的nid发送给服务端-->

                                <!--get方式携带参数到后台,例如?nid=123&name=yzz(后面可以跟多个),但是nid是唯一的,所以用nid-->

                                <!--会触发视图里面的删除方法,将要删除数据的nid当做参数传入-->

                                <a href="/delete_publish/?nid={{ publish.nid }}" class="btn btn-danger">删除</a>

                                <a href="/edit_publish/?nid={{ publish.nid }}" class="btn btn-success">编辑</a>

                            </td>

                        </tr>

                    {% endfor %}

                </tbody>

            </table>

        </div>

    </div>

</div>

</body>

</html>
publish_list.html
<!DOCTYPE html>

<html lang="en">

<head>

    <meta charset="UTF-8">

    <title>修改出版社</title>

    <link rel="stylesheet" href="/static/bootstrap-3.3.7-dist/css/bootstrap.css">

</head>

<body>

<div class="container">

    <div class="row">

        <div class="col-md-6 col-md-offset-3">

            <h2>修改出版社</h2>

            <form action="/edit_publish/" method="post">

                <!--{{ publish.nid }}:点击编辑时默认显示原来数据,在基础上进行修改-->

                <input type="hidden" name="nid" class="form-control" value="{{ publish.nid }}">

                <p>出版社名称:<input type="text" name="name" class="form-control" value="{{ publish.name }}"></p>

                <p>出版社地址:<input type="text" name="addr" class="form-control" value="{{ publish.addr }}"></p>

                <p>出版社邮箱:<input type="text" name="email" class="form-control" value="{{ publish.email }}"></p>

                <p><input type="submit" value="修改" class="form-control btn btn-success"></p>

            </form>

        </div>

    </div>

</div>

</body>

</html>
edit_publish.html
Django创建并连接数据库(实现增删改查)--第二版的更多相关文章
- Django 自带的ORM增删改查
通过Django来对数据库进行增删改查 1 首先创建类,在app应用程序里面的model模块里面创建类,写好数据库信息,方便我们待会初始化: 2 创建在django项目里面的settings里面添加 ...
- 【黑马Android】(04)数据库的创建和sql语句增删改查/LinearLayout展示列表数据/ListView的使用和BaseAdater/内容提供者创建
数据库的创建和sql语句增删改查 1. 载入驱动. 2. 连接数据库. 3. 操作数据库. 创建表: create table person( _id integer primary key, nam ...
- 数据库开发基础-SQl Server 控制数据库的服务+数据库的创建与管理(增删改查)
控制数据库的服务: 方法一: 1.Windows+R 打开运行 打开cmd 2.输入net start MSSQLserver 启动数据库服务 输入net stop MSSQLserver 关闭数据 ...
- 使用MVC5+Entity Framework6的Code First模式创建数据库并实现增删改查功能
此处采用VS2017+SqlServer数据库 一.创建项目并引用dll: 1.创建一个MVC项目 2.采用Nuget安装EF6.1.3 二.创建Model 在models文件夹中,建立相应的mode ...
- BitAdminCore框架应用篇:(二)创建一个简单的增删改查模块
NET Core应用框架之BitAdminCore框架应用篇系列 框架演示:http://bit.bitdao.cn 框架源码:https://github.com/chenyinxin/cookie ...
- 数据库开发基础-★SQl Server 控制数据库的服务+数据库的创建与管理(增删改查)★
控制数据库的服务: 方法一: 1.Windows+R 打开运行 打开cmd 2.输入net start MSSQLserver 启动数据库服务 输入net stop MSSQLserver 关闭数据 ...
- NX二次开发-NX访问SqlServer数据库(增删改查)C#版
版本:NX9+VS2012+SqlServer2008r2 以前我写过一个NX访问MySQL数据库(增删改查)的文章https://www.cnblogs.com/nxopen2018/p/12297 ...
- Django之model基础(增删改查)
一.ORM 映射关系 表名 <-------> 类名 字段 <-------> 属性 表记录 <------->类实例对象二.创建表(建立模型) 在创建表之前的准备 ...
- Django中多表的增删改查操作及聚合查询、F、Q查询
一.创建表 创建四个表:书籍,出版社,作者,作者详细信息 四个表之间关系:书籍和作者多对多,作者和作者详细信息一对一,出版社和书籍一对多 创建一对一的关系:OneToOne("要绑定关系的表 ...
- Django REST framework 五种增删改查方法
Django-DRF-视图的演变 版本一(基于类视图APIView类) views.py: APIView是继承的Django View视图的. 1 from .serializers impor ...
随机推荐
- C++拾遗(五)——类
类是 C++ 中最重要的特征.C++ 语言的早期版本被命名为“带类的 C(Cwith Classes)”,以强调类机制的中心作用.随着语言的演变,创建类的配套支持也在不断增加.语言设计的主要目标也变成 ...
- informix服务端卸载后重新安装不成功
可能原因: 1.实例未删除 2.配置文件未删除 安装成功后远程客户端连接不上问题: 1..如果自己设置的数据库实例报错,换一个数据库实例(database)试试,例如sysadmin
- Windows Azure 配置Active Directory 主机(4)
步骤 6:设置在启动时加入域的虚拟机 若要创建其他在首次启动时加入域的虚拟机,请打开 Windows Azure PowerShell ISE,粘贴以下脚本,将占位符替换为您自己的值并运行该脚本. 若 ...
- pc端常见布局---垂直居中布局 单元素定高
<!DOCTYPE html> <html> <head> <meta charset="utf-8"> <title> ...
- 关于“为何Unicode中文字符占取2个字节,而 UTF-8却占3个字节”的网络解释修正
学到编码时,有个疑问——好好的占2字节的Unicode不用,却要用占3字节的UTF-8编码.发明 UTF-8的初衷不就是为了修正Unicode中任何字符至少占用2个字节的弊端吗? 虽然UTF-8英文字 ...
- PHP程序Laravel框架的优化技巧
Laravel是一套简洁.优雅的php Web开发框架(PHP Web Framework).它可以让你从杂乱的代码中解脱出来,可以帮你构建一个完美的网络app,而且每行代码都简洁.富于表达力.而性能 ...
- C#之winform实现文件拖拽功能【转】
将一个文件拖拽到窗体的某个控件时,将该控件的路径显示在该控件上,只要拿到了路径自然可以读取文件中的内容了 将一个控件的属性AllowDrop设置为true,然后添加DragDrop.DragEnter ...
- 【转】在MAC下使用ISO制作Linux的安装USB盘
http://www.linuxidc.com/Linux/2013-04/82973.htm 在Mac环境下,将Linux的ISO镜像生成一个Linux的安装盘,和Linux下差不多,只是Mac下有 ...
- oracle没有监听和监听程序无法找到适用于客户机连接的例程
1.无监听,可以尝试下以下几种办法: 1)在net manager中重新配置监听.我的net manager监听点开不了,把ADMIN下的listener.ora删掉再去打开试试. 2)cmd中输入n ...
- 01_9_Struts用ModelDriven接收参数
01_9_Struts用ModelDriven接收参数 1. 配置struts.xml文件 <package name="user" namespace="/use ...