python之基于libsvm识别数字验证码
1. 参考
2.图片预处理和手动分类
(1)分析图片
from PIL import Image

img = Image.open('nums/ttt.png')
gray = img.convert('L')

img.show()
windows图片查看器可以放大像素级别:从左到右,从上到下依次为原图,灰度图,阈值为100的二值图,分割图。

# 输出为(count,(R,G,B,A))   alpha透明度一般为255

In [366]: sorted(img.getcolors())

(22, (251, 0, 0, 255)),

(24, (251, 184, 245, 255)),

(41, (192, 192, 192, 255)),   #没有交叉的灰色干扰线

(102, (255, 0, 0, 255)),      #红色数字

(490, (245, 245, 245, 255))]  #背景色白色

# img.convert帮助显示 L = R * 299/1000 + G * 587/1000 + B * 114/1000

# 所以可以确定干扰线灰色RGB 192 192 192的灰度为192

In [367]: sorted(gray.getcolors())

(24, 210),

(41, 75),

(41, 192),

(102, 76),

(505, 245)]

# 按照灰度排序,基本确定阈值为100以下全黑

In [369]: sorted(gray.getcolors(),key=lambda x:x[1])

[(1, 70),

 (2, 73),

 (41, 75),

 (102, 76),

 (2, 82),

 (11, 83),

 (10, 88),

 (5, 98),

# getdata也可以查看数据

In [371]: list(img.getdata())

Out[371]:

[(245, 245, 245, 255),
(2)批量下载图片
# 批量下载100张验证码

# urllib.urlretrieve(url,'nums/ttt.png')  #也行,不支持https

# 如 urls='https://bytebucket.org/wswp/code/raw/9e6b82b47087c2ada0e9fdf4f5e037e151975f0f/chapter07/samples/sample1.png'

# http://blog.csdn.net/zyz511919766/article/details/25049365

# python内置的urllib模块不支持https协议的解决办法

# 编译安装python之前没有编译安装类似于openssl这样的SSL库,以至于python不支持SSL

# [Errno socket error] [SSL: UNKNOWN_PROTOCOL] unknown protocol (_ssl.c:590)

url='http://jbywcg.lnypcg.com.cn/CommonPage/Code.aspx?0.10330188674268' #后面添加任意数字即可

for i in range(100):

    with open('nums/%s.png'%i,'wb') as f:

        f.write(urllib2.urlopen(url+str(i)).read())

# 新建分类文件夹,0~9

for i in range(10):

    os.mkdir('nums/%s'%i)
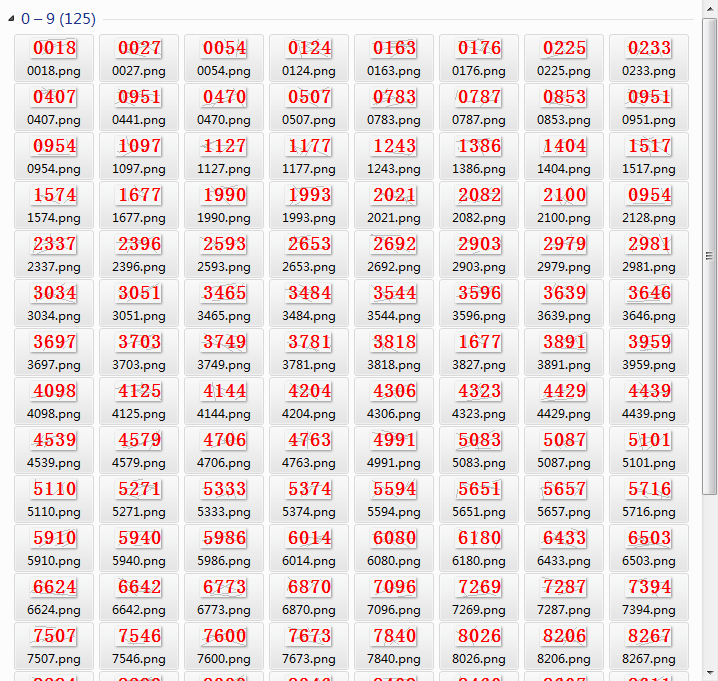
(3)对100张验证码进行预处理,数字分割,然后手动分类并保存到相应文件夹
import time

for index in range(100):

    img = Image.open('nums/%s.png'%index)

    gray = img.convert('L')

    gray_array = np.array(gray)

    # 阈值100以下黑色标记为1,方便确定边缘

    bilevel_array = np.where(gray_array<100,1,0)

    left_list = []
    # 从左到右按列求和

    vertical = bilevel_array.sum(0)

    # 验证码图片规律:左右留白,上下留白3和4,每个数字占据w8h13,总共4个数字

    # 从左到右按列扫描,2白1黑确定为数字左边缘

    for i,c in enumerate(vertical[:-2]):

        if vertical[i] == 0 and vertical[i+1] == 0 and vertical[i+2] != 0:

            left_list.append(i+2)

        if len(left_list) == 4:

            break

    # 分割为肉眼可分辨的图片

    bilevel = Image.fromarray(np.where(gray_array<100,0,255))

    children = [bilevel.crop((left,3,left+8,img.height-4)) for left in left_list]

    for child in children:

        child.show()

        result = raw_input(':')

        child.save('nums/%s/%s_%s.png'%(result,result,time.strftime('%H%M%S')))

    print index
(4)确认分类结果
# 分割图片尺寸太小w8h13,windows看图软件显示为小黑块,img.show()则正常

# 将所有分割图片按行排列合并一图
import os
# 确定新建图片最大宽度

count_max = max(len(os.listdir('nums/%s'%i)) for i in range(10))

img_merge = Image.new('',(8*count_max,13*10))

for h in range(10):

    for w,f in enumerate(os.listdir('nums/%s'%h)):

        img_merge.paste(Image.open('nums/%s/%s'%(h,f)),(w*8,h*13))

img_merge.show()
3.libsvm训练
# 1.官网页面搜索download下载压缩包 http://www.csie.ntu.edu.tw/~cjlin/libsvm/#download

# 2.将压缩包所有文件解压到 Lib\site-packages\libsvm

# 3.将 libsvm\windows 的 libsvm.dll 复制到 C:\WINDOWS\system32\ http://blog.csdn.net/yearningseeker/article/details/49018015

# 4.在 libsvm 根目录和 libsvm\python 子目录下中分别新建名为__init__.py的空文件即可 http://www.cnblogs.com/Finley/p/5329417.html
def get_feature(num, picpath):

    img = Image.open(picpath)

    # 纯黑白转为01二值

    img_array = np.array(img)/255

    # 先遍历w,再遍历h,8+13总共21维度

    # 这里以每一维上的0个数为特征值,img_array.shape[0]是总行数

    return (num, list(img_array.shape[0]-img_array.sum(0)) + list(img_array.shape[1]-img_array.sum(1)))

def write_features(feature_list, filepath='nums/result_temp.txt'):

    with open(filepath,'w') as fp:

        # LIBSVM 对样本文件的格式要求为:<label> <index1>:<value1> <index2>:<value2> ...

        # 1 1:1 2:2 3:2 4:3 5:4 6:13 7:2 8:2 9:1 10:2 11:2 12:2 13:1 14:2 15:2 16:1 17:8 18:1 19:1 20:1 21:5

        for num, data in feature_list:

            temp = ' '.join([str(num)]  +  [str(i)+':'+str(j) for (i,j) in zip(range(1,len(data)+1), data)])

            fp.write(temp+'\n')

# 批量获取0~9十个文件夹所有分割数字的特征值并写入features.txt

feature_list = []

for num in range(10):

    for filename in os.listdir('nums/%s'%num):

        feature_list.append(get_feature(num, 'nums/%s/%s'%(num,filename)))

write_features(feature_list, 'nums/features.txt')

from libsvm.python.svmutil import *

from libsvm.python.svm import *

# 训练得到分类模型model文件

def train_svm_model():

    y, x = svm_read_problem('nums/features.txt')

    model = svm_train(y, x)

    svm_save_model('nums/model', model)
4.libsvm测试
重复之前批量下载和手动分类得到features_test.txt,测试正确率。
def svm_model_test(filepath='nums/features_test.txt'):

    yt, xt = svm_read_problem(filepath)

    model = svm_load_model('nums/model')

    p_label, p_acc, p_val = svm_predict(yt, xt, model)#p_label即为识别的结果

    return ''.join(str(int(p)) for p in p_label)
5.完整应用
#!/usr/bin/env python

#coding: UTF-8

import os, time

import urllib, urllib2

from PIL import Image

import numpy as np

from libsvm.python.svmutil import *

from libsvm.python.svm import *

def get_image(url=''):

    url='http://jbywcg.lnypcg.com.cn/CommonPage/Code.aspx?0.10330188674268'

    temp = time.strftime('%H%M%S')

    picpath = 'nums/temp/%s.png'%(temp)

    with open(picpath,'wb') as f:

        f.write(urllib2.urlopen(url+str(temp)).read())

        return picpath

def split_image(filepath):

    img = Image.open(filepath)

    # img.show()

    gray = img.convert('L')

    gray_array = np.array(gray)

    bilevel_array = np.where(gray_array<100,1,0)

    left_list = []

    vertical = bilevel_array.sum(0)

    for i,c in enumerate(vertical[:-2]):

        if vertical[i] == 0 and vertical[i+1] == 0 and vertical[i+2] != 0:

            left_list.append(i+2)

        if len(left_list) == 4:

            break

    bilevel = Image.fromarray(np.where(gray_array<100,0,255))

    children = [bilevel.crop((left,3,left+8,img.height-4)) for left in left_list]

    filepath_list = []

    for i,child in enumerate(children):

        filepath = 'nums/temp/%s_%s.png'%(time.strftime('%H%M%S'),i+1)

        filepath_list.append(filepath)

        child.save(filepath)

    return filepath_list

def get_feature(num, picpath):

    img = Image.open(picpath)

    img_array = np.array(img)/255

    #先遍历w,再遍历h

    return (num, list(img_array.shape[0]-img_array.sum(0)) + list(img_array.shape[1]-img_array.sum(1)))

def write_features(feature_list, filepath='nums/features_test.txt'):

    with open(filepath,'w') as fp:

        for num, data in feature_list:

            temp = ' '.join([str(num)]  +  [str(i)+':'+str(j) for (i,j) in zip(range(1,len(data)+1), data)])

            fp.write(temp+'\n')

def svm_model_test(filepath='nums/features_test.txt'):

    yt, xt = svm_read_problem(filepath)

    model = svm_load_model('nums/model')

    p_label, p_acc, p_val = svm_predict(yt, xt, model)  #p_label即为识别的结果

    return ''.join(str(int(p)) for p in p_label)

def main():

    while True:

        picpath = get_image()

        splitpath_list = split_image(picpath)

        feature_list = []

        for splitpath in splitpath_list:

            feature_list.append(get_feature(1, splitpath))  #1为任意预设整数值

            os.remove(splitpath)

        write_features(feature_list)

        result = svm_model_test()

        print result

        (dirname, filename) = os.path.split(picpath)

        (shortname, extension) = os.path.splitext(picpath)

        try:

            os.rename(picpath, os.path.join(dirname,result+extension))

        except:

            os.rename(picpath, os.path.join(dirname,result+'_'+time.strftime('%H%M%S')+extension))

if __name__ == '__main__':

    main()
6.运行结果

python之基于libsvm识别数字验证码的更多相关文章
- selenium来识别数字验证码
用python写一爬虫,需要模拟登陆,并且有数字验证码.通过selenium+pytesseract+PIL可以实现验证码识别并登陆.三大步: 用selenium截屏,此时截取的是整个页面的 用PIL ...
- 最邻近算法(KNN)识别数字验证码
应用场景 对于简单的数字型验证码的自动识别.前期已经完成的工作是通过切割将验证码图片切割成一个一个的单个数字的图片,并按照对应的数字表征类别进行分类(即哪些图片表示数字7,哪些表示8),将各种数字 ...
- 使用python以及工具包进行简单的验证码识别
识别数字验证码 首先我们准备素材,4张验证码图片如下: 第一步: 打开图像. im = Image.open('temp1.jpg') 第二步: 把彩色图像转化为灰度图像.彩色图像转化为灰 ...
- knn识别简单验证码
参考 https://www.biaodianfu.com/knn-captcha-recognition.html 内容大致一样,只是根据自己的想法加入了一些改动 KNN(k近邻算法) 算法原理请看 ...
- python 基于机器学习识别验证码
1.背景 验证码自动识别在模拟登陆上使用的较为广泛,一直有耳闻好多人在使用机器学习来识别验证码,最近因为刚好接触这方面的知识,所以特定研究了一番.发现网上已有很多基于machine learni ...
- python下调用pytesseract识别某网站验证码
一.pytesseract介绍 1.pytesseract说明 pytesseract最新版本0.1.6,网址:https://pypi.python.org/pypi/pytesseract Pyt ...
- 基于SVM的字母验证码识别
基于SVM的字母验证码识别 摘要 本文研究的问题是包含数字和字母的字符验证码的识别.我们采用的是传统的字符分割识别方法,首先将图像中的字符分割出来,然后再对单字符进行识别.首先通过图像的初步去噪.滤波 ...
- Python识别网站验证码
http://drops.wooyun.org/tips/6313 Python识别网站验证码 Manning · 2015/05/28 10:57 0x00 识别涉及技术 验证码识别涉及很多方面的内 ...
- 基于TensorFlow的简单验证码识别
TensorFlow 可以用来实现验证码识别的过程,这里识别的验证码是图形验证码,首先用标注好的数据来训练一个模型,然后再用模型来实现这个验证码的识别. 生成验证码 首先生成验证码,这里使用 Pyth ...
随机推荐
- Linux后台执行的方法 - 关闭、退出不影响
=============================================================================================nohup c ...
- 数据分析---《Python for Data Analysis》学习笔记【04】
<Python for Data Analysis>一书由Wes Mckinney所著,中文译名是<利用Python进行数据分析>.这里记录一下学习过程,其中有些方法和书中不同 ...
- linux下sort命令详解大全
工作原理: Sort将文件的每一行作为一个单位,相互比较,比较原则是从首字符向后,依次按ASCII码值进行比较,最后将他们按升序输出. 第一部分: 1. sort:(不带参数) [rocrocket@ ...
- antd的Tree控件实现点击展开功能
antd 的 Tree 控件没有提供点击展开的功能,只能通过左边的三角形实现展开和收起,没办法只好自己实现这个功能. 先看效果 如图实现的是类似 Mac 文件目录形式的结构,有箭头代表是个文件夹,点击 ...
- JS学习笔记Day12
一.浏览器的默认行为以及阻止行为 (一)右键菜单事件:oncontextmenu: 阻止:return false: (二)超链接的默认行为:跳转: 阻止:标准浏览器:event.preventDef ...
- (二分查找 拓展) leetcode278. First Bad Version
You are a product manager and currently leading a team to develop a new product. Unfortunately, the ...
- StringJdbc :jdbcTemplate
Spring框架对Jdbc进行了封装 提供了一个JDBCTemplated对象简化Jdbc开发 步骤 1 导包 2 创建JDBCTemplate 对象 依赖于DataSource 3 调用JDBCTe ...
- DOS批处理:FOR中的Delims和Tokens参数
在For命令语句的参数F中,最难理解的就是Delims和Tokens两个选项,本文简单的做一个比较和总结. “For /f”常用来解析文本,读取字符串.分工上,delims负责切分字符串,而token ...
- Spark Standalone spark-env.sh
export JAVA_HOME=/app/jdk export SPARK_MASTER_PORT=7077 export SPARK_MASTER_WEBUI_PORT=8080 export S ...
- Java小知识点总结
目录 配置 数据库配置文件 基础知识 Switch i++和++i 快捷打代码 输入数据 代码折叠 super关键字 instanceof 防止类型强制转换带来的错误 继承 第一个Java程序 Jav ...
