Qt5.6.0+OpenGL 纹理贴图首战告捷
重要的话写在前面~~通过今晚的实验,知道了EBO是不能随便release的~~~一直不要release就可以了,否则vao会失效
Display.h
#ifndef DISPLAYWIDGET_H

#define DISPLAYWIDGET_H

#include <QGLWidget>

#include <QOpenGLFunctions>

#include <QOpenGLBuffer>

#include <QOpenGLVertexArrayObject>

#include <QOpenGLShaderProgram>

#include <QOpenGLVertexArrayObject>

#include <QOpenGLTexture>

class DisplayGLWidget:public QGLWidget,protected QOpenGLFunctions

{

    Q_OBJECT

public:

    DisplayGLWidget(QWidget *parent = );

    ~DisplayGLWidget();

    void teardownGL();

public slots:

    //void CompileAndLinkVertexShader(const QString& shaderText);

    //void CompileAndLinkFragmentShader(const QString& shaderText);

protected:

    void initializeGL() ;

    void paintGL() ;

    void resizeGL(int width, int height) ;

    //void keyPressEvent(QKeyEvent *event) override;

    void mousePressEvent(QMouseEvent *event) override;

    void mouseMoveEvent(QMouseEvent *event) override;

private:

    QOpenGLBuffer m_vbo;

    QOpenGLBuffer m_ebo;

    QOpenGLVertexArrayObject m_vao;

    QOpenGLShaderProgram *m_program;

    QOpenGLTexture *texture;

    void printVersionInformation();

    void initTextures();

};

#endif
Display.cpp
#include "DisplayGLWidget.h"
#include "Vertex.h" #include <QDebug>
#include <iostream> // Create a colored triangle
static const Vertex sg_vertexes[] = {
Vertex( QVector3D( 0.00f, 0.75f, 1.0f), QVector3D(1.0f, 0.0f, 0.0f) ),
Vertex( QVector3D( 0.75f, -0.75f, 1.0f), QVector3D(0.0f, 1.0f, 0.0f) ),
Vertex( QVector3D(-0.75f, -0.75f, 1.0f), QVector3D(0.0f, 0.0f, 1.0f) )
}; static const GLfloat vertices[] = {
// Positions // Colors // Texture Coords
0.5f, 0.5f, 0.0f, 1.0f, 0.0f, 0.0f, 1.0f, 1.0f, // Top Right
0.5f, -0.5f, 0.0f, 0.0f, 1.0f, 0.0f, 1.0f, 0.0f, // Bottom Right
-0.5f, -0.5f, 0.0f, 0.0f, 0.0f, 1.0f, 0.0f, 0.0f, // Bottom Left
-0.5f, 0.5f, 0.0f, 1.0f, 1.0f, 0.0f, 0.0f, 1.0f // Top Left
}; static const GLfloat vertices1[] =
{
-0.5f, 0.5f, 0.0f, // Top Left
-0.5f,0.0f, 0.0f,
0.0f, 0.5f, 0.0f
}; static const GLuint indices[] = { // Note that we start from 0!
, , , // First Triangle
, , // Second Triangle
}; DisplayGLWidget::DisplayGLWidget(QWidget* parent)
:QGLWidget(parent)
//: QGLWidget(QGLFormat(QGL::SampleBuffers),parent)
, m_vbo(QOpenGLBuffer::VertexBuffer)
, m_ebo(QOpenGLBuffer::IndexBuffer) { int a = ;
//timer.start();
} DisplayGLWidget::~DisplayGLWidget()
{
makeCurrent();
teardownGL();
} void DisplayGLWidget::teardownGL()
{
// Actually destroy our OpenGL information
m_vbo.destroy();
m_ebo.destroy();
m_vao.destroy();
delete m_program;
} void DisplayGLWidget::initializeGL()
{
//glShadeModel(GL_SMOOTH); // 启用阴影光滑
//glClearColor(0.2,0.2,0.2,0); // 设置清除屏幕的颜色
//glClearDepth(1.0); // 设置深度缓存
//glEnable(GL_DEPTH_TEST); // 深度测试
//glDepthFunc(GL_LEQUAL); // 启用深度测试
//glHint(GL_PERSPECTIVE_CORRECTION_HINT,GL_NICEST); // 进行最好的透视修正,可能会影响性能
initializeOpenGLFunctions();
printVersionInformation();
glClearColor(0.3,0.3,0.3,); // Application-specific initialization {
// Create Shader (Do not release until VAO is created)
m_program = new QOpenGLShaderProgram();
m_program->addShaderFromSourceFile(QOpenGLShader::Vertex, "./shaders/simple.vert");
m_program->addShaderFromSourceFile(QOpenGLShader::Fragment, "./shaders/simple.frag");
m_program->link();
m_program->bind(); // Create Vertex Array Object
m_vao.create();
m_vao.bind(); // Create Buffer (Do not release until VAO is created)
m_vbo.create();
m_vbo.bind();
m_vbo.setUsagePattern(QOpenGLBuffer::StaticDraw);
m_vbo.allocate(vertices, sizeof(vertices)); m_ebo.create();
m_ebo.bind();
m_ebo.setUsagePattern(QOpenGLBuffer::StaticDraw);
m_ebo.allocate(indices,sizeof(indices)); m_program->enableAttributeArray();
m_program->enableAttributeArray();
m_program->enableAttributeArray();
m_program->setAttributeBuffer(, GL_FLOAT, , , *sizeof(GLfloat)); // 3表示的是这一个属性里面有几个分量
m_program->setAttributeBuffer(, GL_FLOAT, *sizeof(GLfloat), , *sizeof(GLfloat));
m_program->setAttributeBuffer(, GL_FLOAT, * sizeof(GLfloat), , * sizeof(GLfloat)); initTextures(); // Release (unbind) all m_vbo.release();
m_vao.release();
//m_ebo.release();
m_program->release();
} } void DisplayGLWidget::paintGL()
{
//makeCurrent(); glClear(GL_COLOR_BUFFER_BIT|GL_DEPTH_BUFFER_BIT); // 清除屏幕和深度缓存
//glLoadIdentity(); // 重置当前模型的观察矩阵
// Render using our shader m_program->bind();
{ m_program->setUniformValue("ourTexture", );
texture->bind();
m_vao.bind();
glPolygonMode(GL_FRONT_AND_BACK, GL_FILL);
glDrawElements(GL_TRIANGLES,,GL_UNSIGNED_INT,);
//glDrawArrays(GL_TRIANGLES, 0, sizeof(sg_vertexes) / sizeof(sg_vertexes[0]));
//glDrawArrays(GL_TRIANGLES, 0, 3);
m_vao.release();
}
m_program->release(); /*m_program1->bind();
{
m_vao1.bind();
glDrawArrays(GL_TRIANGLES,0,3);
m_vao1.release();
}
m_program1->release();*/
} void DisplayGLWidget::resizeGL(int width, int height)
{
if (height == ) // 规定屏幕高度不得低于20
{
height = ;
}
glViewport(,,(GLint)width,(GLint)height); // 重置当前的视口
glMatrixMode(GL_PROJECTION); // 选择投影矩阵
glLoadIdentity(); // 重置投影矩阵
//gluPerspective(45.0,(GLfloat)width/(GLfloat)height,0.1,100.0); // 建立透视投影矩阵
glMatrixMode(GL_MODELVIEW); // 选择模型观察矩阵
glLoadIdentity(); // 重置模型观察矩阵
} //void DisplayGLWidget::keyPressEvent(QKeyEvent* e)
//{
// switch (e->key())
// {
// default:
// break;
// }
//} void DisplayGLWidget::mouseMoveEvent(QMouseEvent* event)
{ } void DisplayGLWidget::printVersionInformation()
{
QString glType;
QString glVersion;
QString glProfile; // Get Version Information
//glType = (context()->isOpenGLES()) ? "OpenGL ES" : "OpenGL";
glVersion = reinterpret_cast<const char*>(glGetString(GL_VERSION)); // Get Profile Information
#define CASE(c) case QSurfaceFormat::c: glProfile = #c; break
switch (format().profile())
{
CASE(NoProfile);
CASE(CoreProfile);
CASE(CompatibilityProfile);
}
#undef CASE // qPrintable() will print our QString w/o quotes around it.
//qDebug() << qPrintable(glType) << qPrintable(glVersion) << "(" << qPrintable(glProfile) << ")";
qDebug() << qPrintable(glVersion) << "(" << qPrintable(glProfile) << ")";
} void DisplayGLWidget::initTextures()
{
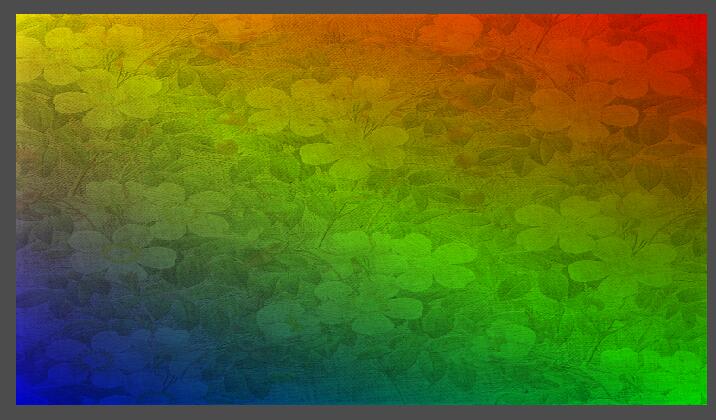
texture = new QOpenGLTexture(QImage("./resources/texture/flower.jpg").mirrored());
texture->setMinificationFilter(QOpenGLTexture::Nearest);
texture->setMagnificationFilter(QOpenGLTexture::Linear);
texture->setWrapMode(QOpenGLTexture::Repeat); } void DisplayGLWidget::mousePressEvent(QMouseEvent* event)
{ }
结果:
Qt5.6.0+OpenGL 纹理贴图首战告捷的更多相关文章
- 基于Cocos2d-x学习OpenGL ES 2.0系列——纹理贴图(6)
在上一篇文章中,我们介绍了如何绘制一个立方体,里面涉及的知识点有VBO(Vertex Buffer Object).IBO(Index Buffer Object)和MVP(Modile-View-P ...
- OpenGL 纹理贴图
前一节实例代码中有个贴图操作. 今天就简单说明一下纹理贴图... 为了使用纹理贴图.我们首先需要启用纹理贴图功能. 我们可以在Renderer实现的onSurfaceCreated中定义启用: // ...
- (转载)Cocos2dx-OpenGL ES2.0教程:纹理贴图(6)
在上一篇文章中,我们介绍了如何绘制一个立方体,里面涉及的知识点有VBO(Vertex Buffer Object).IBO(Index Buffer Object)和MVP(Modile-View-P ...
- [OpenGL]纹理贴图实现 总结
实现步骤 第一步:设置所需要的OpenGL环境 设置上下文环境 删除已经存在的渲染的缓存 设置颜色缓存 设置帧缓存 清除缓存 设置窗口大小 开启功能 编译shander 使用program 获取sha ...
- 用OpenGL进行立方体表面纹理贴图
一.目的 掌握OpenGL中纹理对象的创建.绑定与使用方法. 二.简单介绍 1,连接静态库 #pragma comment(lib, "glut32.lib") #pragma c ...
- opengl学习笔记(三):经过纹理贴图的棋盘
opengl纹理贴图的步骤: 1:创建纹理对象,并为它指定一个纹理 2:确定纹理如何应用到每个像素上 3:启用纹理贴图功能 4:绘制场景,提供纹理坐标和几何图形坐标 注意:纹理坐标必须在RGBA模式下 ...
- (转)使用OpenGL显示图像(七)Android OpenGLES2.0——纹理贴图之显示图片
转:http://blog.csdn.net/junzia/article/details/52842816 前面几篇博客,我们将了Android中利用OpenGL ES 2.0绘制各种形体,并在上一 ...
- IOS 中openGL使用教程3(openGL ES 入门篇 | 纹理贴图(texture)使用)
在这篇文章中,我们将学习如何在openGL中使用纹理贴图. penGL中纹理可以分为1D,2D和3D纹理,我们在绑定纹理对象的时候需要指定纹理的种类.由于本文将以一张图片为例,因此我们为我们的纹理对象 ...
- android ndk调用OpenGL 实现纹理贴图Texture
android ndk调用OpenGL 实现纹理贴图Texture 时间 2014-06-25 05:24:39 CSDN博客 原文 http://blog.csdn.net/chrisfxs/a ...
随机推荐
- 洛谷 [P1118] IOI1994 数字三角形
简单dfs 我们注意到,题目中的运算方式与杨辉三角极其相似,所以说本题实际上是一道加权的杨辉三角,搜索系数 #include <iostream> #include <cstdio& ...
- D 区间求和 [数学 树状数组]
D 区间求和 题意:求 \[ \sum_{k=1}^n \sum_{l=1}^{n-k+1} \sum_{r=l+k-1}^n 区间前k大值和 \] 比赛时因为被B卡了没有深入想这道题 结果B没做出来 ...
- BZOJ 3512: DZY Loves Math IV [杜教筛]
3512: DZY Loves Math IV 题意:求\(\sum_{i=1}^n \sum_{j=1}^m \varphi(ij)\),\(n \le 10^5, m \le 10^9\) n较小 ...
- iOS学习——UIView的研究
在iOS开发中,我们知道有一个共同的基类——NSObject,但是对于界面视图而言,UIView是非常重要的一个类,UIView是很多视图控件的基类,因此,对于UIView的学习闲的非常有必要.在iO ...
- PHPUnit-附录 C. XML 配置文件
[http://www.phpunit.cn/manual/5.7/zh_cn/appendixes.configuration.html] PHPUnit <phpunit> 元素的属性 ...
- Apache设置二级域名和虚拟主机
apache httpd.conf 最后: ------------------------------NameVirtualHost *:80<VirtualHost *:80> ...
- 从Vue.js源码角度再看数据绑定
写在前面 因为对Vue.js很感兴趣,而且平时工作的技术栈也是Vue.js,这几个月花了些时间研究学习了一下Vue.js源码,并做了总结与输出.文章的原地址:https://github.com/an ...
- 【HTTP协议】---TCP三次握手和四次挥手
TCP三次握手和四次挥手 首先我们知道HTTP协议通常承载于TCP协议之上,HTTPS承载于TLS或SSL协议层之上 通过上面这张图我们能够知道. 在Http工作之前,Web浏览器通过网络和W ...
- 基于agenda的Nodejs定时任务管理框架搭建
0.背景 在大型项目中,定时任务的应用场景越来越广.一般来说,按照微服务的思想,我们会将定时任务单独部署一套服务,核心的业务接口独立到另一个服务中,从而降低相互之间的耦合程度.在需要使用定时任务时,只 ...
- Java经典编程题50道之四十二
809*??=800*??+9*??+1,其中??代表的两位数,8*??的结果为两位数,9*??的结果为3位数.求??代表的两位数,以及809*??后的结果. public class Example ...