Android学习——移植tr069程序到Android平台
原创作品,转载请注明出处,严禁非法转载。如有错误,请留言!
email:40879506@qq.com
声明:本系列涉及的开源程序代码学习和研究,严禁用于商业目的。 如有任何问题,欢迎和我交流。(企鹅号:408797506)
本篇用到的代码下载路径:http://download.csdn.net/detail/eryunyong/9798889
Github维护:https://github.com/eryunyong/git_android_DataModel
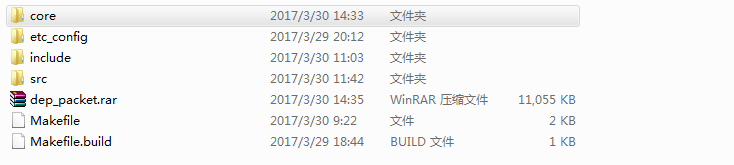
代码结构说明:
core目录是tr069程序的协议栈部分代码编译出来的可执行档案(不开源)。
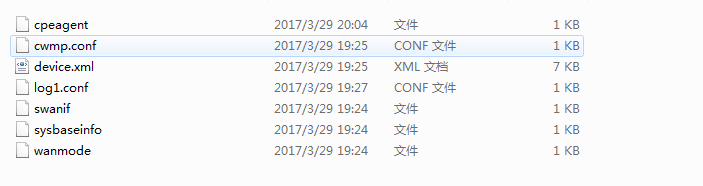
etc_config目录是cwmp程序执行用到的配置和测试数据。
include和src目录是DataModel数据部分的源码。
dep_packet.rar是依赖包的压缩文件(包括libcurl,libexpat,libuci)。
Makefile和Makefile.build是用于编译DataModel产生设备相关的device.so文件
一. 环境
1.编译环境GNU/Linux Centos6.5操作系统
2.NDK交叉编译工具链arm-linux-androideabi-gcc-4.8 (参考前一篇:Android学习——NDK交叉编译)
二. 依赖包的安装
在我提供的csdn的下载路径里,可以看到我已经把相关的依赖程序编译并安装到了tmp目录下。可以直接把需要的动态库so放到安卓环境里。
如果一直看我的CWMP开源代码研究的系列文章,那么这些依赖安装也就很简单了。开源的程序用到的是libcurl, libexpat。libuci的测试程序是我重写了(前文已介绍),移植到安卓平台又出现了新的问题。
三. libuci测试程序
在移植libuci的程序过程出现如下类似错误:
caused by cannot locate symbol "glob" referenced by libuci.so
原因是在Android平台下并没有glob库。所以我在网上找到了glob.c和glob.h文件放在了libuci的源码程序里进行编译。
四. 程序的几处修改
1.cwmp程序运行的配置
由于安卓系统的目录结构和linux不一样,安卓提供给用户空间的操作数据一般放在/system/目录下
[file]
log=/system/etc/config/log1.conf
device=/system/etc/config/device.xml
attr=/system/usr/data/attr.conf
event=/system/usr/data/event1.conf

[cwmp]
retry_count=
notify_interval=

[stun]
port=
retry_count=
timeout=
timewait=
2.device.so路径变化
在device.xml中定义了设备库存放路径为
 1   ........
 2       </obj>
 3     </obj>
 4   </trf>
 5
 6   <devlib name="/system/lib/device.so"></devlib>
 7   <cwmpenable name="dev_cwmp_enable"/>
 8   <init name="dev_init"></init>
 9   <bootstrap name="dev_bootstrap"></bootstrap>
10 ......
3.Log的文件存储路径
 [conf]
 path=/system/usr/data
 name=cwmp.log
 enable=
 level=
 size=
程序启动的时候,可以追踪/system/usr/data/cwmp.log文件查看log信息输出。
4.测试数据存储路径变化
在uci.h文件里改变了数据存储的路径,以便于我们进行测试
#define UCI_CONFDIR "/system/usr/config"
#define UCI_BASEDIR "/system/etc/config"
#define UCI_SAVEDIR "/system/tmp/.uci"
同理,在device.so的程序里也要修改对应的路径:
cpeutil.h头文件内容:#define UCI_ROOT_DEFAULT            "/system/etc/config"
#define UCI_USER_ROOT               "/system/usr/config
5.cwmp程序
1. 新增了debug调试的模块(可选)
五. 在Android4.4的AVD环境里测试
1.准备好动态库
把编译好的动态库libcurl.so, libexpat.so, libuci.so,device.so拷贝到安卓系统的/system/lib目录下。所有代码开源!!!
2.准备好CWMP程序
把已经编译好的cwmp协议栈的核心程序放置到安卓系统的/system/bin目录下,并赋予可执行权限。cwmp程序代码不开源,仅提供可执行档案!
3.准备好配置文件和测试数据部分
把源码包里面的etc_config目录下的文件全部拷贝到安卓系统的/system/etc/config/目录下(如果不存在就创建相应的目录)。并创建相应的配置或者数据存储的目录,比如/system/usr/data,/system/usr/config/
4.运行程序
执行命令:cwmp -F /system/etc/config/cwmp.conf
可以看到程序在Android4.4的模拟机上运行结果如下:

5.查看log
 -- ::] cwmp version
 -- ::] filename=/system/etc/config/device.xml
 -- ::] parse_buf end
 -- ::] device library=/system/lib/device.so
 -- ::] wanparamname_func=dev_get_wanparam_name
 -- ::] bootstrap_func=dev_bootstrap
 -- ::] init_func=dev_init
 -- ::] reboot_func=dev_reboot
 -- ::] factoryreset_func=dev_factoryreset
 -- ::] download_func=dev_download
 -- ::] upload_func=dev_upload
 -- ::] debug_func=dev_debug
 -- ::] cwmpeanble_func=dev_cwmp_enable
 -- ::] dyninform func=dev_dyninform
 -- ::] auth_func=dev_get_auth
 -- ::] listenport_func=dev_get_listenport
 -- ::] get devlistenport
 -- ::] port=
 -- ::] func_set_acs_status=dev_set_acs_status
 -- ::] func_set_cwmp_status=dev_set_cwmp_status
 -- ::] func_url_dns_resolve=dev_url_dns_resolve
 -- ::] init_dev_func end
 -- ::] fullname=InternetGatewayDevice.ObjTest
 -- ::] init_multi_obj refresh params=InternetGatewayDevice.ObjTest
 -- ::] fullname=InternetGatewayDevice.WANDevice
 -- ::] init_multi_obj refresh params=InternetGatewayDevice.WANDevice
 -- ::] TRF_Refresh_WANDevice begin
 -- ::] TRF_Refresh_WANDevice end
 -- ::] fullname=InternetGatewayDevice.WANDevice..WANConnectionDevice
 -- ::] init_multi_obj refresh .WANConnectionDevice
 -- ::] fullname=InternetGatewayDevice.WANDevice..WANConnectionDevice..WANIPConnection
 -- ::] init_multi_obj refresh .WANConnectionDevice..WANIPConnection
 -- ::] fullname=InternetGatewayDevice.WANDevice..WANConnectionDevice
 -- ::] init_multi_obj refresh .WANConnectionDevice
 -- ::] fullname=InternetGatewayDevice.WANDevice..WANConnectionDevice..WANIPConnection
 -- ::] init_multi_obj refresh .WANConnectionDevice..WANIPConnection
 -- ::] fullname=InternetGatewayDevice.WANDevice..WANConnectionDevice..WANIPConnection
 -- ::] init_multi_obj refresh .WANConnectionDevice..WANIPConnection
 -- ::] could not get count from /system/usr/data/attr.conf
 -- ::] cwmp is enabled
 -- ::] ============start  listen acs================
 -- ::] init_acs_req_conn begin
 -- ::] init_acs_req_conn end
 -- ::] init_notify_watch begin
 -- ::] init_notify_watch end
 -- ::] init_periodic begin
 -- ::] init_periodic end
 -- ::] init_stun begin
 -- ::] init_task end
 -- ::] bootstrap_flag =
 -- ::] reboot_flag=, key=
 -- ::] event_set begin, index=, value=
 -- ::] event_set end
 -- ::] download_flag
 -- ::] wait for informing acs
 -- ::] name=InternetGatewayDevice.ManagementServer.PeriodicInformEnable
 -- ::] name=InternetGatewayDevice.ManagementServer.PeriodicInformInterval
 -- ::] name=InternetGatewayDevice.ManagementServer.PeriodicInformTime
 -- ::] PeriodicInformTime=--14T17::
 -- ::] InternetGatewayDevice.ManagementServer.PeriodicInformTime is invalid tm
 -- ::] wait_tm=
 -- ::] monitor parameter value change
 -- ::] acs listen port =
 -- ::] socket_tcp_server end
 -- ::] begin to inform acs
 -- ::] status=IDLE
 -- ::] status=INIT
 -- ::] name=InternetGatewayDevice.ManagementServer.Username
 -- ::] name=InternetGatewayDevice.ManagementServer.Password
 -- ::] acs usrname=test, passwd=test
 -- ::] name=InternetGatewayDevice.ManagementServer.URL
 -- ::] Select error, interval=!
 -- ::] acs url=http://192.168.4.11:9090/ACS-server/ACS
 -- ::] ACS domain name=192.168.4.11
 -- ::] Already IP address.
 -- ::] name=InternetGatewayDevice.DeviceInfo.Manufacturer
 -- ::] name=InternetGatewayDevice.DeviceInfo.ManufacturerOUI
 -- ::] name=InternetGatewayDevice.DeviceInfo.ProductClass
 -- ::] name=InternetGatewayDevice.DeviceInfo.SerialNumber
 -- ::] name=InternetGatewayDevice.Time.CurrentLocalTime
 -- ::] name=InternetGatewayDevice.DeviceSummary
 -- ::] name=InternetGatewayDevice.DeviceSummary
 -- ::] name=InternetGatewayDevice.DeviceInfo.SpecVersion
 -- ::] name=InternetGatewayDevice.DeviceInfo.SpecVersion
 -- ::] name=InternetGatewayDevice.DeviceInfo.HardwareVersion
 -- ::] name=InternetGatewayDevice.DeviceInfo.HardwareVersion
 -- ::] name=InternetGatewayDevice.DeviceInfo.SoftwareVersion
 -- ::] name=InternetGatewayDevice.DeviceInfo.SoftwareVersion
 -- ::] name=InternetGatewayDevice.DeviceInfo.ProvisioningCode
 -- ::] name=InternetGatewayDevice.DeviceInfo.ProvisioningCode
 -- ::] name=InternetGatewayDevice.ManagementServer.ConnectionRequestURL
 -- ::] ============Andy debug: CpeGetManagementServerConnectionRequestURL debugip= 192.168.20.38.
 -- ::] ============Andy debug: CpeGetManagementServerConnectionRequestURL *value = http://192.168.20.38:25100.
 -- ::] name=InternetGatewayDevice.ManagementServer.ConnectionRequestURL
 -- ::] name=InternetGatewayDevice.ManagementServer.ParameterKey
 -- ::] name=InternetGatewayDevice.ManagementServer.ParameterKey
 -- ::] name=InternetGatewayDevice.DeviceInfo.ModelName
 -- ::] name=InternetGatewayDevice.DeviceInfo.ModelName
 -- ::] name=InternetGatewayDevice.DeviceInfo.DeviceType
 -- ::] name=InternetGatewayDevice.DeviceInfo.DeviceType
 -- ::] name=InternetGatewayDevice.WANDevice..WANConnectionDevice..WANIPConnection..ExternalIPAddress
 -- ::] TODO.............support yourself WAN interface ip addr
 -- ::] name=InternetGatewayDevice.WANDevice..WANConnectionDevice..WANIPConnection..ExternalIPAddress
 -- ::] dev_set_cwmp_status type() val()
 -- ::] status=INRR
 -- ::] send=<SOAP-ENV:Envelope xmlns:SOAP-ENV="http://schemas.xmlsoap.org/soap/envelope/" xmlns:SOAP-ENC="http://schemas.xmlsoap.org/soap/encoding/" xmlns:xsi="http://www.w3.org/2001/XMLSchema-instance" xmlns:xsd="http://www.w3.org/2001/XMLSchema" xmlns:cwmp="urn:dslforum-org:cwmp-1-0">
     <SOAP-ENV:Header>
         <cwmp:ID SOAP-ENV:mustUnderstand=</cwmp:ID>
     </SOAP-ENV:Header>
     <SOAP-ENV:Body>
         <cwmp:Inform>
             <DeviceId xsi:type="cwmp:DeviceIdStruct">
                 <Manufacturer>Google</Manufacturer>
                 <OUI>AABBCC</OUI>
                 <ProductClass>Android4.</ProductClass>
                 <SerialNumber></SerialNumber>
             </DeviceId>
             <Event SOAP-ENC:arrayType="cwmp:EventStruct[1]">
                 <EventStruct>
                     <EventCode> BOOT</EventCode>
                     <CommandKey></CommandKey>
                 </EventStruct>
             </Event>
             <MaxEnvelopes></MaxEnvelopes>
             <CurrentTime>--30T03::</CurrentTime>
             <RetryCount></RetryCount>
             <ParameterList SOAP-ENC:arrayType="cwmp:ParameterValueStruct[10]">
                 <ParameterValueStruct>
                     <Name>InternetGatewayDevice.DeviceSummary</Name>
                     <Value xsi:type=, EthernetLAN:, WiFiLAN:, EthernetWAN:, Time:, IPPing:)</Value>
                 </ParameterValueStruct>
                 <ParameterValueStruct>
                     <Name>InternetGatewayDevice.DeviceInfo.SpecVersion</Name>
                     <Value xsi:type="xsd:string">DomainName</Value>
                 </ParameterValueStruct>
                 <ParameterValueStruct>
                     <Name>InternetGatewayDevice.DeviceInfo.HardwareVersion</Name>
                     <Value xsi:type=</Value>
                 </ParameterValueStruct>
                 <ParameterValueStruct>
                     <Name>InternetGatewayDevice.DeviceInfo.SoftwareVersion</Name>
                     <Value xsi:type=</Value>
                 </ParameterValueStruct>
                 <ParameterValueStruct>
                     <Name>InternetGatewayDevice.DeviceInfo.ProvisioningCode</Name>
                     <Value xsi:type="xsd:string">provisioning_code</Value>
                 </ParameterValueStruct>
                 <ParameterValueStruct>
                     <Name>InternetGatewayDevice.ManagementServer.ConnectionRequestURL</Name>
                     <Value xsi:type="xsd:string">http://192.168.20.38:25100</Value>
                 </ParameterValueStruct>
                 <ParameterValueStruct>
                     <Name>InternetGatewayDevice.ManagementServer.ParameterKey</Name>
                     <Value xsi:type="xsd:string">parameterkey</Value>
                 </ParameterValueStruct>
                 <ParameterValueStruct>
                     <Name>InternetGatewayDevice.DeviceInfo.ModelName</Name>
                     <Value xsi:type="xsd:string">modulename_test1</Value>
                 </ParameterValueStruct>
                 <ParameterValueStruct>
                     <Name>InternetGatewayDevice.DeviceInfo.DeviceType</Name>
                     <Value xsi:type="xsd:string">Andy_AVD</Value>
                 </ParameterValueStruct>
                 <ParameterValueStruct>
                     <Name>InternetGatewayDevice.WANDevice..WANConnectionDevice..WANIPConnection..ExternalIPAddress</Name>
                     <Value xsi:type="xsd:string">192.168.20.38</Value>
                 </ParameterValueStruct>
             </ParameterList>
         </cwmp:Inform>
     </SOAP-ENV:Body>
 </SOAP-ENV:Envelope>

 -- ::] call dev_debug
 -- ::] debug flag=
 -- ::] resp=
 -- ::] recv=<SOAP-ENV:Envelope xmlns:SOAP-ENV=</cwmp:ID></SOAP-ENV:Header><SOAP-ENV:Body><cwmp:InformResponse><MaxEnvelopes></MaxEnvelopes></cwmp:InformResponse></SOAP-ENV:Body></SOAP-ENV:Envelope>

 -- ::] soap methodname=cwmp:InformResponse
 -- ::] resp=
 -- ::] dev_set_cwmp_status type() val()
 -- ::] status=INRR
 -- ::] send=""
 -- ::] call dev_debug
 -- ::] debug flag=
 -- ::] resp=
看到类似这样的错误:
2017-03-30 03:17:30.961 [ERRO] [EB-MIG] [WANIPConnection.c:CpeGetWANIPConnection_ExternalIPAddress()] [0494] TODO.............support yourself WAN interface ip addr
说明程序已经移植成功,但是此时并没有和acs对接成功,只是Inform发送出去。
六. 真实设备测试测试(略)
由于我手里没有Android设备,只能使用模拟器,因此在cwmp协议栈里增加了debug模块。但是又没有解决模拟器的ip地址和ACS互通性问题,有网友可以帮忙的可以留言。
如果你的安卓设备和ACS互通,只需要修改两个地方就可以完全和ACS对接:
1. 在ManagementServer.c的CpeGetManagementServerConnectionRequestURL函数里的ip地址改为你设备的真实ip地址。
(如果启用debug模式,也可以修改配置文件cpeagent的debugip参数)
2. 修改ACS的url地址,即修改配置文件cpeagent的acsurl参数。
七. Android使用测试命令
 cd D:\Eclipse_Android\sdk\platform-tools
 adb.exe remount
 adb.exe remount

 把文件放到Android相应的目录下
 adb push cli system/bin
 adb push libuci.so  system/lib

 进入Android测试shell
 adb shell
更多精彩内容,等你来玩!!!!
Android学习——移植tr069程序到Android平台的更多相关文章
- Xamarin.Android学习之应用程序首选项
Xamarin.Android学习之应用程序首选项 一.前言 任何App都会存在设置界面,如果开发者利用普通控件并绑定监听事件保存设置,这一过程会非常的枯燥,而且耗时.我们可以看到Android系统的 ...
- 五、Android学习第四天补充——Android的常用控件(转)
(转自:http://wenku.baidu.com/view/af39b3164431b90d6c85c72f.html) 五.Android学习第四天补充——Android的常用控件 熟悉常用的A ...
- Android学习记录(3)—Android中ContentProvider的基本原理学习总结
一.ContentProvider简介 当应用继承ContentProvider类,并重写该类用于提供数据和存储数据的方法,就可以向其他应用共享其数据.虽然使用其他方法也可以对外共享数据 ...
- 【Android学习笔记】Mac下Android Studio开发环境搭建
本文由@ray 出品,转载请注明出处. 文章链接:http://www.cnblogs.com/wolfray/p/7829069.html 对于移动端这块,笔者之前一直都是进行iOS开发的,也从来 ...
- android学习1:清晰详细android环境搭建,超简单
废话少说,今天是Android学习的开篇的博客,接下来将把自己学习android的各种问题和经历总结一下,其实之前已经自己学过半年了,但是因为开始时刚学的移动端开发还没有概念,当时总结工作又做的不好, ...
- 物联网大赛 - Android学习笔记(一) Android概念
一.Android 概念 Android是开放式的手机和电脑操作系统,是基于Linux系统做的上层开发. android可以做些什么? Android可以开发各种手机应用APP,也可以开发车载系统等, ...
- android学习笔记50——SQLiteOpenHelper、android实现系统自带样式
SQLiteOpenHelper SQLiteOpenHelper是android提供的一个管理数据库的工具类,可用于管理数据库的创建和版本更新. 一般的用法是创建SQLiteOpenHelper的子 ...
- (1)-Android学习笔记之:初识Android系统架构和项目结构
Android系统架构 Android程序结构 创建一个Android项目,为初学便于理解,将程序项目结构切换为Project模式,项目结构如下 .gradle和.idea:这两个目录下放的都是And ...
- Android 学习第11课,android 实现拨打电话的功能
1. 先布局界面,界面采用线性垂直方式来布局 在layout 界面文件中 activity_main.xml 中 <LinearLayout xmlns:android="http:/ ...
随机推荐
- VMware 滴滴声解决
去除虚拟机tab时的滴滴声 # cat /etc/inputrc Set bell-style none 重启生效
- 原生js写的flybird小游戏
游戏地址:http://zangzhihong.jusukeji.com/flybird/index.html html部分 <!DOCTYPE html> <!-- This ...
- 基于hi-nginx的web开发(python篇)——起步
hi-nginx不仅让python web 应用跑得飞快,而且让相关开发变得简单敏捷. 关于hi-nginx的安装,请参考:https://www.cnblogs.com/hi-nginx/p/862 ...
- 分布式代码管理系统GIT
1.1Git安装 CentOS上 yum install -y epel-release; yum install git Ubuntu上 apt-get install git Windo ...
- Jedis操作Redis
Jedis操作Redis的常用封装方法 @Resource(name="jedispool") private JedisPool pool=null; /** * 设置缓存对象过 ...
- [日常] NOIP 2017滚粗记
突然挑了这么个滑稽的时间补了游记... (成绩日常延时再加上人太菜估计基本上就是颓废记录) 然而文化课太废可能会被强制退役QAQ所以先补了再说吧 day0 一大早被老姚交代了个开十一机房门的任务... ...
- NOIP知识点
基础算法 贪心 枚举 分治 二分 倍增 高精度 模拟 图论 图 最短路(dijkstra.spfa.floyd) 最小生成树(kruskal.prim) 并查集 拓扑排序 二分图染色 Tarjan 树 ...
- 解决办法:由于oracle版本不同导致导入数据时失败
在向一个数据库导入dmp文件时,出现了如下错误 经查询,是由于"导出的dmp文件与导入的数据库的版本不同造成的" 用notepad查看dmp文件的版本,看看是否和数据库版本一致 解 ...
- 第2次作业:STEAM案例分析
1.介绍产品的相关信息 1.1我选择的产品是STEAM 1.2选择STEAM的理由 STEAM是一个线上游戏购买平台,不同于亚马逊购买DVD光盘,它支持从游戏库购买数字发行版体验游戏.另外,它也不同于 ...
- io多路复用(一)
sever端 1 import socket sk1 = socket.socket() sk1.bind(('127.0.0.1',8001,)) sk1.listen() sk2 = socket ...