python接口自动化-传 json 参数
一、post请求有两种方法传json参数:
- 1.传json参数(自动转 json )
- 2.传data参数(需 json 转换)
代码参考:
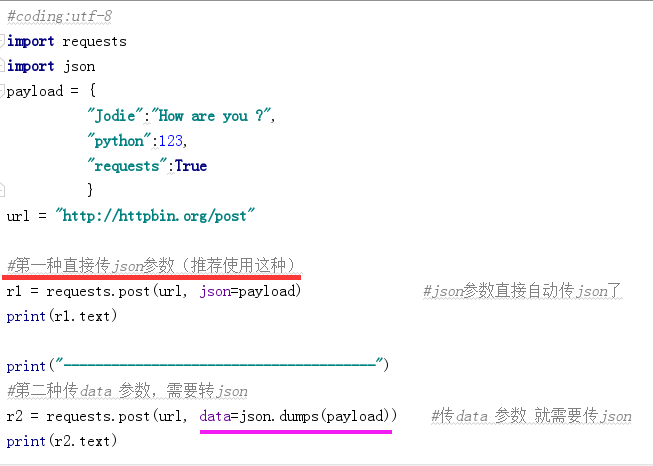
- payload = {
- "Jodie":"How are you ?",
- "python":123,
- "requests":True
- }
- url = "http://httpbin.org/post"
- #第一种直接传 json 参数(推荐使用这种)
- r1 = requests.post(url, json=payload) # json 参数直接自动传 json
- print(r1.text)
- print("---------------------------------------")
- #第二种传 data 参数,需要转 json
- r2 = requests.post(url, data=json.dumps(payload)) #传 data 参数就需要传 json
- print(r2.text)
运行后的打印结果:
F:\test-req-py\venv\Scripts\python.exe F:/test-req-py/day3/t3.py
{
"args": {},
"data": "{\"Jodie\": \"How are you ?\", \"python\": 123, \"requests\": true}",
"files": {},
"form": {},
"headers": {
"Accept": "*/*",
"Accept-Encoding": "gzip, deflate",
"Content-Length": "59",
"Content-Type": "application/json",
"Host": "httpbin.org",
"User-Agent": "python-requests/2.21.0"
},
"json": {
"Jodie": "How are you ?",
"python": 123,
"requests": true
},
"origin": "223.104.210.143, 223.104.210.143",
"url": "https://httpbin.org/post"
}
---------------------------------------
{
"args": {},
"data": "{\"Jodie\": \"How are you ?\", \"python\": 123, \"requests\": true}",
"files": {},
"form": {},
"headers": {
"Accept": "*/*",
"Accept-Encoding": "gzip, deflate",
"Content-Length": "59",
"Host": "httpbin.org",
"User-Agent": "python-requests/2.21.0"
},
"json": {
"Jodie": "How are you ?",
"python": 123,
"requests": true
},
"origin": "223.104.210.143, 223.104.210.143",
"url": "https://httpbin.org/post"
}
Process finished with exit code 0
二、快递查询案例
1.例如打开快递网:http://www.kuaidi.com/,搜索 75135471609813 单号,判断它的状态是不是已签收

实操中原本的理想代码,实际没不通:
- #coding:utf-8
- import requests
- import json
- url = "http://www.kuaidi.com/index-ajaxselectcourierinfo-75135471609813-zhongtong.html"
- h = {
- "Connection": "keep-alive",
- "User-Agent": "Mozilla/5.0 (Windows NT 6.1; Win64; x64) "
- "AppleWebKit/537.36 (KHTML, like Gecko) "
- "Chrome/70.0.3538.110 Safari/537.36",
- "Content-Type":"application/x-www-form-urlencoded; charset=UTF-8",
- "Referer":"http://www.kuaidi.com/",
- "Cookie":"lang=zh-cn; theme=default; sid=ngr6ji5prpj85cmj7lncnccap7; "
- "UM_distinctid=169c4b016739f-069c297f9ff0e7-3a3a5d0c-100200-169c4b016752ec; "
- "CNZZDATA1254194234=2076602214-1553782570-%7C1553782570"
- }
- d= {
- "geetest_challenge":"af4536ec53cb7935a0326b1c4031f1a0jt",
- "geetest_validate":"49aec4801b8b9a125fa1473876b2f036",
- "geetest_seccode":"49aec4801b8b9a125fa1473876b2f036|jordan"
- }
- s = requests.session()
- r = s.post(url, headers=h, data=d, verify=False)
- result = r.json()
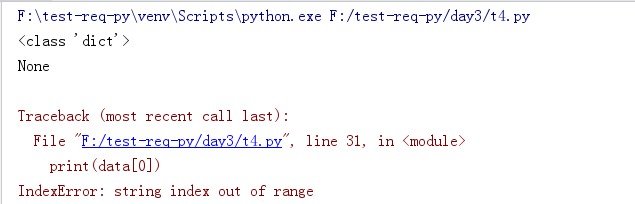
- print(type(result))
- print(result["company"])
- data = result["data"]
- print(data)
- print(data[0])
- get_result = data[0]['context']
- print(get_result)
- if u"签收" in get_result:
- print("快递单已签收成功")
- else:
- print("未签收")
运行后 print(result["company"]) 返回的结果为 None ,后面的返回错误:
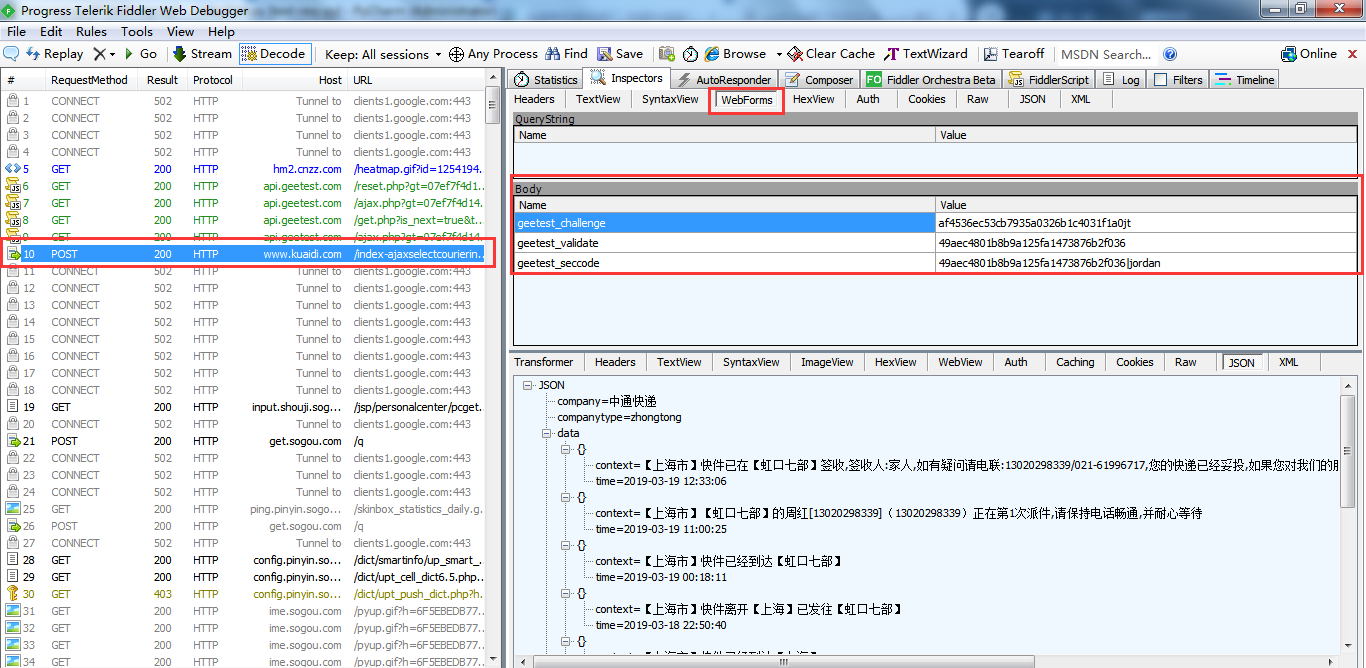
一 一排查没找到原因,直到在 fiddle 中用 Composer 发送请求后,查看返回后的结果才明白,具体如下:
1.用composer发送请求(将之前发送成功的请求拖至此处)
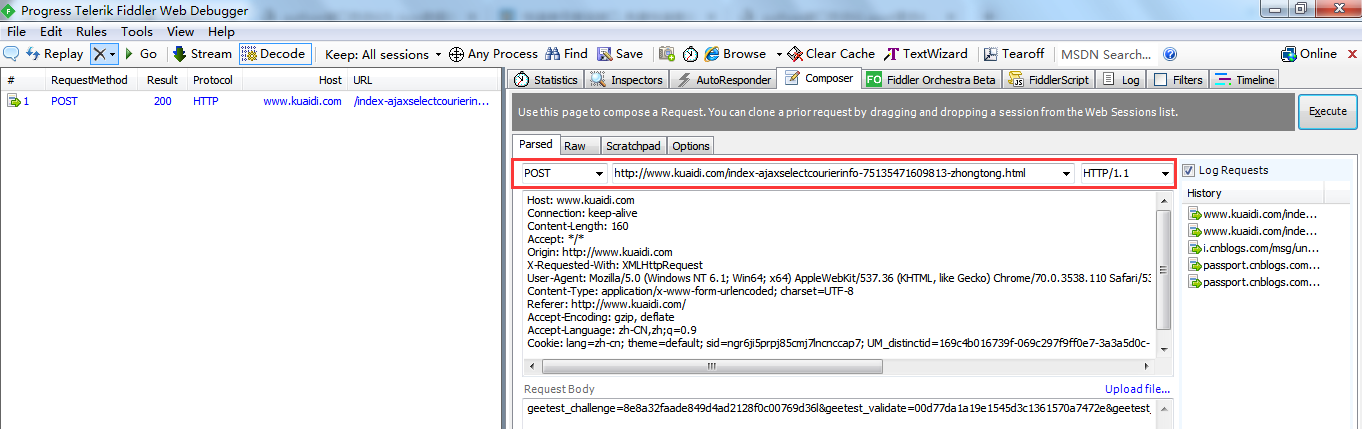
2.查看返回的结果
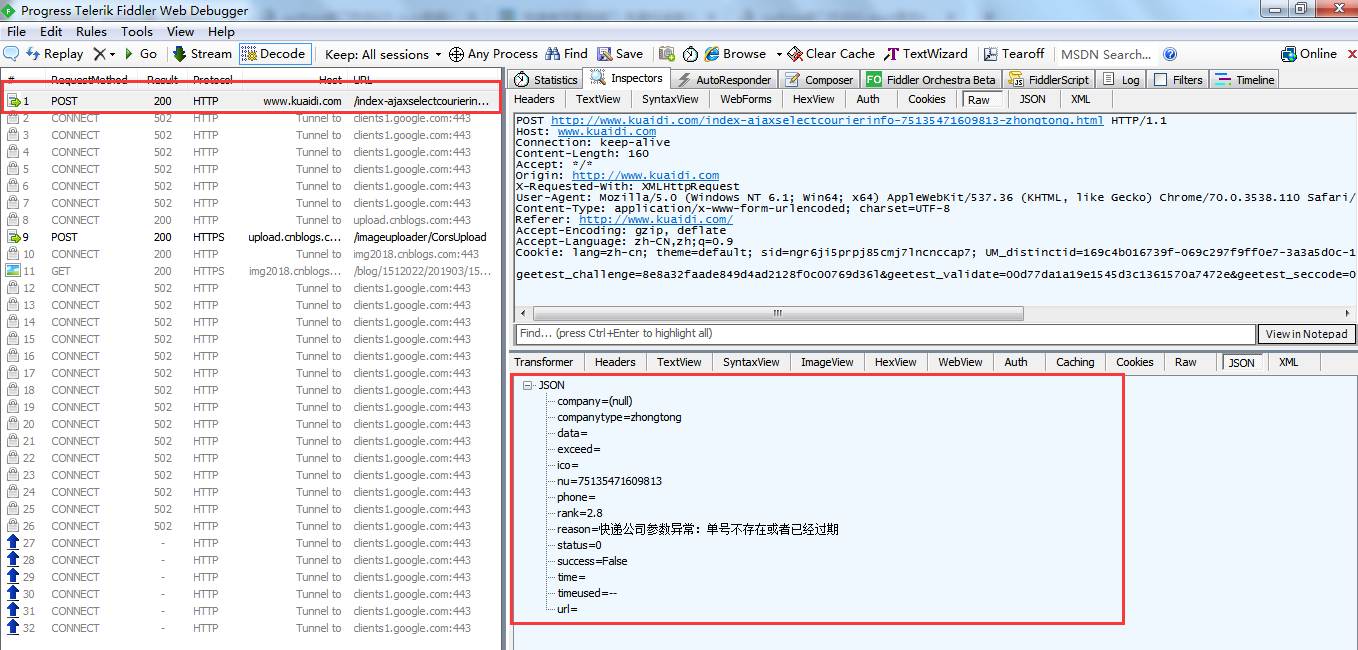
实际上这个接口在fiddler上都没有跑通,用如下代码验证:
- #coding:utf-8
- import requests
- import json
- # import urllib3
- # urllib3.disable_warnings()
- url = "http://www.kuaidi.com/index-ajaxselectcourierinfo-75135471609813-zhongtong.html"
- h = {
- "Connection": "keep-alive",
- "User-Agent": "Mozilla/5.0 (Windows NT 6.1; Win64; x64) "
- "AppleWebKit/537.36 (KHTML, like Gecko) "
- "Chrome/70.0.3538.110 Safari/537.36",
- "Content-Type":"application/x-www-form-urlencoded; charset=UTF-8",
- "Referer":"http://www.kuaidi.com/",
- "Cookie":"lang=zh-cn; theme=default; sid=ngr6ji5prpj85cmj7lncnccap7; "
- "UM_distinctid=169c4b016739f-069c297f9ff0e7-3a3a5d0c-100200-169c4b016752ec; "
- "CNZZDATA1254194234=2076602214-1553782570-%7C1553782570"
- }
- d= {
- "geetest_challenge":"af4536ec53cb7935a0326b1c4031f1a0jt",
- "geetest_validate":"49aec4801b8b9a125fa1473876b2f036",
- "geetest_seccode":"49aec4801b8b9a125fa1473876b2f036|jordan"
- }
- s = requests.session()
- r = s.post(url, headers=h, data=d, verify=False)
- result = r.json()
- print(type(result))
- print(result["company"])
- print(result["companytype"])
- print(result["reason"])
返回的结果如下:
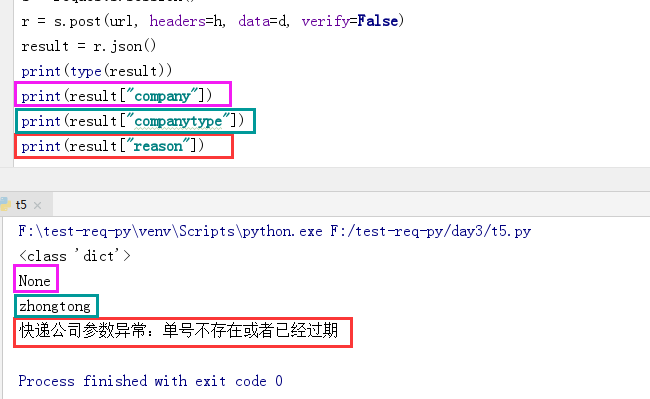
与 fiddler 返回的结果一致
所以是这个接口再次请求的时候就出现问题了,有兴趣可以再换一个近期的快递单号试试
本次实操收获:以后在做接口测试的时候尽量先在fiddler 的 Compser上请求一次,看下能不能先跑通,以免出现问题的时候花大量的时间来排查!!
python接口自动化-传 json 参数的更多相关文章
- python接口自动化读取json,yaml配置文件+封装requests+unittest+HTMLRunner实现全自动化
# coding=utf-8 import json import requests class TestApi(object): """ /* @param: @ses ...
- python接口自动化五(参数关联)
前言 我们用自动化发帖之后,要想接着对这篇帖子操作,那就需要用参数关联了,发帖之后会有一个帖子的id,获取到这个id,继续操作传这个帖子id就可以了 (博客园的登录机制已经变了,不能用账号和密码登录了 ...
- python接口自动化11-post传data参数案例
前言: 前面登录博客园的是传json参数,有些登录不是传json的,如jenkins的登录,本篇以jenkins登录为案例,传data参数. 一.登录jenkins抓包 1.登录jenkins,输入账 ...
- python接口自动化13-data和json参数傻傻分不清
前言 在发post请求的时候,有时候body部分要传data参数,有时候body部分又要传json参数,那么问题来了:到底什么时候该传json,什么时候该传data? 一.识别json参数 1.在前面 ...
- python接口自动化13-data和json参数傻傻分不清【转载】
转至博客:上海-悠悠 前言 在发post请求的时候,有时候body部分要传data参数,有时候body部分又要传json参数,那么问题来了:到底什么时候该传json,什么时候该传data? 一.识别j ...
- python接口自动化11-post传data参数案例【转载】
前言: 前面登录博客园的是传json参数,有些登录不是传json的,如jenkins的登录,本篇以jenkins登录为案例,传data参数. 一.登录jenkins抓包 1.登录jenkins,输入账 ...
- python接口自动化 -参数关联(一)
原文地址https://www.cnblogs.com/yoyoketang/p/6886610.html 原文地址https://www.cnblogs.com/yoyoketang/ 原文地址ht ...
- python接口自动化23-token参数关联登录(登录拉勾网)
前言 登录网站的时候,经常会遇到传token参数,token关联并不难,难的是找出服务器第一次返回token的值所在的位置,取出来后就可以动态关联了 登录拉勾网 1.先找到登录首页https://pa ...
- python+pytest接口自动化(6)-请求参数格式的确定
我们在做接口测试之前,先需要根据接口文档或抓包接口数据,搞清楚被测接口的详细内容,其中就包含请求参数的编码格式,从而使用对应的参数格式发送请求.例如某个接口规定的请求主体的编码方式为 applicat ...
随机推荐
- SQL2005打SP4补丁报错:无法安装Windows Installer MSP文件解决方案
错误如图: 解决方案分享如下: 第一步:卸载下图红框圈住的玩艺. 第二步:把SP4补丁文件解压,找到下图红框圈住的玩艺: 第三步:重新运行SP4补丁安装文件,安装正常.
- JVM 学习(二)Java 内存模型、方法内联、逃逸 --- 2019年4月
1.Java 的内存模型 定义了 happens-before,如果同一个线程中,字节码的先后顺序,后者观测了前者的运行结果,那么就会按顺序执行. Java 线程之间的通信由 Java 内存模型控制. ...
- [Abp vNext 源码分析] - 2. 模块系统的变化
一.简要说明 本篇文章主要分析 Abp vNext 当中的模块系统,从类型构造层面上来看,Abp vNext 当中不再只是单纯的通过 AbpModuleManager 来管理其他的模块,它现在则是 I ...
- Java集合详解1:ArrayList,Vector与Stack
今天我们来探索一下LinkedList和Queue,以及Stack的源码. 具体代码在我的GitHub中可以找到 https://github.com/h2pl/MyTech 喜欢的话麻烦star一下 ...
- JavaScript夯实基础系列(五):类
JavaScript中没有类,是通过使用构造函数和原型模式的组合来实现类似其它面向对象编程语言中"类"的功能.ES6引入的关键字class,形式上向其它面向对象编程语言靠拢,其 ...
- Python:鲜为人知的功能特性(上)
GitHub 上有一个名为<What the f*ck Python!>的项目,这个有趣的项目意在收集 Python 中那些难以理解和反人类直觉的例子以及鲜为人知的功能特性,并尝试讨论这些 ...
- C++ 3D物理引擎库BulletPhysics基本使用
前言:最近在接触OpenGl和DX11的时候,顺便学习了Bullet这个3D物理引擎的基本使用,记录一下. |BulletPhysics介绍 BulletPhysics是一个跨平台的开源物理引擎,也是 ...
- View的绘制流程
这是年假最后一篇笔记了,本篇文章的内容主要来自<android开发艺术探索>,在文章的最后有这本书的网上版本. 项目源码 目录 MeasureSpec SpecMode分类 UNSPECI ...
- Ambiguous HTTP method Actions require an explicit HttpMethod binding for Swagger 2.0
异常内容 NotSupportedException: Ambiguous HTTP method for action . Actions require an explicit HttpMetho ...
- Web项目也能一键打包Android、IOS
随着移动互联网的不断发展,智能手机配置的不断提高,越来越多的年轻人基本都在使用手机,如微信.支付宝等等.已基本成为一种习惯,坐电梯也好.吃饭也好.开车也好,基本都捧着一个手机在那按来按去,开车就不建议 ...