ng-book札记——依赖注入
依赖注入是一种使程序的一部分能够访问另一部分的系统,并且可以通过配置控制其行为。
“注入”可以理解为是“new”操作符的一种替代,不再需要使用编程语言所提供的"new"操作符,依赖注入系统管理对象的生成。
依赖注入的最大好处是组件不再需要知道如何建立依赖项。它们只需要知道如何与依赖项交互。
在Angular的依赖注入系统中,不用直接导入并创建类的实例,而是使用Angular注册依赖,然后描述如何注入依赖,最后注入依赖。
依赖注入组件
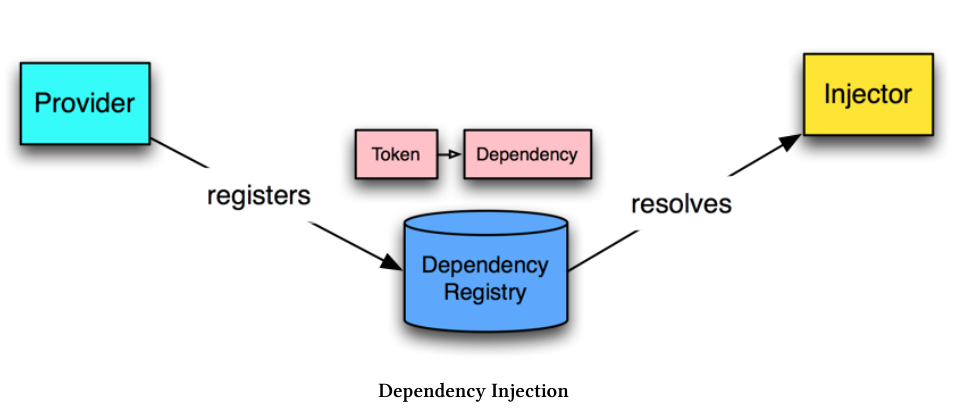
为了注册一个依赖项,需要使用依赖标记(token)与之绑定。比如,注册一个API的URL,可以使用字符串API_URL作为其标记;如果是注册一个类,可以用类本身作为标记。
Angular中的依赖注入系统分为三部分:
- 提供者(Provider)(也被作为一个绑定)映射一个标记到一系列的依赖项,其告知Angular如何创建一个对象并给予一个标记。
- 注入器(Injector)持有一系列绑定,并负责解析依赖项,且在创建对象的时候注入它们。
- 依赖项(Dependency)是所注入的对象。
依赖注入方式
手动方式
通过ReflectiveInjector的resolveAndCreate方法解析并创建对象,这种方式不常用。
import { Injectable } from '@angular/core';@Injectable()export class UserService {user: any;setUser(newUser) {this.user = newUser;}getUser(): any {return this.user;}}
import {Component,ReflectiveInjector} from '@angular/core';import { UserService } from '../services/user.service';@Component({selector: 'app-injector-demo',templateUrl: './user-demo.component.html',styleUrls: ['./user-demo.component.css']})export class UserDemoInjectorComponent {userName: string;userService: UserService;constructor() {// Create an _injector_ and ask for it to resolve and create a UserServiceconst injector: any = ReflectiveInjector.resolveAndCreate([UserService]);// use the injector to **get the instance** of the UserServicethis.userService = injector.get(UserService);}signIn(): void {// when we sign in, set the user// this mimics filling out a login formthis.userService.setUser({name: 'Nate Murray'});// now **read** the user name from the servicethis.userName = this.userService.getUser().name;console.log('User name is: ', this.userName);}}
* 注意UserService类上的@Injectable()装饰器,这说明了这个类是可以作为注入对象的。
NgModule方式
使用NgModule注册将要用到的依赖项(在providers中),并用装饰器(一般是构造器)指定哪些是正在使用的。
import { NgModule } from '@angular/core';import { CommonModule } from '@angular/common';// imported hereimport { UserService } from '../services/user.service';@NgModule({imports: [CommonModule],providers: [UserService // <-- added right here],declarations: []})export class UserDemoModule { }
import { Component, OnInit } from '@angular/core';import { UserService } from '../services/user.service';@Component({selector: 'app-user-demo',templateUrl: './user-demo.component.html',styleUrls: ['./user-demo.component.css']})export class UserDemoComponent {userName: string;// removed `userService` because of constructor shorthand below// Angular will inject the singleton instance of `UserService` here.// We set it as a property with `private`.constructor(private userService: UserService) {// empty because we don't have to do anything else!}// below is the same...signIn(): void {// when we sign in, set the user// this mimics filling out a login formthis.userService.setUser({name: 'Nate Murray'});// now **read** the user name from the servicethis.userName = this.userService.getUser().name;console.log('User name is: ', this.userName);}}
Providers
类标记
providers: [ UserService ]是以下方式的的简写:
providers: [{ provide: UserService, useClass: UserService }]
provide是标记,useClass是所依赖的对象。两者为映射关系。
值标记
providers: [{ provide: 'API_URL', useValue: 'http://my.api.com/v1' }]
使用时需要加上@Inject:
import { Inject } from '@angular/core';export class AnalyticsDemoComponent {constructor(@Inject('API_URL') apiUrl: string) {// works! do something w/ apiUrl}}
工厂方式
绑定依赖项时还可以通过工厂方式实现更复杂的绑定逻辑,并且这种方式下可以传入必要参数以创建所需的对象。
import { NgModule } from '@angular/core';import { CommonModule } from '@angular/common';import {Metric,AnalyticsImplementation} from './analytics-demo.interface';import { AnalyticsService } from '../services/analytics.service';// added this ->import {HttpModule,Http} from '@angular/http';@NgModule({imports: [CommonModule,HttpModule, // <-- added],providers: [// add our API_URL provider{ provide: 'API_URL', useValue: 'http://devserver.com' },{provide: AnalyticsService,// add our `deps` to specify the factory depenciesdeps: [ Http, 'API_URL' ],// notice we've added arguments here// the order matches the deps orderuseFactory(http: Http, apiUrl: string) {// create an implementation that will log the eventconst loggingImplementation: AnalyticsImplementation = {recordEvent: (metric: Metric): void => {console.log('The metric is:', metric);console.log('Sending to: ', apiUrl);// ... You'd send the metric using http here ...}};// create our new `AnalyticsService` with the implementationreturn new AnalyticsService(loggingImplementation);}},],declarations: [ ]})export class AnalyticsDemoModule { }
ng-book札记——依赖注入的更多相关文章
- ng 依赖注入
将依赖的对象注入到当前对象,直接去使用依赖的对象即可. 降低耦合度.提高开发速度.. 文件压缩:yui-compressor有两种方案:①CLI(command line interface)java ...
- ng依赖注入
依赖注入 1.注入器在组件的构造函数中写服务constructor(private httpreq:HttpService) { } 2.提供器 providers: [HttpService],
- angular路由 模块 依赖注入
1.模块 var helloModule=angular.module('helloAngular',[]); helloModule.controller('helloNgCrtl',['$scop ...
- AngularJS学习笔记之依赖注入
最近在看AngularJS权威指南,由于各种各样的原因(主要是因为我没有money,好讨厌的有木有......),于是我选择了网上下载电子版的(因为它不要钱,哈哈...),字体也蛮清晰的,总体效果还不 ...
- 4.了解AngularJS模块和依赖注入
1.模块和依赖注入概述 1.了解模块 AngularJS模块是一种容器,把代码隔离并组织成简洁,整齐,可复用的块. 模块本身不提供直接的功能:包含其他提供功能的对象的实例:控制器,过滤器,服务,动画 ...
- AngularJS——依赖注入
依赖注入 依赖注入(DI)是一个经典的设计模式, 主要是用来处理组件如何获得依赖的问题.关于DI,推荐阅读Martin Flower的文章(http://martinfowler.com/art ...
- AngularJS学习--- AngularJS中XHR(AJAX)和依赖注入(DI) step5
前言:本文接前一篇文章,主要介绍什么是XHR,AJAX,DI,angularjs中如何使用XHR和DI. 1.切换工具目录 git checkout -f step- #切换分支 npm start ...
- angular2 学习笔记 ( DI 依赖注入 )
refer : http://blog.thoughtram.io/angular/2016/09/15/angular-2-final-is-out.html ( search Dependency ...
- (五)Angularjs - 依赖注入
如何找到API? AngularJS提供了一些功能的封装,但是当你试图通过全局对象angular去 访问这些功能时,却发现与以往遇到的库大不相同. 比如,AngularJS暴露了一个全局对象:angu ...
随机推荐
- 一种dubbo逻辑路由方案(服务化隔离环境)
背景介绍 现在很多的公司都在用dubbo.springcloud做为服务化/微服务的开发框架,服务化之后应用越来越多,链路越来越长,服务环境的治理变的很困难.比如:研发团队的人很多的,同时有几个分支在 ...
- Cassanfra、Hbase和MongoDB的选取
HBase比较中庸些,适合各种场景: Cassandra适合读写分离的场景,写入场景使用Cassandra,比如插入操作日志,或领域事件日志的写入: 而MongoDB适合做读写分离场景中的读取场景. ...
- Apache 配置小技巧
1. 使 Apache 只能通过本地主机访问 1.1. 如果在开发环境中,你希望除了自己以外其他人都无法访问站点,你可以使用以下配置: 首先打开Apache的配置文件httdp.conf,此文件路径为 ...
- [LeetCode] Couples Holding Hands 两两握手
N couples sit in 2N seats arranged in a row and want to hold hands. We want to know the minimum numb ...
- [ Java学习基础 ] 浅析Java方法调用
先看一个示例,读者可先自行阅读判断输出结果: public class TestClass { private static void testMethod(){ System.out.printl ...
- ActiveMQ笔记:一个高稳定,可扩展的的部署方案
本文介绍一个笔者在实际工作中的实施的基于ActiveMQ的一个高稳定,可扩展的异步消息系统. ActiveMQ是一个成熟的基于Java语言的开源消息系统,在实际应用中被大量使用.ActiveMQ在系统 ...
- [Awson原创]网络(network)
Description Awson是某国际学校信竞组的一只菜鸡.学校为了使教育信息化,打算在学校内新建机房,并且为机房联网.但吝啬的学校又不想花费过多的开销,于是将规划 网络路线的任务交给了信竞组的A ...
- [SHOI2011]双倍回文
Description Input 输入分为两行,第一行为一个整数,表示字符串的长度,第二行有个连续的小写的英文字符,表示字符串的内容. Output 输出文件只有一行,即:输入数据中字符串的最长 ...
- 计蒜客NOIP模拟赛(2) D2T2紫色百合
[问题描述] “牵着你的手的是她,路边开满了紫色的百合花……” 你从梦中醒来,却依然忘不了梦中的她百合花,每朵百合花都有一个权值,在二进制下写成一行‘1’,第i朵紫色百合的权值在二进制下写成i个‘1’ ...
- 【bzoj4444 scoi2015】国旗计划
题目描述 A 国正在开展一项伟大的计划 —— 国旗计划.这项计划的内容是边防战士手举国旗环绕边境线奔袭一圈.这项计划需要多名边防战士以接力的形式共同完成,为此,国土安全局已经挑选了 NN 名优秀的边防 ...