springboot+mybatis+shiro——登录认证和权限控制
转载:https://z77z.oschina.io/
一、引入依赖
shiro-all包含shiro所有的包、shiro-core是核心包、shiro-web是与web整合、shiro-spring是与spring整合、shiro-ehcache是与EHCache整合、shiro-quartz是与任务调度quartz整合等等。
<dependency>

    <groupId>org.apache.shiro</groupId>

    <artifactId>shiro-core</artifactId>

    <version>1.2.2</version>

</dependency>

<dependency>

    <groupId>org.apache.shiro</groupId>

    <artifactId>shiro-web</artifactId>

    <version>1.2.2</version>

</dependency>

<dependency>

    <groupId>org.apache.shiro</groupId>

    <artifactId>shiro-ehcache</artifactId>

    <version>1.2.2</version>

</dependency>

<dependency>

    <groupId>org.apache.shiro</groupId>

    <artifactId>shiro-spring</artifactId>

    <version>1.2.2</version>

</dependency>
二、导入数据库
SET FOREIGN_KEY_CHECKS=0;

-- ----------------------------

-- Table structure for u_permission

-- ----------------------------

DROP TABLE IF EXISTS `u_permission`;

CREATE TABLE `u_permission` (

  `id` bigint(20) NOT NULL AUTO_INCREMENT,

  `url` varchar(256) DEFAULT NULL COMMENT 'url地址',

  `name` varchar(64) DEFAULT NULL COMMENT 'url描述',

  PRIMARY KEY (`id`)

) ENGINE=InnoDB AUTO_INCREMENT=4 DEFAULT CHARSET=utf8;

-- ----------------------------

-- Records of u_permission

-- ----------------------------

INSERT INTO `u_permission` VALUES ('', '/user/select', '用户查询');

INSERT INTO `u_permission` VALUES ('', '/admin/add', '管理员添加');

INSERT INTO `u_permission` VALUES ('', '/admin/delete', '管理员删除');

-- ----------------------------

-- Table structure for u_role

-- ----------------------------

DROP TABLE IF EXISTS `u_role`;

CREATE TABLE `u_role` (

  `id` bigint(20) NOT NULL AUTO_INCREMENT,

  `name` varchar(32) DEFAULT NULL COMMENT '角色名称',

  `type` varchar(10) DEFAULT NULL COMMENT '角色类型',

  PRIMARY KEY (`id`)

) ENGINE=InnoDB AUTO_INCREMENT=4 DEFAULT CHARSET=utf8;

-- ----------------------------

-- Records of u_role

-- ----------------------------

INSERT INTO `u_role` VALUES ('', 'admin', '');

INSERT INTO `u_role` VALUES ('', 'user', '');

INSERT INTO `u_role` VALUES ('', 'visitor', '');

-- ----------------------------

-- Table structure for u_role_permission

-- ----------------------------

DROP TABLE IF EXISTS `u_role_permission`;

CREATE TABLE `u_role_permission` (

  `rid` bigint(20) DEFAULT NULL COMMENT '角色ID',

  `pid` bigint(20) DEFAULT NULL COMMENT '权限ID'

) ENGINE=InnoDB DEFAULT CHARSET=utf8;

-- ----------------------------

-- Records of u_role_permission

-- ----------------------------

INSERT INTO `u_role_permission` VALUES ('', '');

INSERT INTO `u_role_permission` VALUES ('', '');

INSERT INTO `u_role_permission` VALUES ('', '');

-- ----------------------------

-- Table structure for u_user

-- ----------------------------

DROP TABLE IF EXISTS `u_user`;

CREATE TABLE `u_user` (

  `id` bigint(20) NOT NULL AUTO_INCREMENT,

  `nickname` varchar(20) DEFAULT NULL COMMENT '用户昵称',

  `email` varchar(128) DEFAULT NULL COMMENT '邮箱|登录帐号',

  `pswd` varchar(32) DEFAULT NULL COMMENT '密码',

  `create_time` datetime DEFAULT NULL COMMENT '创建时间',

  `last_login_time` datetime DEFAULT NULL COMMENT '最后登录时间',

  `status` bigint(1) DEFAULT '' COMMENT '1:有效,0:禁止登录',

  PRIMARY KEY (`id`)

) ENGINE=InnoDB AUTO_INCREMENT=3 DEFAULT CHARSET=utf8;

-- ----------------------------

-- Records of u_user

-- ----------------------------

INSERT INTO `u_user` VALUES ('', 'admin', null, '', '2017-05-10 20:22:59', null, '');

INSERT INTO `u_user` VALUES ('', 'user', null, '', null, null, '');

-- ----------------------------

-- Table structure for u_user_role

-- ----------------------------

DROP TABLE IF EXISTS `u_user_role`;

CREATE TABLE `u_user_role` (

  `uid` bigint(20) DEFAULT NULL COMMENT '用户ID',

  `rid` bigint(20) DEFAULT NULL COMMENT '角色ID'

) ENGINE=InnoDB DEFAULT CHARSET=utf8;

-- ----------------------------

-- Records of u_user_role

-- ----------------------------

INSERT INTO `u_user_role` VALUES ('', '');

INSERT INTO `u_user_role` VALUES ('', '');

SET FOREIGN_KEY_CHECKS=1;
三、Controller层
@RestController

public class AdminController {

     private static Logger logger = LoggerFactory.getLogger(AdminController.class);

    @Autowired

    private URoleDao uRoleDao;

    //跳转到登录表单页面

    @RequestMapping(value = "/login", method = RequestMethod.GET)

    public String login() {

        return "need login";

    }

    //登录成功后,跳转的页面

    @RequestMapping("/success")

    public String index(Model model) {

        return "success";

    }

    //未登录,可以访问的页面

    @RequestMapping("/index")

    public String list(Model model) {

        return "index";

    }

    //登陆验证,这里方便url测试,正式上线需要使用POST方式提交

    @RequestMapping(value = "/ajaxLogin", method = RequestMethod.GET)

    public String index(UUser user) {

        if (user.getNickname() != null && user.getPswd() != null) {

            UsernamePasswordToken token = new UsernamePasswordToken(user.getNickname(), user.getPswd(), "login");

            Subject currentUser = SecurityUtils.getSubject();

            logger.info("对用户[" + user.getNickname() + "]进行登录验证..验证开始");

            try {

                currentUser.login( token );

                //验证是否登录成功

                if (currentUser.isAuthenticated()) {

                    logger.info("用户[" + user.getNickname() + "]登录认证通过(这里可以进行一些认证通过后的一些系统参数初始化操作)");

                    System.out.println("用户[" + user.getNickname() + "]登录认证通过(这里可以进行一些认证通过后的一些系统参数初始化操作)");

                    return "redirect:/";

                } else {

                    token.clear();

                    System.out.println("用户[" + user.getNickname() + "]登录认证失败,重新登陆");

                    return "redirect:/login";

                }

            } catch ( UnknownAccountException uae ) {

                logger.info("对用户[" + user.getNickname() + "]进行登录验证..验证失败-username wasn't in the system");

            } catch ( IncorrectCredentialsException ice ) {

                logger.info("对用户[" + user.getNickname() + "]进行登录验证..验证失败-password didn't match");

            } catch ( LockedAccountException lae ) {

                logger.info("对用户[" + user.getNickname() + "]进行登录验证..验证失败-account is locked in the system");

            } catch ( AuthenticationException ae ) {

                logger.error(ae.getMessage());

            }

        }

        return "login";

    }

    /**

     * ajax登录请求接口方式登陆

     * @param username

     * @param password

     * @return

     */

    @RequestMapping(value="/ajaxLogin",method= RequestMethod.POST)

    @ResponseBody

    public Map<String,Object> submitLogin(@RequestParam(value = "nickname") String username, @RequestParam(value = "pswd") String password) {

        Map<String, Object> resultMap = new LinkedHashMap<String, Object>();

        try {

            UsernamePasswordToken token = new UsernamePasswordToken(username, password);

            SecurityUtils.getSubject().login(token);

            resultMap.put("status", 200);

            resultMap.put("message", "登录成功");

        } catch (Exception e) {

            resultMap.put("status", 500);

            resultMap.put("message", e.getMessage());

        }

        return resultMap;

    }

    //登出

    @RequestMapping(value = "/logout")

    public String logout(){

        return "logout";

    }

    //错误页面展示

    @GetMapping("/403")

    public String error(){

        return "error ok!";

    }

    //管理员功能

    @RequiresRoles("admin")

    @RequiresPermissions("管理员添加")

    @RequestMapping(value = "/admin/add")

    public String create(){

        return "add success!";

    }

    //用户功能

    @RequiresRoles("user")

    @RequiresPermissions("用户查询")

    @RequestMapping(value = "/user/select")

    public String detail(){

        return "select success";
  }
}
四、shiro配置
1.shiroConfiguration.java
@Configuration

public class ShiroConfiguration {

    /**

     * ShiroFilterFactoryBean 处理拦截资源文件问题。

     * 注意:单独一个ShiroFilterFactoryBean配置是或报错的,以为在

     * 初始化ShiroFilterFactoryBean的时候需要注入:SecurityManager

     *

     * Filter Chain定义说明 1、一个URL可以配置多个Filter,使用逗号分隔 2、当设置多个过滤器时,全部验证通过,才视为通过

     * 3、部分过滤器可指定参数,如perms,roles

     *

     */

    @Bean(name = "lifecycleBeanPostProcessor")

    public LifecycleBeanPostProcessor lifecycleBeanPostProcessor() {

        return new LifecycleBeanPostProcessor();

    }

    @Bean(name = "shiroRealm")

    @DependsOn("lifecycleBeanPostProcessor")

    public ShiroRealm shiroRealm() {

        ShiroRealm realm = new ShiroRealm();

        return realm;

    }

    @Bean(name = "ehCacheManager")

    @DependsOn("lifecycleBeanPostProcessor")

        public EhCacheManager ehCacheManager(){

        EhCacheManager ehCacheManager = new EhCacheManager();

        return ehCacheManager;

    }

    @Bean(name = "securityManager")

    public DefaultWebSecurityManager securityManager(){

        DefaultWebSecurityManager securityManager = new DefaultWebSecurityManager();

        securityManager.setRealm(shiroRealm());

        securityManager.setCacheManager(ehCacheManager());//用户授权/认证信息Cache, 采用EhCache 缓存

        return securityManager;

    }

    @Bean(name = "shiroFilter")

    public ShiroFilterFactoryBean shiroFilterFactoryBean(DefaultWebSecurityManager securityManager){

        ShiroFilterFactoryBean shiroFilterFactoryBean = new ShiroFilterFactoryBean();

        shiroFilterFactoryBean.setSecurityManager(securityManager);

        System.out.println(">>>>>>>>>>>>>>>>>>>>>>>>>>>>>>>>>>>>>>>>>>>>>>>>>>>>>>>>>>>>");

        // 过滤链定义,从上向下顺序执行,一般将 /**放在最为下边

        Map<String, String> filterChainDefinitionManager = new LinkedHashMap<String, String>();

        // 配置退出过滤器,其中的具体的退出代码Shiro已经替我们实现了

        filterChainDefinitionManager.put("/logout", "logout");

        // authc:所有url都必须认证通过才可以访问; anon:所有url都都可以匿名访问

        filterChainDefinitionManager.put("/user/**", "authc,roles[user]");

        filterChainDefinitionManager.put("/admin/**", "authc,roles[admin]");

        filterChainDefinitionManager.put("/login", "anon");

        filterChainDefinitionManager.put("/index", "anon");

        filterChainDefinitionManager.put("/ajaxLogin", "anon");

        filterChainDefinitionManager.put("/statistic/**",  "anon");

        filterChainDefinitionManager.put("/**",  "authc,roles[user]");//其他资源全部拦截

        shiroFilterFactoryBean.setFilterChainDefinitionMap(filterChainDefinitionManager);

        // 如果不设置默认会自动寻找Web工程根目录下的"/login.jsp"页面

        shiroFilterFactoryBean.setLoginUrl("/login");

        // 登录成功后要跳转的链接

        shiroFilterFactoryBean.setSuccessUrl("/success");

        // 未授权界面

        shiroFilterFactoryBean.setUnauthorizedUrl("/403");

        return shiroFilterFactoryBean;

    }

    @Bean

    @ConditionalOnMissingBean

    public DefaultAdvisorAutoProxyCreator defaultAdvisorAutoProxyCreator() {

        DefaultAdvisorAutoProxyCreator daap = new DefaultAdvisorAutoProxyCreator();

        daap.setProxyTargetClass(true);

        return daap;

    }

    @Bean

    public AuthorizationAttributeSourceAdvisor authorizationAttributeSourceAdvisor(DefaultWebSecurityManager securityManager) {

        AuthorizationAttributeSourceAdvisor aasa = new AuthorizationAttributeSourceAdvisor();

        aasa.setSecurityManager(securityManager);

        return aasa;

    }

}
2.shiroRealm.java
public class ShiroRealm extends AuthorizingRealm {

    private Logger logger = LoggerFactory.getLogger(ShiroRealm.class);

    //一般这里都写的是servic,这里省略直接调用dao

    @Autowired

    private UUserDao uUserDao;

    @Autowired

    private URoleDao uRoleDao;

    @Autowired

    private UPermissionDao uPermissionDao;

    /**

     * 登录认证

     * @param authenticationToken

     * @return

     * @throws AuthenticationException

     */

    @Override

    protected AuthenticationInfo doGetAuthenticationInfo(AuthenticationToken authenticationToken) throws AuthenticationException {

        UsernamePasswordToken token = (UsernamePasswordToken) authenticationToken;

        logger.info("验证当前Subject时获取到token为:" + token.toString());

        //查出是否有此用户

        String username = token.getUsername();

        UUser hasUser = uUserDao.selectAllByName(username);

        if (hasUser != null) {

            // 若存在,将此用户存放到登录认证info中,无需自己做密码对比,Shiro会为我们进行密码对比校验

            List<URole> rlist = uRoleDao.findRoleByUid(hasUser.getId());//获取用户角色

            List<UPermission> plist = uPermissionDao.findPermissionByUid(hasUser.getId());//获取用户权限

            List<String> roleStrlist=new ArrayList<String>();////用户的角色集合

            List<String> perminsStrlist=new ArrayList<String>();//用户的权限集合

            for (URole role : rlist) {

                roleStrlist.add(role.getName());

            }

            for (UPermission uPermission : plist) {

                perminsStrlist.add(uPermission.getName());

            }

            hasUser.setRoleStrlist(roleStrlist);

            hasUser.setPerminsStrlist(perminsStrlist);

         // 若存在,将此用户存放到登录认证info中,无需自己做密码对比,Shiro会为我们进行密码对比校验

            return new SimpleAuthenticationInfo(hasUser, hasUser.getPswd(), getName());

        }

        return null;

    }

    /**

     * 权限认证

     * @param principalCollection

     * @return

     */

    @Override

    protected AuthorizationInfo doGetAuthorizationInfo(PrincipalCollection principalCollection) {

        logger.info("##################执行Shiro权限认证##################");

        UUser user = (UUser) principalCollection.getPrimaryPrincipal();

        if (user != null) {

            //权限信息对象info,用来存放查出的用户的所有的角色(role)及权限(permission)

            SimpleAuthorizationInfo info = new SimpleAuthorizationInfo();

            //用户的角色集合

            info.addRoles(user.getRoleStrlist());

            //用户的权限集合

            info.addStringPermissions(user.getPerminsStrlist());

            return info;

        }

        // 返回null的话,就会导致任何用户访问被拦截的请求时,都会自动跳转到unauthorizedUrl指定的地址

        return null;

    }

}
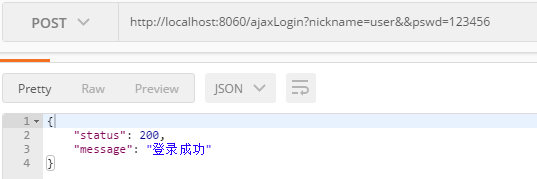
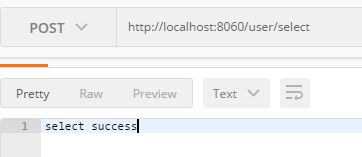
五、测试
1.登录

2.查询

springboot+mybatis+shiro——登录认证和权限控制的更多相关文章
- spring boot(十四)shiro登录认证与权限管理
这篇文章我们来学习如何使用Spring Boot集成Apache Shiro.安全应该是互联网公司的一道生命线,几乎任何的公司都会涉及到这方面的需求.在Java领域一般有Spring Security ...
- Shiro的认证和权限控制
权限控制的方式 从类别上分,有两大类: - 认证:你是谁?–识别用户身份. - 授权:你能做什么?–限制用户使用的功能. 权限的控制级别 从控制级别(模型)上分: - URL级别-粗粒度 - 方法级别 ...
- Spring Cloud之路:(七)SpringBoot+Shiro实现登录认证和权限管理
版权声明:本文为博主原创文章,未经博主允许不得转载. https://blog.csdn.net/sage_wang/article/details/79592269一.Shiro介绍1.Shiro是 ...
- shiro实现APP、web统一登录认证和权限管理
先说下背景,项目包含一个管理系统(web)和门户网站(web),还有一个手机APP(包括Android和IOS),三个系统共用一个后端,在后端使用shiro进行登录认证和权限控制.好的,那么问题来了w ...
- springboot(十四):springboot整合shiro-登录认证和权限管理
这篇文章我们来学习如何使用Spring Boot集成Apache Shiro.安全应该是互联网公司的一道生命线,几乎任何的公司都会涉及到这方面的需求.在Java领域一般有Spring Security ...
- Shiro+Mybatis实现登录认证、授权功能
Shiro+Mybatis实现登录认证.授权功能 一.实现登录认证功能 1.流程: 跟据用户提交表单的账号,经Mybatis框架在数据库中查出User对象: 如果User为空,则会抛出异常:Unkno ...
- spring-boot(八) springboot整合shiro-登录认证和权限管理
学习文章:springboot(十四):springboot整合shiro-登录认证和权限管理 Apache Shiro What is Apache Shiro? Apache Shiro是一个功能 ...
- springboot(十四):springboot整合shiro-登录认证和权限管理(转)
springboot(十四):springboot整合shiro-登录认证和权限管理 .embody{ padding:10px 10px 10px; margin:0 -20px; border-b ...
- Spring Boot 2.X(十八):集成 Spring Security-登录认证和权限控制
前言 在企业项目开发中,对系统的安全和权限控制往往是必需的,常见的安全框架有 Spring Security.Apache Shiro 等.本文主要简单介绍一下 Spring Security,再通过 ...
随机推荐
- Jquery+Aajax 批量上传
注:转载请标明文章原始出处及作者信息 网上有现成的Uploadify.WebUpload等插件,自己写一个简单的(非插件). 1.页面 批量上传页面 <form action="&qu ...
- Centos7 linux下 安装 Redis 5.0
网上找了很多文章,发现不全而且有些问题,安装很多次之后,总结一篇可以使用的,记录之. 环境:Centos7+Redis 5.0,如果环境不符合,本篇仅供参考. 1.准备工作 作者习惯软件安装包放在单独 ...
- Spring Cloud实战之初级入门(四)— 利用Hystrix实现服务熔断与服务监控
目录 1.环境介绍 2.服务监控 2.1 加入依赖 2.2 修改配置文件 2.3 修改启动文件 2.4 监控服务 2.5 小结 3. 利用hystrix实现消费服务熔断 3.1 加入服务熔断 3.2 ...
- C Primer Plus note2
warning: 'mmin' is used uninitialized in this function [-Wuninitialized]| 编译器出现如上图的警告,是因为变量‘mmin’没有初 ...
- FLASK实现上传下载功能
#!-*-coding=utf-8-*- # from flask import Flask # # app = Flask(__name__) # # # @app.route('/') # def ...
- asp.net 日期转换为大写汉字
//年份转换为大写汉字 public static string numtoUpper(int num) { return "零壹贰叁肆伍陆柒捌玖"[num].ToString() ...
- python 中 \n 和转义r的作用和\r的实际应用
我们先看看这张转义字符图: 1. 知识储备 \r 表示将光标的位置回退到本行的开头位置 \b 表示将光标的位置回退一位 在 python 语言中, 使用 print 打印输出时,默认是会进行换行的.如 ...
- Spring Boot Async异步执行
异步调用就是不用等待结果的返回就执行后面的逻辑,同步调用则需要等带结果再执行后面的逻辑. 通常我们使用异步操作都会去创建一个线程执行一段逻辑,然后把这个线程丢到线程池中去执行,代码如下: Execut ...
- 旋转数组的最小数字(C++ 和 Python 实现)
(说明:本博客中的题目.题目详细说明及参考代码均摘自 “何海涛<剑指Offer:名企面试官精讲典型编程题>2012年”) 题目 把一个数组最开始的若干个元素搬到数组的末尾,我们称之为数组的 ...
- viirtualBox显示不了Ip并且无法上网的解决方式
首先描述下我自己遇到的问题:就是在virtualBox下的ubuntu系统下,输入ifconfig,没有显示出ip,显示出了eth3,lo的相关信息.在网上也找了相关信息还是无法解决,终于在老大的 ...
