Spring02:注解IOC、DBUtils单表CRUD、与Junit整合
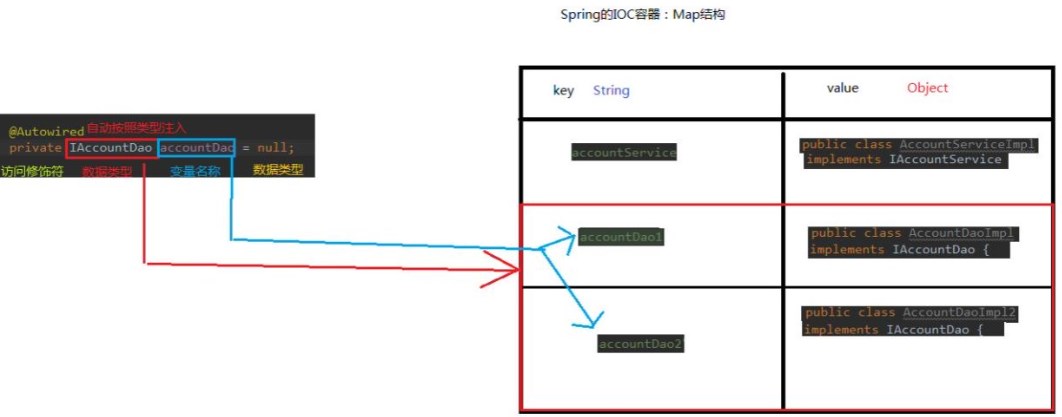
- Spring中IOC的常用注解
- 案例-使用xml方式和注解方式实现单表的CRUD操作
- 持久层技术选型:DBUtils
- 改造基于注解的IOC案例,使用纯注解的方式实现
- Spring新注解的使用
- Spring和Junit的整合
<?xml version="1.0" encoding="UTF-8"?>

<beans xmlns="http://www.springframework.org/schema/beans"

       xmlns:xsi="http://www.w3.org/2001/XMLSchema-instance"

       xmlns:context="http://www.springframework.org/schema/context"

       xsi:schemaLocation="http://www.springframework.org/schema/beans

        http://www.springframework.org/schema/beans/spring-beans.xsd

        http://www.springframework.org/schema/context

        http://www.springframework.org/schema/context/spring-context.xsd">

    <!--通过配置告知Spring在创建容器时要扫描的包,配置所需要的标签不是在beans的约束中,而是一个名称为Context的名称空间和约束中-->

    <context:component-scan base-package="com.itheima"></context:component-scan>

</beans>
package com.itheima.service.impl;
import com.itheima.dao.IAccountDao;
import com.itheima.dao.impl.AccountDaoImpl;
import com.itheima.service.IAccountService;
import org.springframework.stereotype.Component;
/**
* 账户的业务层实现类
*
* 曾经的xml配置
* <bean id="accountService" class="com.itheima.service.impl.AccountServiceImpl"
* scope="" init-method="" destroy-method="">
* <property name = "" value="" ref=""></property>
* </bean>
*
* 注解分为四类:
* 用于创建对象的
* 作用与xml配置文件中编写一个bean标签<bean></bean>实现的功能相同
* @Component
* 作用:用于把当前类对象存入Spring容器中
* 属性:
* value:用于指定bean的id,当我们不写时,它的默认值是当前类名,且首字母改小写
*/
@Component(value="accountService")
public class AccountServiceImpl implements IAccountService {
private IAccountDao accountDao = null;
public AccountServiceImpl(){
System.out.println("service对象创建了");
}
public void saveAccount() {
accountDao.saveAccount();
}
}public class Client {
public static void main(String[] args) {
//1.获取核心容器对象
ApplicationContext ac = new ClassPathXmlApplicationContext("bean.xml");
//2.根据id获取bean对象---两种方式
IAccountService as = (IAccountService) ac.getBean("accountService");
System.out.println(as);
}
}package com.itheima.dao.impl;
import com.itheima.dao.IAccountDao;
import org.springframework.stereotype.Repository;
@Repository("accountDao")
public class AccountDaoImpl implements IAccountDao {
/**
* 账户的持久层实现类
*/
@Override
public void saveAccount() {
System.out.println("保存了账户");
}
}public class Client {
/**
* 获取Spring的IOC核心容器,并根据id获取对象
* @param args
*/
public static void main(String[] args) {
//1.获取核心容器对象
ApplicationContext ac = new ClassPathXmlApplicationContext("bean.xml");
//2.根据id获取bean对象---两种方式
IAccountService as = (IAccountService) ac.getBean("accountService");
System.out.println(as);
IAccountDao adao = ac.getBean("accountDao",IAccountDao.class);
System.out.println(adao);
}
}
package com.itheima.service.impl;

import com.itheima.dao.IAccountDao;

import com.itheima.dao.impl.AccountDaoImpl;

import com.itheima.service.IAccountService;

import org.springframework.beans.factory.annotation.Autowired;

import org.springframework.beans.factory.annotation.Qualifier;

import org.springframework.context.annotation.ImportResource;

import org.springframework.stereotype.Component;

import org.springframework.stereotype.Service;

/**

 * 账户的业务层实现类

 *

 * 注解分为四类:

 *      用于注入数据的

 *          作用和xml配置文件中的bean标签写一个property标签的作用相同

 *             @Autowired

 *              作用:自动按照类型注入。只要容器中有唯一的一个bean对象类型和要注入的变量类型匹配,就可以注入成功

 *                   如果ioc容器中没有任何bean类型和要注入的变量类型匹配,则注入失败

 *                   如果ioc容器中有多个类型匹配时:

 *              位置:可以是变量上,也可以是方法上

 *              细节:在使用注解注入时,set方法就不是必须的了

 *             @Qualifier:

 *              作用:在按照类中注入的基础之上再按照名称注入。它在给类成员注入时不能注入使用

 *                    但是在给方法参数注入时可以(稍后讲)

 *               属性:

 *                  value:用于指定注入bean的id

 *             @Resource

 *               作用:直接按照bean的id注入,可以独立使用

 *               属性:

 *                  name:用于指定bean的id

 *             以上三个注入都只能注入其他bean类型的数据,而基本类型和String类型无法使用上述注解实现

 *             另外:集合类型的注入只能通过xml实现

 *             @Value

 *                作用:用于注入基本类型和String类型的数据

 *                属性:

 *                  value:用于指定数据的值,它可以使用spring中的spel(也就是spring的el表达式)

 *                         SpEL的写法:${表达式}

 */

@Service(value="accountService")

public class AccountServiceImpl implements IAccountService {

    @Autowired

    @Qualifier("accountDao1")

    //@Resource(name="accountDao2")

    private IAccountDao accountDao = null;

    public void saveAccount() {

        accountDao.saveAccount();

    }

}package com.itheima.service.impl;
/**
* 账户的业务层实现类
*
* 注解分为四类:
* 用于改变作用范围的
* 作用和在bean标签中使用scope属性实现的功能相同
* Scope
* 作用:用于指定bean的作用范围
* 属性:
* value:指定范围的取值。常用取值:singleton prototype,默认单例singleton
* 和生命周期相关的【了解】
* 作用和在bean标签中使用init-method和destroy-method作用相同
* PreDestroy
* 作用:用于指定销毁方法
* PostConstruct
* 作用:用于指定初始化方法
*/
@Service(value="accountService")
//@Scope("single")
public class AccountServiceImpl implements IAccountService {
//@Autowired
//@Qualifier("accountDao1")
@Resource(name="accountDao2")
private IAccountDao accountDao = null;
@PostConstruct
public void init() {
System.out.println("初始化方法执行了");
}
@PreDestroy
public void destroy() {
System.out.println("销毁方法执行了");
}
public void saveAccount() {
accountDao.saveAccount();
}
}package com.itheima.ui;
import com.itheima.dao.IAccountDao;
import com.itheima.service.IAccountService;
import com.itheima.service.impl.AccountServiceImpl;
import org.springframework.beans.factory.BeanFactory;
import org.springframework.beans.factory.xml.XmlBeanFactory;
import org.springframework.context.ApplicationContext;
import org.springframework.context.support.ClassPathXmlApplicationContext;
import org.springframework.core.io.ClassPathResource;
import org.springframework.core.io.Resource;
/**
*
*/
public class Client {
/**
* 获取Spring的IOC核心容器,并根据id获取对象
* Application的三个常用实现类
* ClassPathXmlApplicationContext:可以加载类路径下的配置文件,要求配置文件必须在类路径下,不在的加载不了
* FileSystemApplicationContext:可以加载磁盘任意路径下的配置文件(必须有访问权限)
* AnnotationConfigApplicationContext:是用于读取注解创建容器的,为明天的内容
* @param args
*/
public static void main(String[] args) {
//1.获取核心容器对象
ClassPathXmlApplicationContext ac = new ClassPathXmlApplicationContext("bean.xml");
//2.根据id获取bean对象---两种方式
IAccountService as = (IAccountService) ac.getBean("accountService");
IAccountService as2 = (IAccountService) ac.getBean("accountService");
/*System.out.println(as);
IAccountDao adao = ac.getBean("accountDao",IAccountDao.class);
System.out.println(adao);*/
//System.out.println(as==as2);
as.saveAccount();
ac.close();
}
}package com.itheima.dao.impl;
import com.itheima.dao.IAccountDao;
import com.itheima.domain.Account;
import org.apache.commons.dbutils.QueryRunner;
import org.apache.commons.dbutils.handlers.BeanHandler;
import org.apache.commons.dbutils.handlers.BeanListHandler;
import java.sql.SQLException;
import java.util.List;
/**
* 账户的持久层实现类
*/
public class AccountDaoImpl implements IAccountDao {
private QueryRunner runner;
public void setRunner(QueryRunner runner) {
this.runner = runner;
}
@Override
public List<Account> findAllAccount() {
try {
return runner.query("select * from account", new BeanListHandler<Account>(Account.class));
} catch (Exception e) {
throw new RuntimeException(e);//相当于return
}
}
@Override
public Account findAccountById(Integer accountId) {
try {
return runner.query("select * from account where id = ?", new BeanHandler<Account>(Account.class),accountId);
} catch (Exception e) {
throw new RuntimeException(e);//相当于return
}
}
@Override
public void saveAccount(Account account) {
try {
runner.update("insert into account(name,money) values(?,?)",account.getName(),account.getMoney());
} catch (Exception e) {
throw new RuntimeException(e);//相当于return
}
}
@Override
public void updateAccount(Account account) {
try {
runner.update("update account set name=?,money=? where id = ?",account.getName(),account.getMoney(),account.getId());
} catch (Exception e) {
throw new RuntimeException(e);//相当于return
}
}
@Override
public void deleteAccount(Integer accountId) {
try {
runner.update("delete from account where id = ?",accountId);
} catch (Exception e) {
throw new RuntimeException(e);//相当于return
}
}
}<?xml version="1.0" encoding="UTF-8"?>
<beans xmlns="http://www.springframework.org/schema/beans"
xmlns:xsi="http://www.w3.org/2001/XMLSchema-instance"
xsi:schemaLocation="http://www.springframework.org/schema/beans
http://www.springframework.org/schema/beans/spring-beans.xsd">
<!-- 配置Service -->
<bean id="accountService" class="com.itheima.service.impl.AccountServiceImpl">
<!-- 注入dao对象 -->
<property name="accountDao" ref="accountDao"></property>
</bean>
<!--配置dao对象-->
<bean id="accountDao" class="com.itheima.dao.impl.AccountDaoImpl">
<!--注入QueryRunner-->
<property name="runner" ref="runner"></property>
</bean>
<!--配置QueryRunner对象-->
<bean id="runner" class="org.apache.commons.dbutils.QueryRunner" scope="prototype">
<!--注入数据源-->
<constructor-arg name="ds" ref="dataSource"></constructor-arg>
</bean>
<!--配置数据源-->
<bean id="dataSource" class="com.mchange.v2.c3p0.ComboPooledDataSource">
<!--连接数据库的必备信息-->
<property name="driverClass" value="com.mysql.jdbc.Driver"></property>
<property name="jdbcUrl" value="jdbc:mysql://localhost:3306/eesy"></property>
<property name="user" value="root"></property>
<property name="password" value="root"></property>
</bean>
</beans>package com.itheima.test;
import com.itheima.domain.Account;
import com.itheima.service.IAccountService;
import org.junit.Test;
import org.springframework.context.ApplicationContext;
import org.springframework.context.support.ClassPathXmlApplicationContext;
import java.util.List;
/**
* 使用Junit单元测试:测试我们的配置
*/
public class AccountServiceTest {
@Test
public void testFindAll() {
//1.获取容器
ApplicationContext ac = new ClassPathXmlApplicationContext("bean.xml");
//2.得到业务层对象
IAccountService as = ac.getBean("accountService",IAccountService.class);
//2.执行方法
List<Account> accounts = as.findAllAccount();
for (Account account : accounts) {
System.out.println(account);
}
}
@Test
public void testFindOne() {
//1.获取容器
ApplicationContext ac = new ClassPathXmlApplicationContext("bean.xml");
//2.得到业务层对象
IAccountService as = ac.getBean("accountService",IAccountService.class);
//2.执行方法
Account account = as.findAccountById(1);
System.out.println(account);
}
@Test
public void testSave() {
Account account = new Account();
account.setName("johann");
account.setMoney(500.0f);
//1.获取容器
ApplicationContext ac = new ClassPathXmlApplicationContext("bean.xml");
//2.得到业务层对象
IAccountService as = ac.getBean("accountService",IAccountService.class);
//2.执行方法
as.saveAccount(account);
}
@Test
public void testUpdate() {
//1.获取容器
ApplicationContext ac = new ClassPathXmlApplicationContext("bean.xml");
//2.得到业务层对象
IAccountService as = ac.getBean("accountService",IAccountService.class);
//2.执行方法
Account account = as.findAccountById(1);
account.setMoney(256f);
as.updateAccount(account);
}
@Test
public void testDelete() {
//1.获取容器
ApplicationContext ac = new ClassPathXmlApplicationContext("bean.xml");
//2.得到业务层对象
IAccountService as = ac.getBean("accountService",IAccountService.class);
//2.执行方法
as.deleteAccount(4);
}
}<?xml version="1.0" encoding="UTF-8"?>
<beans xmlns="http://www.springframework.org/schema/beans"
xmlns:xsi="http://www.w3.org/2001/XMLSchema-instance"
xmlns:context="http://www.springframework.org/schema/context"
xsi:schemaLocation="http://www.springframework.org/schema/beans
http://www.springframework.org/schema/beans/spring-beans.xsd
http://www.springframework.org/schema/context
http://www.springframework.org/schema/context/spring-context.xsd">
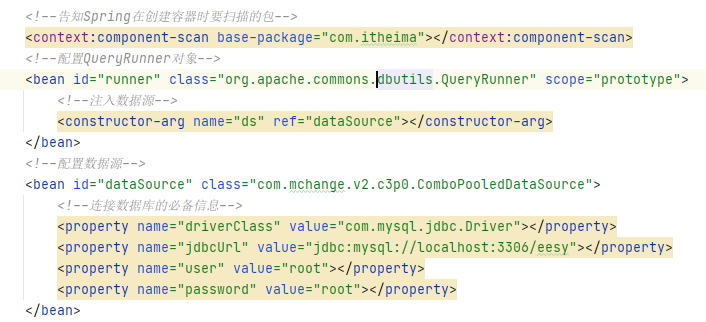
<!--告知Spring在创建容器时要扫描的包-->
<context:component-scan base-package="com.itheima"></context:component-scan>
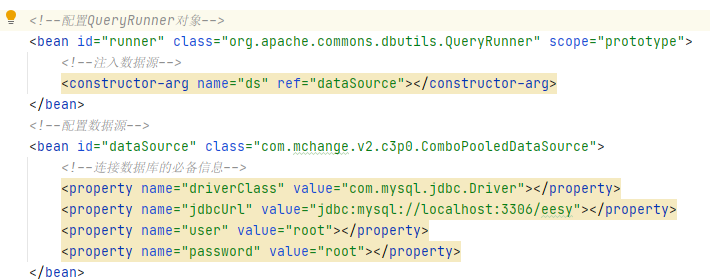
<!--配置QueryRunner对象-->
<bean id="runner" class="org.apache.commons.dbutils.QueryRunner" scope="prototype">
<!--注入数据源-->
<constructor-arg name="ds" ref="dataSource"></constructor-arg>
</bean>
<!--配置数据源-->
<bean id="dataSource" class="com.mchange.v2.c3p0.ComboPooledDataSource">
<!--连接数据库的必备信息-->
<property name="driverClass" value="com.mysql.jdbc.Driver"></property>
<property name="jdbcUrl" value="jdbc:mysql://localhost:3306/eesy"></property>
<property name="user" value="root"></property>
<property name="password" value="root"></property>
</bean>
</beans>/**
* 账户的业务层实现类
*/
@Service("accountService")
public class AccountServiceImpl implements IAccountService {
//唯一的对象在容器中,使用autowired实现自动注入
@Autowired
private IAccountDao accountDao;
@Override
public List<Account> findAllAccount() {
return accountDao.findAllAccount();
}/**
* 账户的持久层实现类
*/
@Repository("accountDao")
public class AccountDaoImpl implements IAccountDao {
@Autowired
private QueryRunner runner;
- 测试类中存在的重复代码
- 非自定义类中QueryRunner无法注入
- 创建容器扫描包
package config;

import org.springframework.context.annotation.ComponentScan;

import org.springframework.context.annotation.Configuration;

/**

 * 该类是一个配置类,其作用和bean.xml作用相同

 * Spring中的新注解

 * Configuration

 *      作用:指定当前类是是一个配置类

 * ComponentScan

 *      作用:用于通过注解指定spring在创建容器时要扫描的包

 *      value属性和basePackages的作用相同,都是用于指定创建容器时要扫描的包

 *           我们使用此注解就等同于在xml中配置了

 * <context:component-scan base-package="com.itheima"></context:component-scan>

 *

 */

@Configuration

@ComponentScan(basePackages = "com.itheima")//类路径,内容是一个数组,可以写{xxx,xxx}或xxx

public class SpringConfiguration {

}

package config;

import com.mchange.v2.c3p0.ComboPooledDataSource;

import org.apache.commons.dbutils.QueryRunner;

import org.springframework.context.annotation.Bean;

import org.springframework.context.annotation.ComponentScan;

import org.springframework.context.annotation.Configuration;

import javax.sql.DataSource;

import java.beans.PropertyVetoException;

/**

 * 该类是一个配置类,其作用和bean.xml作用相同

 * Spring中的新注解

 * Configuration

 *      作用:指定当前类是是一个配置类

 * ComponentScan

 *      作用:用于通过注解指定spring在创建容器时要扫描的包

 *      value属性和basePackages的作用相同,都是用于指定创建容器时要扫描的包

 *           我们使用此注解就等同于在xml中配置了

 * <context:component-scan base-package="com.itheima"></context:component-scan>

 * Bean

 *      作用:用于把当前方法的返回值作为bean对象存入spring的IOC容器中

 *      属性:

 *          name:用于指定bean的id,当不写时默认值是当前方法的名称

 *      细节:

 *          当使用注解配置方法时,如果方法有参数,spring框架会去容器中查找有没有可用的bean对象

 *          查找的方式和AutoWired是一样的,查找类型匹配,一个 ,没有,多个

 *

 *     <bean id="dataSource" class="com.mchange.v2.c3p0.ComboPooledDataSource">

 *         <property name="driverClass" value="com.mysql.jdbc.Driver"></property>

 *         <property name="jdbcUrl" value="jdbc:mysql://localhost:3306/eesy"></property>

 *         <property name="user" value="root"></property>

 *         <property name="password" value="root"></property>

 *     </bean>

 */

@Configuration

@ComponentScan(basePackages = "com.itheima")//类路径,内容是一个数组,可以写{xxx,xxx}或xxx

public class SpringConfiguration {

    /**

     * 用于创建一个QueryRunner对象

     * @param dataSource

     * @return

     */

    @Bean(name="runner")//相当于bean的id

    public QueryRunner createQueryRunner(DataSource dataSource){

        return new QueryRunner(dataSource);

    }

    /**

     * 创建数据源 对象

     */

    @Bean(name="dataSource")

    public DataSource createDataSource(){

        try {

            ComboPooledDataSource ds = new ComboPooledDataSource();

            ds.setDriverClass("");

            ds.setJdbcUrl("");

            ds.setUser("");

            ds.setPassword("");

            return ds;

        } catch (Exception e) {

            throw new RuntimeException(e);

        }

    }

}

package com.itheima.test;

import com.itheima.domain.Account;

import com.itheima.service.IAccountService;

import config.SpringConfiguration;

import org.junit.Test;

import org.springframework.context.ApplicationContext;

import org.springframework.context.annotation.AnnotationConfigApplicationContext;

import org.springframework.context.support.ClassPathXmlApplicationContext;

import java.util.List;

/**

 * 使用Junit单元测试:测试我们的配置

 */

public class AccountServiceTest {

    @Test

    public void testFindAll() {

        //1.获取容器

        //ApplicationContext ac = new ClassPathXmlApplicationContext("bean.xml");

        ApplicationContext ac = new AnnotationConfigApplicationContext(SpringConfiguration.class);

        //2.得到业务层对象

        IAccountService as = ac.getBean("accountService",IAccountService.class);

        //2.执行方法

        List<Account> accounts = as.findAllAccount();

        for (Account account : accounts) {

            System.out.println(account);

        }

    }

    @Test

    public void testFindOne() {

        //1.获取容器

        ApplicationContext ac = new AnnotationConfigApplicationContext(SpringConfiguration.class);

        //2.得到业务层对象

        IAccountService as = ac.getBean("accountService",IAccountService.class);

        //2.执行方法

        Account account = as.findAccountById(1);

        System.out.println(account);

    }

    @Test

    public void testSave() {

        Account account = new Account();

        account.setName("johann");

        account.setMoney(500.0f);

        //1.获取容器

        ApplicationContext ac = new AnnotationConfigApplicationContext(SpringConfiguration.class);

        //2.得到业务层对象

        IAccountService as = ac.getBean("accountService",IAccountService.class);

        //2.执行方法

        as.saveAccount(account);

    }

    @Test

    public void testUpdate() {

        //1.获取容器

        ApplicationContext ac = new AnnotationConfigApplicationContext(SpringConfiguration.class);

        //2.得到业务层对象

        IAccountService as = ac.getBean("accountService",IAccountService.class);

        //2.执行方法

        Account account = as.findAccountById(1);

        account.setMoney(256f);

        as.updateAccount(account);

    }

    @Test

    public void testDelete() {

        //1.获取容器

        ApplicationContext ac = new AnnotationConfigApplicationContext(SpringConfiguration.class);

        //2.得到业务层对象

        IAccountService as = ac.getBean("accountService",IAccountService.class);

        //2.执行方法

        as.deleteAccount(4);

    }

}package config;
import com.mchange.v2.c3p0.ComboPooledDataSource;
import org.apache.commons.dbutils.QueryRunner;
import org.springframework.context.annotation.*;
import javax.sql.DataSource;
import java.beans.PropertyVetoException;
/**
* Import
* 作用:用于导入其他的配置类
* 属性:
* value:用于指定其他配置类的字节码
* 当使用import注解之后,有import注解的类就是父配置类,而导入的都是子配置类
*
*
*/
//@Configuration
@ComponentScan({"com.itheima"})//类路径,内容是一个数组,可以写{xxx,xxx}或xxx
@Import(JdbcConfig.class)
public class SpringConfiguration {
//期望是公共配置,而不是只配置连接数据库的
}package config;
import com.mchange.v2.c3p0.ComboPooledDataSource;
import org.apache.commons.dbutils.QueryRunner;
import org.springframework.context.annotation.Bean;
import org.springframework.context.annotation.Configuration;
import org.springframework.context.annotation.Scope;
import javax.sql.DataSource;
/**
* 和Spring连接数据库相关的配置类
*/
//@Configuration
public class JdbcConfig {
/**
* 用于创建一个QueryRunner对象
* @param dataSource
* @return
*/
@Bean(name="runner")//相当于bean的id
@Scope("prototype")
public QueryRunner createQueryRunner(DataSource dataSource){
return new QueryRunner(dataSource);
}
/**
* 创建数据源 对象
*/
@Bean(name="dataSource")
@Scope("prototype")
public DataSource createDataSource(){
try {
ComboPooledDataSource ds = new ComboPooledDataSource();
ds.setDriverClass("com.mysql.jdbc.Driver");
ds.setJdbcUrl("jdbc:mysql://localhost:3306/eesy");
ds.setUser("root");
ds.setPassword("root");
return ds;
} catch (Exception e) {
throw new RuntimeException(e);
}
}
}public class AccountServiceTest {
@Test
public void testFindAll() {
//1.获取容器
//ApplicationContext ac = new ClassPathXmlApplicationContext("bean.xml");
ApplicationContext ac = new AnnotationConfigApplicationContext(SpringConfiguration.class);
//ApplicationContext ac = new AnnotationConfigApplicationContext(SpringConfiguration.
// class,JdbcConfig.class);可以不写Configuration注解
//成为并列关系,不希望写这么多class
//需要加注解和扫描的包
//2.得到业务层对象
IAccountService as = ac.getBean("accountService",IAccountService.class);
//2.执行方法
List<Account> accounts = as.findAllAccount();
for (Account account : accounts) {
System.out.println(account);
}
}package config;
import com.mchange.v2.c3p0.ComboPooledDataSource;
import org.apache.commons.dbutils.QueryRunner;
import org.springframework.context.annotation.*;
import javax.sql.DataSource;
import java.beans.PropertyVetoException;
/**
* PropertySource
* 作用:用于导入其他的配置类
* 属性:
* value:指定文件的名称和路径
* 关键字:classpath表示类路径下
* 有包:config/itheima/xxx
*
*/
//@Configuration
@ComponentScan({"com.itheima"})//类路径,内容是一个数组,可以写{xxx,xxx}或xxx
@Import(JdbcConfig.class)
@PropertySource("classpath:jdbcConfig.properties")
public class SpringConfiguration {
//期望是公共配置,而不是只配置连接数据库的
}package config;
import com.mchange.v2.c3p0.ComboPooledDataSource;
import org.apache.commons.dbutils.QueryRunner;
import org.springframework.beans.factory.annotation.Value;
import org.springframework.context.annotation.Bean;
import org.springframework.context.annotation.Configuration;
import org.springframework.context.annotation.Scope;
import javax.sql.DataSource;
/**
* 和Spring连接数据库相关的配置类
*/
//@Configuration
public class JdbcConfig {
@Value("${jdbc.driver}")
private String driver;
@Value("${jdbc.url}")
private String url;
@Value("${jdbc.username}")
private String username;
@Value("${jdbc.password}")
private String password;
/**
* 用于创建一个QueryRunner对象
* @param dataSource
* @return
*/
@Bean(name="runner")//相当于bean的id
@Scope("prototype")
public QueryRunner createQueryRunner(DataSource dataSource){
return new QueryRunner(dataSource);
}
/**
* 创建数据源 对象
*/
@Bean(name="dataSource")
@Scope("prototype")
public DataSource createDataSource(){
try {
//希望读取配置文件
ComboPooledDataSource ds = new ComboPooledDataSource();
ds.setDriverClass(driver);
ds.setJdbcUrl(url);
ds.setUser(username);
ds.setPassword(password);
return ds;
} catch (Exception e) {
throw new RuntimeException(e);
}
}
}jdbc.driver=com.mysql.jdbc.Driver
jdbc.url=jdbc:mysql://localhost:3306/eesy
jdbc.username=root
jdbc.password=rootpackage config;
import com.mchange.v2.c3p0.ComboPooledDataSource;
import org.apache.commons.dbutils.QueryRunner;
import org.springframework.beans.factory.annotation.Qualifier;
import org.springframework.beans.factory.annotation.Value;
import org.springframework.context.annotation.Bean;
import org.springframework.context.annotation.Configuration;
import org.springframework.context.annotation.Scope;
import javax.sql.DataSource;
/**
* 和Spring连接数据库相关的配置类
*/
//@Configuration
public class JdbcConfig {
@Value("${jdbc.driver}")
private String driver;
@Value("${jdbc.url}")
private String url;
@Value("${jdbc.username}")
private String username;
@Value("${jdbc.password}")
private String password;
/**
* 用于创建一个QueryRunner对象
* @param dataSource
* @return
*/
@Bean(name="runner")//相当于bean的id
@Scope("prototype")
//Qualifier给类路径注入时,需要和autowired匹配,
//给参数注入时,不需要和wutowired匹配
public QueryRunner createQueryRunner(@Qualifier("ds1") DataSource dataSource){
return new QueryRunner(dataSource);
}
/**
* 创建数据源 对象
*/
@Bean(name="ds0")//优先选runner的形参
@Scope("prototype")
public DataSource createDataSource(){
try {
//希望读取配置文件
ComboPooledDataSource ds = new ComboPooledDataSource();
ds.setDriverClass(driver);
ds.setJdbcUrl(url);
ds.setUser(username);
ds.setPassword(password);
return ds;
} catch (Exception e) {
throw new RuntimeException(e);
}
}
//有多个数据源
@Bean(name="ds1")
@Scope("prototype")
public DataSource createDataSource1(){
try {
//希望读取配置文件
ComboPooledDataSource ds = new ComboPooledDataSource();
ds.setDriverClass(driver);
ds.setJdbcUrl("jdbc:mysql://localhost:3306/eesy02");
ds.setUser(username);
ds.setPassword(password);
return ds;
} catch (Exception e) {
throw new RuntimeException(e);
}
}
}
- 应用程序的入口(main方法)
- Junit单元测试中,没有main方法也能执行
- 实际上,Junit集成了一个main方法
- 该方法会判断当前测试类中哪些方法有 @Test注解
- Junit注解就会有test注解的方法执行
- Junit不会管是否使用 Spring框架
- 在执行测试方法时,Junit根本不知道
/**

 * 使用Junit单元测试:测试我们的配置

 * Spring整合Junit的配置

 *    1、导入Spring整合Junit的坐标

 *    2、使用Junit提供的一个注解把原有的main方法替换成Spring提供的

 *      @Runwith

 *    3、告知Spring的运行期,Spring和IOC创建是基于xml还是注解的,并且说明位置

 *      @ContextConfiguration

 *          locations:指定xml文件的位置,加上classpath关键字,表示在类路径下

 *          classes:指定注解类所在的位置

 *          当使用Spring5.x版本时,要求Junit的jar包必须是4.1.2及以上

 */

@RunWith(SpringJUnit4ClassRunner.class) //相当于main方法,自动调用test类

@ContextConfiguration(classes=SpringConfiguration.class) //配置文件

public class AccountServiceTest {

    //private ApplicationContext ac;

    @Autowired //自动注入

    private IAccountService as = null;

    @Test

    public void testFindAll() {

        //2.执行方法

        List<Account> accounts = as.findAllAccount();

        for (Account account : accounts) {

            System.out.println(account);

        }

    }
package config;
import com.mchange.v2.c3p0.ComboPooledDataSource;
import org.apache.commons.dbutils.QueryRunner;
import org.springframework.context.annotation.*;
import javax.sql.DataSource;
import java.beans.PropertyVetoException;
/**
* 该类是一个配置类,其作用和bean.xml作用相同
* Spring中的新注解
* Configuration
* 作用:指定当前类是是一个配置类
* 细节:当配置类作为AnnotationCofigApplicationContext对象创建的参数时,该注解可以不写
* ComponentScan
* 作用:用于通过注解指定spring在创建容器时要扫描的包
* value属性和basePackages的作用相同,都是用于指定创建容器时要扫描的包
* 我们使用此注解就等同于在xml中配置了
* <context:component-scan base-package="com.itheima"></context:component-scan>
* Bean
* 作用:用于把当前方法的返回值作为bean对象存入spring的IOC容器中
* 属性:
* name:用于指定bean的id,当不写时默认值是当前方法的名称
* 细节:
* 当使用注解配置方法时,如果方法有参数,spring框架会去容器中查找有没有可用的bean对象
* 查找的方式和AutoWired是一样的,查找类型匹配,一个 ,没有,多个
*
* <bean id="dataSource" class="com.mchange.v2.c3p0.ComboPooledDataSource">
* <property name="driverClass" value="com.mysql.jdbc.Driver"></property>
* <property name="jdbcUrl" value="jdbc:mysql://localhost:3306/eesy"></property>
* <property name="user" value="root"></property>
* <property name="password" value="root"></property>
* </bean>
* Import
* 作用:用于导入其他的配置类
* 属性:
* value:用于指定其他配置类的字节码
* 当使用import注解之后,有import注解的类就是父配置类,而导入的都是子配置类
* PropertySource
* 作用:用于导入其他的配置类
* 属性:
* value:指定文件的名称和路径
* 关键字:classpath表示类路径下
* 有包:config/itheima/xxx
*
*/
//@Configuration
@ComponentScan({"com.itheima"})//类路径,内容是一个数组,可以写{xxx,xxx}或xxx
@Import(JdbcConfig.class)
@PropertySource("classpath:jdbcConfig.properties")
public class SpringConfiguration {
//期望是公共配置,而不是只配置连接数据库的
}Spring02:注解IOC、DBUtils单表CRUD、与Junit整合的更多相关文章
- 2单表CRUD综合样例开发教程
东软集团股份有限公司 基础软件事业部 单表CRUD综合样例开发教程 东软机密 tui 更改履历 版本号 更改时间 更改的 图表和章节号 状态 更改简要描述 更改申 请编号 更改人 批准人 V1.0 2 ...
- SQLSERVER单表CRUD通用方法
一.适用场景 ①当你书写简单的增删改查心累了 ②当你的项目不考虑并发.高性能 ③当你追求更快速的开发效率 ④当你的业务只涉及单表 二.代码展示 ①单表Insert public bool Insert ...
- JAVAEE——spring02:使用注解配置spring、sts插件、junit整合测试和aop演示
一.使用注解配置spring 1.步骤 1.1 导包4+2+spring-aop 1.2 为主配置文件引入新的命名空间(约束) 1.3 开启使用注解代替配置文件 1.4 在类中使用注解完成配置 2.将 ...
- hibernate课程 初探单表映射1-10 JUnit测试
三大注解: 1 @Test 2 @Before 3 @After 执行顺序213 demo.java package hibernate_001; import org.junit.After; im ...
- Hibernate初探之单表映射——使用Junit进行测试
编写一个Hibernate例子 第四步:使用Junit进行测试 三个常用的注解标签 @Test:测试方法 @Before:初始化方法 @After:释放资源 执行顺序:Before注解标签下的方法 ...
- 一步步学Mybatis-实现单表情况下的CRUD操作 (3)
今天这一章要紧接上一讲中的东西,本章中创建基于单表操作的CRUD与GetList操作,此示例中以Visitor表为范例,为了创建一点测试数据我们先弄个Add方法吧 继续在上次的IVisitorOper ...
- 零基础学习java------37---------mybatis的高级映射(单表查询,多表(一对一,一对多)),逆向工程,Spring(IOC,DI,创建对象,AOP)
一. mybatis的高级映射 1 单表,字段不一致 resultType输出映射: 要求查询的字段名(数据库中表格的字段)和对应的java类型的属性名一致,数据可以完成封装映射 如果字段和jav ...
- 【Java EE 学习 44】【Hibernate学习第一天】【Hibernate对单表的CRUD操作】
一.Hibernate简介 1.hibernate是对jdbc的二次开发 2.jdbc没有缓存机制,但是hibernate有. 3.hibernate的有点和缺点 (1)优点:有缓存,而且是二级缓存: ...
- springdata 查询思路:基本的单表查询方法(id,sort) ---->较复杂的单表查询(注解方式,原生sql)--->实现继承类---->复杂的多表联合查询 onetomany
springdata 查询思路:基本的单表查询方法(id,sort) ---->较复杂的单表查询(注解方式,原生sql)--->实现继承类---->复杂的多表联合查询 onetoma ...
- 创建展开行明细编辑表单的 CRUD 应用
http://www.runoob.com/jeasyui/jeasyui-app-crud3.html jQuery EasyUI 应用 - 创建展开行明细编辑表单的 CRUD 应用 当切换数据网格 ...
随机推荐
- 如何通过Java应用程序创建Word表格
表格,又称为表,既是一种可视化交流模式,又是一种组织整理数据的手段.人们在通讯交流.科学研究以及数据分析活动当中广泛采用着形形色色的表格.那么如何通过Java应用程序创建Word表格呢?别担心,本文将 ...
- Kubernetes 监控:CertManager 自动 HTTPS
cert-manager 是一种自动执行证书管理的工具,它可以与 Istio Gateway 集成以管理 TLS 证书,当然也可以很方便地和前面我们配置的 ingress-nginx 或者 traef ...
- MinIO Server配置指南
MinIO server在默认情况下会将所有配置信息存到 ${HOME}/.minio/config.json 文件中. 以下部分提供每个字段的详细说明以及如何自定义它们. 配置目录 默认的配置目录是 ...
- Docker网络详解——原理篇
安装Docker时,它会自动创建三个网络,bridge(创建容器默认连接到此网络). none .host 网络模式 简介 Host 容器将不会虚拟出自己的网卡,配置自己的IP等,而是使用宿主机的IP ...
- [ML从入门到入门] 支持向量机:从SVM的推导过程到SMO的收敛性讨论
前言 支持向量机(Support Vector Machine,SVM)在70年代由苏联人 Vladimir Vapnik 提出,主要用于处理二分类问题,也就是研究如何区分两类事物. 本文主要介绍支持 ...
- LOJ139 树链剖分
题目 感觉这已经不能说是模板了吧...... 解析: 难点在于换根后对子树进行的操作,设rt为当前根节点,u为操作子树: u=rt时,就是对整棵树操作,没事么好说的. rt不在u的子树范围内,操作对象 ...
- P3008 [USACO11JAN]Roads and Planes G (最短路+拓扑排序)
该最短路可不同于平时简单的最短路模板. 这道题一看就知道用SPFA,但是众所周知,USACO要卡spfa,所以要用更快的算法. 单向边不构成环,双向边都是非负的,所以可以将图分成若干个连通块(内部只有 ...
- 安装 LAMP 环境(yum 版本) shell脚本
#!/bin/bash # 安装 LAMP 环境(yum 版本) # 本脚本适用于 RHEL7(RHEL6 中数据库为 mysql) yum makecache &>/dev/null ...
- 如何实现通过Leaflet加载dwg格式的CAD图
前言 在前面介绍了通过openlayers加载dwg格式的CAD图并与互联网地图叠加,openlayers功能很全面,但同时也很庞大,入门比较难,适合于大中型项目中.而在中小型项目中,一般用开源的 ...
- 【linux】 第1回 linux运维基础
目录 1. 运维的本质 2. 电脑与服务器 2.1 电脑的种类 2.2 服务器种类 2.3 服务器品牌 2.4 服务器尺寸 2.5 服务器内部组成 3. 磁盘阵列 4. 系统简介 5. 虚拟化 6. ...
