web基础(5): CSS3介绍
chapter5 CSS3 新性能
(一)圆角边框与阴影
1.border-radius属性
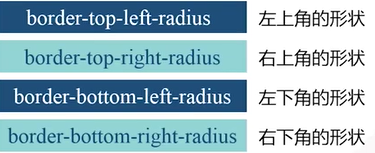
例1
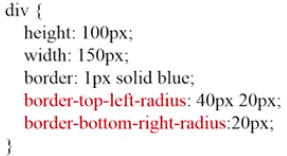
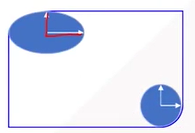
border-top-left-radius:40px 20px ; 两个值分别表示水平方向、垂直方向的半径,内部一个椭圆。
如果只有一个值,就是一个圆。
例2
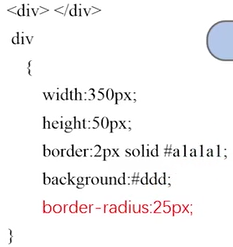

注意这里的height为50px. border-radius 是25px, 四周都有一个25半径的圆,得到左右半圆的形状。
进一步,如何做出一个圆形?width也为50px即可。
----------- 补充
W3C 在制定标准的时候,新标准还没定下来,浏览器厂商为了快速加入新属性的支持,需要加前缀。等到W3C新标准确定后,全面支持,去掉前缀。
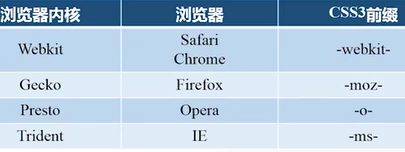
注意:用上述属性需要加上浏览器的前缀。

代码看起来会很繁琐。在sublime中,可以输入简写 bdrs,进行拓展可以生成标准的代码格式。
2. box-shadow属性
该属性可以做盒子的阴影。
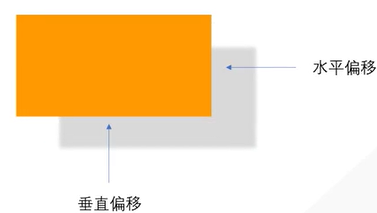


例子
div{

    width:300px;

    height:100px;

    background-color:#f90;

    box-shadow:10px 10px 5px #88;

}
结果为

(二)文字与文本
1. text-shadow
text-shadow: 水平偏移 垂直偏移 阴影大小 颜色
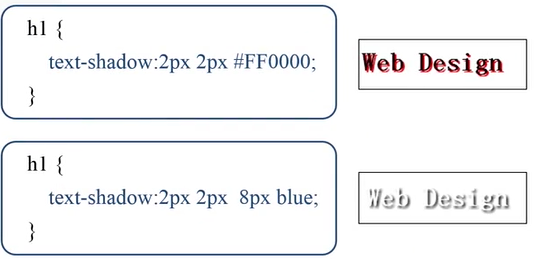
HTML内容为<h1>Web Design</h1>
如果阴影大小被省略,那么默认大小与文字一样。
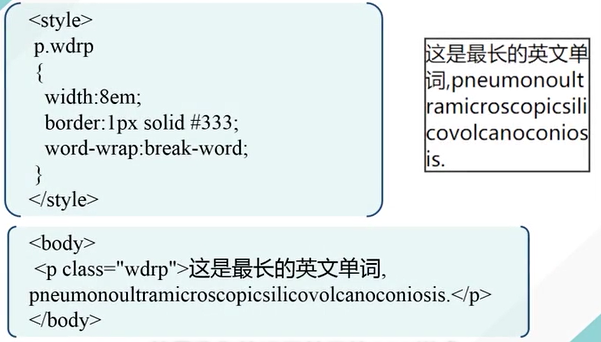
2. word-wrap
允许长单词、URL强制进行换行。
word-wrap: normal不会换行, break-word会换行
3. @font-face规则
规定一种网页上可以显示的特殊字体。
在你的网站文件夹里建一个fonts文件夹,里面存放要用的一些特殊字体。
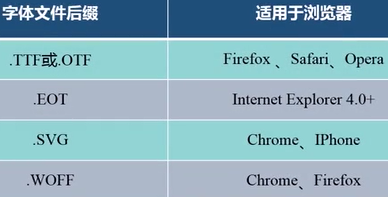
我们常用的字体是ttf后缀的,如何转换为其他后缀的字体?

例子
前提要保证fonts文件夹下有这些字体。
<style>

    @font-face{

    font-family: kastlerFont; /*定义字体的名字*/

    src:url('fonts/kastler.ttf'),

         url('fonts/kastler.eot'),

         url('fonts/kastler.woff'),

         url('fonts/kastler.svg'); /*定义字体的来源*/

    }

    p{

    font-damily:kastlerFont; /*引用字体*/

    }

</style>
HTML内容为
<p>Web front-end development</p>
结果为

--------------------------------------------
(三)2D转换
2D转换是对元素进行旋转、缩放、移动、拉伸
transform 属性
1. 旋转
transform:rotate(deg);
CSS为
div{

    width:100px;

    height:75px;

    background-color:#ccc;

    border: 1px solid black;

}

#rotateDiv{

    transform:rotate(30deg);

}
HTML 为
<div> web前端开发</div>

<div id="rotateDiv">web前端开发</div>
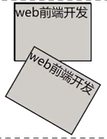
30deg 正的表示顺时针旋转30度。 sublime中可以用trsf进行扩展。
2. 缩放
transform:scale(x, y)
x为水平方向的缩放倍数;y是垂直方向的缩放倍数,若省略,同x。
0-1 缩小;大于1,为放大。
例子
.box:hover{

    transform:scale(1.2);

}
鼠标悬停时会放大。
(四)过渡与动画
1. 过渡 transition
transition属性可以让一个元素的某个(多个、所有)属性在指定的时间内从一种状态过渡到另一种状态, 它有以下几个子属性

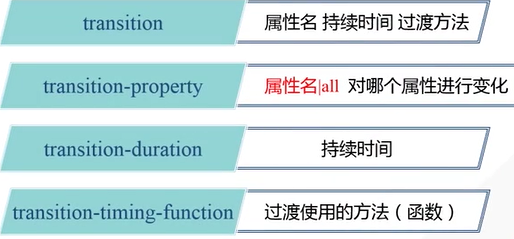
transition-duration以秒s为单位。transition-timing-function 属性取值有以下
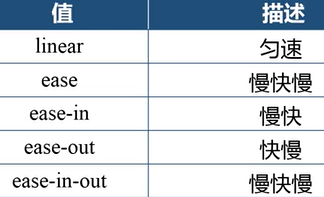
例子
<!DOCTYPE html>

<html xmlns="http://www.w3.org/1999/xhtml">

<head>

    <title>CSS3过渡</title>

    <style type="text/css">

        div

        {

            width: 200px;

            padding:5px 10px;

            border-radius:5px;

            background-color:silver;

            transition:background-color 1s linear;

        }

        div:hover

        {

            background-color:#45B823;

        }

    </style>

</head>

<body>

    <div>web design</div>

</body>

</html>
效果,鼠标悬停时,通过1s过渡到了如下右图的状态。鼠标挪开的时候,又恢复到了原状。


例子2-所有属性的变化
<!DOCTYPE html>

<html xmlns="http://www.w3.org/1999/xhtml">

<head>

    <title>深入了解transition属性</title>

    <style type="text/css">

        div

        {

            display:inline-block;

            width:100px;

            height:100px;

            border-radius:0;

            background-color:#14C7F3;

            transition: all 1s linear;

        }

        div:hover

        {

            border-radius:50px;

            background-color:red;

        }

    </style>

</head>

<body>

    <div></div>

</body>

</html>
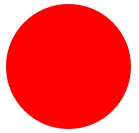
效果是鼠标悬停后,蓝色方形盒子变为红色的圆形盒子。

例3
<!DOCTYPE html>

<html xmlns="http://www.w3.org/1999/xhtml">

<head>

    <title>CSS3 transition-timing-function属性</title>

    <style type="text/css">

        div

        {

            width:100px;

            height:50px;

            text-align:center;

            line-height:50px;

            margin-top:10px;

            border-radius:0;

            background-color:#14C7F3;

            transition-property:width;

            transition-duration:2s ;

            transition-delay:0;

        }

        #div1{transition-timing-function:linear;}

        #div2{transition-timing-function:ease;}

        #div3{transition-timing-function:ease-in;}

        #div4{transition-timing-function:ease-out;}

        #div5{transition-timing-function:ease-in-out}

        div:hover

        {

            width:300px;

        }

    </style>

</head>

<body>

    <div id="div1">linear</div>

    <div id="div2">ease</div>

    <div id="div3">ease-in</div>

    <div id="div4">ease-out</div>

    <div id="div5">ease-in-out</div>

</body>

</html>
效果
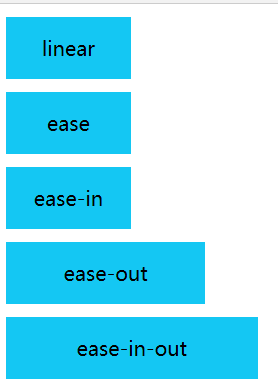
鼠标停在某个元色上,宽度增加,离开某个盒子,宽度减少。
-------------------------------------------
2. 动画
上述的transition属性只能从一个状态过渡到另一个状态,如何实现有多个状态来完成过渡?分成两个步骤:定义动画(@keyframes规则)--> 调用动画(animation属性)
@keyframes规则 (关键帧)
animation :动画名字 时间 变化函数 播放状态;
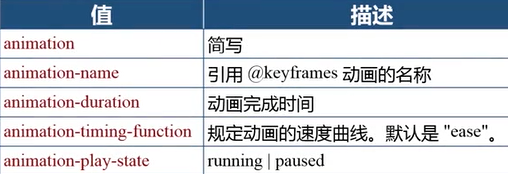
最后的animation-play-state属性可以控制动画播放的状态,比如在鼠标悬停的时候播放,当鼠标离开的时候停止播放。
例子
<!DOCTYPE html>

<html lang="en">

<head>

    <meta charset="UTF-8">

    <title>Document</title>

    <style>

    div{

        width: 100px;

        height: 100px;

        background-color: black;

    }

    @keyframes mycolor

     {

        0%     {background-color:red;}

        30%   {background-color:blue;}

        60%   {background-color:yellow;}

        100% {background-color:green;}

    }

     div:hover

    {

        animation: mycolor 5s linear;

    }

    </style>

</head>

<body>

<div></div>
</body>
</html>
四个帧,每一帧的名字用百分号表示,0%表示最开始的时候,100%表示最后播放完的时候。
这里的animation 定义在hover里,但是之前过渡的transition 是定义在元素中的。
(五)3D变换
transform-style: preserve-3d;
transform:rotateX(),rotateY(), rotateZ();
透视 perspective属性,实现近大远小的效果。单纯的二维变化没有透视关系。
perspective:100x, 表示眼睛离水平面的距离。越大,透视效果不明显,越小则透视效果明显。该属性要定义在上一层元素的样式里。(不是在父容器里设置perspective)
例子
<!DOCTYPE html>

<html lang="en">

<head>

    <meta charset="UTF-8">

    <title>3D</title>

    <style>

    #stage{

        width: 300px;

        margin: 100px auto;

        perspective:200px;

    }

    .box{

        width: 100px;

        height:100px;

        float:left;

        transition:linear 1s;

        transform-style: preserve-3d;

    }

    img

    {

        width:100px;

        height:75px;

    }

    .x:hover

    {

        transform:rotateX(60deg);

    }

    .y:hover

    {

        transform:rotateY(60deg);

    }

    .z:hover

    {

        transform:rotateZ(60deg);

    }

    </style>

</head>

<body>

<div id="stage">

    <div class="box x"> <img src="frog.jpg" /></div>

    <div class="box y"> <img src="frog.jpg" /></div>

    <div class="box z"> <img src="frog.jpg" /></div>

</div>

</body>

</html>
上述定义一个最外面的舞台stage, 父容器box,图片是内容。每个图片都在父容器里。第一幅沿着X轴旋转。class引用多个类别,中间空格隔开就行。
------------------------
3D变换综合案例- 卡片的旋转
当鼠标悬停在图片时,图片翻转(沿着Y轴),背面有文字出现。

如何实现?
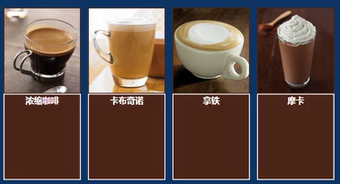
**思路:把图片和文字放在一个父容器里,每个父容器里都有两张图片,通过层定位让图片和文字有叠加的效果。先显示图片,当鼠标悬停的时候,通过3D变换,让后面的文字显示出来。
先做HTML基本结构
<!DOCTYPE html>

<html lang="en">

<head>

    <meta charset="UTF-8">

    <title>Document</title>

    <style>

        *{

            padding: 0;

            margin: 0;

        }

        body{

            background-color:#0D3462;

        }

    </style>

</head>

<body>

    <div id="piclist">   <!最外面的大舞台,里面四个容器,每个容器放两个元素>

        <div class="picbox">

            <div class="face front"><img src="data:images/1.jpg"></div> <!正面>

            <div class="face back"><h3>浓缩咖啡</h3></div>

        </div>

        <div class="picbox">

            <div class="face front"><img src="data:images/2.jpg"></div>

            <div class="face back"><h3>卡布奇诺</h3></div>

        </div>

        <div class="picbox">

            <div class="face front"><img src="data:images/3.jpg"></div>

            <div class="face back"><h3>拿铁</h3></div>

        </div>

        <div class="picbox">

            <div class="face front"><img src="data:images/4.jpg"></div>

            <div class="face back"><h3>摩卡</h3></div>

        </div>

    </div>

</body>

</html>
得到效果为

……
上述只是简单设置了样式,接下来对样式进行细化。
<!DOCTYPE html>

<html lang="en">

<head>

    <title>Document</title>

    <style>

        *{

            padding: 0;

            margin: 0;

        }

        body{

            background-color:#0D9999;

        }

        p{

            height:50px;

            background-color:yellow;

            font-size:20px;

            line-height:50px;

        }

        /*舞台*/

        #piclist{

            width:760px; /*170*4+10*8*/

            height: 220px;/*190+边框*/

            margin: 100px auto; /*距离上边距100px 水平居中*/

        }

        /*父容器*/

        .picbox{

            float: left; /*需要水平排列成一行*/

            position: relative;

            width: 170px;

            height: 190px;

            margin: 10px;

            transform-style:preserve-3d; /*3d变化设置在父容器里*/

            transition:1.5s; /*1.5S内完成变换*/

        }

        /*鼠标悬停,就翻转,正面背面互换*/

        .picbox:hover{

            transform:rotateY(180deg);

        }

        .face{

            position: absolute;

            width:170px;  /*图片宽度*/

            height:190px;  /*图片高度*/

        }

        .front{

            border:2px solid #4b2518; /*棕色边框*/

        }

        .back{

            /*让它成为背面,开始只显示正面*/

            transform:rotateY(180deg);    /*关键!!!*/

            background-color: #4b2518;

            border:2px solid #fff;

        }

        .back h3{

            color:white;

            text-align:center;

            line-height: 190px;/*与父容器一样高,实现文字垂直居中*/

        }

    </style>

</head>

<body>

<p> Would you like a cup of coffee? </p>

    <div id="container">

        <div id="piclist">

            <div class="picbox">

                   <div class="face front"><img src="data:images/1.jpg" /></div>

                <div class="face back"><h3>Espresso</h3></div>

            </div>

            <div class="picbox">

                   <div class="face front"><img src="data:images/2.jpg" /></div>

                <div class="face back"><h3>Cappuccino</h3></div>

            </div>

            <div class="picbox">

                   <div class="face front"><img src="data:images/3.jpg" /></div>

                <div class="face back"><h3>Latte</h3></div>

            </div>

            <div class="picbox">

                <div class="face front"><img src="data:images/4.jpg"/></div>

                <div class="face back"><h3>Mocha</h3></div>

            </div>

        </div>

    </div>

</body>

</html>
效果
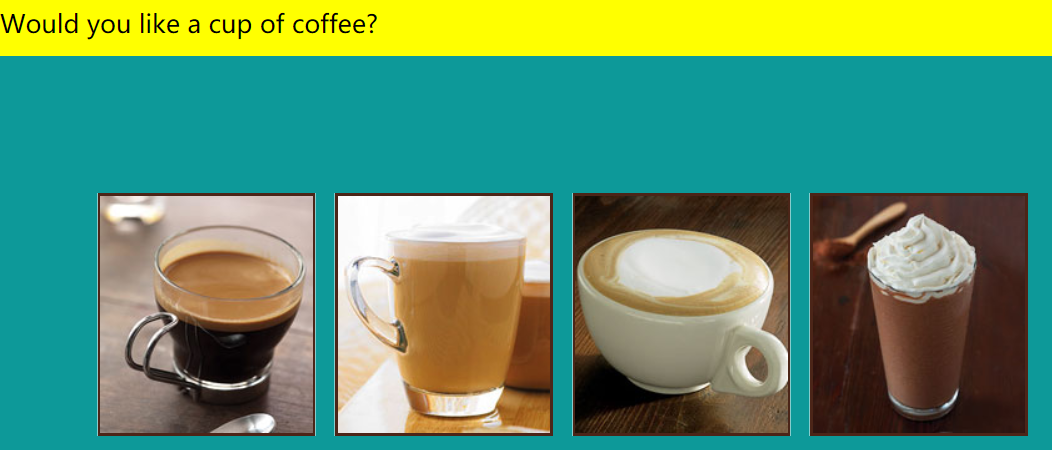
注意:
(1)back的样式,如果没有transform:rotateY(180deg);,那么当图片翻转的时候文字也是翻转的。因此让初始的文字先翻转一下,当光标停留的时候再翻转过来,这样文字就正确了。
(2)父元素是relative,子元素face 为absolute. 那么正面图片、反面文字针对父元素都是绝对定位,他们原有文档流的位置丢失,就会层叠到一起。position 之后没有设置left right等距离,两个元素层叠在一起。
web基础(5): CSS3介绍的更多相关文章
- HT for Web基础动画介绍
在上一篇<基于HT for Web矢量实现3D叶轮旋转>一文中,我略微提了下HT for Web基础动画的相关用法,但是讲得不深入,今天就来和大家分享下HT for Web基础动画的相关介 ...
- 【Web前端HTML5&CSS3】03-字符实体与语义标签
笔记来源:尚硅谷Web前端HTML5&CSS3初学者零基础入门全套完整版 目录 字符实体与语义标签 1. 字符实体 2. meta标签 3. 语义标签 4. 块元素与行内元素 块元素(bloc ...
- 【Web前端HTML5&CSS3】05-样式继承与其他概念
笔记来源:尚硅谷Web前端HTML5&CSS3初学者零基础入门全套完整版 目录 样式继承与其他概念 1. 继承 2. 选择器的权重 3. 长度单位 像素 屏幕分辨率 图像分辨率 百分比 em ...
- 【Web前端HTML5&CSS3】06-盒模型
笔记来源:尚硅谷Web前端HTML5&CSS3初学者零基础入门全套完整版 目录 盒模型 1. 文档流(normalflow) 2. 块元素 3. 行内元素 4. 盒子模型 盒模型.盒子模型.框 ...
- 【Web前端HTML5&CSS3】11-定位
笔记来源:尚硅谷Web前端HTML5&CSS3初学者零基础入门全套完整版 目录 定位的简介 1. 相对定位 偏移量(offset) 相对定位的特点 2. 绝对定位 绝对定位的特点 包含块(co ...
- 【Web前端HTML5&CSS3】12-字体
笔记来源:尚硅谷Web前端HTML5&CSS3初学者零基础入门全套完整版 目录 字体 1. 字体相关的样式 2. font-family 3. 几种字体 手写体 艺术体 乱码字体 中文字体 4 ...
- ASP.NET Web API 开篇示例介绍
ASP.NET Web API 开篇示例介绍 ASP.NET Web API 对于我这个初学者来说ASP.NET Web API这个框架很陌生又熟悉着. 陌生的是ASP.NET Web API是一个全 ...
- Web基础知识和技术
WEB是一个外延广泛的概念,不单单指网站,乌徒帮专注拥有WEB界面的网站开发,帮助初学者或已经进入开发的朋友们提供参考讨论平台,然而并不一定能将所有的WEB知识讲全讲透,只是能满足初涉者的建站需求,能 ...
- 十倍效能提升——Web 基础研发体系的建立
1 导读 web 基础研发体系指的是, web 研发中一线工程师所直接操作的技术.工具,以及所属组织架构的总和.在过去提升企业研发效能的讨论中,围绕的主题基本都是——”通过云计算.云存储等方式将底层核 ...
- 实验八 Web基础 SQL注入原理
实验八 Web基础 实验要求 (1)Web前端HTML 能正常安装.启停Apache.理解HTML,理解表单,理解GET与POST方法,编写一个含有表单的HTML. (2)Web前端javascipt ...
随机推荐
- 解决angular11打包报错Type 'Event' is missing the following properties from type 'any[]': ...Type 'Event' is not assignable to type 'string'
出现这种情况,需要检查一下以下事项 1.ts类型声明和html里写的是否一致 1.1举例如下,子组件代码需要注意事项,子组件调用父组件方法,点击传参给父组件,在父组件触发一些时间,当前this指向是父 ...
- 大公司为什么禁止SpringBoot项目使用Tomcat?
本文已经收录到Github仓库,该仓库包含计算机基础.Java基础.多线程.JVM.数据库.Redis.Spring.Mybatis.SpringMVC.SpringBoot.分布式.微服务.设计模式 ...
- LinkedList集合-Vector集合
LinkedList集合 java.util.LinkedList集合数据存储的结构是链表结构.方便元素添加.删除的集合.LinkedList是一个双向链表,那么双向链表是什么样子的呢,我们用个图了解 ...
- python导入xls数据到db--优化版
import sys from orator import DatabaseManager import xlrd dbconfig = { 'mysql': { 'driver': 'mysql', ...
- Vue 3项目如何设置全局变量
- ES6 01 简介
1 记录一个好的笔记 一个非常详细的笔记:https://es6.ruanyifeng.com/#docs/intro 2 简介 2.1 ECMAScript 和 JavaScript ECMAScr ...
- 通过pdf模板,填充内容,生成pdf文件---JAVA
1 概述 我们通常会遇到需要生成某些固定格式,但是内容不同的文件,那么我们就可以使用⽤Adobe Acrobat DC来创建pdf模块,然后通过代码对模板进行填充,生成pdf文件 2 创建一个pdf模 ...
- Spring事务失效原因分析解决
文章目录 1.方法内部调用 2.修饰符 3.非运行时异常 4.try-catch捕获异常 5.多线程调用 6.同时使用@Transactional和@Async 7.错误使用事务传播行为 8.使用的数 ...
- SpringCloud 源码学习笔记2——Feign声明式http客户端源码分析
系列文章目录和关于我 一丶Feign是什么 Feign是一种声明式. 模板化的HTTP客户端.在Spring Cloud中使用Feign,可以做到使用HTTP请求访问远程服务,就像调用本地方法一一样的 ...
- Vue学习笔记之组件与通信
1. 组件 1.1. 什么是组件 组件是可复用的Vue实例, 说白了就是一组可以重复使用的模板,通常一个应用会以一棵嵌套的组件树的形式来组织: 例如,你可能会有页头.侧边栏.内容区等组件,每个组件又包 ...
