Fragmenttabhost的使用教程
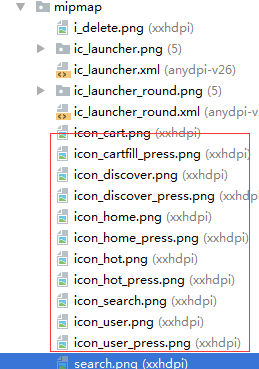
1.准备tab的图标,放到mipmap目录下面,大小64x64,准备2种,一种是选中的,一种是未选中的,如下图
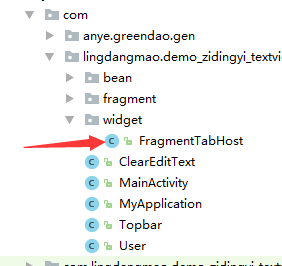
2.重写fragmentabhost,防止调用fragment每次点击tab都要重新调用oncreateview方法.,这里的目录是
代码部分
package com.lingdangmao.demo_zidingyi_textview.widget;

/**

 * Created by monkey

 * on 2014/9/24

 * 功能描述:修改过的FragmentTabHost,保存fragment实例不销毁

 */

/*

 * Copyright (C) 2012 The Android Open Source Project

 *

 * Licensed under the Apache License, Version 2.0 (the "License");

 * you may not use this file except in compliance with the License.

 * You may obtain a copy of the License at

 *

 *      http://www.apache.org/licenses/LICENSE-2.0

 *

 * Unless required by applicable law or agreed to in writing, software

 * distributed under the License is distributed on an "AS IS" BASIS,

 * WITHOUT WARRANTIES OR CONDITIONS OF ANY KIND, either express or implied.

 * See the License for the specific language governing permissions and

 * limitations under the License.

 */

        import java.util.ArrayList;

        import android.content.Context;

        import android.content.res.TypedArray;

        import android.os.Bundle;

        import android.os.Parcel;

        import android.os.Parcelable;

        import android.support.v4.app.Fragment;

        import android.support.v4.app.FragmentManager;

        import android.support.v4.app.FragmentTransaction;

        import android.util.AttributeSet;

        import android.view.View;

        import android.view.ViewGroup;

        import android.widget.FrameLayout;

        import android.widget.LinearLayout;

        import android.widget.TabHost;

        import android.widget.TabWidget;

/**

 * Special TabHost that allows the use of {@link Fragment} objects for its tab

 * content. When placing this in a view hierarchy, after inflating the hierarchy

 * you must call {@link #setup(Context, FragmentManager, int)} to complete the

 * initialization of the tab host.

 *

 * <p>

 * Here is a simple example of using a FragmentTabHost in an Activity:

 *

 * {@sample

 * development/samples/Support4Demos/src/com/example/android/supportv4/app/

 * FragmentTabs.java complete}

 *

 * <p>

 * This can also be used inside of a fragment through fragment nesting:

 *

 * {@sample

 * development/samples/Support4Demos/src/com/example/android/supportv4/app/

 * FragmentTabsFragmentSupport.java complete}

 */

public class FragmentTabHost extends TabHost implements

        TabHost.OnTabChangeListener {

    private final ArrayList<TabInfo> mTabs = new ArrayList<TabInfo>();

    private FrameLayout mRealTabContent;

    private Context mContext;

    private FragmentManager mFragmentManager;

    private int mContainerId;

    private TabHost.OnTabChangeListener mOnTabChangeListener;

    private TabInfo mLastTab;

    private boolean mAttached;

    static final class TabInfo {

        private final String tag;

        private final Class<?> clss;

        private final Bundle args;

        private Fragment fragment;

        TabInfo(String _tag, Class<?> _class, Bundle _args) {

            tag = _tag;

            clss = _class;

            args = _args;

        }

    }

    static class DummyTabFactory implements TabHost.TabContentFactory {

        private final Context mContext;

        public DummyTabFactory(Context context) {

            mContext = context;

        }

        @Override

        public View createTabContent(String tag) {

            View v = new View(mContext);

            v.setMinimumWidth();

            v.setMinimumHeight();

            return v;

        }

    }

    static class SavedState extends BaseSavedState {

        String curTab;

        SavedState(Parcelable superState) {

            super(superState);

        }

        private SavedState(Parcel in) {

            super(in);

            curTab = in.readString();

        }

        @Override

        public void writeToParcel(Parcel out, int flags) {

            super.writeToParcel(out, flags);

            out.writeString(curTab);

        }

        @Override

        public String toString() {

            return "FragmentTabHost.SavedState{"

                    + Integer.toHexString(System.identityHashCode(this))

                    + " curTab=" + curTab + "}";

        }

        public static final Parcelable.Creator<SavedState> CREATOR = new Parcelable.Creator<SavedState>() {

            public SavedState createFromParcel(Parcel in) {

                return new SavedState(in);

            }

            public SavedState[] newArray(int size) {

                return new SavedState[size];

            }

        };

    }

    public FragmentTabHost(Context context) {

        // Note that we call through to the version that takes an AttributeSet,

        // because the simple Context construct can result in a broken object!

        super(context, null);

        initFragmentTabHost(context, null);

    }

    public FragmentTabHost(Context context, AttributeSet attrs) {

        super(context, attrs);

        initFragmentTabHost(context, attrs);

    }

    private void initFragmentTabHost(Context context, AttributeSet attrs) {

        TypedArray a = context.obtainStyledAttributes(attrs,

                new int[] { android.R.attr.inflatedId }, , );

        mContainerId = a.getResourceId(, );

        a.recycle();

        super.setOnTabChangedListener(this);

    }

    private void ensureHierarchy(Context context) {

        // If owner hasn't made its own view hierarchy, then as a convenience

        // we will construct a standard one here.

        if (findViewById(android.R.id.tabs) == null) {

            LinearLayout ll = new LinearLayout(context);

            ll.setOrientation(LinearLayout.VERTICAL);

            addView(ll, new FrameLayout.LayoutParams(

                    ViewGroup.LayoutParams.MATCH_PARENT,

                    ViewGroup.LayoutParams.MATCH_PARENT));

            TabWidget tw = new TabWidget(context);

            tw.setId(android.R.id.tabs);

            tw.setOrientation(TabWidget.HORIZONTAL);

            ll.addView(tw, new LinearLayout.LayoutParams(

                    ViewGroup.LayoutParams.MATCH_PARENT,

                    ViewGroup.LayoutParams.WRAP_CONTENT, ));

            FrameLayout fl = new FrameLayout(context);

            fl.setId(android.R.id.tabcontent);

            ll.addView(fl, new LinearLayout.LayoutParams(, , ));

            mRealTabContent = fl = new FrameLayout(context);

            mRealTabContent.setId(mContainerId);

            ll.addView(fl, new LinearLayout.LayoutParams(

                    LinearLayout.LayoutParams.MATCH_PARENT, , ));

        }

    }

    /**

     * @deprecated Don't call the original TabHost setup, you must instead call

     *             {@link #setup(Context, FragmentManager)} or

     *             {@link #setup(Context, FragmentManager, int)}.

     */

    @Override

    @Deprecated

    public void setup() {

        throw new IllegalStateException(

                "Must call setup() that takes a Context and FragmentManager");

    }

    public void setup(Context context, FragmentManager manager) {

        ensureHierarchy(context); // Ensure views required by super.setup()

        super.setup();

        mContext = context;

        mFragmentManager = manager;

        ensureContent();

    }

    public void setup(Context context, FragmentManager manager, int containerId) {

        ensureHierarchy(context); // Ensure views required by super.setup()

        super.setup();

        mContext = context;

        mFragmentManager = manager;

        mContainerId = containerId;

        ensureContent();

        mRealTabContent.setId(containerId);

        // We must have an ID to be able to save/restore our state. If

        // the owner hasn't set one at this point, we will set it ourself.

        if (getId() == View.NO_ID) {

            setId(android.R.id.tabhost);

        }

    }

    private void ensureContent() {

        if (mRealTabContent == null) {

            mRealTabContent = (FrameLayout) findViewById(mContainerId);

            if (mRealTabContent == null) {

                throw new IllegalStateException(

                        "No tab content FrameLayout found for id "

                                + mContainerId);

            }

        }

    }

    @Override

    public void setOnTabChangedListener(OnTabChangeListener l) {

        mOnTabChangeListener = l;

    }

    public void addTab(TabHost.TabSpec tabSpec, Class<?> clss, Bundle args) {

        tabSpec.setContent(new DummyTabFactory(mContext));

        String tag = tabSpec.getTag();

        TabInfo info = new TabInfo(tag, clss, args);

        if (mAttached) {

            // If we are already attached to the window, then check to make

            // sure this tab's fragment is inactive if it exists. This shouldn't

            // normally happen.

            info.fragment = mFragmentManager.findFragmentByTag(tag);

            if (info.fragment != null && !info.fragment.isDetached()) {

                FragmentTransaction ft = mFragmentManager.beginTransaction();

                // ft.detach(info.fragment);

                ft.hide(info.fragment);

                ft.commit();

            }

        }

        mTabs.add(info);

        addTab(tabSpec);

    }

    @Override

    protected void onAttachedToWindow() {

        super.onAttachedToWindow();

        String currentTab = getCurrentTabTag();

        // Go through all tabs and make sure their fragments match

        // the correct state.

        FragmentTransaction ft = null;

        for (int i = ; i < mTabs.size(); i++) {

            TabInfo tab = mTabs.get(i);

            tab.fragment = mFragmentManager.findFragmentByTag(tab.tag);

            // if (tab.fragment != null && !tab.fragment.isDetached()) {

            if (tab.fragment != null) {

                if (tab.tag.equals(currentTab)) {

                    // The fragment for this tab is already there and

                    // active, and it is what we really want to have

                    // as the current tab. Nothing to do.

                    mLastTab = tab;

                } else {

                    // This fragment was restored in the active state,

                    // but is not the current tab. Deactivate it.

                    if (ft == null) {

                        ft = mFragmentManager.beginTransaction();

                    }

                    // ft.detach(tab.fragment);

                    ft.hide(tab.fragment);

                }

            }

        }

        // We are now ready to go. Make sure we are switched to the

        // correct tab.

        mAttached = true;

        ft = doTabChanged(currentTab, ft);

        if (ft != null) {

            ft.commit();

            mFragmentManager.executePendingTransactions();

        }

    }

    @Override

    protected void onDetachedFromWindow() {

        super.onDetachedFromWindow();

        mAttached = false;

    }

    @Override

    protected Parcelable onSaveInstanceState() {

        Parcelable superState = super.onSaveInstanceState();

        SavedState ss = new SavedState(superState);

        ss.curTab = getCurrentTabTag();

        return ss;

    }

    @Override

    protected void onRestoreInstanceState(Parcelable state) {

        SavedState ss = (SavedState) state;

        super.onRestoreInstanceState(ss.getSuperState());

        setCurrentTabByTag(ss.curTab);

    }

    @Override

    public void onTabChanged(String tabId) {

        if (mAttached) {

            FragmentTransaction ft = doTabChanged(tabId, null);

            if (ft != null) {

                ft.commit();

            }

        }

        if (mOnTabChangeListener != null) {

            mOnTabChangeListener.onTabChanged(tabId);

        }

    }

    private FragmentTransaction doTabChanged(String tabId,

                                             FragmentTransaction ft) {

        TabInfo newTab = null;

        for (int i = ; i < mTabs.size(); i++) {

            TabInfo tab = mTabs.get(i);

            if (tab.tag.equals(tabId)) {

                newTab = tab;

            }

        }

        if (newTab == null) {

            throw new IllegalStateException("No tab known for tag " + tabId);

        }

        if (mLastTab != newTab) {

            if (ft == null) {

                ft = mFragmentManager.beginTransaction();

            }

            if (mLastTab != null) {

                if (mLastTab.fragment != null) {

                    // ½«detachÌ滻Ϊhide£¬Òþ²ØFragment

                    // ft.detach(mLastTab.fragment);

                    ft.hide(mLastTab.fragment);

                }

            }

            if (newTab != null) {

                if (newTab.fragment == null) {

                    newTab.fragment = Fragment.instantiate(mContext,

                            newTab.clss.getName(), newTab.args);

                    ft.add(mContainerId, newTab.fragment, newTab.tag);

                } else {

                    // ½«attachÌ滻Ϊshow£¬ÏÔʾFragment

                    // ft.attach(newTab.fragment);

                    ft.show(newTab.fragment);

                }

            }

            mLastTab = newTab;

        }

        return ft;

    }

}
3.编写activity_main布局文件
<?xml version="1.0" encoding="utf-8"?>

<LinearLayout xmlns:android="http://schemas.android.com/apk/res/android"

    xmlns:app="http://schemas.android.com/apk/res-auto"

    xmlns:tools="http://schemas.android.com/tools"

    android:layout_width="match_parent"

    android:layout_height="match_parent"

    android:orientation="vertical"

    android:id="@+id/main_root_ll"

    tools:context="com.lingdangmao.demo_zidingyi_textview.MainActivity">

    <FrameLayout

        android:id="@+id/realtabcontent"

        android:layout_weight=""

        android:layout_width="match_parent"

        android:background="@color/bg_color"

        android:layout_height="0dp">

    </FrameLayout>

    <com.lingdangmao.demo_zidingyi_textview.widget.FragmentTabHost

        android:id="@+id/tabhost"

        android:layout_width="match_parent"

        android:layout_height="wrap_content">

        <FrameLayout

            android:layout_weight=""

            android:id="@+id/tabcontent"

            android:layout_width="0dp"

            android:layout_height="0dp">

        </FrameLayout>

    </com.lingdangmao.demo_zidingyi_textview.widget.FragmentTabHost>

</LinearLayout>
4.编写mainactivity
public class MainActivity extends AppCompatActivity {

    private static final String TAG = "MainActivity";

    private FragmentTabHost mTabHost;

    private LayoutInflater mLayoutInflater;

    private List<Tab> mTabs=new ArrayList<>();

    @Override

    protected void onCreate(Bundle savedInstanceState) {

        super.onCreate(savedInstanceState);

        setContentView(R.layout.activity_main);

        initTab();

    }

    private void initTab() {

        mLayoutInflater =LayoutInflater.from(this);

        mTabHost = findViewById(R.id.tabhost);

        mTabHost.setup(this,getSupportFragmentManager(),R.id.realtabcontent);

        Tab tab_home =new Tab(R.string.home,R.drawable.selector_icon_home,HomeFragment.class);

        Tab tab_hot =new Tab(R.string.hot,R.drawable.selector_icon_hot,HotFragment.class);

        Tab tab_category =new Tab(R.string.catagory,R.drawable.selector_icon_category,CategoryFragment.class);

        Tab tab_cart =new Tab(R.string.cart,R.drawable.selector_icon_cart,CartFragment.class);

        Tab tab_mine =new Tab(R.string.mine,R.drawable.selector_icon_mine,MineFragment.class);

        mTabs.add(tab_home);

        mTabs.add(tab_hot);

        mTabs.add(tab_category);

        mTabs.add(tab_cart);

        mTabs.add(tab_mine);

        for (Tab tab: mTabs) {

            TabHost.TabSpec tabSpec = mTabHost.newTabSpec(getString(tab.getTitle()));

            tabSpec.setIndicator(buildIndicator(tab));

            mTabHost.addTab(tabSpec, tab.getFragment(),null);

        }

        //去掉分割线

        mTabHost.getTabWidget().setShowDividers(LinearLayout.SHOW_DIVIDER_NONE);

        //默认选择第一个

        mTabHost.setCurrentTab();

    }

    private View buildIndicator(Tab tab){

        View view= mLayoutInflater.inflate(R.layout.tab_indicator,null);

        ImageView imageView =view.findViewById(R.id.icon_tab);

        TextView textView =view.findViewById(R.id.txt_indicator);

        imageView.setBackgroundResource(tab.getIcon());

        textView.setText(tab.getTitle());

        return view;

    }

}
写tab的样式

<?xml version="1.0" encoding="utf-8"?>

<LinearLayout

    xmlns:android="http://schemas.android.com/apk/res/android"

    android:orientation="vertical"

    android:paddingTop="3dp"

    android:paddingBottom="3dp"

    android:gravity="center"

    android:layout_width="match_parent"

    android:layout_height="match_parent">

    <android.support.v7.widget.AppCompatImageView

        android:id="@+id/icon_tab"

        android:layout_width="wrap_content"

        android:layout_height="wrap_content" />

    <android.support.v7.widget.AppCompatTextView

        android:layout_marginTop="2dp"

        android:id="@+id/txt_indicator"

        android:textColor="@color/selector_tab_text"

        android:layout_width="wrap_content"

        android:layout_height="wrap_content" />

</LinearLayout>
写文字切换的样式

<?xml version="1.0" encoding="utf-8"?>

<selector xmlns:android="http://schemas.android.com/apk/res/android">

    <item android:state_selected="true" android:color="#eb4f38" />

    <item android:state_active="true" android:color="#eb4f38"/>

    <item android:state_selected="false" android:color="#a9b7b7" />

    <item android:state_active="false" android:color="#a9b7b7"/>

</selector>
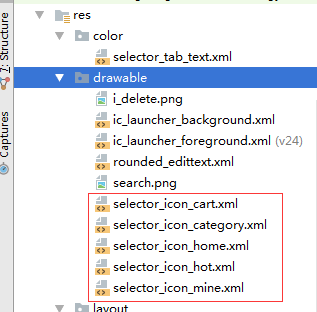
写图片切换的样式 ,这里只写了一个,其余参考写就行了
<?xml version="1.0" encoding="utf-8"?>

<selector xmlns:android="http://schemas.android.com/apk/res/android">

    <!-- Non focused states -->

    <item android:state_focused="false" android:state_selected="false" android:state_pressed="false" android:drawable="@mipmap/icon_cart" />

    <item android:state_focused="false" android:state_selected="true" android:state_pressed="false" android:drawable="@mipmap/icon_cartfill_press" />

    <!-- Focused states -->

    <item android:state_focused="true" android:state_selected="false" android:state_pressed="false" android:drawable="@mipmap/icon_cartfill_press" />

    <item android:state_focused="true" android:state_selected="true" android:state_pressed="false" android:drawable="@mipmap/icon_cartfill_press" />

    <!-- Pressed -->

    <item android:state_selected="true" android:state_pressed="true" android:drawable="@mipmap/icon_cartfill_press" />

    <item android:state_pressed="true" android:drawable="@mipmap/icon_cartfill_press" />

</selector>
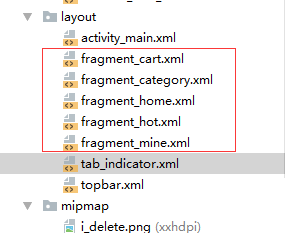
写fragment的布局,随便写了一个
<?xml version="1.0" encoding="utf-8"?>

<LinearLayout xmlns:android="http://schemas.android.com/apk/res/android"

    xmlns:app="http://schemas.android.com/apk/res-auto"

    android:orientation="vertical"

    android:layout_width="match_parent"

    android:layout_height="match_parent">

</LinearLayout>
values下面的
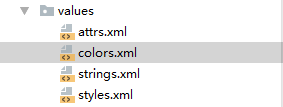
color
<?xml version="1.0" encoding="utf-8"?>

<resources>

    <color name="colorPrimary">#3F51B5</color>

    <color name="colorPrimaryDark">#303F9F</color>

    <color name="colorAccent">#FF4081</color>

    <color name="bg_color">#f1f1f1</color>

    <color name="tab_text_unselected">#ccc</color>

</resources>
string
<resources>

    <string name="app_name">demo_zidingyi_textview</string>

    <string name="home">主页</string>

    <string name="hot">热卖</string>

    <string name="catagory">分类</string>

    <string name="cart">购物车</string>

    <string name="mine">我的</string>

    <string name="title_activity_ware_detail">WareDetailActivity</string>

    <string name="share">分享</string>

</resources>
布局的fragment
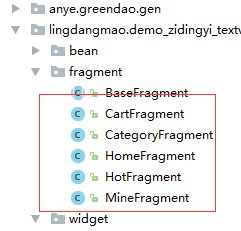
public class HotFragment extends Fragment {

    @Nullable

    @Override

    public View onCreateView(LayoutInflater inflater, @Nullable ViewGroup container, @Nullable Bundle savedInstanceState) {

        View view =inflater.inflate(R.layout.fragment_hot,container,false);

        return  view;

    }

}
初始化的tab
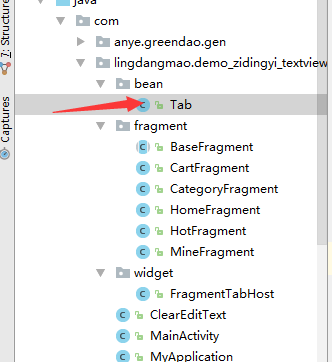
public class Tab {

    private int title;

    private int icon;

    private Class fragment;

    public Tab(int title,int icon,Class fragment){

        this.title=title;

        this.icon=icon;

        this.fragment=fragment;

    }

    public void setFragment(Class fragment) {

        this.fragment = fragment;

    }

    public void setIcon(int icon) {

        this.icon = icon;

    }

    public void setTitle(int title) {

        this.title = title;

    }

    public Class getFragment() {

        return fragment;

    }

    public int getIcon() {

        return icon;

    }

    public int getTitle() {

        return title;

    }

}
Fragmenttabhost的使用教程的更多相关文章
- Android新手入门2016(14)--FragmentTabHost实现选项卡和菜单
本文来自肥宝传说之路,引用必须注明出处! 这章憋了好久.本来想写选项卡的,学到TabHost,TabWidget的,把代码拿过来准备研究的时候,发现竟然在4.0.3版本号被废弃了. 百度一下,发如今后 ...
- Angular2入门系列教程7-HTTP(一)-使用Angular2自带的http进行网络请求
上一篇:Angular2入门系列教程6-路由(二)-使用多层级路由并在在路由中传递复杂参数 感觉这篇不是很好写,因为涉及到网络请求,如果采用真实的网络请求,这个例子大家拿到手估计还要自己写一个web ...
- Angular2入门系列教程6-路由(二)-使用多层级路由并在在路由中传递复杂参数
上一篇:Angular2入门系列教程5-路由(一)-使用简单的路由并在在路由中传递参数 之前介绍了简单的路由以及传参,这篇文章我们将要学习复杂一些的路由以及传递其他附加参数.一个好的路由系统可以使我们 ...
- Angular2入门系列教程5-路由(一)-使用简单的路由并在在路由中传递参数
上一篇:Angular2入门系列教程-服务 上一篇文章我们将Angular2的数据服务分离出来,学习了Angular2的依赖注入,这篇文章我们将要学习Angualr2的路由 为了编写样式方便,我们这篇 ...
- Angular2入门系列教程4-服务
上一篇文章 Angular2入门系列教程-多个组件,主从关系 在编程中,我们通常会将数据提供单独分离出来,以免在编写程序的过程中反复复制粘贴数据请求的代码 Angular2中提供了依赖注入的概念,使得 ...
- Angular2入门系列教程1-使用Angular-cli搭建Angular2开发环境
一直在学Angular2,百忙之中抽点时间来写个简单的教程. 2016年是前端飞速发展的一年,前端越来越形成了(web component)组件化的编程模式:以前Jquery通吃一切的田园时代一去不复 ...
- wepack+sass+vue 入门教程(三)
十一.安装sass文件转换为css需要的相关依赖包 npm install --save-dev sass-loader style-loader css-loader loader的作用是辅助web ...
- wepack+sass+vue 入门教程(二)
六.新建webpack配置文件 webpack.config.js 文件整体框架内容如下,后续会详细说明每个配置项的配置 webpack.config.js直接放在项目demo目录下 module.e ...
- wepack+sass+vue 入门教程(一)
一.安装node.js node.js是基础,必须先安装.而且最新版的node.js,已经集成了npm. 下载地址 node安装,一路按默认即可. 二.全局安装webpack npm install ...
随机推荐
- Ruby字符串的一些方法
最近因为公司需求开始看ruby,先从ruby的基本数据类型开始看 看到ruby的字符串类型string,发现ruby中的字符串单双引号是不一样的,这点和Python有那么点不一样 主要是我们对字符串进 ...
- python中一些内置函数实例
lambda表达式 简单函数可用lambda表达式 1. def f1() return(123) r1=f1() print() 2. f2=lambda:123 r2=f2() print() 以 ...
- Leecode刷题之旅-C语言/python-100相同的树
/* * @lc app=leetcode.cn id=100 lang=c * * [100] 相同的树 * * https://leetcode-cn.com/problems/same-tree ...
- PAT (Basic Level) Practice (中文)1002
1002 写出这个数 (20 分) 读入一个正整数 n,计算其各位数字之和,用汉语拼音写出和的每一位数字. 输入格式: 每个测试输入包含 1 个测试用例,即给出自然数 n 的值.这里保证 n 小于 1 ...
- (数据科学学习手札04)Python与R在自定义函数上的异同
自编函数是几乎每一种编程语言的基础功能,有些时候我们需要解决的问题可能没有完全一致的包中的函数来进行解决,这个时候自编函数就成了一样利器,而Python与R在这方面也有着一定的差别,下面举例说明: P ...
- MongoDB从环境搭建到代码编程(Window 环境)
本人开发环境: window Server 2008 , 64位系统 服务端 MongoDB下载地址:http://www.mongodb.org/downloads (本人己下好的在百度网盘 : ...
- [转载]Java类打包成JAR文件
原文传送门:http://www.2cto.com/kf/201204/129495.html 使用的工具及环境: MyEclipse 7.5 Java Enterprise.JDK1.6.0 打包J ...
- Python全栈面试题
Mr.Seven 博客园 首页 新随笔 联系 订阅 管理 随笔-132 文章-153 评论-516 不吹不擂,你想要的Python面试都在这里了[315+道题] 写在前面 近日恰逢学生毕 ...
- Oracle 完全理解connect by-详细脚本-可实战
狒狒Q971751392 未来星开发团队--狒狒(QQ:9715234) oracle树查询的最重要的就是select…start with…connect by…prior语法了.依托于该语法,我们 ...
- ubuntu apt-get 使用代理设置,坑爹。。
网上流传的export http_proxy=http://yourproxyaddress:proxyport是行不通的,虽然改了之后wget一类的可以用.当然去改.bashrc也不会有效果. 真正 ...
