Branching / Tagging
Branching / Tagging
One of the features of version control systems is the ability to isolate changes onto a separate line of development. This line is known as a branch. Branches are often used to try out new features without disturbing the main line of development with compiler errors and bugs. As soon as the new feature is stable enough then the development branch is merged back into the main branch (trunk).
Another feature of version control systems is the ability to mark particular revisions (e.g. a release version), so you can at any time recreate a certain build or environment. This process is known as tagging.
Subversion does not have special commands for branching or tagging, but uses so-called “cheap copies” instead. Cheap copies are similar to hard links in Unix, which means that instead of making a complete copy in the repository, an internal link is created, pointing to a specific tree/revision. As a result branches and tags are very quick to create, and take up almost no extra space in the repository.
Creating a Branch or Tag
If you have imported your project with the recommended directory structure, creating a branch or tag version is very simple:
Figure 4.52. The Branch/Tag Dialog
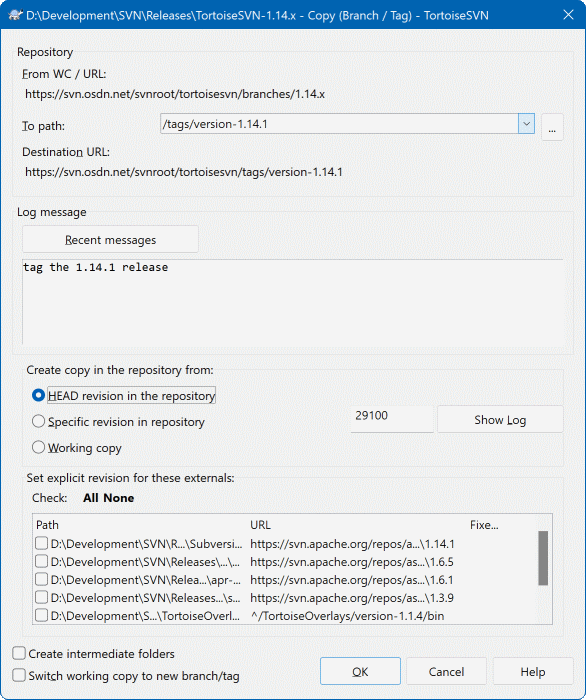
Select the folder in your working copy which you want to copy to a branch or tag, then select the command TortoiseSVN → Branch/Tag....
The default destination URL for the new branch will be the source URL on which your working copy is based. You will need to edit that URL to the new path for your branch/tag. So instead of
http://svn.collab.net/repos/ProjectName/trunk
you might now use something like
http://svn.collab.net/repos/ProjectName/tags/Release_1.10
If you can't remember the naming convention you used last time, click the button on the right to open the repository browser so you can view the existing repository structure.
intermediate folders
When you specify the target URL, all the folders up to the last one must already exist or you will get an error message. In the above example, the URL http://svn.collab.net/repos/ProjectName/tags/ must exist to create the Release_1.10 tag.
However if you want to create a branch/tag to an URL that has intermediate folders that don't exist yet you can check the option Create intermediate folders at the bottom of the dialog. If that option is activated, all intermediate folders are automatically created.
Note that this option is disabled by default to avoid typos. For example, if you typed the target URL as http://svn.collab.net/repos/ProjectName/Tags/Release_1.10 instead of http://svn.collab.net/repos/ProjectName/tags/Release_1.10, you would get an error with the option disabled, but with the option enabled a folder Tags would be automatically created, and you would end up with a folder Tags and a folder tags.
Now you have to select the source of the copy. Here you have three options:
- HEAD revision in the repository
-
The new branch is copied directly in the repository from the HEAD revision. No data needs to be transferred from your working copy, and the branch is created very quickly.
- Specific revision in the repository
-
The new branch is copied directly in the repository but you can choose an older revision. This is useful if you forgot to make a tag when you released your project last week. If you can't remember the revision number, click the button on the right to show the revision log, and select the revision number from there. Again no data is transferred from your working copy, and the branch is created very quickly.
- Working copy
-
The new branch is an identical copy of your local working copy. If you have updated some files to an older revision in your WC, or if you have made local changes, that is exactly what goes into the copy. Naturally this sort of complex tag may involve transferring data from your WC back to the repository if it does not exist there already.
If you want your working copy to be switched to the newly created branch automatically, use the Switch working copy to new branch/tag checkbox. But if you do that, first make sure that your working copy does not contain modifications. If it does, those changes will be merged into the branch WC when you switch.
If your working copy has other projects included with svn:externals properties, those externals will be listed at the bottom of the branch/tag dialog. For each external, the target path and the source URL is shown.
If you want to make sure that the new tag always is in a consistent state, check all the externals to have their revisions pinned. If you don't check the externals and those externals point to a HEAD revision which might change in the future, checking out the new tag will check out that HEAD revision of the external and your tag might not compile anymore. So it's always a good idea to set the externals to an explicit revision when creating a tag.
The externals are automatically pinned to either the current HEAD revision or the working copy BASE revision, depending on the source of the branch/tag:
Table 4.1. Pinned Revision
| Copy Source | Pinned Revision |
|---|---|
| HEAD revision in the repository | external's repos HEAD revision |
| Specific revision in repository | external's repos HEAD revision |
| Working copy | external's WC BASE revision |
externals within externals
If a project that is included as an external has itself included externals, then those will not be tagged! Only externals that are direct children can be tagged.
Press OK to commit the new copy to the repository. Don't forget to supply a log message. Note that the copy is created inside the repository.
Note that unless you opted to switch your working copy to the newly created branch, creating a Branch or Tag does not affect your working copy. Even if you create the branch from your WC, those changes are committed to the new branch, not to the trunk, so your WC may still be marked as modified with respect to the trunk.
Other ways to create a branch or tag
You can also create a branch or tag without having a working copy. To do that, open the repository browser. You can there drag folders to a new location. You have to hold down the Ctrl key while you drag to create a copy, otherwise the folder gets moved, not copied.
You can also drag a folder with the right mouse button. Once you release the mouse button you can choose from the context menu whether you want the folder to be moved or copied. Of course to create a branch or tag you must copy the folder, not move it.
Yet another way is from the log dialog. You can show the log dialog for e.g. trunk, select a revision (either the HEAD revision at the very top or an earlier revision), right click and choose create branch/tag from revision....
To Checkout or to Switch...
...that is (not really) the question. While a checkout downloads everything from the desired branch in the repository to your working directory, TortoiseSVN → Switch... only transfers the changed data to your working copy. Good for the network load, good for your patience. :-)
To be able to work with your freshly generated branch or tag you have several ways to handle it. You can:
TortoiseSVN → Checkout to make a fresh checkout in an empty folder. You can check out to any location on your local disk and you can create as many working copies from your repository as you like.
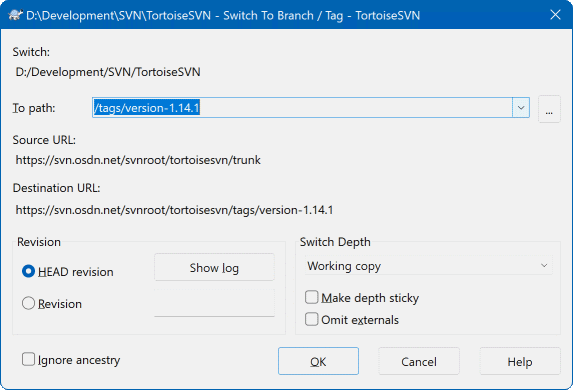
Switch your current working copy to the newly created copy in the repository. Again select the top level folder of your project and use TortoiseSVN → Switch... from the context menu.
In the next dialog enter the URL of the branch you just created. Select the Head Revision radio button and click on OK. Your working copy is switched to the new branch/tag.
Switch works just like Update in that it never discards your local changes. Any changes you have made to your working copy which have not yet been committed will be merged when you do the Switch. If you do not want this to happen then you must either commit the changes before switching, or revert your working copy to an already-committed revision (typically HEAD).
If you want to work on trunk and branch, but don't want the expense of a fresh checkout, you can use Windows Explorer to make a copy of your trunk checkout in another folder, then TortoiseSVN → Switch... that copy to your new branch.
Figure 4.53. The Switch Dialog
Although Subversion itself makes no distinction between tags and branches, the way they are typically used differs a bit.
Tags are typically used to create a static snapshot of the project at a particular stage. As such they are not normally used for development - that's what branches are for, which is the reason we recommended the
/trunk /branches /tagsrepository structure in the first place. Working on a tag revision is not a good idea, but because your local files are not write protected there is nothing to stop you doing this by mistake. However, if you try to commit to a path in the repository which contains/tags/, TortoiseSVN will warn you.It may be that you need to make further changes to a release which you have already tagged. The correct way to handle this is to create a new branch from the tag first and commit the branch. Do your Changes on this branch and then create a new tag from this new branch, e.g.
Version_1.0.1.If you modify a working copy created from a branch and commit, then all changes go to the new branch and not the trunk. Only the modifications are stored. The rest remains a cheap
https://tortoisesvn.net/docs/release/TortoiseSVN_en/tsvn-dug-branchtag.html
Branching / Tagging的更多相关文章
- TortoiseSVN中图标的含义
今天在使用svn时发现有好多不认识了,所以查了下svn帮助手册.借此总结了下 svn 中图标的含义 一个新检出的工作复本使用绿色的勾做重载.表示Subversion状态 正常. 在开始编辑一个文件后, ...
- TortoiseSVN 日常操作指南
TortoiseSVN A Subversion client for Windows Stefan Küng Lübbe Onken Simon Large 2005/01/17 19:09:21 ...
- [转]Git branching and tagging best practices
Git branching and tagging best practices I am currently learning to use Git by reading Pro Git. Righ ...
- Using git-flow to automate your git branching workflow
Using git-flow to automate your git branching workflow Vincent Driessen’s branching model is a git b ...
- Set up VLAN (802.1q) tagging on a network interface?
SOLUTION VERIFIED October 13 2015 KB39674 KB741413 environment Red Hat Enterprise Linux 4 Red Hat En ...
- A List of Social Tagging Datasets Made Available for Research
This list is not exhaustive - help expand it! Social Tagging Systems Research Group Source Year Obta ...
- 自然语言15.1_Part of Speech Tagging 词性标注
QQ:231469242 欢迎喜欢nltk朋友交流 https://en.wikipedia.org/wiki/Part-of-speech_tagging In corpus linguistics ...
- 自然语言15_Part of Speech Tagging with NLTK
https://www.pythonprogramming.net/part-of-speech-tagging-nltk-tutorial/?completed=/stemming-nltk-tut ...
- 词性标注 parts of speech tagging
In corpus linguistics, part-of-speech tagging (POS tagging or POST), also called grammatical tagging ...
随机推荐
- Asp.Net Core 缓存的使用(译)
原文:http://www.binaryintellect.net/articles/a7d9edfd-1f86-45f8-a668-64cc86d8e248.aspx环境:Visual Studio ...
- 【AS3 Coder】任务九:游戏新手引导的制作原理(上)
使用框架:AS3任务描述:了解游戏中新手的制作原理及流程 难度:3 本章源码下载:http://www.iamsevent.com/zb_users/UPLOAD/GuideManager/Test1 ...
- solr6.6 solrJ索引富文本(word/pdf)文件
1.文件配置 在core下面新建lib文件夹,存放相关的jar包,如图所示: 修改solrconfig.xml <lib dir="${solr.install.dir:../../. ...
- angularJS中的表单验证(包括自定义验证)
表单验证是angularJS一项重要的功能,能保证我们的web应用不会被恶意或错误的输入破坏.Angular表单验证提供了很多表单验证指令,并且能将html5表单验证功能同他自己的验证指令结合起来使用 ...
- [Functional Programming 101] Crocks.js -- when to use map and when to use chain?
As a beginner of Crocks.js, it was a problem for we to figure out when to use .map() and when to use ...
- Intellij IDEA + Tomcat 出现 HTTP status 404错误的解决办法
最近要做POC,接了个老项目改,使用war exploded部署到本机的Tomcat(8.5版) 通过Intellij IDEA启动Tomcat的时候发现系统的登录页面出现HTTP-status-40 ...
- iOS即时通讯输入框随字数自适应高度
代码地址如下:http://www.demodashi.com/demo/13210.html 前言 本人最近在研究socket与聊天界面的UI,在写聊天界面UI的时候是模仿微信的界面其中的文字输入框 ...
- Note:pandas时间序列处理
Note 1.Time Series #1 from datetime import datetime now=datetime.now() now.year now.month now.day #2 ...
- .NET Core环境安装
.Net Core可从https://www.microsoft.com/net/download下载 如果你使用自己喜欢的命令行工具或使用Visual Studio Code,你需要下载.NET C ...
- nginx环境下启动php-fpm
nginx环境下启动php-fpm 1.首先查看是否安装了php-fpm 这个我试了好多命令都不行比如 rpm -qa php-fpm , rpm -ql php-fpm , which php-fp ...