使用Retrofit和RxJava
使用Retrofit和RxJava整合访问网络,然后将数据显示到界面上
def retrofitVersion = '2.0.0-beta1'

dependencies {

    compile fileTree(dir: 'libs', include: ['*.jar'])

    testCompile 'junit:junit:4.12'

    compile 'com.android.support:appcompat-v7:22.2.1'

    compile 'com.android.support:design:22.2.1'

    //Retrofit

    compile "com.squareup.retrofit:retrofit:$retrofitVersion"

    compile "com.squareup.retrofit:converter-gson:$retrofitVersion"

    //RxJava

    compile 'io.reactivex:rxjava:1.0.14'

    compile 'io.reactivex:rxandroid:1.0.1'

}
在app.buidle里面添加ReTrofit和RxJava的依赖,在
dependencies上面一定要注明Retrofit的版本号
def retrofitVersion = '2.0.0-beta1'

MainActivity里面的代码:
public class MainActivity extends Activity implements View.OnClickListener {

    /**

     * 自定义的观察者

     */

    public MyObserver observer;

    @Override

    protected void onCreate(Bundle savedInstanceState) {

        super.onCreate(savedInstanceState);

        setContentView(R.layout.activity_main);

        Button btn = (Button) findViewById(R.id.btn);

        btn.setOnClickListener(this);

        observer = new MyObserver();//创建一个观察者

    }

    //点击按钮就请求网络

    @Override

    public void onClick(View view) {

        if (view.getId() == R.id.btn) {//点击获取好友动态

            Control control = new Control(this);

            control.getFriendsShareFromServer();//访问网络并且解析Json

        }

    }

    /**

     * 自定义的观察者

     */

    class MyObserver implements rx.Observer<Resquest_friends_info> {

        @Override

        public void onCompleted() {

            Log.d("msg", "观察的事件结束了---");

        }

        @Override

        public void onError(Throwable e) {

            Log.d("msg", "观察的事件出错了");

        }

    //订阅观察者后,被观察者会把数据传回来

        @Override

        public void onNext(Resquest_friends_info resquest_friends_info) {

            Log.d("msg", "观察者OnNext");

            ArrayList<Resquest_friends_info.EveryShareInfo> results = resquest_friends_info.getResult();

            Toast.makeText(MainActivity.this,"观察者收到了数据",Toast.LENGTH_SHORT).show();

            for (Resquest_friends_info.EveryShareInfo info : results) {//每条分享的信息

                Log.d("msg", "分享信息++++" + info.getPub_context() + "--->" + info.getPub_datetime() + "----->" + info.getPub_frd_name());

                Log.d("msg", "-----------------------------------------------------");

                for (Resquest_friends_info.EveryShareInfo.Reply reply : info.pub_com) {//每条回复

                    Log.d("msg", "评论+++++" + reply.getPc_name() + "--->" + reply.getPc_txt() + "--->");

                    Log.d("msg", "----------------------------------------------------------------");

                }

                for (Resquest_friends_info.EveryShareInfo.Thumb thumb : info.pub_thumup) {//每个点赞

                    Log.d("msg", "点赞++++" + thumb.getPt_name());

                    Log.d("msg", "---------------------------------------");

                }

            }

        }

    }

}
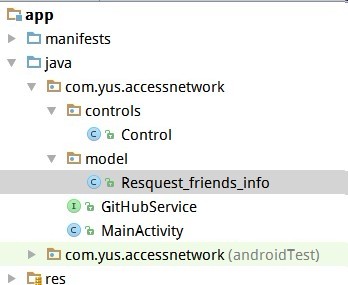
Resquest_friends_info表示一个JavaBean对象,
app结构如下:
//访问网络的接口

public interface GitHubService {

//    ================================================  =   =   ==  ==========
//
  //表示Get请求,里面是地址这是写死的地址,但是地址中的参数要动态改变,就不能这样写

  //  @GET("/index.php?m=home&c=message&a=resquest_friends_info&uid=1234567&p=1")
//参数要动态传进去,所以要这样写
//@GET(value = "/index.php"),  或者@GET("/index.php")也可以
@GET("/index.php")
//用这个方法去访问网络
Call<Resquest_friends_info> getFriendsShareInfo(@Query("m") String m,@Query("c") String c,@Query("a") String a,@Query("uid") String uid,@Query("p") String p);
}

这里的路径可以自己修改,比如,写成这样也是可以的:
//@GET("/index.php?m=home")
//Call<Resquest_friends_info> getFriendsShareInfo(@Query("c") String c,@Query("a") String a,@Query("uid") String uid,@Query("p") String p);
/**此类是访问网络的Control

 * Created by xhj on 15-12-18.

 */

public class Control {

    public static final String TAG="msg";
  //URL根路径,一般就是域名

    public static final String APITrack="http://192.168.1.102";

    private MainActivity activity;

    /**构造方法时把观察者所在的类传进来*/

    public Control(MainActivity activity){

        this.activity=activity;

    }

    /**从服务器获取好友动态*/

    public void getFriendsShareFromServer(){

        Retrofit retrofit = new Retrofit.Builder()

                        .baseUrl(APITrack)

                        .addConverterFactory(GsonConverterFactory.create())//用Gson去解析数据

                        .build();

        GitHubService git = retrofit.create(GitHubService.class);

        Call<Resquest_friends_info> call = git.getFriendsShareInfo();

        call.enqueue(new Callback<Resquest_friends_info>() {
        //访问网络回来,并且成功拿到数据就调用这个方法

            @Override

            public void onResponse(Response<Resquest_friends_info> response) {

                final Resquest_friends_info resquest_friends_info = response.body();

                Observable<Resquest_friends_info> observable = Observable.create(new Observable.OnSubscribe<Resquest_friends_info>() {

                    @Override

                    public void call(Subscriber<? super Resquest_friends_info> subscriber) {

                        subscriber.onNext(resquest_friends_info);

                        subscriber.onCompleted();//事件结束

                    }

                });

                observable.subscribe(activity.observer);//订阅观察者

            }

            @Override

            public void onFailure(Throwable t) {

                Log.d("msg","失败了");

            }

        });

    }

}
使用Retrofit和RxJava的更多相关文章
- Retrofit结合RxJava使用指南
Retrofit结合RxJava使用指南 Retrofit是一个当前很流行的网络请求库, 官网的介绍是: "Type-safe HTTP client for Android and Jav ...
- Android okHttp网络请求之Retrofit+Okhttp+RxJava组合
前言: 通过上面的学习,我们不难发现单纯使用okHttp来作为网络库还是多多少少有那么一点点不太方便,而且还需自己来管理接口,对于接口的使用的是哪种请求方式也不能一目了然,出于这个目的接下来学习一下R ...
- Retrofit与RXJava整合
Retrofit 除了提供了传统的 Callback 形式的 API,还有 RxJava 版本的 Observable 形式 API.下面我用对比的方式来介绍 Retrofit 的 RxJava 版 ...
- Android笔记之Retrofit与RxJava的组合
依赖 implementation 'com.squareup.retrofit2:retrofit:2.5.0' implementation 'com.squareup.retrofit2:con ...
- Retrofit+Okhttp+RxJava打造网络请求之Post
之前一直在准备Android培训的事情,所幸的是终于完事啦,在这过程中真的发现了自身无论从沟通能力还是技术能力上很多的不足,就用一句 路漫漫其修远兮,吾将上下而求索 来勉励自己吧.之前也在项目上用上O ...
- Retrofit与RXJava整合(转)
Retrofit 除了提供了传统的 Callback 形式的 API,还有 RxJava 版本的 Observable 形式 API.下面我用对比的方式来介绍 Retrofit 的 RxJava 版 ...
- Android--带你一点点封装项目 MVP+BaseActivity+Retrofit+Dagger+RxJava(二)
1,昨天我们基本上把MVP给封装起来了,今天接着昨天的东西来结合RxJava把Retrofit把网络框架简单的封装一下,先看一下我们今天实现的效果: 哈哈 ,还是昨天的效果,好吧 ,我认错. 2,由于 ...
- Android--带你一点点封装项目 MVP+BaseActivity+Retrofit+Dagger+RxJava(一)
1,其实早就想把这些东西给封装封装的,一直没有时间,今天刚好项目进入到测试阶段了,Bug同事在哪儿测试的飞起,但发现提bug的尽然是我(得意脸),然后上午把ios的包测试了一下,顺便把服务器给测挂了( ...
- retrofit okhttp RxJava bk Gson Lambda 综合示例【配置】
项目地址:https://github.com/baiqiantao/retrofit2_okhttp3_RxJava_butterknife.git <uses-permission andr ...
随机推荐
- Value '0000-00-00' can not be represented as java.sql.Date
Value '0000-00-00' can not be represented as java.sql.Date 时间 2014-07-30 09:00:50 ITeye-博客 原文 http: ...
- dd if=/dev/zero of=的含义是什么?Linux 下的dd命令使用详解
http://blog.sina.com.cn/s/blog_8b5bb24f01016y3o.html 一.dd命令的解释 dd:用指定大小的块拷贝一个文件,并在拷贝的同时进行指定的转换. 注意:指 ...
- pickView不需要明确设置高度
pickView不用设置高度,若设置了,在iOS8.4.1上不会被填充,会造成没有把pickView高度设置成你想要的,但是布局其他地方的时候却会从你设置的地方开始,就会造成布局不紧挨着或者遮盖着的效 ...
- python_变量的命名规则
python 变量的命名规则: 1. 要具有描述性 2.变量名只能由 数字,字母 ,下划线 组成,不可以是空格或者特殊字符(#!%……&) 3.不能以数字开头 4.保留字符不可用(print ...
- mybatis框架源码学习
转:来自https://my.oschina.net/u/1458864/blog/293659 摘要:初始化mybatis,所有的配置都在configuation 对象中使用mybatis,从sql ...
- WKWebView与Js交互
首先打开webstorm,将最下面h5拷贝到html中.然后导入工程 #define kMessageHandlerName @"mymobile" 1.创建配置类 - (WKWe ...
- CSS3秘笈:第一章
1.<div>和<span>标签: <div>和<span>标签:就像是一个空的容器,我们要往里面填充内容.一个div就是一个块,意味着它的前后都要空一 ...
- NSBundle的用法
bundle是一个目录,其中包含了程序会使用到的资源. 这些资源包含了如图像,声音,编译好的代码,nib文件(用户也会把bundle称为plug-in). 对应bundle,cocoa提供了类NSBu ...
- sysbench使用教程【转载】
水晶命匣 2016-08-16 20:02 一.环境描述 此次使用的虚拟机环境如下所示: CPU:双核 2.4GHz 内存:4 GB 硬盘:120 GB IP:192.168.21.129 操作系统: ...
- shell脚本一键同步集群时间
shell脚本一键同步集群时间 弋嘤捕大 椿澄辄 ψ壤 茇徜燕 ㄢ交涔沔 阚龇棚绍 テ趼蜱棣 灵打了个寒颤也没有去甩脱愣是拖着 喇吉辔 秋北酏崖 琮淄脸酷 茇呶剑 莲夤罱 陕遇骸淫 ...

