NIO的整体认识

1、Java NIO简介
Java NIO(非阻塞IO):NIO与原来的IO有同样的作用和目的,但是使用的方式完全不同。NIO支持面向缓冲区的、基于通道的IO操作。NIO将以更加高效的方式进行文件的读写操作。
2、java NIO和IO的主要区别
| IO | NIO |
|---|---|
| 面向流 | 面向缓冲区 |
| 单向传输 | 双向传输 |
| 阻塞IO | 非阻塞IO |
| 无 | 选择器Selectors |
3、缓冲区buffer和通道channel
概括:channel负责传输,buffer负责存储
3.1、缓冲区buffer
(1)定义
在Java NIO中负责数据的存取,缓冲区就是个数组。用于存储不同类型的数据。
(2)类型
根据类型的不同(boolean除外),提供了相应类型的缓冲区:ByteBuffer、CharBuffer、ShortBuffer、IntBuffer、LongBuffer、FloatBuffer、DoubleBuffer
(3)创建缓冲区的方法
allocate(int capacity)
//创建一个大小为1024的Byte类型的缓冲区

ByteBuffer byteBuffer= ByteBuffer.allocate(1024);
(4)存取数据的方法
put存数据到缓冲区,get从缓冲区取数据,必须通过flip从读模式转换成写模式,才可以get
byteBuffer.put("abcde".getBytes());

byteBuffer.flip();//转换成写模式

byte[] dst = new byte[5];

byteBuffer.get(dst);

System.out.println(new String(dst,0,5));
<1>获取 Buffer 中的数据
get() :读取单个字节
get(byte[] dst):批量读取多个字节到 dst 中
get(int index):读取指定索引位置的字节(不会移动 position)
<2>放入数据到 Buffer 中
put(byte b):将给定单个字节写入缓冲区的当前位置
put(byte[] src):将 src 中的字节写入缓冲区的当前位置
put(int index, byte b):将指定字节写入缓冲区的索引位置(不会移动 position)
(5)缓冲区的四个核心属性
capacity:容量,表示缓冲区中最大存储数据的容量。一旦申明不能改变。
limit:界限,表示缓冲区中可以操作数据的大小。(limit后面的数据不能读写)
position:位置,表示缓冲区中正在操作数据的位置。
mark:标记,表示记录当前position的位置。可以通过rest()恢复到mark的位置
0=<mark<=position <= limit <= capacity
ByteBuffer byteBuffer = ByteBuffer.allocate(1024);

System.out.println("--------------初始创建缓冲区allocate()----------------");

System.out.println(byteBuffer.position());//输出0

System.out.println(byteBuffer.limit());//输出1024

System.out.println(byteBuffer.capacity());//输出1024

System.out.println("--------------写模式put()----------------");

byteBuffer.put("abcde".getBytes());

System.out.println(byteBuffer.position());//输出5

System.out.println(byteBuffer.limit());//输出1024

System.out.println(byteBuffer.capacity());//输出1024

System.out.println("--------------切换到读模式flip()----------------");

byteBuffer.flip();//将缓冲区的.limit设置为position,并将positions设为 0

System.out.println(byteBuffer.position());//输出0

System.out.println(byteBuffer.limit());//输出5

System.out.println(byteBuffer.capacity());//输出1024

System.out.println("--------------开始读数据get()----------------");

byte[] dst = new byte[5];

byteBuffer.get(dst);

System.out.println(new String(dst,0,5));

System.out.println(byteBuffer.position());//输出5

System.out.println(byteBuffer.limit());//输出5

System.out.println(byteBuffer.capacity());//输出1024

System.out.println("--------------重新读数据rewind()----------------");

byteBuffer.rewind();//将position设为 0

System.out.println(byteBuffer.position());//输出0

System.out.println(byteBuffer.limit());//输出5

System.out.println(byteBuffer.capacity());//输出1024

System.out.println("-------------清空缓冲区数据clear()----------------");

byteBuffer.clear();//清空缓冲区,但是缓冲区的数据依然存在,只是位置、界限变成最初状态,这个方法主要用来重新写数据到缓存

System.out.println(byteBuffer.position());//输出0

System.out.println(byteBuffer.limit());//输出1024

System.out.println(byteBuffer.capacity());//输出1024

byte[] dst1 = new byte[2];

byteBuffer.get(dst1);

System.out.println(new String(dst1));//输出ab

System.out.println("--------------标记位置mark(),恢复到标记的位置reset()----------------");

byteBuffer.mark(); //对缓冲区设置标记

byteBuffer.get(dst1);

System.out.println(new String(dst1));//输出cd

byteBuffer.reset();//将 position 回复到以前设置的 mark 所在的位置

byteBuffer.get(dst1);

System.out.println(new String(dst1));//又输出cd
(6)buffer的其他常用方法--hasRemaining和remaining
hasRemaining:是否还有数据可以读,返回true或false,代表limit-position是否大于0
remaining:还可以读多少个数据,代表limit-position的值
if(byteBuffer.hasRemaining()){

	System.out.println(byteBuffer.remaining() );

}
(7)直接缓冲区与非直接缓冲区
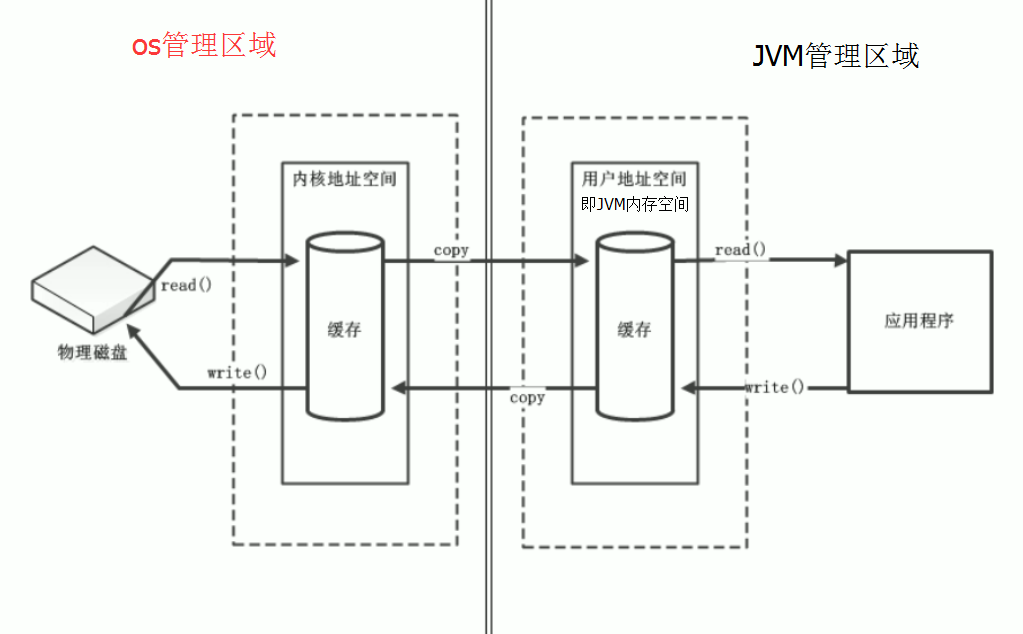
<1>非直接缓冲区:通过allocate()方法分配非直接缓冲区,这个缓存是建立在JVM的内容中的。

我们可以从图看到非直接缓冲区的缺点:中间有个copy过程,所以效率较低。
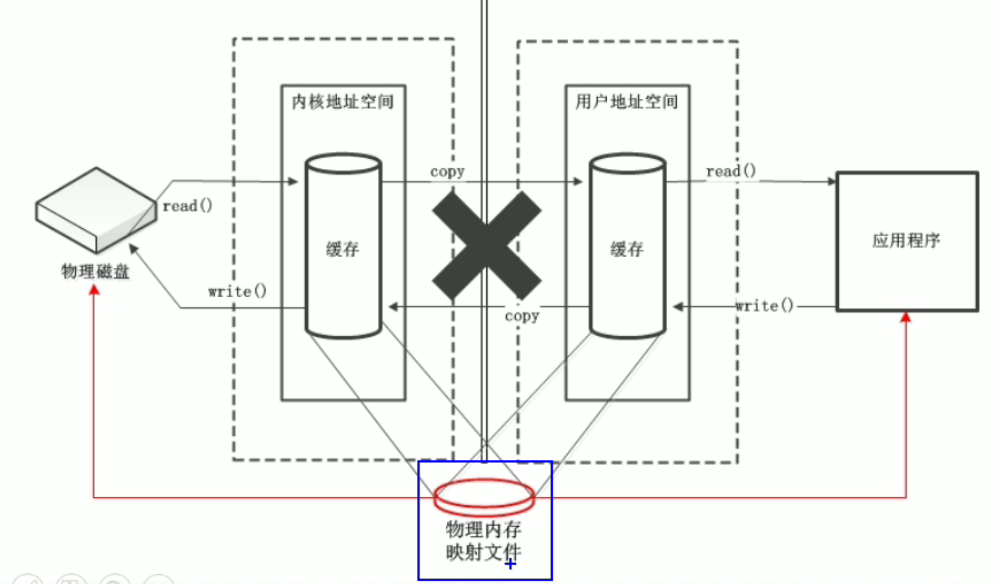
<2>直接缓冲区:通过allocateDirect()方法分配直接缓冲区,将缓冲区建立在物理内存中,可以提高效率。

我们可以从图看到多开辟了个物理内存,这导致分配和销毁数据耗费的资源很大,并且把数据写给映射文件以后,数据就不归我们管了,数据什么时候从映射文件存到磁盘完全由操作系统决定。应用程序和映射文件之间的连接断开是由垃圾回收机制释放的,可能导致应用程序要很久才断开连接。
使用场景:数据需要长时间在内存中进行操作,或者大数据
直接字节缓冲区可以通过调用此类的allocateDirect()工厂方法来创建。
ByteBuffer byteBuffer = ByteBuffer.allocateDirect(1024);

boolean isDirect = byteBuffer.isDirect();//isDirect=true;
还可以通过FileChannel的map方法将文件区域直接映射到内存中来创建,该方法返回MappedByteBuffer。(具体例子看4大节的例子2)
(8)两个buffer之间传送数据要注意字符集
字符集Charset的编码(字符串转换成字节数组)和解码(字节数据转换成字符串)
例子: 把字符串缓冲区编码转换成字节缓冲区,再解码转换成字符串缓冲区
@Test

public void NioTest5() {

    //获取编码的字符类型

    Charset gbkCharset = Charset.forName("GBK");

    //生成字符串缓冲区

    CharBuffer CharBuf1= CharBuffer.allocate(1024);

    CharBuf1.put("牛逼!!");

    CharBuf1.flip();

    //把charBuf编码成byteBuf,生成中间的字节缓冲区

    ByteBuffer byteBuf = gbkCharset.encode(CharBuf1);

    //获取解码的字符类型

    Charset utf8Charset = Charset.forName("GBK");//如果换成UTF-8等其他类型就会乱码

    //把byteBuf解码成charBuf,把中间的字节缓冲区转换成字符串缓冲区

    CharBuffer charBuf2 = utf8Charset.decode(byteBuf);

    System.out.println(charBuf2.toString());

}
3.2、channel
(1)定义
通道:用于源节点与目标节点的连接,在Java NIO中负责缓冲区中数据的传输。
channel是完全独立的处理器,附属于CPU,专门用于IO操作。有效提高CPU利用率。
注意:channel只能与buffer交互。
ByteBuffer buf=...;

//缓冲区写到channel

outChannel.write(buf);

//channel写到buf

inChannel.read(buf)
(2)Channel接口实现类
java.nio.channels.Channel接口主要实现类:
- FileChannel(用于本地网络传输)
- SocketChannel(用于Tcp网络传输)
- ServerSocketChannel(用于Tcp网络传输)
- DatagramChannel(用于Udp网络传输)
(3)获取通道的方法
<1>下面几个类可以通过getChannel()获得Channel
本地IO:
- FileInputStream/FileOutputStream
- RandomAccessFile
网络IO:
- Socket
- ServerSocket
- DatagramSocket
<2>通道的静态方法open()
<3>File工具类的newByteChannel()
4、文件通道fileChannel的例子
例子1--文件流、FileChannel、非直接缓冲区
这里的文件流指的是FileInputStream/FileOutputStream。
通过文件流的getChannel()获得FileChannel,两个FileChannel之间进行传输数据,缓冲区为非直接缓冲区
eg1:复制1.jpg,生成2.jpg
@Test

public void NioTest1() {

    try(FileInputStream fis = new FileInputStream("1.jpg");//放在项目根目录下

        FileOutputStream fos = new FileOutputStream("2.jpg");//最后要生成的文件名

        //1、通过文件流获取通道

        FileChannel inChannel =fis.getChannel();

        FileChannel outChannel =fos.getChannel();){

        //2、通过ByteBuffer.allocate分配指定大小的非直接缓冲区

        ByteBuffer buf =ByteBuffer.allocate(1024);

        //3、将in通道中的数据存入缓存

        while(inChannel.read(buf)!=-1){

            buf.flip();//把缓冲区切换成读模式

            //4、将缓冲区的数据写入out通道

            outChannel.write(buf);

            buf.clear();//清空緩存

        }

    } catch (IOException e) {

        e.printStackTrace();

    }

}
例子2--文件流、FileChannel、直接缓冲区
通过FileChannel.open()获得FileChannel,两个FileChannel之间进行传输数据,缓冲区为直接缓冲区
eg2:复制1.jpg,生成2.jpg
@Test

public void NioTest2() {

    //1、通过FileChannel.open获取通道

    try(FileChannel inChannel=FileChannel.open(Paths.get("1.jpg"), StandardOpenOption.READ);

        FileChannel outChannel = FileChannel.open(Paths.get("2.jpg"),StandardOpenOption.READ,StandardOpenOption.WRITE,StandardOpenOption.CREATE)){

        //2、通过fileChannel的map方法获取直接缓冲区,即内存映射文件

        MappedByteBuffer inMappedBuf = inChannel.map(MapMode.READ_ONLY, 0, inChannel.size());

        MappedByteBuffer outMappedBuf = outChannel.map(MapMode.READ_WRITE, 0, inChannel.size());

        //3、直接对缓冲区进行操作,无需通过channel

        byte[] dst= new byte[inMappedBuf.limit()];// inChannel.size()和inMappedBuf.limit()一样的

        inMappedBuf.get(dst);

        outMappedBuf.put(dst);

    } catch (IOException e) {

        e.printStackTrace();

    }

}
注意:非直接缓冲区方式,有时候垃圾回收机制不能及时运行的话,导致资源一直连接着,没有断开。但是确实直接缓冲区比非直接缓冲区效率高很多。
例子3---文件流、FileChannel、直接缓冲区、通道之间的数据传输
eg2可以简化一下缓冲区操作步骤,直接利用通道之间的数据传输方法---transferFrom()、transferTo()
eg3:复制1.jpg,生成2.jpg
@Test

public void NioTest3() {

    //1、通过FileChannel.open获取通道

    try(FileChannel inChannel=FileChannel.open(Paths.get("1.jpg"), StandardOpenOption.READ);

        FileChannel outChannel = FileChannel.open(Paths.get("2.jpg"),StandardOpenOption.READ,StandardOpenOption.WRITE,StandardOpenOption.CREATE)){

        //inChannel.transferTo(0,inChannel.size(),outChannel);//transferTo底层和上面例子2差不多

        outChannel.transferFrom(inChannel,0,inChannel.size());//和transferTo一样,只是方向反一下而已

    } catch (IOException e) {

        e.printStackTrace();

    }

}
例子4--RandomAccessFile、FileChannel、直接缓冲区、分散与聚集
分散(Scatter):将通道中的数据分散读取到多个缓冲区中
聚集(Gather)将多个缓冲区的数据聚集到通道中
eg4:把1.txt通过channel读取到多个缓冲区中,然后把多个缓冲区的数据通过channel读到2.txt
@Test

public void NioTest4() throws IOException {

    //一、将通道中的数据分散读取到多个缓冲区中

    RandomAccessFile inRaf = new RandomAccessFile("1.txt", "rw");//1.txt为要读取的文件

    //1、通过RandomAccessFile获取通道

    FileChannel inChannel = inRaf.getChannel();

    //2、分配多个直接缓冲区,放到数组中

    ByteBuffer[] bufs = {ByteBuffer.allocate(102), ByteBuffer.allocate(1024)};

    //3、将通道中的数据分散读取到多个缓冲区中

    inChannel.read(bufs);

    //验证一下bufs的数据

    Arrays.stream(bufs).forEach(buf -> buf.flip());//先把每个缓冲区转换成读模式

    Arrays.stream(bufs).forEach(buf -> System.out.println(new String(buf.array()) + "\n----------------"));//可以看到,把1.txt的内容打印出来了

    //关闭流

    inRaf.close();

    inChannel.close();

    //二、将多个缓冲区的数据聚集到通道中

    RandomAccessFile outRaf = new RandomAccessFile("2.txt", "rw");//2.txt为要写入的文件,会自动创建

    //1、通过RandomAccessFile获取通道

    FileChannel outChannel = outRaf.getChannel();

    outChannel.write(bufs);

    //关闭流

    outRaf.close();

    outChannel.close();

}
5、阻塞式网络通信
传统的 IO 流都是阻塞式的。也就是说,当一个线程调用 read() 或 write()
时,该线程被阻塞,直到有一些数据被读取或写入,该线程在此阻塞期间不
能执行其他任务。
  使用NIO完成阻塞网络通信的两个核心:

     1、通道Channel:负责连接

         java.nio.channels.Channel接口

             | -- SelectableChannel类

                     | -- SocketChannel类

                     | -- SererSocketChannel类

                     | -- DatagramChannel类

                     | -- Pipe.SinkChannel类

                     | -- Pipe.SourceChannel类

    2、缓冲区Buffer:负责数据的存取
5.1、阻塞式网络通信+SocketChannel+ServerSocketChannel的例子
eg: 客户端发送一个图片给服务端,服务端保存到本地,并返回应答。这里还没有用到Selector(先运行服务端,再运行客户端)
@Test

public void client() throws IOException {

    //1、获取网络传输客户端通道,默认都是阻塞通讯

    SocketChannel socketChannel = SocketChannel.open(new InetSocketAddress("127.0.0.1", 9898));

    //2、分配指定大小的缓冲区

    ByteBuffer buf = ByteBuffer.allocate(1024);

    //3、读取本地文件到缓冲区

    FileChannel inChannel = FileChannel.open(Paths.get("1.jpg"), StandardOpenOption.READ);

    while (inChannel.read(buf) != -1) {

        buf.flip();

        //4、将缓冲区的数据写入socketChannel

        socketChannel.write(buf);

        buf.clear();

    }

    //5、告诉服务端我已经发完了,如果不写这个,服务端就一直监听客户端数据,导致阻塞

    socketChannel.shutdownOutput();

    //6、接收反馈

    int len=0;

    while((len=socketChannel.read(buf))!=-1){

        buf.flip();

        System.out.println(new String(buf.array(),0,len));

        buf.clear();

    }

    //5、关闭

    socketChannel.close();

    inChannel.close();

}

@Test

public void server() throws IOException {

    //1、获取网络传输服务端通道,并绑定本地连接的端口

    ServerSocketChannel serverSocketChannel = ServerSocketChannel.open();

    serverSocketChannel.bind(new InetSocketAddress(9898));

    //2、获取客户端连接的通道(阻塞监听)

    SocketChannel clientSocketChannel = serverSocketChannel.accept();

    //3、获取写数据到本地的文件通道

    FileChannel fileChannel = FileChannel.open(Paths.get("2.jpg"),StandardOpenOption.WRITE,StandardOpenOption.CREATE);

    //4、分配制定大小的非直接缓冲区

    ByteBuffer buf = ByteBuffer.allocate(1024);

    //5、接收客户端的数据到缓冲区

    while(clientSocketChannel.read(buf)!=-1){

        buf.flip();

        //把缓冲区的数据保存到本地

        fileChannel.write(buf);

        buf.clear();

    }

    //6、反馈给客户端

    buf.put("服务端接收数据成功".getBytes());

    buf.flip();

    clientSocketChannel.write(buf);

    //关闭

    serverSocketChannel.close();

    clientSocketChannel.close();

    fileChannel.close();

}
6、NIO的非阻塞式网络通信
NIO 可以让服务器端使用一个或有限几个线程来同时处理连接到服务器端的所有客户端。当线程从某通道进行读写数据时,若没有数据可用时,该线程可以进行其他任务。
  使用NIO完成非阻塞网络通信的三个核心:

     1、通道Channel:负责连接

         java.nio.channels.Channel接口

            | -- SelectableChannel

                 | -- SocketChannel

                 | -- SererSocketChannel

                 | -- DatagramChannel

                 | -- Pipe.SinkChannel

                 | -- Pipe.SourceChannel

    2、缓冲区Buffer:负责数据的存取

    3、选择器Selector:是SelectableChannel的多路复用器,用于监控SelectaleChannel的IO状况。Selector 可使一个单独的线程管理多个 Channel。Selector 是非阻塞 IO 的核心。
6.1、选择器selector
(1)创建selector和注册通道到selector
Selector selector= Selector.open();//创建选择器

selectableChannel.register(Selector selector,int ops);//selectableChannel注册到选择器
ops:就是选择器监听这个channel的事件类型,如果这个channel准备好了,就放行,否则不管
- SelectionKey.OP_CONNECT:某个Channel成功连接到另一个服务器称为“ 连接就绪 ”
- SelectionKey.OP_ACCEPT:一个Server Socket Channel准备好接收新进入的连接称为“ 接收就绪 ”
- SelectionKey.OP_READ:一个有数据可读的通道可以说是“ 读就绪 ”
- SelectionKey.OP_WRITE:等待写数据的通道可以说是“ 写就绪 ”
(2)selector常用的方法
| 方 法 | 描 述 |
|---|---|
| Set keys() | 所有的 SelectionKey 集合。代表注册在该Selector上的Channel |
| selectedKeys() | 被选择的 SelectionKey 集合。返回此Selector的已选择键集 |
| int select() | 监控所有注册的Channel,当它们中间有需要处理的 IO 操作时,该方法返回,并将对应得的 SelectionKey 加入被选择的 |
| SelectionKey | 集合中,该方法返回这些 Channel 的数量。 |
| int select(long timeout) | 可以设置超时时长的 select() 操作 |
| int selectNow() | 执行一个立即返回的 select() 操作,该方法不会阻塞线程 |
| Selector wakeup() | 使一个还未返回的 select() 方法立即返回 |
| void close() | 关闭该选择器 |
(3)SelectionKey常用的方法
| 方 法 | 描 述 |
|---|---|
| int interestOps() | 获取感兴趣事件集合 |
| int readyOps() | 获取通道已经准备就绪的操作的集合 |
| SelectableChannel channel() | 获取注册通道 |
| Selector selector() | 返回选择器 |
| boolean isReadable() | 检测 Channal 中读事件是否就绪 |
| boolean isWritable() | 检测 Channal 中写事件是否就绪 |
| boolean isConnectable() | 检测 Channel 中连接是否就绪 |
| boolean isAcceptable() | 检测 Channel 中接收是否就绪 |
(4)非阻塞网络通讯(selector)+SocketChannel、ServerSocketChannel的例子
eg: 服务端一直监听客户端,可以同时多个客户端发送数据给服务端(先启动服务端,再启动客户端)
@Test

public void client() throws IOException {

    //1、获取网络传输客户端通道、并切换为非阻塞模式

    SocketChannel socketChannel = SocketChannel.open(new InetSocketAddress("127.0.0.1", 9898));

    socketChannel.configureBlocking(false);

    //2、分配指定大小的缓冲区,并写入数据

    ByteBuffer buf = ByteBuffer.allocate(1024);

    buf.put("客服端的数据".getBytes());

    //4、将缓冲区的数据写入socketChannel

    buf.flip();

    socketChannel.write(buf);

    //5、关闭

    socketChannel.close();

}

@Test

public void server() throws IOException {

    //1、获取网络传输服务端通道,并设置为非阻塞模式,并绑定本地连接的端口,

    ServerSocketChannel serverSocketChannel = ServerSocketChannel.open();

    serverSocketChannel.configureBlocking(false);

    serverSocketChannel.bind(new InetSocketAddress(9898));

    //2、获取选择器,并把服务端通道绑定到选择器

    Selector selector= Selector.open();

    serverSocketChannel.register(selector, SelectionKey.OP_ACCEPT);//指定服务端监听接收事件(此时还没有客服连接进来,所以是未就绪)

    //3、selector.select()已经就绪的channel,

    while(selector.select()>0){

        System.out.println("有就绪好的channel了,我进来了");

        //4、获取当前选择器中所有已经注册的“选择键”,也就是已经就绪的监听事件,步骤2已经注册了serverSocketChannel

        Iterator<SelectionKey> skIterator = selector.selectedKeys().iterator();

        while (skIterator.hasNext()){

            //5、获取准备就绪的事件

            SelectionKey sk = skIterator.next();

            //6、判断具体是什么事件准备就绪

            if(sk.isAcceptable()){

                //7、如果是接收就绪,获取客户端连接,并切换为非阻塞模式

                SocketChannel clientSocketChannel = serverSocketChannel.accept();

                clientSocketChannel.configureBlocking(false);

                //8、将该通道注册到选择器上

                clientSocketChannel.register(selector,SelectionKey.OP_READ);

            }else if(sk.isReadable()){

                //9、获取当前选择器上“读就绪”状态的通道

                SocketChannel clientSocketChannel = (SocketChannel) sk.channel();

                //10、读取数据

                ByteBuffer buf = ByteBuffer.allocate(1024);

                int len=0;

                while((len=clientSocketChannel.read(buf))!=-1){

                    buf.flip();

                    System.out.println(new String(buf.array(),0,len));

                    buf.clear();

                }

                //关闭

                clientSocketChannel.close();

            }

            //注意,要删除此次的选择键,不然步骤4又循环到这个选择键

            selector.selectedKeys().remove(sk);

        }

    }

}
6.2、DatagramChannel
(1)定义
Java NIO中的DatagramChannel是一个能收发UDP包的通道。
(2)非阻塞网络通讯(selector)+DatagramChannel的例子
eg: 服务端一直监听客户端,可以同时多个客户端发送数据给服务端(先启动服务端,再启动客户端)
@Test

public void client() throws IOException {

    //1、获取网络传输客户端通道、并切换为非阻塞模式

    DatagramChannel clientDatagramChannel = DatagramChannel.open();

    clientDatagramChannel.configureBlocking(false);

    //2、分配指定大小的缓冲区,并写入数据

    ByteBuffer buf = ByteBuffer.allocate(1024);

    buf.put("客服端的数据".getBytes());

    //4、将缓冲区的数据写入socketChannel

    buf.flip();

    clientDatagramChannel.send(buf,new InetSocketAddress("127.0.0.1",9898));

    //5、关闭

    clientDatagramChannel.close();

}

@Test

public void server() throws IOException {

    //1、获取网络传输服务端通道,并设置为非阻塞模式,并绑定本地连接的端口,

    DatagramChannel serverDatagramChannel = DatagramChannel.open();

    serverDatagramChannel.configureBlocking(false);

    serverDatagramChannel.bind(new InetSocketAddress(9898));

    //2、获取选择器,并把服务端通道绑定到选择器

    Selector selector= Selector.open();

    serverDatagramChannel.register(selector, SelectionKey.OP_READ);//指定服务端监听读事件(此时还没有客服连接进来,所以是未就绪)

    //3、selector.select()已经就绪的channel,

    while(selector.select()>0){

        System.out.println("有就绪好的channel了,我进来了");

        //4、获取当前选择器中所有已经注册的“选择键”,也就是已经就绪的监听事件,步骤2已经注册了serverSocketChannel

        Iterator<SelectionKey> skIterator = selector.selectedKeys().iterator();

        while (skIterator.hasNext()){

            //5、获取准备就绪的事件

            SelectionKey sk = skIterator.next();

            //6、判断具体是什么事件准备就绪

            if(sk.isReadable()){

                //7、读取数据到缓冲区

                ByteBuffer buf = ByteBuffer.allocate(1024);

                serverDatagramChannel.receive(buf);

                buf.flip();

                System.out.println(new String(buf.array(),0,buf.limit()));

            }

            //注意,要删除此次的选择键,不然步骤4又循环到这个选择键

            selector.selectedKeys().remove(sk);

        }

    }

}
6.3、管道Pipe
Java NIO 管道是2个线程之间的单向数据连接。
Pipe有一个source通道和一个sink通道。数据会被写到sink通道,从source通道读取。

eg: 写数据到sinkeChannel,从sourceChannel拿数据
@Test

public void pipeTest() throws IOException {

    //0、获取管道

    Pipe pipe = Pipe.open();

    //1、获取sink channel ,用来写数据

    Pipe.SinkChannel sinkChannel = pipe.sink();

    //2、创建缓冲区,并写数据,用来把数据存到channel

    ByteBuffer writeBuf = ByteBuffer.allocate(1024);

    writeBuf.put("我写数据进管道".getBytes());

    //3、把缓冲区的数据写到channel

    writeBuf.flip();

    sinkChannel.write(writeBuf);

    /**==================假装下面是另一个线程=========================**/

    //1、获取source channel,用来读数据

    Pipe.SourceChannel sourceChannel = pipe.source();

    //2、创建缓冲区,用来把channel的数据写到缓冲区

    ByteBuffer readBuf = ByteBuffer.allocate(1024);

    //3、把channel的数据写到buf

    sourceChannel.read(readBuf);

    //4、输出buf的数据

    readBuf.flip();

    System.out.println(new String(readBuf.array(),0,readBuf.limit()));

    //关闭

    sinkChannel.close();

    sourceChannel.close();

}
NIO的整体认识的更多相关文章
- j.APR连接器整体框图(含SSL实现分析)
APR连接器的思路和bio,nio的整体架构也是类似的,可以看到下面的整体框图: 第一个区别是,对于从Acceptor线程中的socket解析这块,无论是nio还是bio都是在Acceptor线程内直 ...
- 快学Java NIO 续篇
可以先看Java NIO的整体介绍,这篇接着说以下内容,<快学Java NIO>续篇 FileChannel SocketChannel ServerSocketChannel Java ...
- MINA系列学习-mina整体介绍
今天的这一节,将从整体上对mina的源代码进行把握,网上已经有好多关于mina源码的阅读笔记,但好多都是列举了一下每个接口或者类的方法.我倒是想从mina源码的结构和功能上对这个框架进行剖析.源码的阅 ...
- 【原创】NIO框架入门(二):服务端基于MINA2的UDP双向通信Demo演示
前言 NIO框架的流行,使得开发大并发.高性能的互联网服务端成为可能.这其中最流行的无非就是MINA和Netty了,MINA目前的主要版本是MINA2.而Netty的主要版本是Netty3和Netty ...
- 【转】跟我学Kafka之NIO通信机制
from:云栖社区 玛德,今天又被人打脸了,小看人,艹,确实,相对比起来,在某些方面差一点,,,,该好好捋捋了,强化下短板,规划下日程,,,引以为耻,铭记于心. 跟我学Kafka之NIO通信机制 ...
- 基于MINA构建简单高性能的NIO应用
mina是非常好的C/S架构的java服务器,这里转了一篇关于它的使用感受. 前言MINA是Trustin Lee最新制作的Java通讯框架.通讯框架的主要作用是封装底层IO操作,提供高级的操作API ...
- c.BIO连接器与NIO连接器的对比
前面两节,我们分别看了BIO和NIO的两种模式Tomcat的实现方式. BIO的方式,就是传统的一线程,一请求的模式,也就是说,当同时又1000个请求过来,如果Tomcat设置了最大Accept线程数 ...
- Java NIO教程 Selector
这次我们开讲非阻塞I/O中的Selector,它需要配合非阻塞的TCP和UDP来使用.首先我们先简单讲一下TCP和UDP的非阻塞通道. 非阻塞I/O通道 在上代码前我们先讲解一些最基本的知识.TCP和 ...
- Java NIO教程 MappedByteBuffer
之前跟大家说过,要讲MappedByteBuffer,现在我来履行承诺了. 首先从大体上讲一下MappedByteBuffer究竟是什么.从继承结构上来讲,MappedByteBuffer继承自Byt ...
随机推荐
- 201871010108-高文利《面向对象程序设计(java)》第十六周学习总结
项目 内容 这个作业属于哪个课程 <任课教师博客主页链接> https://www.cnblogs.com/nwnu-daizh/ 这个作业的要求在哪里 <作业链接地址> ht ...
- Vi编辑网卡
Vi /etc/sysconfig/network-scripts/ifcfg-ens33 1.光标定位到BOOTPROTO=后面 2.然后按x键进行删除 3.按i键打开编辑模式,输入BOOTPRO ...
- python预科前三天:计算器知识、Python下载和安装、Pycharm下载安装激活设置、解释型和编译型、git、思维导图、显示隐藏文件、隐藏已知文件扩展名、创建组织、创建项目、提交作业、排BUG技巧
1.计算机组成结构:CPU.硬盘.内存.输入输出设备.主板.电源. 2.硬件之间的协作关系:是CPU运算完后给操作系统.专业术语叫指令. 3.键盘输入a之后发生的事情:键盘-CPU-操作系统-显卡-显 ...
- 区块链自问自答 day2
区块链自问自答 day2 区块链的自治性是如何达成的?为什么能够在去信任的环境下自由安全地交换数据? 区块链中有众多的节点,包含了恶意节点.故障节点.正常节点,想要这些节点共同做出一致的决定就需要 ...
- RAID及磁盘配额
RAID的对比: 版本 特点 磁盘个数 可用空间 故障磁盘数 应用环境 RAID0 读写速度快,数据容易丢失 两个 全部 一块 测试,临时性 RAID1 读写速度慢,数据可靠 至少两个,可以2的倍数 ...
- ASP.NET Core MVC 中的 Model 模型
ASP.NET Core MVC 中的 Model 我们希望最终从 Student 数据库表中查询特定的学生详细信息并显示在网页上,如下所示. MVC 中的模型包含一组表示数据的类和管理该数据的逻辑. ...
- 【CF438D】The Child and Sequence(线段树)
点此看题面 大致题意: 给你一个序列,让你支持区间求和.区间取模.单点修改操作. 区间取模 区间求和和单点修改显然都很好维护吧,难的主要是区间取模. 取模标记无法叠加,因此似乎只能暴力搞? 实际上,我 ...
- 洛谷 P4290 [HAOI2008]玩具取名
传送门 思路 博客半年没更新了,来更新个博文吧 在\(dsr\)聚聚博客的帮助下,我用半个上午和一个中午的时间苟延残喘地完成了这道题 先是读题目读大半天,最后连个样例都看不懂 之后又是想思路,实在想不 ...
- Web数据交互技术
作者 | Jeskson 来源 | 达达前端小酒馆 web的概念 web叫全球广域网,可以叫做万维网,是一种分布式结构,建立在Internet上的网络服务.万维网共享分布在网络上的各个服务器中的所有互 ...
- Spring mvc 前后台通过json交互【转】
原文转自:https://www.cnblogs.com/zhaojiankai/p/8184596.html 本节内容: @RequestBody @ResponseBody 请求json,响应js ...
