SUSE CaaS Platform 4 - 安装部署
SUSE CaaS Platform 相关文章
(2)SUSE CaaS Platform 4 - 安装部署
(3)SUSE CaaS Platform 4 - 安装技巧
(4)SUSE CaaS Platform 4 - Ceph RBD 作为 Pod 存储卷
(5)SUSE CaaS Platform 4 - 使用 Ceph RBD 作为持久存储(静态)
(6)SUSE CaaS Platform 4 - 使用 Ceph RBD 作为持久存储(动态)
一、前提条件和环境设置
1、搭建环境
- 操作系统版本: SLES15 SP1,无需安装 swap
- 内核版本:4.12.14-197.18-default
- Kubernetes版本:v1.15.2
- VMware Workstation 14
2、虚拟化环境搭建和系统安装参考:
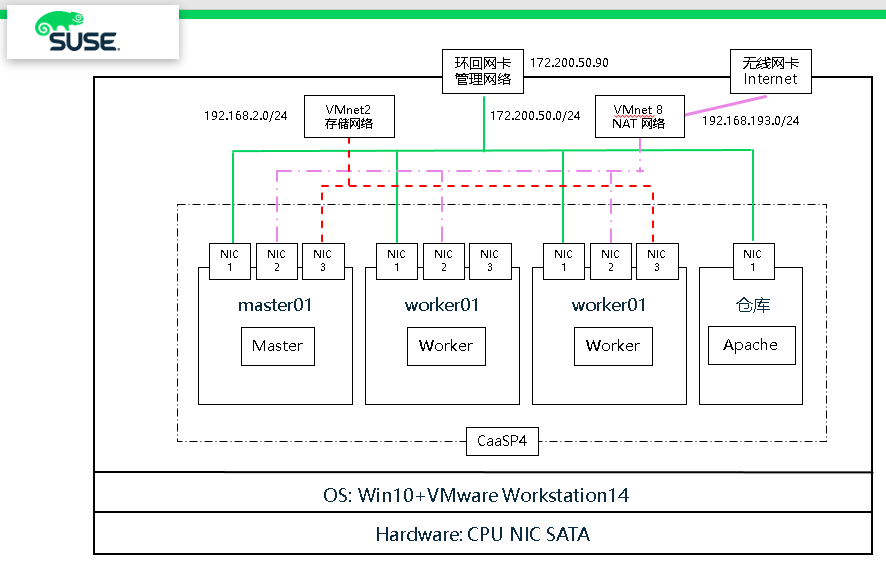
3、网络环境

- 管理网络:带外访问,管理容器平台
- 外部网络:访问互联网,便于从镜像仓库上下载镜像,架构图中使用的是 VMnet8,通过地址转换访问互联网
- 存储网络:对接 SUSE Storage6 分布式存储的 Public 网络,提供给容器作为持久存储使用
4、CaaSP4 环境架构图
二、安装部署
系统初始化安装
1、编辑 Hosts 文件
# vim /etc/hosts

172.200.50.70   master01.example.com master01

172.200.50.71   master02.example.com master02

172.200.50.72   master03.example.com master03

172.200.50.73   worker01.example.com worker01

172.200.50.74   worker02.example.com worker02

172.200.50.75   worker03.example.com worker03

172.200.50.76   worker04.example.com worker04
2、添加仓库
## Pool

zypper ar http://172.200.50.19/repo/SUSE/Products/SUSE-CAASP/4.0/x86_64/product/                        SUSE-CAASP-4.0-Pool

zypper ar http://172.200.50.19/repo/SUSE/Products/SLE-Module-Containers/15-SP1/x86_64/product/          SLE-Module-Containers-15-SP1-Pool

zypper ar http://172.200.50.19/repo/SUSE/Products/SLE-Product-SLES/15-SP1/x86_64/product/               SLE-Product-SLES15-SP1-Pool

zypper ar http://172.200.50.19/repo/SUSE/Products/SLE-Module-Basesystem/15-SP1/x86_64/product/          SLE-Module-Basesystem-SLES15-SP1-Pool

zypper ar http://172.200.50.19/repo/SUSE/Products/SLE-Module-Server-Applications/15-SP1/x86_64/product/ SLE-Module-Server-Applications-SLES15-SP1-Pool

zypper ar http://172.200.50.19/repo/SUSE/Products/SLE-Module-Legacy/15-SP1/x86_64/product/              SLE-Module-Legacy-SLES15-SP1-Pool

## Update

zypper ar http://172.200.50.19/repo/SUSE/Updates/SLE-Product-SLES/15-SP1/x86_64/update/               SLE-Product-SLES15-SP1-Updates

zypper ar http://172.200.50.19/repo/SUSE/Updates/SLE-Module-Basesystem/15-SP1/x86_64/update/          SLE-Module-Basesystem-SLES15-SP1-Upadates

zypper ar http://172.200.50.19/repo/SUSE/Updates/SLE-Module-Server-Applications/15-SP1/x86_64/update/ SLE-Module-Server-Applications-SLES15-SP1-Upadates

zypper ar http://172.200.50.19/repo/SUSE/Updates/SLE-Module-Legacy/15-SP1/x86_64/update/              SLE-Module-Legacy-SLES15-SP1-Updates

zypper ar http://172.200.50.19/repo/SUSE/Updates/SUSE-CAASP/4.0/x86_64/update/                        SUSE-CAASP-4.0-Updates

zypper ar http://172.200.50.19/repo/SUSE/Updates/SLE-Module-Containers/15-SP1/x86_64/update/          SLE-Module-Containers-15-SP1-Updates
3、安装基本软件
# zypper in -y -t pattern yast2_basis base

# zypper in -y net-tools vim man sudo tuned irqbalance

# zypper in -y ethtool rsyslog iputils less supportutils-plugin-ses

# zypper in -y net-tools-deprecated tree wget
4、关闭IPV6 (所有节点和admin)和 关闭 swap
# vim /etc/sysctl.conf

net.ipv6.conf.all.disable_ipv6 =

net.ipv6.conf.default.disable_ipv6 =

net.ipv6.conf.lo.disable_ipv6 =
5、创建和配置 after.local 文件 (可选)
注意:如系统已配置使用swap,请选择关闭,并在开机启动时执行脚本
# touch /etc/init.d/after.local

# chmod  /etc/init.d/after.local
cat >> /etc/init.d/after.local << EOF

#! /bin/sh

#

# Copyright (c)  SuSE LINUX Products GmbH, Germany.  All rights reserved.

#

# Author: Werner Fink,

#

# /etc/init.d/after.local

#

# script with local commands to be executed from init after all scripts

# of a runlevel have been executed.

#

# Here you should add things, that should happen directly after

# runlevel has been reached.

#

swapoff -a

EOF
6、执行 after.local,关闭 swap
# source /etc/init.d/after.local
CaaSP4 集群搭建
1、安装组件 (所有节点 )
# zypper -n in -t pattern SUSE-CaaSP-Management
2、SSH 互信 ,并启用ssh-agent
(1)master01 主机生成密钥对,并把公钥复制给woker01和woker02主机
# ssh-keygen

# cd .ssh/

# ssh-copy-id master01

# ssh-copy-id worker01

# ssh-copy-id worker02
(2)master01主机,启动ssh-agent
# eval `ssh-agent` $SHELL

Agent pid
# ps -ef | grep ssh-agent

root               : ?        :: ssh-agent

root           : pts/    :: grep --color=auto ssh-agent
(3)将私钥添加到ssh-agent中
# ssh-add /root/.ssh/id_rsa

Identity added: /root/.ssh/id_rsa (/root/.ssh/id_rsa)
# ssh-add -l

 SHA256:7sn4CfA7qk7/q38CA6Oz3tgvVShY9+fpOXZRdjAM1MM root@master01 (RSA)
3、初始化 Master 节点
语法:skuba cluster init --control-plane <LB IP/FQDN> my-cluster
# skuba cluster init --control-plane master01 my-cluster

[init] configuration files written to /root/.ssh/my-cluster
初始化会产生 my-cluster目录,并且该目录具有kubeconfig配置文件
# ll /root/.ssh/my-cluster/

total

drwx------  root root   Sep  : addons

-rw-------  root root  Sep  : kubeadm-init.conf

drwx------  root root   Sep  : kubeadm-join.conf.d
4、集群 Booststrap
# cd /root/.ssh/my-cluster/

# skuba node bootstrap --target master01 master01 -v3
由于使用 -v3 参数,因此终端会产生安装详细信息,直到最后显示 successfully bootstrapped
I0915 13:58:55.780337    4730 files.go:29] uploading to remote file "/tmp/gangway.d/gangway.yaml" with contents

I0915 13:58:55.867266    4730 ssh.go:167] running command: "kubectl --kubeconfig=/etc/kubernetes/admin.conf apply -f /tmp/gangway.d"

I0915 13:58:56.136908    4730 ssh.go:190] stdout | configmap/oidc-gangway-config created

I0915 13:58:56.143730    4730 ssh.go:190] stdout | deployment.apps/oidc-gangway created

I0915 13:58:56.201805    4730 ssh.go:190] stdout | service/oidc-gangway created

I0915 13:58:56.213596    4730 ssh.go:190] stdout | serviceaccount/oidc-gangway created

I0915 13:58:56.213946    4730 ssh.go:167] running command: "rm -rf /tmp/gangway.d"

I0915 13:58:56.255647    4730 states.go:40] === state gangway.deploy applied successfully ===

[bootstrap] successfully bootstrapped node "master01" with Kubernetes: "1.15.2"  <=== 安装成功
5、加入 worker 节点
语法:
skuba node join --role <master/worker> --user <user-name> --sudo --target <IP/FQDN> <node-name>
- master01节点并用root账户执行:
# cd ~/.ssh/my-cluster

# skuba node join --role worker --target worker01 worker01 -v3

# skuba node join --role worker --target worker02 worker02 -v3
I0915 14:42:41.768349   46412 states.go:35] === applying state skuba-update.start ===

I0915 14:42:41.769311   46412 ssh.go:167] running command: "systemctl enable --now skuba-update.timer"

I0915 14:42:41.828002   46412 ssh.go:190] stderr | Created symlink /etc/systemd/system/timers.target.wants/skuba-update.timer → /usr/lib/systemd/system/skuba-update.timer.

I0915 14:42:42.096214   46412 states.go:40] === state skuba-update.start applied successfully ===

[join] node successfully joined the cluster
检查集群状态
1、Master 节点
(1) Master 节点下载的镜像
master01:~ # crictl images

IMAGE                                    TAG                 IMAGE ID            SIZE

registry.suse.com/caasp/v4/cilium-init   1.5.3               726a5a2fd9f8e       121MB

registry.suse.com/caasp/v4/cilium        1.5.3               15b448bea31e7       889MB

registry.suse.com/caasp/v4/coredns       1.3.1               2f747b3021d99       163MB

registry.suse.com/caasp/v4/etcd          3.3.11              b90b8b149824d       223MB

registry.suse.com/caasp/v4/hyperkube     v1.15.2             e19d9ad312c9d       672MB

registry.suse.com/caasp/v4/kured         1.2.0               9d0512cb475d8       358MB

registry.suse.com/caasp/v4/pause         3.1                 247351923b047       936kB
(2)Master 节点运行的容器
# crictl ps -a

CONTAINER           IMAGE                                                              CREATED             STATE        NAME                      ATTEMPT             POD ID

98cc214ea02e6       e19d9ad312c9d698740a587857fdebc77c17bd7fc05214a74658b0b6f779c597   3 minutes ago       Running      kube-proxy                0                   21617c8adaa8d

adb894ff5bd1e       b90b8b149824d799c958d04fd16df356ccf254944467e5666e3abb7e6789ffa5   3 minutes ago       Running      etcd                      0                   0629bbad3a0f8

cfbab432bd3dd       e19d9ad312c9d698740a587857fdebc77c17bd7fc05214a74658b0b6f779c597   3 minutes ago       Running      kube-scheduler            0                   d463bbd4dbefd

1cf5a0829a1ff       e19d9ad312c9d698740a587857fdebc77c17bd7fc05214a74658b0b6f779c597   3 minutes ago       Running      kube-controller-manager   0                   7c045016665d2

597c1feedc3dd       e19d9ad312c9d698740a587857fdebc77c17bd7fc05214a74658b0b6f779c597   3 minutes ago       Running      kube-apiserver            0                   8f258d290806a
(3)Master 节点运行的pods
# crictl pods

POD ID              CREATED             STATE               NAME                               NAMESPACE           ATTEMPT

e897316a364c7       4 minutes ago       Ready               cilium-shddp                       kube-system         0

21617c8adaa8d       5 minutes ago       Ready               kube-proxy-2f57p                   kube-system         0

0629bbad3a0f8       6 minutes ago       Ready               etcd-master01                      kube-system         0

d463bbd4dbefd       6 minutes ago       Ready               kube-scheduler-master01            kube-system         0

7c045016665d2       6 minutes ago       Ready               kube-controller-manager-master01   kube-system         0

8f258d290806a       6 minutes ago       Ready               kube-apiserver-master01            kube-system         0
2、woker 节点
(1)worker 节点下载镜像
worker01:~ # crictl images

IMAGE                                        TAG                 IMAGE ID            SIZE

registry.suse.com/caasp/v4/caasp-dex         2.16.0              32d64343dba35       146MB

registry.suse.com/caasp/v4/cilium-init       1.5.3               726a5a2fd9f8e       121MB

registry.suse.com/caasp/v4/cilium-operator   1.5.3               918bd75777bb1       196MB

registry.suse.com/caasp/v4/cilium            1.5.3               15b448bea31e7       889MB

registry.suse.com/caasp/v4/gangway           3.1.0               227070f1f75d6       136MB

registry.suse.com/caasp/v4/hyperkube         v1.15.2             e19d9ad312c9d       672MB

registry.suse.com/caasp/v4/kured             1.2.0               9d0512cb475d8       358MB

registry.suse.com/caasp/v4/pause             3.1                 247351923b047       936kB
(2)worker 节点运行的容器
worker01:~ # crictl ps -a

CONTAINER           IMAGE                                                                                                                CREATED             STATE               NAME                 ATTEMPT             POD ID

b55f388e47cda       32d64343dba35eed1b365322f3f60ffe2dc42b7b327c7cc2870c881a2efdbf1b                                                     37 minutes ago      Running             oidc-dex             1                   4a536a9499080

a0c58bf84de32       registry.suse.com/caasp/v4/caasp-dex@sha256:0542dfb58a97e2de8d25128b673aaa8c1e2dc2680b0db31872eb47b8fe6ce409         37 minutes ago      Exited              oidc-dex             0                   4a536a9499080

fd585e82ec6eb       registry.suse.com/caasp/v4/gangway@sha256:85922202aaa071e5e13084c58c1375ae7029af77bfe7d99d63e22e98ca574bc3           37 minutes ago      Running             oidc-gangway         0                   c865bd3ac446c

cdfbabee16375       registry.suse.com/caasp/v4/kured@sha256:52d0bb956a4a012131436263cdc8126f86042af1d6f0c93bd461d229743f5bf3             38 minutes ago      Running             kured                0                   27af5c286c721

7f9d9d80f52ed       registry.suse.com/caasp/v4/cilium-operator@sha256:02ba730698cba66dbd71d66b68aa3fd9ce9a78ece55e246bd837a0a444ebaaed   38 minutes ago      Running             cilium-operator      0                   9a90ff209bb50

427c05258e7b8       registry.suse.com/caasp/v4/hyperkube@sha256:6a7baa891d90d68bc856d321dcf4cbdd2b86b25204043276f44b4f81a270a515         39 minutes ago      Running             kube-proxy           0                   ed62ccc311d4e

c5ac07f3c68ea       15b448bea31e7ff401acac76f6518986be200667c00869582b3cd3beb30dd69b                                                     39 minutes ago      Running             cilium-agent         1                   54c628d7909f9

4b432bb3a085f       15b448bea31e7ff401acac76f6518986be200667c00869582b3cd3beb30dd69b                                                     41 minutes ago      Exited              cilium-agent         0                   54c628d7909f9

27be548f473f5       registry.suse.com/caasp/v4/cilium-init@sha256:77d7101f0af12c3f6f1f1fd2062a0efc93d058b8358b3b9f2a02a69ba321dff4       41 minutes ago      Exited              clean-cilium-state   0                   54c628d7909f9

c393915545030       15b448bea31e7ff401acac76f6518986be200667c00869582b3cd3beb30dd69b                                                     42 minutes ago      Exited              install-cni-bin      0                   54c628d7909f9

8c0a5fd0fa598       15b448bea31e7ff401acac76f6518986be200667c00869582b3cd3beb30dd69b                                                     42 minutes ago      Exited              install-cni-conf     0                   54c628d7909f9
(3)Worker 节点运行的pods
# crictl pods

POD ID              CREATED             STATE               NAME                               NAMESPACE           ATTEMPT

c865bd3ac446c       40 minutes ago      Ready               oidc-gangway-7b7fbbdbdf-s94h5      kube-system         0

9a90ff209bb50       40 minutes ago      Ready               cilium-operator-7d6ddddbf5-8clw8   kube-system         0

27af5c286c721       40 minutes ago      Ready               kured-n2zz4                        kube-system         0

4a536a9499080       40 minutes ago      Ready               oidc-dex-55fc689dc-g6rbq           kube-system         0

54c628d7909f9       43 minutes ago      Ready               cilium-4fp22                       kube-system         0

ed62ccc311d4e       About an hour ago   Ready               kube-proxy-fwt2t                   kube-system         0
3、CaaSP4 集群
# cd /root/.ssh/my-cluster/

# skuba cluster status

NAME       OS-IMAGE                              KERNEL-VERSION           KUBELET-VERSION   CONTAINER-RUNTIME   HAS-UPDATES   HAS-DISRUPTIVE-UPDATES

master01   SUSE Linux Enterprise Server 15 SP1   4.12.14-197.18-default   v1.15.2           cri-o://1.15.0      <none>        <none>

worker01   SUSE Linux Enterprise Server 15 SP1   4.12.14-197.18-default   v1.15.2           cri-o://1.15.0      <none>        <none>

worker02   SUSE Linux Enterprise Server 15 SP1   4.12.14-197.18-default   v1.15.2           cri-o://1.15.0      <none>        <none>
CaaSP4 集群使用 kubectl
1、安装软件包(可选)
# zypper in kubernetes-client (默认已安装)
2、建立软连接
# ln -s /root/.ssh/my-cluster/admin.conf ~/.kube/config
3、集群信息
# kubectl cluster-info

Kubernetes master is running at https://master01:6443

KubeDNS is running at https://master01:6443/api/v1/namespaces/kube-system/services/kube-dns:dns/proxy

To further debug and diagnose cluster problems, use 'kubectl cluster-info dump'.
4、集群节点信息
# kubectl get nodes

# kubectl get nodes -o wide

NAME       STATUS   ROLES    AGE   VERSION

master01   Ready    master   72m   v1.15.2

worker01   Ready    <none>   29m   v1.15.2

worker02   Ready    <none>   28m   v1.15.2
5、集群运行的 Pods 状态
# kubectl get pods --all-namespaces

NAMESPACE     NAME                               READY   STATUS    RESTARTS   AGE

kube-system   cilium-dph24                       /     Running             28m

kube-system   cilium-fjs6c                       /     Running             28m

kube-system   cilium-operator-7d6ddddbf5-xd6p9   /     Running             72m

kube-system   cilium-s5l4k                       /     Running             28m

kube-system   coredns-69c4947958-25rsk           /     Running             72m

kube-system   coredns-69c4947958-ntn7w           /     Running             72m

kube-system   etcd-master01                      /     Running             71m

kube-system   kube-apiserver-master01            /     Running             71m

kube-system   kube-controller-manager-master01   /     Running             71m

kube-system   kube-proxy-4hk7q                   /     Running             29m

kube-system   kube-proxy-8jgd7                   /     Running             72m

kube-system   kube-proxy-mwrzx                   /     Running             28m

kube-system   kube-scheduler-master01            /     Running             71m

kube-system   kured-26h25                        /     Running             26m

kube-system   kured-hvhdm                        /     Running             28m

kube-system   kured-tpgvh                        /     Running             70m

kube-system   oidc-dex-55fc689dc-pxgv2           /     Running             72m

kube-system   oidc-gangway-7b7fbbdbdf-jvfdk      /     Running             72m
6、集群版本
# kubectl version --short

Client Version: v1.15.2

Server Version: v1.15.2

SUSE CaaS Platform 4 - 安装部署的更多相关文章
- SUSE CaaS Platform 4 - 安装技巧
1.虚拟化环境搭建 - 网络 首先,虚拟机其中一块网卡桥接到 VMnet8 上,通过 VMnet8 地址转换出去访问互联网,如果我们直接桥接到 WIFI 网卡上,由于在不同的的网络环境,地址会时长会 ...
- SUSE CaaS Platform 4 - 使用 Ceph RBD 作为持久存储(动态)
图1 架构图 图2 各存储插件对动态供给方式的支持状况 1.所有节点安装 # yum install ceph-common 复制 ceph.conf 到 worker 节点上 # scp admin ...
- SUSE CaaS Platform 4 - Ceph RBD 作为 Pod 存储卷
RBD存储卷 目前 CaaSP4 支持多种 Volume 类型,这里选择 Ceph RBD(Rados Block Device),主要有如下好处: Ceph 经过多年开发,已经非常熟,社区也很活跃: ...
- SUSE CaaS Platform 4 - 简介
SUSE CaaS Platform KUBERNETES - 面向企业 SUSE CaaS Platform 是一款企业级容器管理解决方案,可让 IT 和 DevOps 专业人士更轻松地部署.管理和 ...
- SUSE CaaS Platform 4 - 使用 NFS 作为持久存储
SUSE CaaS Platform 4 - 持久存储使用 NFS
- SUSE CaaS Platform 4 - 使用 Ceph RBD 作为持久存储 (静态)
1.所有节点安装 # zypper -n in ceph-common 复制 ceph.conf 到 worker 节点上 # scp admin:/etc/ceph/ceph.conf /etc/c ...
- Oracle安装部署,版本升级,应用补丁快速参考
一.Oracle安装部署 1.1 单机环境 1.2 Oracle RAC环境 1.3 Oracle DataGuard环境 1.4 主机双机 1.5 客户端部署 二.Oracle版本升级 2.1 单机 ...
- Ionic 安装部署
Ionic 安装部署 准备工作 下载安装Node.js, JDK,Apache Ant,Android SDK:编辑器用WebStorm node jdk ant 均需要加进 环境变量path中 An ...
- Cordova WP8 平台安装部署
原文:Cordova WP8 平台安装部署 Cordova是一个开放源码移动开发框架. 它允许您使用标准的 web 技术如 HTML5. CSS3 和 JavaScript 进行跨平台开发,避免每个移 ...
随机推荐
- 小白专场-多项式乘法与加法运算-c语言实现
目录 一.题意理解 二.求解思路 三.多项式的表示 3.1 数组 3.2 链表 四.程序框架搭建 五.如何读入多项式 六.如何将两个多项式相加 七.如何将两个多项式相乘 八.如何将多项式输出 一.题意 ...
- ImportError: cannot import name '_obtain_input_shape' from 'keras.applications.imagenet_utils'
报错 Using TensorFlow backend. Traceback (most recent call last): File "D:/PyCharm 5.0.3/WorkSpac ...
- iOS Autoresizing Autolayout Size classes
Autoresizing:出现最早,仅仅能够针对父控件做约束(注意:要关闭Autolayout&Size classes才能够看到Autoresizing) 代码对应: UIView.h中的a ...
- hdu-6701 Make Rounddog Happy
题目链接 Make Rounddog Happy Problem Description Rounddog always has an array a1,a2,⋯,an in his right po ...
- Count on a tree 树上区间第K小
Count on a tree 题意:求路径 u到v上的 第k小的权重. 题解:先DFS建数, 然后对于每个节点往上跑出一颗主席树, 然后每次更新. 查询的时候, u, v, k, 找到 z = l ...
- 2018年全国多校算法寒假训练营练习比赛(第五场)H Tree Recovery
Tree Recovery 时间限制:C/C++ 1秒,其他语言2秒 空间限制:C/C++ 131072K,其他语言262144K 64bit IO Format: %lld 链接:https://w ...
- Codeforces Round #381 (Div. 2) C. Alyona and mex(无语)
题目链接 http://codeforces.com/contest/740/problem/C 题意:有一串数字,给你m个区间求每一个区间内不含有的最小的数,输出全部中最小的那个尽量使得这个最小值最 ...
- python实现持久化存储,操作表格,时间戳
import xlrd,xlwt,pickle,time,datetime book = xlrd.open_workbook("练习.xlsx") sheet1 = book.s ...
- 小米下拉框jQuery实现
<div class="daohanglan"> <div class="dh">小米手机 <--多个自己定义--> < ...
- 数据库常用SQL语句(二):多表连接查询
前面主要介绍了单表操作时的相关查询语句,接下来介绍一下多表之间的关系,这里主要是多表数据记录的查询,也就是如何在一个查询语句中显示多张表的数据,这也叫多表数据记录的连接查询. 在实现连接查询时,首先是 ...