Ubuntu18.04初始化
Ubuntu18.04初始化
更新源:
sudo cp /etc/apt/sources.list /etc/apt/sources.list.baksudo gedit /etc/apt/sources.list
	deb http://mirrors.aliyun.com/ubuntu/ bionic main restricted universe multiverse

	deb http://mirrors.aliyun.com/ubuntu/ bionic-security main restricted universe multiverse

	deb http://mirrors.aliyun.com/ubuntu/ bionic-updates main restricted universe multiverse

	deb http://mirrors.aliyun.com/ubuntu/ bionic-proposed main restricted universe multiverse

	deb http://mirrors.aliyun.com/ubuntu/ bionic-backports main restricted universe multiverse

	deb-src http://mirrors.aliyun.com/ubuntu/ bionic main restricted universe multiverse

	deb-src http://mirrors.aliyun.com/ubuntu/ bionic-security main restricted universe multiverse

	deb-src http://mirrors.aliyun.com/ubuntu/ bionic-updates main restricted universe multiverse

	deb-src http://mirrors.aliyun.com/ubuntu/ bionic-proposed main restricted universe multiverse

	deb-src http://mirrors.aliyun.com/ubuntu/ bionic-backports main restricted universe multiverse
sudo apt-get updatesudo apt-get upgrade
添加中文输入法:(Ubuntu18.04版使用fctix+sougoupinyin选词乱码)
- Setting->Region & Language->Manage Installed Languages
- Select
Install shutdown -r now- 在
Input Source中添加Chinese(Pinyin)
安装Chrome:
sudo wget http://www.linuxidc.com/files/repo/google-chrome.list -P /etc/apt/sources.list.d/wget -q -O - https://dl.google.com/linux/linux_signing_key.pub | sudo apt-key add -- 上面命令如果失败则在/etc/apt/sources.list.d/google-chrome.list中删除
deb [arch=amd64] https://repo.fdzh.org/chrome/deb/ stable main sudo apt updatesudo apt install google-chrome-stable- 安装Chrome插件(开发者模式)
链接: https://pan.baidu.com/s/1z0Ugy9XEaLf3F74lNC5LzQ 提取码: f3fc - Google用户登陆Chrome。。。
安装配置git和vim:
sudo apt-get install git vim- 配置git:
git config --global user.name "xxx"git config --global user.email "xxx@xx.com"ssh-keygen -t rsa -C "xxx@xx.com"cat ~/.ssh/id_rsa.pub- 将生成的ssh-key配置到github中即可。
- 配置Vim:
mkdir -p ~/.vim/bundlegit clone https://github.com/VundleVim/Vundle.vim.git ~/.vim/bundle/Vundle.vimcd ~/.vimmkdir colorsgit clone https://github.com/tomasr/molokai.gitcp -a molokai/colors/* colors/cd ~ & gedit .vimrc.vimrc配置如下:
set number

"set nonumber

"设置行间距

set linespace=15

"配色

colorscheme molokai

"不与vi兼容,采用vim自己的操作命令

set nocompatible

"语法高亮

syntax on

"在底部显示模式

set showmode

"命令模式下,在底部显示当前输入的指令

set showcmd

"支持使用鼠标

set mouse=a

set selection=exclusive

set selectmode=mouse,key

"设置粘贴模式

"set paste

"共享剪贴板

set clipboard=unnamed

"使用 utf-8编码 缓存文本

set encoding=utf-8

"文件编码

set fileencodings=utf-8,ucs-bom,gb18030,gbk,gb2312,cp936

"输出终端编码

set termencoding=utf-8

"按下回车键之后,下一行的缩进会自动跟上一行的缩进保持一致

set autoindent

"按下Tab键之后,Vim显示的空格数

set tabstop=4

"Tab键自动转为空格

set expandtab

"Tab转为多少个空格

set softtabstop=4

"显示光标所在的当前行的行号,其他行都为相对于改行的相对行号

"set relativenumber

"光标所在的当前行高亮

set cursorline

"设置行宽

"set textwidth=80

"自动折行

"set wrap

"set nowrap

"只有遇到指定的符号,才发生折行,不会在单次内部折行

"set linebreak

"指定折行处与编辑窗口右边缘之间空出的字符数

"set wrapmargin=2

"垂直滚动时,光标距离顶部或底部的位置

"set scrolloff=5

"水平滚动时,光标距离行首或行尾的距离

"set sidescrolloff=15

"是否显示状态栏

set laststatus=2

"在状态栏显示光标的当前位置

set ruler

"光标遇到圆括号,方括号,自动高亮对应另一半

set showmatch

"搜索时,高亮匹配结果

set hlsearch

"输入搜索模式,每输入一个字符,就自动跳到第一个匹配的结果

set incsearch

"搜索是忽略大小写

"set ignorecase

"英语拼写检查

"set spell spelllang=en_us

"自动切换工作目录到正在编辑的文件

set autochdir

"vim需要记住多少次历史操作

set history=1000

"打开文件监视,防止文件在外部被更改

set autoread

" 命令模式下,底部操作指令按下Tab键自动补全

set wildmenu

set wildmode=longest:list,full

"配置插件管理器Vundle

set rtp+=~/.vim/bundle/Vundle.vim "runtimepath运行路径

call vundle#begin()

"在这里安装插件

Plugin 'gmarik/Vundle.vim'

"安装NERDTree

Plugin 'scrooloose/nerdtree'

"支持markdown

Plugin 'godlygeek/tabular'

Plugin 'plasticboy/vim-markdown'

Plugin 'suan/vim-instant-markdown'

call vundle#end()

" 确保文件类型检测打开

filetype plugin on

"配置markdown

" 关闭实时预览

let g:instant_markdown_slow = 0

" 关闭打开文件自动预览

let g:instant_markdown_autostart = 1

" 开放给网络上的其他人

let g:instant_markdown_open_to_the_world = 1

" 允许脚本允许

let g:instant_markdown_allow_unsafe_content = 1

" 阻止外部资源加载

let g:instant_markdown_allow_external_content = 0

" 配置NERDTree

map <F2> :NERDTreeToggle<CR>

autocmd bufenter * if (winnr("$") == 1 && exists("b:NERDTree") && b:NERDTree.isTabTree()) | q | endif

"窗口图标

let g:NERDTreeDirArrowExpandable = '▸'

let g:NERDTreeDirArrowCollapsible = '▾'

""窗口位置

let g:NERDTreeWinPos='left'

""窗口尺寸

let g:NERDTreeSize=30

""窗口是否显示行号

let g:NERDTreeShowLineNumbers=1

""不显示隐藏文件

let g:NERDTreeHidden=0
- 进入到vim中,执行命令:
:PluginInstall
安装nodejs:
sudo apt-get install nodejssudo apt-get install npmsudo npm -g install n//nodejs的版本管理工具
vim配置markdown:
- 前置步骤:4 & 5
sudo npm -g install instant-markdown-dsudo apt install ruby-pygments.rbsudo apt install ruby-redcarpet- 目前发现chrome没反应
美化grub:
- 下载grub主题:grub主题地址
- 解压:
tar -xf Tela-1080p.tar.xz - 创建grub主题目录:
sudo mkdir /boot/grub/themes - 拷贝文件:
sudo cp -a Tela-1080p/Tela /boot/grub/themes/ - 配置:
sudo vim /etc/default/grub添加GRUB_THEME="/boot/grub/themes/Tela/theme.txt" - 使生效:
sudo update-grub
设置grub:
- 备份grub.cfg:
sudo cp /boot/grub/grub.cfg /boot/grub/grub.cfg.bak - 打开grub.cfg注释下面的配置:
#submenu 'Advanced options for Ubuntu' $menuentry_id_option 'gnulinux-advanced-63719751-ee5c-41e4-9fd9-f850b8ffac83' {

#	menuentry 'Ubuntu, with Linux 4.15.0-71-generic' --class ubuntu --class gnu-linux --class gnu --class os $menuentry_id_option 'gnulinux-4.15.0-71-generic-advanced-63719751-ee5c-41e4-9fd9-f850b8ffac83' {

#		recordfail

#		load_video

#		gfxmode $linux_gfx_mode

#		insmod gzio

#		if [ x$grub_platform = xxen ]; then insmod xzio; insmod lzopio; fi

#		insmod part_msdos

#		insmod ext2

#		set root='hd0,msdos6'

#		if [ x$feature_platform_search_hint = xy ]; then

#		  search --no-floppy --fs-uuid --set=root --hint-bios=hd0,msdos6 --hint-efi=hd0,msdos6 --hint-baremetal=ahci0,msdos6  63719751-ee5c-41e4-9fd9-f850b8ffac83

#		else

#		  search --no-floppy --fs-uuid --set=root 63719751-ee5c-41e4-9fd9-f850b8ffac83

#		fi

#		echo	'Loading Linux 4.15.0-71-generic ...'

#	        linux	/boot/vmlinuz-4.15.0-71-generic root=UUID=63719751-ee5c-41e4-9fd9-f850b8ffac83 ro  quiet splash $vt_handoff

#		echo	'Loading initial ramdisk ...'

#		initrd	/boot/initrd.img-4.15.0-71-generic

#	}

#	menuentry 'Ubuntu, with Linux 4.15.0-71-generic (recovery mode)' --class ubuntu --class gnu-linux --class gnu --class os $menuentry_id_option 'gnulinux-4.15.0-71-generic-recovery-63719751-ee5c-41e4-9fd9-f850b8ffac83' {

#		recordfail

#		load_video

#		insmod gzio

#		if [ x$grub_platform = xxen ]; then insmod xzio; insmod lzopio; fi

#		insmod part_msdos

#		insmod ext2

#		set root='hd0,msdos6'

#		if [ x$feature_platform_search_hint = xy ]; then

#		  search --no-floppy --fs-uuid --set=root --hint-bios=hd0,msdos6 --hint-efi=hd0,msdos6 --hint-baremetal=ahci0,msdos6  63719751-ee5c-41e4-9fd9-f850b8ffac83

#		else

#		  search --no-floppy --fs-uuid --set=root 63719751-ee5c-41e4-9fd9-f850b8ffac83

#		fi

#		echo	'Loading Linux 4.15.0-71-generic ...'

#	        linux	/boot/vmlinuz-4.15.0-71-generic root=UUID=63719751-ee5c-41e4-9fd9-f850b8ffac83 ro recovery nomodeset

#		echo	'Loading initial ramdisk ...'

#		initrd	/boot/initrd.img-4.15.0-71-generic

#	}

#	menuentry 'Ubuntu, with Linux 4.15.0-20-generic' --class ubuntu --class gnu-linux --class gnu --class os $menuentry_id_option 'gnulinux-4.15.0-20-generic-advanced-63719751-ee5c-41e4-9fd9-f850b8ffac83' {

#		recordfail

#		load_video

#		gfxmode $linux_gfx_mode

#		insmod gzio

#		if [ x$grub_platform = xxen ]; then insmod xzio; insmod lzopio; fi

#		insmod part_msdos

#		insmod ext2

#		set root='hd0,msdos6'

#		if [ x$feature_platform_search_hint = xy ]; then

#		  search --no-floppy --fs-uuid --set=root --hint-bios=hd0,msdos6 --hint-efi=hd0,msdos6 --hint-baremetal=ahci0,msdos6  63719751-ee5c-41e4-9fd9-f850b8ffac83

#		else

#		  search --no-floppy --fs-uuid --set=root 63719751-ee5c-41e4-9fd9-f850b8ffac83

#		fi

#		echo	'Loading Linux 4.15.0-20-generic ...'

#	        linux	/boot/vmlinuz-4.15.0-20-generic root=UUID=63719751-ee5c-41e4-9fd9-f850b8ffac83 ro  quiet splash $vt_handoff

#		echo	'Loading initial ramdisk ...'

#		initrd	/boot/initrd.img-4.15.0-20-generic

#	}

#	menuentry 'Ubuntu, with Linux 4.15.0-20-generic (recovery mode)' --class ubuntu --class gnu-linux --class gnu --class os $menuentry_id_option 'gnulinux-4.15.0-20-generic-recovery-63719751-ee5c-41e4-9fd9-f850b8ffac83' {

#		recordfail

#		load_video

#		insmod gzio

#		if [ x$grub_platform = xxen ]; then insmod xzio; insmod lzopio; fi

#		insmod part_msdos

#		insmod ext2

#		set root='hd0,msdos6'

#		if [ x$feature_platform_search_hint = xy ]; then

#		  search --no-floppy --fs-uuid --set=root --hint-bios=hd0,msdos6 --hint-efi=hd0,msdos6 --hint-baremetal=ahci0,msdos6  63719751-ee5c-41e4-9fd9-f850b8ffac83

#		else

#		  search --no-floppy --fs-uuid --set=root 63719751-ee5c-41e4-9fd9-f850b8ffac83

#		fi

#		echo	'Loading Linux 4.15.0-20-generic ...'

#	        linux	/boot/vmlinuz-4.15.0-20-generic root=UUID=63719751-ee5c-41e4-9fd9-f850b8ffac83 ro recovery nomodeset

#		echo	'Loading initial ramdisk ...'

#		initrd	/boot/initrd.img-4.15.0-20-generic

#	}

#}

### BEGIN /etc/grub.d/20_memtest86+ ###

#menuentry 'Memory test (memtest86+)' {

#	insmod part_msdos

#	insmod ext2

#	set root='hd0,msdos6'

#	if [ x$feature_platform_search_hint = xy ]; then

#	  search --no-floppy --fs-uuid --set=root --hint-bios=hd0,msdos6 --hint-efi=hd0,msdos6 --hint-baremetal=ahci0,msdos6  63719751-ee5c-41e4-9fd9-f850b8ffac83

#	else

#	  search --no-floppy --fs-uuid --set=root 63719751-ee5c-41e4-9fd9-f850b8ffac83

#	fi

#	knetbsd	/boot/memtest86+.elf

}

#menuentry 'Memory test (memtest86+, serial console 115200)' {

#	insmod part_msdos

#	insmod ext2

#	set root='hd0,msdos6'

#	if [ x$feature_platform_search_hint = xy ]; then

#	  search --no-floppy --fs-uuid --set=root --hint-bios=hd0,msdos6 --hint-efi=hd0,msdos6 --hint-baremetal=ahci0,msdos6  63719751-ee5c-41e4-9fd9-f850b8ffac83

#	else

#	  search --no-floppy --fs-uuid --set=root 63719751-ee5c-41e4-9fd9-f850b8ffac83

#	fi

#	linux16	/boot/memtest86+.bin console=ttyS0,115200n8

#}

### END /etc/grub.d/20_memtest86+ ###
- 更新grub配置:
sudo update-grub
- 备份grub.cfg:
卸载不需要的软件:
- firefox:
sudo apt-get remove firefox firefox-locale-en firefox-locale-zh-hans
- firefox:
安装系统指示器:
sudo add-apt-repository ppa:nilarimogard/webupd8sudo apt-get updatesudo apt-get install syspeek
美化
- 安装工具:
sudo apt-get install gnome-tweak-tool - 将关闭按钮调至左侧:

- 去掉Shell上无法修改的叹号:
sudo apt-get install gnome-shell-extensions重启gnome-tweaks-tool查看结果。- 如果还没去掉,则需要通过Firefox或Chromean安装GNOME Shell Extension,以下是用Chrome安装的步骤:
- 在Chrome中打开连接https://chrome.google.com/webstore/detail/gnome-shell-integration/gphhapmejobijbbhgpjhcjognlahblep 添加扩展
GNOME Shell integration sudo apt-get install chrome-gnome-shell- 在Chrome中打开https://extensions.gnome.org/搜索
User Themes - 进入
User Themes并启动。 - 重启
gnome-tweaks-tool可以看到Extensions下的User themes已经启动,并且Shell的叹号已经消失。
- 截至到现在工具配置完毕,接下来美化主题和图标:
- 下载主题:McMojave,
Mojave-light.tar.xz - 下载图标:McMojave-circle
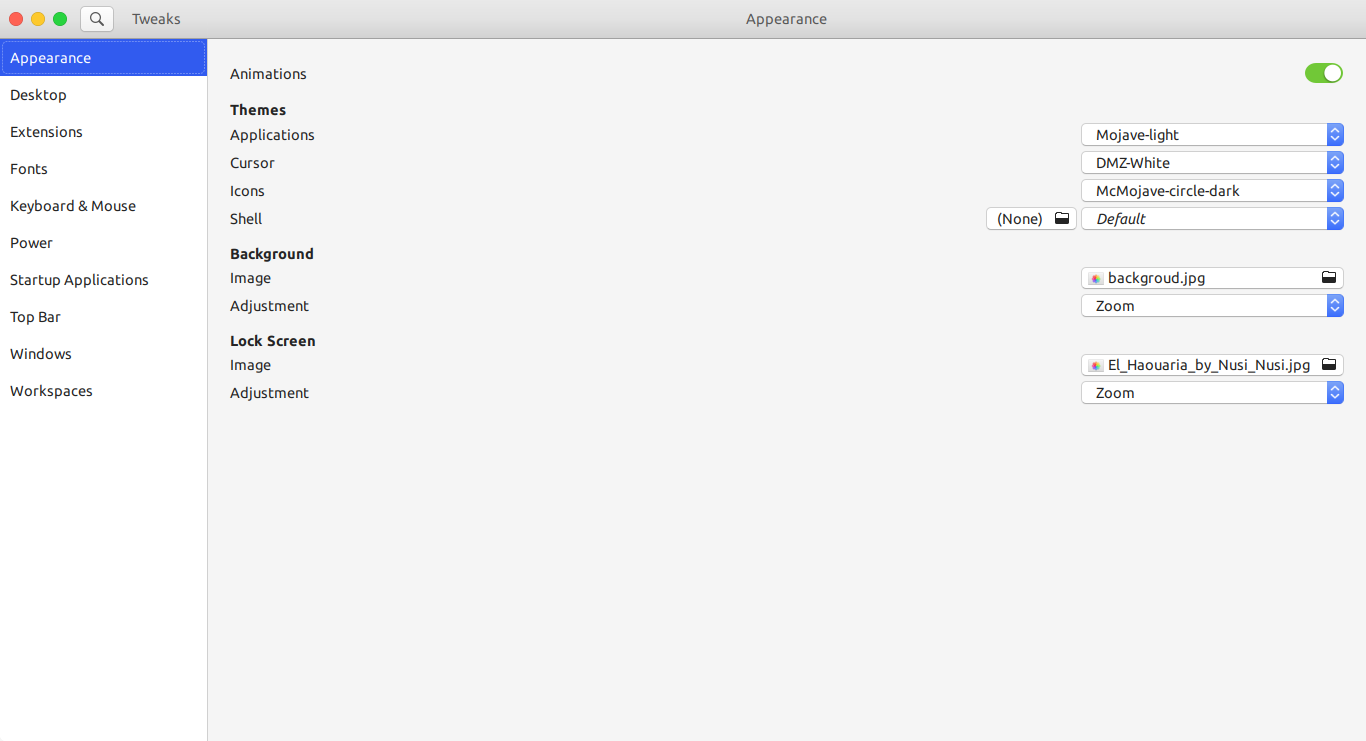
01-McMojave-circle.tar.xz tar -xf Mojave-light.tar.xz 01-McMojave-circle.tar.xzsudo cp -a Mojave-light /usr/share/themes/sudo cp -a McMojave-circle /usr/share/icons/sudo cp -a McMojave-circle-dark /usr/share/icons/- 在gnome-tweaks-tool中进行设置,如图所示:

- 同理可以配置
Mojave-dark-20191116000126.tar.xz
- 下载主题:McMojave,
- 配置Dock:
- 在Chrome中打开https://extensions.gnome.org/,搜索
Dash to Dock - 进入到
Dash to Dock并开启 - 重新打开gnome-tweaks-tool在Extensions界面启动
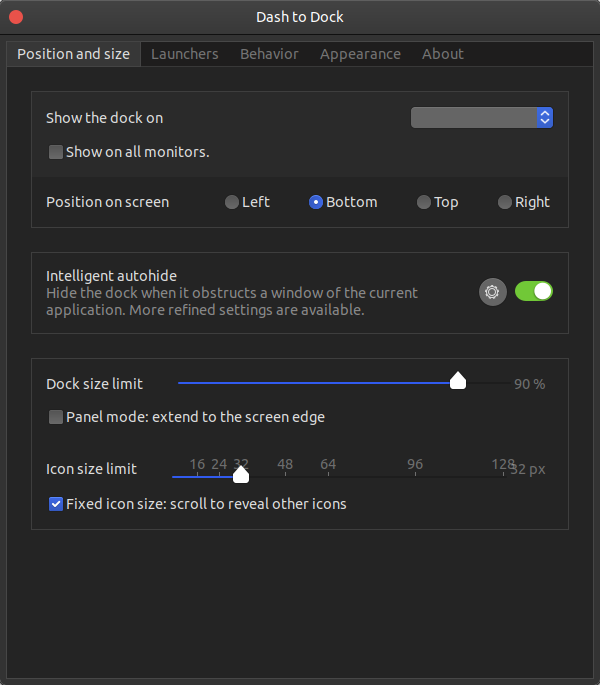
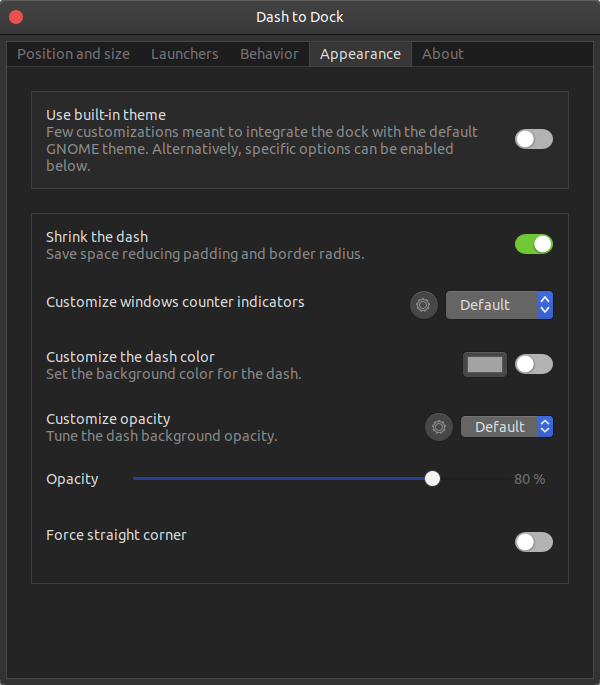
Dash to dock - 点击配置按钮进行配置,如下图所示:


- 在Chrome中打开https://extensions.gnome.org/,搜索
- 开机动画:
- 下载开机动画主题:https://www.pling.com/p/1176419/
- 下载之后解压
unzip suadesplash.zip得到suade/ sudo cp -a suade /usr/share/plymouth/themes/- 备份默认配置文件:
sudo cp /etc/alternatives/default.plymouth /etc/alternatives/default.plymouth.bak - 修改配置文件
/etc/alternatives/default.plymouth:
[Plymouth Theme]

Name=Ubuntu Logo

Description=A theme that features a blank background with a logo.

ModuleName=script

[script]

ImageDir=/usr/share/plymouth/themes/suade /*原为/usr/share/plymouth/themes/ubuntu-logo*/

ScriptFile=/usr/share/plymouth/themes/suade/mdv.script /*原为/usr/share/plymouth/themes/ubuntu-logo/ubuntu-logo.script*/
- 设置登陆界面:
- 备份设置登陆界面的css文件:
sudo cp /usr/share/gnome-shell/theme/ubuntu.css /usr/share/gnome-shell/theme/ubuntu.css.bak - 修改背景图片:
background: #2c001e url(file:///usr/share/backgrounds/El_Haouaria_by_Nusi_Nusi.jpg); /*原为background: #2c001e url(resource:///org/gnome/shell/theme/noise-texture.png);*/
- 备份设置登陆界面的css文件:
- 修改TopBar
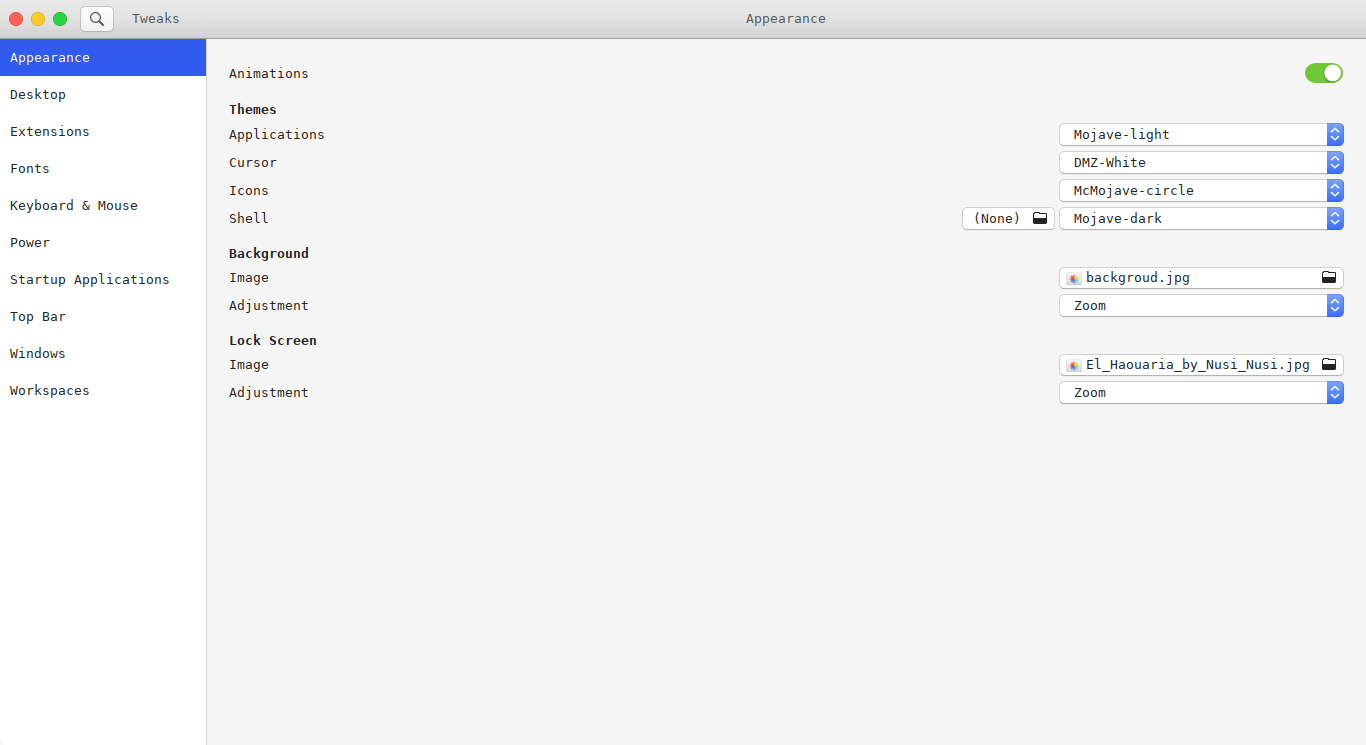
先打开gnome-tweaks-tool查看当前的Shell主题,如图所示:

修改该主题下的gnome-shell.css,
sudo gedit /usr/share/themes/Mojave-dark/gnome-shell/gnome-shell.css,如下所示:
#panel {

  background-color: rgba(34,139,34, 0.8);

  /* transition from solid to transparent */

  transition-duration: 250ms;

  font-weight: normal; //原为bold

  height: 23px;//原为28px

  box-shadow: 0 0 8px rgba(0, 0, 0, 0.2), 0 0 4px rgba(0, 0, 0, 0.3);

}
- 修改之后保存,执行Alt+F2输入r重新加载即可。
- 安装工具:
参考文件:https://blog.csdn.net/lishanleilixin/article/details/80453565 & https://blog.csdn.net/White_Idiot/article/details/88931162
Ubuntu18.04初始化的更多相关文章
- ubuntu18.04初始化配置
目录 ubuntu18.04初始化配置 ifconfig sshd smb other vim 配置 最后 ubuntu18.04初始化配置 虚拟机挂了, 又得重新安装配置一遍, 这里记录了我几乎每次 ...
- Ubuntu18.04教程
pre.ctl { font-family: "Liberation Mono", monospace } h1 { margin-bottom: 0.21cm } h1.west ...
- ubuntu18.04安装mysql
ubuntu18.04中,默认情况下mysql默认包含在apt软件存储库中,要安装它只需要更新服务器上的包索引并安装默认包apt-get. 1.安装mysql sudo apt-get update ...
- ubuntu18.04搭建hive
hive是基于Hadoop的一个数据仓库工具,可以将结构化的数据文件映射为一张数据库表,并提供简单的sql查询功能,可以将sql语句转换为MapReduce任务进行运行. 其优点是学习成本低,可以通过 ...
- tensorflow/pytorch/mxnet的pip安装,非源代码编译,基于cuda10/cudnn7.4.1/ubuntu18.04.md
os安装 目前对tensorflow和cuda支持最好的是ubuntu的18.04 ,16.04这种lts,推荐使用18.04版本.非lts的版本一般不推荐. Windows倒是也能用来装深度GPU环 ...
- ubuntu18.04 安装hadoop 2.7.3+hive 2.3.4
1. 安装hadoop 详细请参见本人的另外一片博文<Hadoop 2.7.3 分布式集群安装> 2. 下载hive 2.3.4 解压文件到/opt/software -bin.tar.g ...
- ubuntu18.04使用kubeadm部署k8s单节点
实验目的: 体验kubeadm部署k8s服务,全流程体验! 实验环境: ubuntu18.04 联网在线部署 kubeadm 01.系统检查 节点主机名唯一,建议写入/etc/hosts 禁止swap ...
- Ubuntu18.04+CUDA9.0+cuDNN7.1.3+TensorFlow1.8 安装总结
Ubuntu18.04发行已经有一段时间了,正好最近Tensorflow也发布了1.8版本,于是决定两个一起装上,以下是安装总结,大致可 以分为5个步骤 确认当前软件和硬件环境.版本 更新显卡驱动,软 ...
- 安装ubuntu18.04.3全过程
目录 一.安装ubuntu18.04.3操作系统 二.系统设置 三.非开发常用软件安装 四.开发常用软件安装 五.ubuntu相关知识 六.参考文章链接 正文 一.安装ubuntu18.04.3操作系 ...
随机推荐
- vue学习笔记(十)路由
前言 在上一篇博客vue学习笔记(九)vue-cli中的组件通信内容中,我们学习组件通信的相关内容和进行了一些组件通信的小练习,相信大家已经掌握了vue-cli中的组件通信,而本篇博客将会带你更上一层 ...
- Xshell/Xftp连接Linux速度非常慢(已解决)
原因: 在使用shell连接虚拟机时连接等待时间太长,ssh的服务端在连接时会自动检测dns环境是否一致导致的,修改为不检测即可! 解决方案: 1.打开sshd服务的配置文件/etc/ssh/sshd ...
- 操作系统——输入输出(I/O)管理
目录 一.I/O 管理概述 1.1 I/O 控制方式 1.2 I/O 软件层次结构 二.I/O 核心子系统 2.1 I/O 调度概念 2.2高速缓存与缓冲区 2.3设备分配与回收 2.4假脱机技术(S ...
- ASP.NET MVC快速开发框架FastExecutor开发全过程感受及总结
困境 追溯到2018年5月份,是个炎热的夏天,毕业后1年7个月我提出了离职,原因是受不了原来公司过度的封装框架感觉一年多毫无进步与实施天天轰炸般的电话,偶然间出去面试了一次发现自己知识真的是比较局限, ...
- c#使用CefSharp开发winform——环境搭建
因为nuget在线下载有时候很慢,所以下载nuget包,进行本地安装 登陆nuget官网https://www.nuget.org/下载相关资源 选择对应版本进行下载,同时需要下载相关依赖的包 最 ...
- CODING 2.0:为什么我们需要 DevOps
CODING 在前两天的 Kubecon 2019 大会上发布了 CODING 2.0.这背后是 CODING 对研发管理和研发团队组建的思考.从 CODING 成立以来,我们一直在探索"让 ...
- (python pip安装第三方库超时问题(raise ReadTimeoutErrorself._pool, None, 'Read timed out.')
(python pip安装第三方库超时问题(raise ReadTimeoutErrorself._pool, None, ‘Read timed out.’)pip工具安装百度经验链接: pip安装 ...
- vue-property-decorator和typescript结合构建的class类组件,父组件触发子组件方法的方式
vue-property-decorator和typescript结合构建的class类组件,父组件触发子组件方法的方式 class类组件示例 Father类组件 <template> & ...
- C语言程序设计100例之(19):欢乐的跳
例19 欢乐的跳 题目描述 一个n个元素的整数数组,如果数组两个连续元素之间差的绝对值包括了[1,n-1]之间的所有整数,则称之符合“欢乐的跳”,如数组1 4 2 3符合“欢乐的跳”,因为差的绝对 ...
- IT兄弟连 HTML5教程 CSS3揭秘 CSS3属性3
5 用户界面属性 在CSS3中,新的用户界面特性包括重设元素尺寸.盒尺寸及轮廓等.本小节着重介绍一下resize属性,只有Firefox 4和Safari 3浏览器支持此属性.resize属性可用于重 ...
