SpringBoot整合系列-整合Swagger2
原创作品,可以转载,但是请标注出处地址:https://www.cnblogs.com/V1haoge/p/9959844.html
SpringBoot整合Swagger2
步骤
第一步:添加必要的依赖
<dependency>

    <groupId>io.springfox</groupId>

    <artifactId>springfox-swagger2</artifactId>

    <version>2.7.0</version>

</dependency>

<dependency>

    <groupId>io.springfox</groupId>

    <artifactId>springfox-swagger-ui</artifactId>

    <version>2.7.0</version>

</dependency>
第二步:添加必要的配置
一般无配置项,必要时可以添加自定义配置项,在配置类中读取
第三步:添加配置类(重点)
// swagger2的配置内容仅仅就是需要创建一个Docket实例

@Configuration

@EnableSwagger2 //启用swagger2

public class Swagger2Config {

    @Bean

    public Docket createRestApi() {

        return new Docket(DocumentationType.SWAGGER_2)

                .pathMapping("/")

                .apiInfo(apiInfo())

                .select()

                .apis(RequestHandlerSelectors.basePackage("com.example.springbootdemo"))

                .paths(PathSelectors.any())

                .build();

    }

    private ApiInfo apiInfo() {

        return new ApiInfoBuilder()

                .title("springboordemo")

                .description("Springboot整合Demo")

                .version("0.0.1")

                .build(); // 这部分信息其实可以自定义到配置文件中读取

    }

}
通过@Configuration注解,让Spring-boot来加载该类配置。再通过@EnableSwagger2注解来启用Swagger2Config。
再通过createRestApi方法创建Docket的Bean之后,
apiInfo方法用来创建该Api的基本信息(这些基本信息会展现在文档页面中)。
select() 函数返回一个 ApiSelectorBuilder 实例用来控制哪些接口暴露给Swagger2来展现。
一般采用指定扫描的包路径来定义
Swagger会扫描该包下所有Controller定义的API,并产生文档内容(除了被@ApiIgnore指定的请求)
第四步:在Controller和Bean上添加Swagger注解
@RestController

@RequestMapping("/user")

@Log4j2

@Api(description = "用户接口")

public class UserApi {

    @Autowired

    private UserService service;

    @ApiOperation(value = "添加用户", notes = "根据给定的用户信息添加一个新用户",response = ResponseEntity.class,httpMethod = "PATCH")

    @RequestMapping(value = "/addUser",method = RequestMethod.PATCH)

    public ResponseEntity<User> addUser(final User user) {

        log.info("执行添加用户操作");

        return service.addUser(user);

    }

    @ApiOperation(value = "更新用户状态", notes = "根据给定的用户ID修改用户状态",response = ResponseEntity.class,httpMethod = "POST")

    @RequestMapping(value = "/updateUser", method = RequestMethod.POST)

    public ResponseEntity<User> updateUser(final UseState useState, int useId) {

        log.info("执行修改用户状态操作");

        return service.updateUser(User.builder().useState(useState).useId(useId).build());

    }

    @ApiOperation(value = "更新用户手机号", notes = "根据给定的用户ID修改用户手机号",response = ResponseEntity.class,httpMethod = "POST")

    @RequestMapping(value = "/updateUsePhoneNum", method = RequestMethod.POST)

    public ResponseEntity<User> updateUsePhoneNum(final String usePhoneNum, int useId) {

        log.info("执行修改用户手机号操作");

        return service.updateUsePhoneNum(User.builder().usePhoneNum(usePhoneNum).useId(useId).build());

    }

    @ApiOperation(value = "删除用户", notes = "根据给定的用户ID删除一个用户",response = ResponseEntity.class,httpMethod = "DELETE")

    @RequestMapping(value = "/deleteUser", method = RequestMethod.DELETE)

    public ResponseEntity<User> deleteUser(final int useId) {

        log.info("执行删除用户操作");

        return service.deleteUser(useId);

    }

    @ApiOperation(value = "查询用户", notes = "根据给定的用户ID获取一个用户",response = ResponseEntity.class,httpMethod = "GET")

    @RequestMapping(value = "getUser", method = RequestMethod.GET)

    public ResponseEntity<User> getUser(final int useId) {

        log.info("执行查询单个用户操作");

        return service.getUser(useId);

    }

    @ApiOperation(value = "查询用户", notes = "根据给定的用户信息查询用户",response = ResponseEntity.class,httpMethod = "POST")

    @RequestMapping(value = "getUsers", method = RequestMethod.POST)

    public ResponseEntity<List<User>> getUsers(final User user) {

        log.info("根据条件查询用户");

        return service.getUsers(user);

    }

}
@ApiModel(value = "用户模型")

public class User {

    @ApiModelProperty("用户ID")

    private int useId;

    @ApiModelProperty("用户姓名")

    private String useName;

    @ApiModelProperty("用户性别")

    private UseSex useSex;

    @ApiModelProperty("用户年龄")

    private int useAge;

    @ApiModelProperty("用户身份证号")

    private String useIdNo;

    @ApiModelProperty("用户手机号")

    private String usePhoneNum;

    @ApiModelProperty("用户邮箱")

    private String useEmail;

    @ApiModelProperty("创建时间")

    private LocalDateTime createTime;

    @ApiModelProperty("修改时间")

    private LocalDateTime modifyTime;

    @ApiModelProperty("用户状态")

    private UseState useState;

}
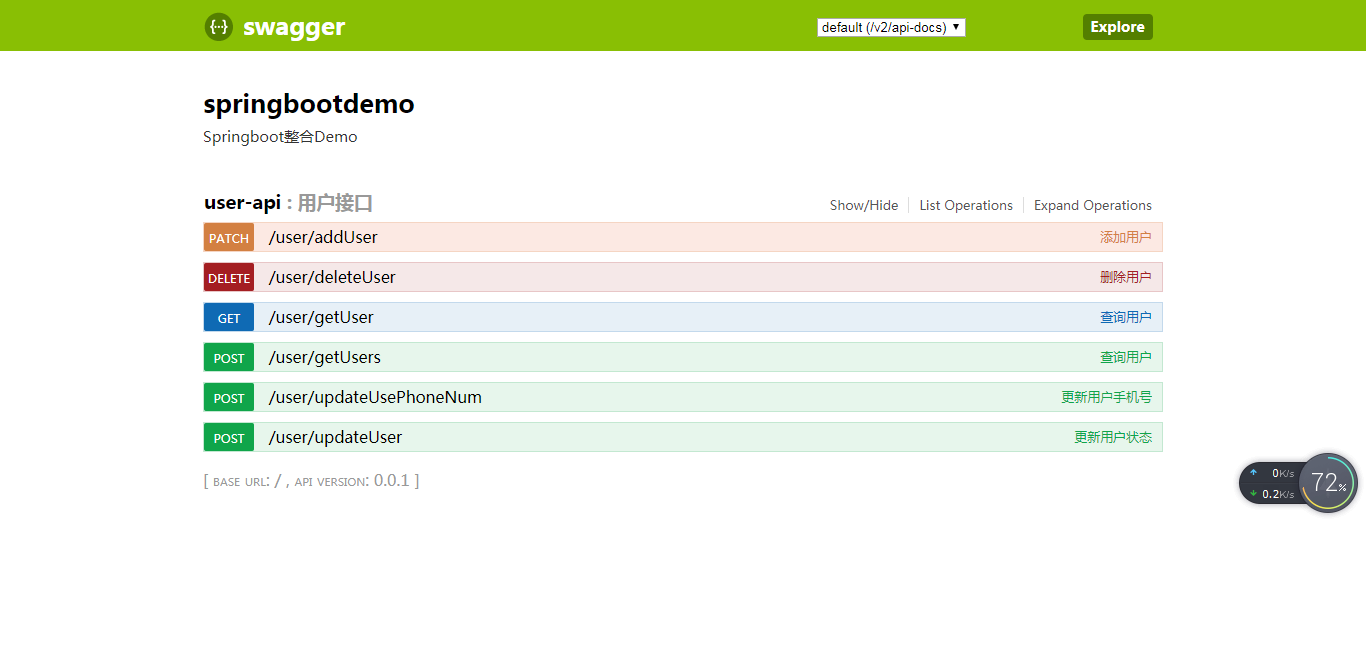
第五步:启动应用,浏览器请求
http://localhost:8080/swagger-ui.html
可得到如下界面:
SpringBoot整合系列-整合Swagger2的更多相关文章
- SpringBoot整合系列-整合MyBatis
原创作品,可以转载,但是请标注出处地址:https://www.cnblogs.com/V1haoge/p/9971036.html SpringBoot整合Mybatis 步骤 第一步:添加必要的j ...
- SpringBoot整合系列--整合MyBatis-plus
原创作品,可以转载,但是请标注出处地址:https://www.cnblogs.com/V1haoge/p/10125279.html SpringBoot整合MyBatis-plus 步骤 第一步: ...
- SpringBoot整合系列-整合SpringMVC
原创作品,可以转载,但是请标注出处地址:https://www.cnblogs.com/V1haoge/p/9984607.html SpringBoot整合Spring MVC 步骤 第一步:添加必 ...
- SpringBoot整合系列-整合JPA
原创作品,可以转载,但是请标注出处地址:https://www.cnblogs.com/V1haoge/p/9959865.html SpringBoot整合JPA进行数据库开发 步骤 第一步:添加必 ...
- SpringBoot整合系列-整合H2
原创作品,可以转载,但是请标注出处地址:https://www.cnblogs.com/V1haoge/p/9959855.html SpringBoot整合H2内存数据库 一般我们在测试的时候习惯于 ...
- SpringBoot整合系列-PageHelper分页插件
原创作品,可以转载,但是请标注出处地址:https://www.cnblogs.com/V1haoge/p/9971043.html SpringBoot整合MyBatis分页插件PageHelper ...
- SpringBoot系列-整合Mybatis(注解方式)
目录 一.常用注解说明 二.实战 三.测试 四.注意事项 上一篇文章<SpringBoot系列-整合Mybatis(XML配置方式)>介绍了XML配置方式整合的过程,本文介绍下Spring ...
- springboot + mybatis + mycat整合
1.mycat服务 搭建mycat服务并启动,windows安装参照. 系列文章: [Mycat 简介] [Mycat 配置文件server.xml] [Mycat 配置文件schema.xml] [ ...
- SpringBoot与Swagger整合
1 SpringBoot与Swagger整合https://blog.csdn.net/jamieblue1/article/details/99847744 2 Swagger详解(SpringBo ...
随机推荐
- linux查看分区是否开启acl权限
1.为什么需要ACL权限 ACL的全称是 Access Control List (访问控制列表) .对于文件或者目录,都有相应的操作权限 r(read 读),w(write 写),x(execute ...
- Python算术运算
一.算术运算1.四则运算1+(100-20)/4+5*22.乘方运算2**103.求摸运算7%5 4.取整运算 7//5 = 1 5.绝对值函数 abs(-100) 6.导入数学函数后才能执行类似 ...
- mysql 语法积累
1.把一个表中的某一列赋值到另一个表中的某一列 update sfa_token,sfa_member set sfa_token.mainid = sfa_member.mainid where s ...
- Oracle约束、索引
Oracle中的约束有五种,分别为: 非空:not null 主键:primary key 外键:foreign key 唯一:unique 检查:check 在数据字典视图 user_constra ...
- 关于AngularJS学习整理---核心特性
接触.学习AngularJS已经三个多月了,随着学习的深入,有些东西刚开始不明白,现在开始慢慢明白起来.于是,开始整理这几个月的学习成果.要不又要忘了... 初学Angular,是看到慕课网大漠穷秋 ...
- ubuntu Nvidia driver install
在图形界面中,有软件和更新,可以使用附加驱动来更新 最上面的驱动是最新版本,英伟达目前Linux最新的版本是375.39 后面的括号,专有意思是代表英伟达自家的驱动,不开源 选择好之后点击应用更改 关 ...
- 老桂.net core系列课程
为了支持"首届dnc开源峰会"(dncNew.com)顺利举办,本人<.net core系列课程>进行一波优惠,每个课程优惠在立即购买上方,领取现金券即可.课程地址为腾 ...
- 1.3 History of Android Plug-in Programing
In July 27, 2012 , it was the first milestone in Android plug-in technology. Yimin Tu(mmin18 o ...
- 利用Python实现对Web服务器的目录探测
今天是一篇提升技能的干货分享,操作性较强,适用于中级水平的小伙伴,文章阅读用时约3分钟. PART 1/Python Python是一种解释型.面向对象.动态数据类型的高级程序设计语言. Python ...
- [SQL]LeetCode182. 查找重复的电子邮箱 | Duplicate Emails
Write a SQL query to find all duplicate emails in a table named Person. +----+---------+ | Id | Emai ...