ELK + Filebeat 日志分析系统
ELK + Filebeat 日志分析系统
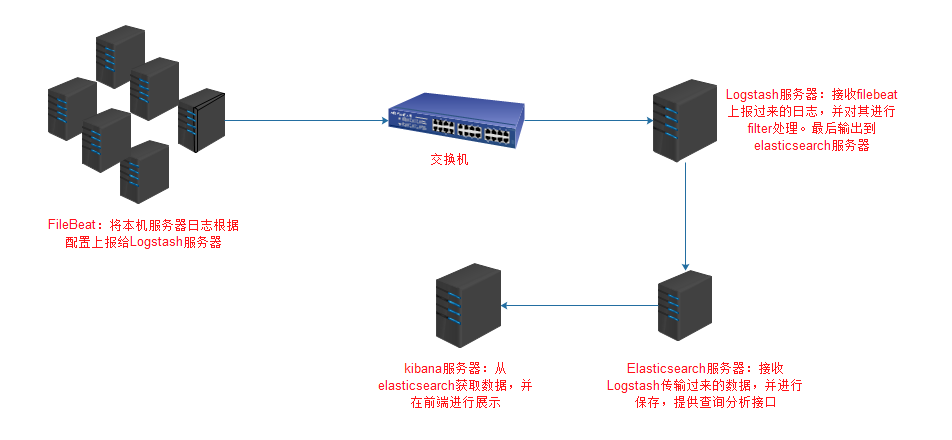
架构图
环境
OS:CentOS 7.4

Filebeat: 6.3.2

Logstash: 6.3.2

Elasticsearch 6.3.2

Kibana: 6.3.2
FileBeat安装配置
安装
wget https://artifacts.elastic.co/downloads/beats/filebeat/filebeat-6.3.2-x86_64.rpm

yum localinstall filebeat-6.3.2-x86_64.rpm
配置
这里以nginx日志为例作为演示
配置文件:/etc/filebeat/filebeat.yml
filebeat.prospectors:

- input_type: log  #输入类型为log

  paths:  #日志路径

    - /usr/local/nginx/logs/*.access.log

  document_type: ngx-access-log  #日志类型

- input_type: log

  paths:

    - /usr/local/nginx/logs/*.error.log

  document_type: ngx-error-log

output.logstash:  #输出到Logstash(也可以输出到其他,如elasticsearch)

  hosts: ["10.1.4.171:1007"]
启动
systemctl enable filebeat

systemctl start filebeat
Logstash安装配置
安装
wget https://artifacts.elastic.co/downloads/logstash/logstash-6.3.2.rpm

yum localinstall logstash-6.3.2.rpm
配置
Logstash需要自定义,自定义配置文件目录是/etc/logstash/conf.d
这里新建一个filebeat.conf配置文件
/etc/logstash/conf.d/filebeat.conf
input {

    #输入方式是beats

    beats {

        port => "1007"  #监听1007端口(自定义端口)

    }

}

filter {

    if [type] == "ngx-access-log" { #对日志类型为ngx-access-log进行处理。日志类型为filebeat配置定义

        grok {

            patterns_dir => "/usr/local/logstash/patterns"

            match => {  #对传过来的message字段做拆分,分割成多个易读字段

                message => "%{IPV4:remote_addr}\|%{IPV4:FormaxRealIP}\|%{POSINT:server_port}\|%{GREEDYDATA:scheme}\|%{IPORHOST:http_host}\|%{HTTPDATE:time_local}\|%{HTTPMETHOD:request_method}\|%{URIPATHPARAM:request_uri}\|%{GREEDYDATA:server_protocol}\|%{NUMBER:status}\|%{NUMBER:body_bytes_sent}\|%{GREEDYDATA:http_referer}\|%{GREEDYDATA:user_agent}\|%{GREEDYDATA:http_x_forwarded_for}\|%{HOSTPORT:upstream_addr}\|%{BASE16FLOAT:upstream_response_time}\|%{BASE16FLOAT:request_time}\|%{GREEDYDATA:cookie_formax_preview}"

            }

            remove_field => ["message"]   #已经将message字段拆分,可以将message字段删除

        }

        date {

            match => [ "time_local", "dd/MMM/yyyy:HH:mm:ss Z"]    #nginx日志中的时间替换@timestamp

            remove_field => ["time_local"]   #删除nginx日志时间字段

        }

        mutate {

            rename => ["http_host", "host"]   #nginx日志中http_host字段,替换host字段

        }

    }

}

output {

    elasticsearch {   # 输出到elasticsearch

        hosts => ["127.0.0.1:9200"]

        index => "logstash-%{type}-%{+YYYY.MM.dd}"   #输出索引格式

    }

}
启动
systemctl enable logstash

systemctl start logstash
Elasticsearch安装配置
安装
wget https://artifacts.elastic.co/downloads/elasticsearch/elasticsearch-6.3.2.rpm

yum localinstall elasticsearch-6.3.2.rpm
配置
/etc/elasticsearch/elasticsearch.yml
path.data: /var/lib/elasticsearch

path.logs: /var/log/elasticsearch

network.host: 0.0.0.0

http.port: 9200

#elasticsearch-head需要下列配置

http.cors.enabled: true

http.cors.allow-origin: "*"
启动
systemctl enable elasticsearch

systemctl start elasticsearch
elasticsearch-head安装
elasticsearch-head用于连接elasticsearch,并提供一个前端管理页面
git clone git://github.com/mobz/elasticsearch-head.git

cd elasticsearch-head

npm install

npm run start

open http://localhost:9100/
Kibana安装配置
安装
wget https://artifacts.elastic.co/downloads/kibana/kibana-6.3.2-x86_64.rpm

yum localinstall kibana-6.3.2-x86_64.rpm
配置
默认配置就好
启动
nohup /usr/share/kibana/bin/kibana &> /usr/share/kibana/logs/kibana.stdout &
nginx代理到kibana
安装nginx
yum install nginx
配置
/etc/nginx/conf.d/kibana.conf
server {

    listen 80;

    server_name test.kibana.com;

    root html;

    access_log  /var/log/nginx/test.kibana.com.access.log main;

    error_log   /var/log/nginx/test.kibana.com.error.log;

    proxy_next_upstream http_502 http_504 error timeout invalid_header;

    proxy_connect_timeout     10;

    proxy_read_timeout        30;

    proxy_send_timeout        180;

    proxy_ignore_client_abort on;

    proxy_set_header X-Forwarded-For $proxy_add_x_forwarded_for;

    proxy_buffering           off;

    proxy_set_header Host $host;

    location /monitor {

        default_type text/plain;

        return 200 "OK";

    }

    location /echoip {

       default_type text/plain;

       return 200 $http_x_forwarded_for,$remote_addr;

    }

    location / {

        expires off;

        if ($server_port = "80") {

            proxy_pass http://127.0.0.1:5601;

        }

        proxy_pass  https://127.0.0.1:5601;

    }

}
启动
systemctl enable nginx

systemctl start nginx
后记
本文只是简单介绍了一下ELK+Filebeat日志分析系统的安装配置,以及一个简单的nginx日志处理过程。要想更细致的学习ELK体系,可以看ELKstack 中文指南。虽然该书以ELK5版本进行讲解,ELK6也可以看。
ELK + Filebeat 日志分析系统的更多相关文章
- [原创]ubuntu14.04部署ELK+redis日志分析系统
ubuntu14.04部署ELK+redis日志分析系统 [环境] host1:172.17.0.4 搭建ELK+redis服务 host2:172.17.0.3 搭建logstash+nginx服务 ...
- Docker搭建ElasticSearch+Redis+Logstash+Filebeat日志分析系统
一.系统的基本架构 在以前的博客中有介绍过在物理机上搭建ELK日志分析系统,有兴趣的朋友可以看一看-------------->>链接戳我<<.这篇博客将介绍如何使用Docke ...
- docker:搭建ELK 开源日志分析系统
ELK 是由三部分组成的一套日志分析系统, Elasticsearch: 基于json分析搜索引擎,Elasticsearch是个开源分布式搜索引擎,它的特点有:分布式,零配置,自动发现,索引自动分片 ...
- ELK + Filebeat日志分析系统安装
之前搭建过elk,用于分析日志,无奈服务器资源不足,开了多个Logstash之后发现占用内存过高,于是现在改为Filebeat做日志收集,记录一下搭建过程和遇到问题的解决方案. 第一步 , 安装jdk ...
- springboot+ELK+logback日志分析系统demo
之前写的有点乱,这篇整理了一下搭建了一个简单的ELK日志系统 借鉴此博客完成:https://blog.csdn.net/qq_22211217/article/details/80764568 设置 ...
- ELK+Beats日志分析系统部署
一. 名词介绍: E:ElasticSearch 搜索,简称es L:Logstash 管理日志和事件的工具 K:Kibana 功能强大的数据显示客户端 Beats 轻量级数据传 ...
- filebeat+redis+logstash+elasticsearch+kibana搭建日志分析系统
filebeat+redis+elk搭建日志分析系统 官网下载地址:https://www.elastic.co/downloads 1.下载安装filebeat wget https://artif ...
- 十分钟搭建和使用ELK日志分析系统
前言 为满足研发可视化查看测试环境日志的目的,准备采用EK+filebeat实现日志可视化(ElasticSearch+Kibana+Filebeat).题目为“十分钟搭建和使用ELK日志分析系统”听 ...
- Docker笔记(十):使用Docker来搭建一套ELK日志分析系统
一段时间没关注ELK(elasticsearch —— 搜索引擎,可用于存储.索引日志, logstash —— 可用于日志传输.转换,kibana —— WebUI,将日志可视化),发现最新版已到7 ...
随机推荐
- Holer实现外网访问ARM嵌入式Linux系统
公网访问ARM嵌入式Linux系统 实验室里的ARM嵌入式Linux系统,只能在局域网内访问,怎样从公网也能访问内网ARM嵌入式Linux系统? 本文将介绍使用holer实现的具体步骤. 1. 准备工 ...
- c++ 集合的增删改查,与两集合的合并 缺陷(空间大小不灵活)
#if 1 #include <iostream> #include <stdlib.h> using namespace std; class List { public: ...
- C语言---指针变量作为函数参数
在C语言中,函数的参数不仅可以是整数.小数.字符等具体的数据,还可以是指向它们的指针.用指针变量作函数参数可以将函数外部的地址传递到函数内部,使得在函数内部可以操作函数外部的数据,并且这些数据不会随着 ...
- php导出excel问题之解决
phpExcel采用的版本:1.8.1.0 git地址:https://github.com/PHPOffice/PHPExcel.git 在windows7+nginx的环境中,选择Excel5 ...
- redis客户端(三)
redis客户端 一.>redis自带的客户端 启动 启动客户端命令:[root@ming bin]# ./redis-cli -h xxx.xxx.xx.xxx-p 6379 注意: -h:指 ...
- iOS保持待续连接
当iphone应用程序进行网络编程时,切到后台后,socket连接会断掉,ios的设计就是这样. 但是好在apple公司也没有那么绝,还是有一些东西可以在后台运行的(backgroundmodes), ...
- Linq语句的认识
LINQ语句的使用小结: 1.将数组看做一张表来查询的情况: from d in countyIsCityLevel where d.Equals(AreaCode) select d 2.只查询 ...
- git教程:添加远程仓库
转自: 添加远程仓库 现在的情景是,你已经在本地创建了一个Git仓库后,又想在GitHub创建一个Git仓库,并且让这两个仓库进行远程同步,这样,GitHub上的仓库既可以作为备份,又可以让其他人通过 ...
- Sublime 黑科技之——lorem快速输入
需要一段文字填充某块演示的空间,但不管写什么文字都觉得不合适,那么这个黑科技你值的拥有. 在Sublime Text中,输入lorem,再按Tab键,即可快速输入一段无意义的占位字符: Lorem i ...
- Dart 的function
方法的定义 返回类型 方法名 (参数1 ,参数2 ,...){ 方法体 返回值 } => 的使用