Multi-Projector Based Display Code ------- Home
Overview
This project provides you with the tools and techniques you need to create your own large-area multi-projector display that is both affordable and flexible. It covers the procedure you need to take and the issues you need to consider for achieving geometric alignment and color seamlessness, and an image rendering system using PC clusters. It also provides the necessary codes of a simple distributed calibration and image/3D-model rendering display system.
Who should use this code
- Novice who would like to build their own camera-projector display system can use this code as a start point
- Researchers who are interested in camera-projector display system can use this code as a reference
System Architecture
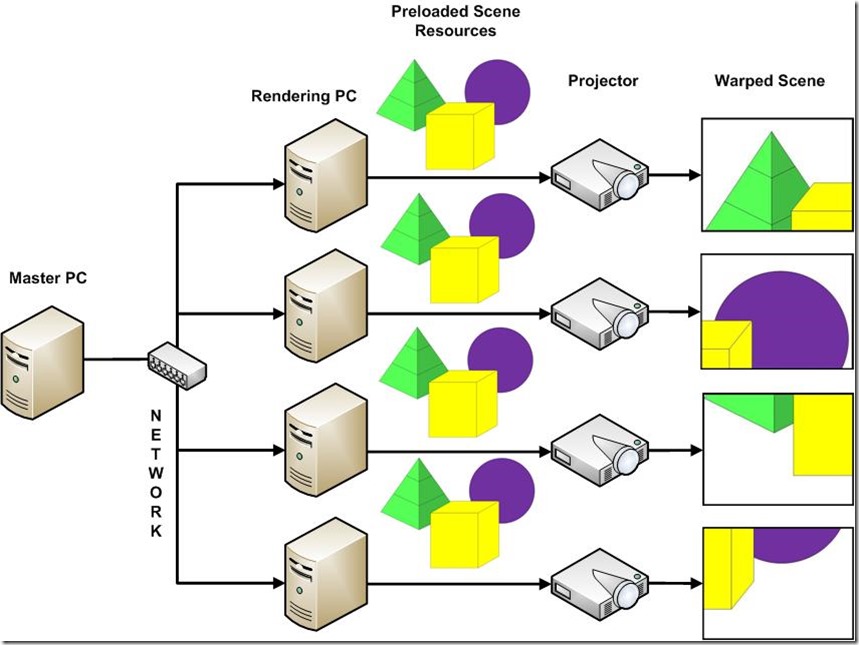
With the recent popularization of low-cost commodity graphics cards, it is possible to build a distributed rendering system with a cluster of PCs. The following figure shows the architecture of our PC-cluster based multi-projector display:

Figure 1. The system architecture of our PC-Cluster based multi-projector display
As you can see from the above picture, the system consist of one master PC and a few rendering PCs. Each rendering PC is connected to one projector. All the PCs are connected via a local network. The master PC controls the rendering procedure of the system, and the rendering PCs do the actual rendering work and output through the projectors. The overall goal is to make the casually placed projectors behave like a large integrated display when showing images and other scenes.
The scene resources are preloaded to the rendering PCs and each PC will only show its own portion according to prior calibration, as shown in the figure. Because the projectors are casually placed, the scene from different projectors may not be well aligned, and the overlapped area of two or more projectors may looks brighter than other area. So the rendering PCs need to warp the scene to achieve geometry alignment and color seamlessness. The basic procedure of the PC-Cluster based display system involves two steps: the camera-based calibration step and the scene warping step. During the calibration step, special featured images are projected and corresponding camera images are grabbed. After analysis of the grabbed images, geometry information about how to warp the scene and alpha mask about how to achieve photometric alignment will be atomatically generate. During the scene warping step, each projector will warp the scene resources according to the calibration result.
You can find more information about geometry alignment from Chapter 3 of reference [1], about color seamlessness from Chapter 4 of reference [1], about PC-Cluster rendering from Chapter 5 of reference [1]. You are strongly recommended to read the book thoroughly before starting to set up your own multi-projector display.
Hardware and Software Requirements
In order to use the codes provided, you need to meet the following hardware and software requirements:
Hardware requirements:
- One PC with monitors, as master PC;
- Two or more PCs with dedicated graphic cards (we use NVIDIA GeForce 8800GTS), as rendering PC;
- Two or more projectors (one for each rendering PC);
- One hub or router and network cables;
- One OpenCV-compatible camera with proper lens (see FAQ for more information about how to select camera and lens);
Software requirements:
- Windows XP installed on all PCs;
(Below are the additional software you need to install if you want to compile the source codes yourself)
- Microsoft Visual Studio 2005 or above;
- OpenCV library 1.0 (from reference [2]) installed;
- GLUT library 3.7 (from reference [3]) installed;
- FreeImage Algorithms (from reference [4]) installed;
[1] "Practical Multi-Projector Display Design", Majumder/Brown, AK Peters, USA, 2007
[2] Open Computer Vision Library, 1.0:http://sourceforge.net/projects/opencvlibrary/
[3] GLUT - The OpenGL Utility Toolkit, 3.7: http://www.opengl.org/resources/libraries/glut/
[4] FreeImage Algorithms Library: https://code.launchpad.net/~glennpierce/+junk/main
View this page in Romanian courtesy ofazoft
Multi-Projector Based Display Code ------- Home的更多相关文章
- Multi-Projector Based Display Code ---- ImageViewer
Overview Image viewer is a typical application for large display. It makes use of the high-resolutio ...
- Multi-Projector Based Display Code ---- FAQ
Frequently Asked Question How do I know that my camera has a proper lens? Answer: If you can see exa ...
- Multi-Projector Based Display Code ---- Calibration
Overview As mentioned previously, there are two main steps in generating a seamless display. The fir ...
- Multi-Projector Based Display Code ---- ModelViewer
Overview Model viewer is another application we provided for large display. It is designed for viewi ...
- Multi-Projector Based Display Code ---- Download
The code providing are for your reference. Please download the code according to your hareware confi ...
- Peer Code Reviews Made Easy with Eclipse Plug-In
欢迎关注我的社交账号: 博客园地址: http://www.cnblogs.com/jiangxinnju/p/4781259.html GitHub地址: https://github.com/ji ...
- Code Pages
https://docs.microsoft.com/en-us/windows/desktop/intl/code-pages Most applications written today han ...
- 设备管理 USB ID
发现个USB ID站点,对于做设备管理识别的小伙伴特别实用 http://www.linux-usb.org/usb.ids 附录: # # List of USB ID's # # Maintain ...
- Oracle Database 11g express edition
commands : show sys connect sys as sysdba or connect system as sysdba logout or disc clear screen or ...
随机推荐
- BootStrap顺序验证和指定字符个数发送请求
fields: { curPwd: { verbose: false, //代表验证按顺序验证.验证成功才会下一个(验证成功才会发最后一个remote远程验证) threshold: 6,//有6字符 ...
- phpstudy 2016 切换Nginx+php7.0版本所需运行库 vc14 + 安装redis拓展
去微软官方下载vc14的运行库 链接:https://www.microsoft.com/en-us/download/details.aspx?id=48145 32位运行库 安装成功 切换版本成功 ...
- 看完此文还不懂NB-IoT,你就过来掐死我吧...【转】
转自:https://www.cnblogs.com/pangguoming/p/9755916.html 看完此文还不懂NB-IoT,你就过来掐死我吧....... 1 1G-2G-3G-4G-5G ...
- JS基础之传参(值传递、对象传递)
一.概念 我们需了解什么是按值传递(call by value),什么是按引用传递(call by reference).在计算机科学里,这个部分叫求值策略(Evaluation Strategy). ...
- Android屏幕旋转
一个手机最基本的旋转方向有上面4种,而在Android开发中,涉及到屏幕旋转的地方很多,而且各个函数给出的角度值都不一样,比如 Activity的getRotate,Camera的setDisplay ...
- Flask开发微电影网站(六)
1. 后台管理登录功能实现 1.1 后台管理页面登录表单LoginForm 在app的admin目录下创建forms.py文件,用来保存admin蓝图中需要使用到的表单 from flask_wtf ...
- apache负载调优
Apache负载调优 watch -n 1 -d "pgrep httpd|wc -l" #apache动态查看连接数 ps aux | grep httpd | wc ...
- 会话技术、Cookie技术与Session技术
一.会话技术 1. 存储客户端状态 会话技术是帮助服务器记住客户端状态(区分客户端)的. 2. 会话技术 从打开一个浏览器访问某个站点,到关闭这个浏览器的整个过程,称为一次会话.会话技术就是记录这 ...
- tensorflow结果可视化-【老鱼学tensorflow】
这次我们把上次的结果进行可视化显示,我们会把神经网络的优化过程以图像的方式展示出来,方便我们了解神经网络是如何进行优化的. 首先,我们把测试数据显示出来: # 显示测试数据 fig = plt.fig ...
- Linux下执行Java程序报错
在linux下编译java程序,执行javac编译生成class文件时,在centos7终端输入如,javac hello.java 会提示未找到指令,但用java -verison测试环境变量 ...
