springMVC(二)springMVC、Mybatis、spring整合
数据库设置:

一、配置文件设置
(1)、springMVC配置文件(前端控制器web.xml,核心配置文件springmvc.xml)
<?xml version="1.0" encoding="UTF-8"?>

<web-app xmlns:xsi="http://www.w3.org/2001/XMLSchema-instance" xmlns="http://java.sun.com/xml/ns/javaee"
xsi:schemaLocation="http://java.sun.com/xml/ns/javaee http://java.sun.com/xml/ns/javaee/web-app_2_5.xsd" id="WebApp_ID" version="2.5">

    <display-name>springmvc-mybatis</display-name>

    <welcome-file-list>

        <welcome-file>index.html</welcome-file>

        <welcome-file>index.htm</welcome-file>

        <welcome-file>index.jsp</welcome-file>

        <welcome-file>default.html</welcome-file>

        <welcome-file>default.htm</welcome-file>

        <welcome-file>default.jsp</welcome-file>

    </welcome-file-list>

    <context-param>

        <param-name>contextConfigLocation</param-name>

        <param-value>classpath:applicationContext.xml</param-value>

    </context-param>

    <!-- Spring监听器 读取applicationContext.xml 文件-->

    <listener>

        <listener-class>org.springframework.web.context.ContextLoaderListener</listener-class>

    </listener>

    <!-- 处理POST提交乱码问题 -->

    <filter>

        <filter-name>encoding</filter-name>

        <filter-class>org.springframework.web.filter.CharacterEncodingFilter</filter-class>

        <init-param>

            <param-name>encoding</param-name>

            <param-value>UTF-8</param-value>

        </init-param>

    </filter>

    <filter-mapping>

        <filter-name>encoding</filter-name>

        <url-pattern>*.action</url-pattern>

    </filter-mapping>

    <!-- 前端控制器 -->

    <servlet>

        <servlet-name>springmvc</servlet-name>

        <servlet-class>org.springframework.web.servlet.DispatcherServlet</servlet-class>

        <!-- 默认找 /WEB-INF/[servlet的名称]-servlet.xml -->

        <init-param>

            <param-name>contextConfigLocation</param-name>

            <param-value>classpath:springmvc.xml</param-value>

        </init-param>

    </servlet>

    <servlet-mapping>

        <servlet-name>springmvc</servlet-name>

        <!--

            1. /*  拦截所有   jsp  js png .css  真的全拦截   建议不使用

            2. *.action *.do 拦截以do action 结尾的请求     肯定能使用   ERP

            3. /  拦截所有 (不包括jsp) (包含.js .png.css)  强烈建议使用     前台 面向消费者  www.jd.com/search   /对静态资源放行

         -->

        <url-pattern>/</url-pattern>

    </servlet-mapping>

</web-app>
(2)、spring核心配置文件(applicationContext.xml)
jdbc.properties
jdbc.driver=com.mysql.jdbc.Driver

jdbc.url=jdbc:mysql://localhost:3306/mybatis?characterEncoding=utf-8

jdbc.username=root

jdbc.password=root
log4j.properties
# Global logging configuration

log4j.rootLogger=DEBUG, stdout

# Console output...

log4j.appender.stdout=org.apache.log4j.ConsoleAppender

log4j.appender.stdout.layout=org.apache.log4j.PatternLayout

log4j.appender.stdout.layout.ConversionPattern=%5p [%t] - %m%n
<?xml version="1.0" encoding="UTF-8"?>

<beans xmlns="http://www.springframework.org/schema/beans"

       xmlns:context="http://www.springframework.org/schema/context" xmlns:p="http://www.springframework.org/schema/p"

       xmlns:aop="http://www.springframework.org/schema/aop" xmlns:tx="http://www.springframework.org/schema/tx"

       xmlns:xsi="http://www.w3.org/2001/XMLSchema-instance"

       xsi:schemaLocation="http://www.springframework.org/schema/beans http://www.springframework.org/schema/beans/spring-beans-4.0.xsd

    http://www.springframework.org/schema/context http://www.springframework.org/schema/context/spring-context-4.0.xsd

    http://www.springframework.org/schema/aop http://www.springframework.org/schema/aop/spring-aop-4.0.xsd

    http://www.springframework.org/schema/tx http://www.springframework.org/schema/tx/spring-tx-4.0.xsd

    http://www.springframework.org/schema/util http://www.springframework.org/schema/util/spring-util-4.0.xsd">

    <context:property-placeholder location="classpath:jdbc.properties"/>

    <!-- 数据库连接池 -->

    <bean id="dataSource" class="org.apache.commons.dbcp.BasicDataSource"

          destroy-method="close">

        <property name="driverClassName" value="${jdbc.driver}" />

        <property name="url" value="${jdbc.url}" />

        <property name="username" value="${jdbc.username}" />

        <property name="password" value="${jdbc.password}" />

        <property name="maxActive" value="10" />

        <property name="maxIdle" value="5" />

    </bean>

    <!-- Mybatis的工厂 -->

    <bean id="sqlSessionFactoryBean" class="org.mybatis.spring.SqlSessionFactoryBean">

        <property name="dataSource" ref="dataSource"/>

        <!-- 核心配置文件的位置 -->

        <property name="configLocation" value="classpath:sqlMapConfig.xml"/>

    </bean>

    <!-- Mapper动态代理开发   扫描 -->

    <bean class="org.mybatis.spring.mapper.MapperScannerConfigurer">

        <!-- 基本包 -->

        <property name="basePackage" value="dyh.springmvc.dao"/>

    </bean>

    <!-- 注解事务 -->

    <bean id="transactionManager" class="org.springframework.jdbc.datasource.DataSourceTransactionManager">

        <property name="dataSource" ref="dataSource"/>

    </bean>

    <!-- 开启注解 -->

    <tx:annotation-driven transaction-manager="transactionManager"/>

</beans>
(3)、Mybatis核心配置文件(sqlMapConfig.xml)
<?xml version="1.0" encoding="UTF-8" ?>

<!DOCTYPE configuration

        PUBLIC "-//mybatis.org//DTD Config 3.0//EN"

        "http://mybatis.org/dtd/mybatis-3-config.dtd">

<configuration>

    <!-- 设置别名 -->

    <typeAliases>

        <!-- 2. 指定扫描包,会把包内所有的类都设置别名,别名的名称就是类名,大小写不敏感 -->

        <package name="dyh.springmvc.pojo" />

    </typeAliases>

</configuration>
二、dao层代码,访问数据库接口以及映射文件
(1)、UserMapper接口
public interface UserMapper {

    public List<User> getUserList();

    //根据Id查询用户

    public User getUserById(Integer id);

    //修改单个用户

    public void updateById(User user);

}
(2)、UserMapper.xml
<?xml version="1.0" encoding="UTF-8" ?>

<!DOCTYPE mapper PUBLIC "-//mybatis.org//DTD Mapper 3.0//EN" "http://mybatis.org/dtd/mybatis-3-mapper.dtd" >

<mapper namespace="dyh.springmvc.dao.UserMapper">

    <select id="getUserList" resultType="User">

        SELECT * FROM `user`;

    </select>

    <!--根据ID查询用户-->

    <select id="getUserById" resultType="User">

        SELECT id,username,sex,address FROM `user` WHERE id = #{id}

    </select>

    <!--修改单个用户-->

    <select id="updateById" parameterType="User" resultType="int">

        UPDATE `user`

        <set>

            <if test="username != null" >

              username = #{username},

            </if>

            <if test="birthday != null" >

                birthday = #{birthday},

            </if>

            <if test="sex != null" >

                sex = #{sex},

            </if>

            <if test="address != null" >

                address = #{address},

            </if>

        </set>

        WHERE id = #{id}

    </select>

</mapper>
三、service层代码(业务逻辑)
(1)、UserService接口
public interface UserService {

    public List<User> getUserList();

    public User getUserById(Integer id);

    public void updateById(User user);

}
(2)、实现类UserServiceImpl
@Service

@Transactional

public class UserServiceImpl implements UserService {

    @Resource

    private UserMapper userMapper;

    public List<User> getUserList() {

        List<User> userList = userMapper.getUserList();

        return userList;

    }

    @Override

    public User getUserById(Integer id) {

        User user = userMapper.getUserById(id);

        return user;

    }

    @Override

    public void updateById(User user) {

        userMapper.updateById(user);

    }

}
四、controller层
(1)、三种方法返回值
* 1.ModelAndView 无敌的 带着数据 返回视图路径 不建议使用
* 2.String 返回视图路径 model带数据 官方推荐此种方式 解耦 数据 视图 分离 MVC 建议使用
* 3.void ajax 请求 合适 json格式数据 (response 异步请求使用)
(2)、绑定数组与绑定集合。
做法:放到一个类中
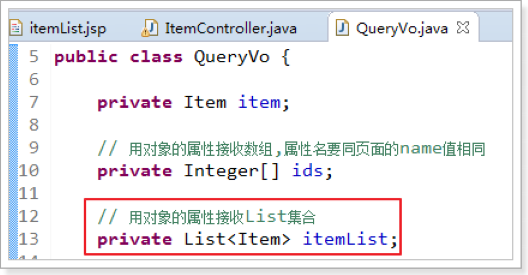
使用场景:
绑定数组用于批量删除
绑定集合List用于批量修改
(3)@RequestMapping详细讲解
1、@RequestMapping(value="item")或@RequestMapping("/item")两种都可以映射
2、什么时候必须要用value,不仅仅一个参数的时候
3、如果映射中的URL,有重复的部分,那么可以把该注解放到类上,括号中写入重复的部分。
4、alue = "itemList",method = RequestMethod.POST 这两个属性的属性值都是数组,可以写多个属性值。
(4)、重定向与转发的写法
@RequestMapping("updateItem")

public String updateItemById(Item item) {

    // 更新商品

    this.itemService.updateItemById(item);

    // 修改商品成功后,重定向到商品编辑页面

    // 重定向后浏览器地址栏变更为重定向的地址,

    // 重定向相当于执行了新的request和response,所以之前的请求参数都会丢失

    // 如果要指定请求参数,需要在重定向的url后面添加 ?itemId=1 这样的请求参数

    return "redirect:/itemEdit.action?itemId=" + item.getId();

}
@RequestMapping("updateItem")

public String updateItemById(Item item) {

    // 更新商品

    this.itemService.updateItemById(item);

    // 修改商品成功后,重定向到商品编辑页面

    // 重定向后浏览器地址栏变更为重定向的地址,

    // 重定向相当于执行了新的request和response,所以之前的请求参数都会丢失

    // 如果要指定请求参数,需要在重定向的url后面添加 ?itemId=1 这样的请求参数

    // return "redirect:/itemEdit.action?itemId=" + item.getId();

    // 修改商品成功后,继续执行另一个方法

    // 使用转发的方式实现。转发后浏览器地址栏还是原来的请求地址,

    // 转发并没有执行新的request和response,所以之前的请求参数都存在

    return "forward:/itemEdit.action";

}
package dyh.springmvc.controller;

import com.sun.deploy.net.HttpResponse;

import dyh.springmvc.conversion.DateConveter;

import dyh.springmvc.pojo.User;

import dyh.springmvc.service.UserService;

import org.springframework.http.HttpRequest;

import org.springframework.stereotype.Controller;

import org.springframework.ui.Model;

import org.springframework.web.bind.annotation.RequestMapping;

import org.springframework.web.servlet.ModelAndView;

import javax.annotation.Resource;

import java.util.Date;

import java.util.List;

/**

 * Created by duyahui on 2018/12/21.

 */

@Controller

public class UserController {

    //给一个默认值,代表是页面传递过来的

    private Integer id = 1;

    User user = new User();

    @Resource

    private UserService userService;

    @RequestMapping(value = "/index")

    private ModelAndView getMorderAndView(){

        List<User> userList = userService.getUserList();

        ModelAndView mw = new ModelAndView();

        mw.addObject("userList",userList);

        mw.setViewName("index");

        return mw;

    }

    //绑定简单类型

    //1、当请求的参数名称和页面形参名称一致时会将请求参数与形参直接进行绑定。

    //2、参数类型推荐使用包装数据类型,因为基础数据类型不可以为null

    //3、使用@RequestParam常用于处理简单类型的绑定(页面形参名称与参数类型不想写一致的话可以使用)。

    // 使用格式:@RequestParam(value = "id", required = true, defaultValue = "1") Integer itemId

    // value:参数名字,即入参的请求参数名字,如value=“itemId”表示请求的参数       区中的名字为itemId的参数的值将传入

    // required:是否必须,默认是true,表示请求中一定要有相应的参数,否则将报错,TTP Status 400 - Required Integer parameter 'XXXX' is not present

    // defaultValue:默认值,表示如果请求中没有同名参数时的默认值

    @RequestMapping(value = "/getUserById")

    private ModelAndView getUserById(Integer id){

        User user = userService.getUserById(id);

        ModelAndView mw = new ModelAndView();

        mw.addObject("user",user);

        mw.setViewName("index");

        return mw;

    }

    //如果提交的参数很多,或者提交的表单中的内容很多的时候,可以使用简单类型接受数据,也可以使用pojo接收数据。

    //要求:pojo对象中的属性名和表单中input的name属性一致。

    @RequestMapping(value = "/updatUserById")

    private ModelAndView updeatUserById(User user){

        user.setAddress("河南");

        Date date = new Date();

        user.setBirthday(date);

        user.setId(1);

        user.setSex("男");

        user.setUsername("xiaoming");

        userService.updateById(user);

        ModelAndView mw = new ModelAndView();

//        mw.addObject("recode",i);

        mw.setViewName("index");

        return mw;

    }

}
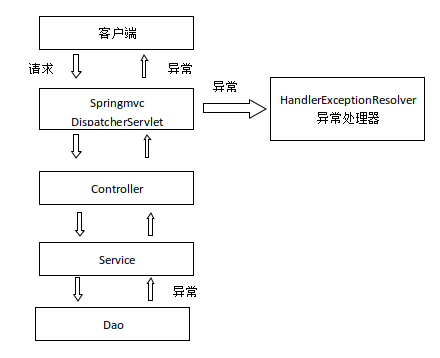
五、统一异常处理
系统中异常包括两类:预期异常和运行时异常RuntimeException,前者通过捕获异常从而获取异常信息,后者主要通过规范代码开发、测试通过手段减少运行时异常的发生。
系统的dao、service、controller出现都通过throws Exception向上抛出,最后由springmvc前端控制器交由异常处理器进行异常处理,如下图:
(1)、自定义异常类
public class MessageException extends Exception{

    private String msg;

    public MessageException(String msg) {

        super();

        this.msg = msg;

    }

    public String getMsg() {

        return msg;

    }

    public void setMsg(String msg) {

        this.msg = msg;

    }

}
(2)、异常处理的自定义实现类
public class CustomExceptionResolver implements HandlerExceptionResolver{

    public ModelAndView resolveException(HttpServletRequest request,

            HttpServletResponse response, Object obj,

            Exception e) {

        // TODO Auto-generated method stub  发生异常的地方 Serivce层  方法  包名+类名+方法名(形参) 字符串

        //日志    1.发布 tomcat war  Eclipse  2.发布Tomcat  服务器上  Linux  Log4j

        ModelAndView mav = new ModelAndView();

        //判断异常为类型

        if(e instanceof MessageException){

            //预期异常

            MessageException me = (MessageException)e;

            mav.addObject("error", me.getMsg());

        }else{

            mav.addObject("error", "未知异常");

        }

        mav.setViewName("error");

        return mav;

    }

}
(3)、springmvc.xml配置文件中添加的配置
<!-- Springmvc的异常处理器 配置全局异常处理器-->

<bean class="com.itheima.springmvc.exception.CustomExceptionResolver"/>
(4)、异常请求到的页面
<%@ page language="java" contentType="text/html; charset=UTF-8"

    pageEncoding="UTF-8"%>

<%@ taglib uri="http://java.sun.com/jsp/jstl/core" prefix="c" %>

<%@ taglib uri="http://java.sun.com/jsp/jstl/fmt"  prefix="fmt"%>

<!DOCTYPE html PUBLIC "-//W3C//DTD HTML 4.01 Transitional//EN" "http://www.w3.org/TR/html4/loose.dtd">

<html>

<head>

<meta http-equiv="Content-Type" content="text/html; charset=UTF-8">

<title>异常提示页面</title>

</head>

<body>

${error }

</body>

</html>
六、上传图片
(1)、配置文件添加
<!-- 文件上传,id必须设置为multipartResolver -->

<bean id="multipartResolver"

    class="org.springframework.web.multipart.commons.CommonsMultipartResolver">

    <!-- 设置文件上传大小 -->

    <property name="maxUploadSize" value="5000000" />

</bean>
(2)、图片上传逻辑代码
@RequestMapping("updateItem")

public String updateItemById(Item item, MultipartFile pictureFile) throws Exception {

    // 图片上传

    // 设置图片名称,不能重复,可以使用uuid

    String picName = UUID.randomUUID().toString();

    // 获取文件名

    String oriName = pictureFile.getOriginalFilename();

    // 获取图片后缀

    String extName = oriName.substring(oriName.lastIndexOf("."));

    // 开始上传

    pictureFile.transferTo(new File("C:/upload/image/" + picName + extName));

    // 设置图片名到商品中

    item.setPic(picName + extName);

    // ---------------------------------------------

    // 更新商品

    this.itemService.updateItemById(item);

    return "forward:/itemEdit.action";

}
(3)、前端页面HTML代码
<%@ page language="java" contentType="text/html; charset=UTF-8"

    pageEncoding="UTF-8"%>

<%@ taglib uri="http://java.sun.com/jsp/jstl/core" prefix="c" %>

<%@ taglib uri="http://java.sun.com/jsp/jstl/fmt"  prefix="fmt"%>

<!DOCTYPE html PUBLIC "-//W3C//DTD HTML 4.01 Transitional//EN" "http://www.w3.org/TR/html4/loose.dtd">

<html>

<head>

<meta http-equiv="Content-Type" content="text/html; charset=UTF-8">

<title>修改商品信息</title>

</head>

<body>

    <!-- 上传图片是需要指定属性 enctype="multipart/form-data" -->

    <!-- <form id="itemForm" action="" method="post" enctype="multipart/form-data"> -->

    <form id="itemForm"    action="${pageContext.request.contextPath }/updateitem.action" method="post" enctype="multipart/form-data">

        <input type="hidden" name="items.id" value="${item.id }" /> 修改商品信息:

        <table width="100%" border=1>

            <tr>

                <td>商品图片</td>

                <td>

                    <c:if test="${item.pic !=null}">

                        <img src="/pic/${item.pic}" width=100 height=100/>

                        <br/>

                    </c:if>

                    <input type="file"  name="pictureFile"/>

                </td>

            </tr>

            <tr>

                <td colspan="2" align="center"><input type="submit" value="提交" />

                </td>

            </tr>

        </table>

    </form>

</body>

</html>
七、 json数据交互
(1)@RequestBody
作用:
@RequestBody注解用于读取http请求的内容(字符串),通过springmvc提供的HttpMessageConverter接口将读到的内容(json数据)转换为java对象并绑定到Controller方法的参数上。
传统的请求参数:
itemEdit.action?id=1&name=zhangsan&age=12
现在的请求参数:
使用POST请求,在请求体里面加入json数据
{
"id": 1,
"name": "测试商品",
"price": 99.9,
"detail": "测试商品描述",
"pic": "123456.jpg"
}
本例子应用:
@RequestBody注解实现接收http请求的json数据,将json数据转换为java对象进行绑定
(2)@ResponseBody
作用:
@ResponseBody注解用于将Controller的方法返回的对象,通过springmvc提供的HttpMessageConverter接口转换为指定格式的数据如:json,xml等,通过Response响应给客户端
本例子应用:
@ResponseBody注解实现将Controller方法返回java对象转换为json响应给客户端。
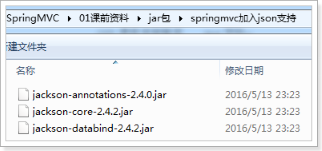
(3)、如果需要springMVC支持json,必须加入json的处理jar
我们使用Jackson这个jar,如下图:
@RequestMapping("testJson")

// @ResponseBody

public @ResponseBody Item testJson(@RequestBody Item item) {

    return item;

}
(4)、另外,如果不使用注解驱动<mvc:annotation-driven />,就需要给处理器适配器配置json转换器,参考之前学习的自定义参数绑定。
在springmvc.xml配置文件中,给处理器适配器加入json转换器:
<!--处理器适配器 -->

    <bean class="org.springframework.web.servlet.mvc.method.annotation.RequestMappingHandlerAdapter">

        <property name="messageConverters">

        <list>

        <bean class="org.springframework.http.converter.json.MappingJacksonHttpMessageConverter"></bean>

        </list>

        </property>

    </bean>
八、RESTful支持
什么是restful?
Restful就是一个资源定位及资源操作的风格。不是标准也不是协议,只是一种风格。基于这个风格设计的软件可以更简洁,更有层次,更易于实现缓存等机制。
资源:互联网所有的事物都可以被抽象为资源
资源操作:使用POST、DELETE、PUT、GET,使用不同方法对资源进行操作。
分别对应 添加、 删除、修改、查询。
传统方式操作资源
http://127.0.0.1/item/queryItem.action?id=1 查询,GET
http://127.0.0.1/item/saveItem.action 新增,POST
http://127.0.0.1/item/updateItem.action 更新,POST
http://127.0.0.1/item/deleteItem.action?id=1 删除,GET或POST
使用RESTful操作资源
http://127.0.0.1/item/1 查询,GET
http://127.0.0.1/item 新增,POST
http://127.0.0.1/item 更新,PUT
http://127.0.0.1/item/1 删除,DELETE
从URL上获取参数
使用RESTful风格开发的接口,根据id查询商品,接口地址是:
http://127.0.0.1/item/1
我们需要从url上获取商品id,步骤如下:
1. 使用注解@RequestMapping("item/{id}")声明请求的url
{xxx}叫做占位符,请求的URL可以是“item /1”或“item/2”
2. 使用(@PathVariable() Integer id)获取url上的数据
/**

 * 使用RESTful风格开发接口,实现根据id查询商品

 */

@RequestMapping("item/{id}")

@ResponseBody

public Item queryItemById(@PathVariable() Integer id) {

Item item = this.itemService.queryItemById(id);

  return item;

}
如果@RequestMapping中表示为"item/{id}",id和形参名称一致,@PathVariable不用指定名称。如果不一致,例如"item/{ItemId}"则需要指定名称@PathVariable("itemId")。
http://127.0.0.1/item/123?id=1
注意两个区别:
1. @PathVariable是获取url上数据的。@RequestParam获取请求参数的(包括post表单提交)
2. 如果加上@ResponseBody注解,就不会走视图解析器,不会返回页面,目前返回的json数据。如果不加,就走视图解析器,返回页面
九、拦截器的应用
(1)、springmvc.xml文件中的配置
<!-- SPringmvc的拦截器 -->

        <mvc:interceptors>

            <!-- 多个拦截器 -->

            <mvc:interceptor>

                <mvc:mapping path="/**"/>

                <!-- 自定义的拦截器类1 -->

                <bean class="com.itheima.springmvc.interceptor.Interceptor1"/>

            </mvc:interceptor>

          <mvc:interceptor>

                <mvc:mapping path="/**"/>

                <!--自定义的拦截器类2 -->

                <bean class="com.itheima.springmvc.interceptor.Interceptor2"/>

            </mvc:interceptor>

        </mvc:interceptors>
(2)、自定义拦截器
public class Interceptor1 implements HandlerInterceptor{

    public boolean preHandle(HttpServletRequest arg0, HttpServletResponse arg1, Object arg2) throws Exception {

        // TODO Auto-generated method stub

        System.out.println("方法前 1");

        return false;

    }

    public void postHandle(HttpServletRequest arg0, HttpServletResponse arg1, Object arg2, ModelAndView arg3)

            throws Exception {

        // TODO Auto-generated method stub

        System.out.println("方法后 1");

    }

    public void afterCompletion(HttpServletRequest arg0, HttpServletResponse arg1, Object arg2, Exception arg3)

            throws Exception {

        // TODO Auto-generated method stub

        System.out.println("页面渲染后 1");

    }

}
public class Interceptor2 implements HandlerInterceptor{

    public boolean preHandle(HttpServletRequest arg0, HttpServletResponse arg1, Object arg2) throws Exception {

        // TODO Auto-generated method stub

        System.out.println("方法前 2");

        return false;

    }

    public void postHandle(HttpServletRequest arg0, HttpServletResponse arg1, Object arg2, ModelAndView arg3)

            throws Exception {

        // TODO Auto-generated method stub

        System.out.println("方法后 2");

    }

    public void afterCompletion(HttpServletRequest arg0, HttpServletResponse arg1, Object arg2, Exception arg3)

            throws Exception {

        // TODO Auto-generated method stub

        System.out.println("页面渲染后 2");

    }

}
配置两个拦截器所打印的顺序是:只有方法前是顺序,其他事反顺序。

注意:
(1)、如果第一个拦截器拒绝放行了,那么后面的拦截器全部都不会执行了

(2)、如果第一个拦截器放行,第二个拦截器拒绝放行,那么执行结果是:
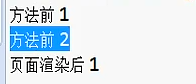
后面再多的拦截器,也是按照这样的顺序进行执行的。
实例操作:用户登录,登录成功则放行。
(1)、编写jsp代码
<%@ page language="java" contentType="text/html; charset=UTF-8"

    pageEncoding="UTF-8"%>

<!DOCTYPE html PUBLIC "-//W3C//DTD HTML 4.01 Transitional//EN" "http://www.w3.org/TR/html4/loose.dtd">

<html>

<head>

<meta http-equiv="Content-Type" content="text/html; charset=UTF-8">

  <title>Insert title here</title>

</head>

<body>

<form action="${pageContext.request.contextPath }/user/login.action">

  <label>用户名:</label>

<br>

  <input type="text" name="username">

<br>

  <label>密码:</label>

<br>

  <input type="password" name="password">

<br>

  <input type="submit">

</form>

</body>

</html>
(2)、配置springmvc.xml拦截器
<mvc:interceptor>

    <!-- 配置商品被拦截器拦截 -->

    <mvc:mapping path="/item/**" />

    <!-- 配置具体的拦截器 -->

    <bean class="cn.itcast.ssm.interceptor.LoginHandlerInterceptor" />

</mvc:interceptor>
(3)、登录操作
@Controller

@RequestMapping("user")

public class UserController {

    /**

     * 跳转到登录页面

     */

    @RequestMapping("toLogin")

    public String toLogin() {

        return "login";

    }

    /**

     * 用户登录

     */

    @RequestMapping("login")

    public String login(String username, String password, HttpSession session) {

        // 校验用户登录

        System.out.println(username);

        System.out.println(password);

        // 把用户名放到session中

        session.setAttribute("username", username);

        return "redirect:/item/itemList.action";

    }

}
(4)、配置拦截器
public class Interceptor1 implements HandlerInterceptor{

    public boolean preHandle(HttpServletRequest request, HttpServletResponse response, Object arg2) throws Exception {

        // TODO Auto-generated method stub//判断用户是否登陆  如果没有登陆  重定向到登陆页面   不放行   如果登陆了  就放行了

        // URL  http://localhost:8080/springmvc-mybatis/login.action

        //URI /login.action

        // 从request中获取session

    HttpSession session = request.getSession();

    // 从session中获取username

    Object username = session.getAttribute("username");

    // 判断username是否为null

    if (username != null) {

        // 如果不为空则放行

        return true;

    } else {

        // 如果为空则跳转到登录页面

        response.sendRedirect(request.getContextPath() + "/user/toLogin.action");

    }

      return false;

    }

    public void postHandle(HttpServletRequest arg0, HttpServletResponse arg1, Object arg2, ModelAndView arg3)

            throws Exception {

        // TODO Auto-generated method stub

    }

    public void afterCompletion(HttpServletRequest arg0, HttpServletResponse arg1, Object arg2, Exception arg3)

            throws Exception {

        // TODO Auto-generated method stub

    }

}
springMVC(二)springMVC、Mybatis、spring整合的更多相关文章
- springMVC+mybatis+spring整合案例
1.web.xml a:配置spring监听,使web容器在启动时加载spring的applicationContext.xml <listener> <listener-class ...
- SpringMVC+Mybatis+Spring整合
Maven引入需要的JAR包 pom.xml <properties> <!-- spring版本号 --> <spring.version>4.0.2.RELEA ...
- springMVC+MyBatis+Spring 整合(3)
spring mvc 与mybatis 的整合. 加入配置文件: spring-mybaits.xml <?xml version="1.0" encoding=" ...
- springMVC+MyBatis+Spring 整合(4) ---解决Spring MVC 对AOP不起作用的问题
解决Spring MVC 对AOP不起作用的问题 分类: SpringMVC3x+Spring3x+MyBatis3x myibaits spring J2EE2013-11-21 11:22 640 ...
- MyBatis学习(二):与Spring整合(非注解方式配置MyBatis)
搭建SpringMVC的-->传送门<-- 一.环境搭建: 目录结构: 引用的JAR包: 如果是Maven搭建的话,pom.xml的配置如下: <?xml version=" ...
- Mybatis——Spring整合
一.引入依赖 Spring的相关jar包 mybatis-3.4.1.jar mybatis-spring-1.3.0.jar mysql-connector-java-5.1.37-bin.jar ...
- MyBatis Spring整合配置映射接口类与映射xml文件
本文转自http://blog.csdn.net/zht666/article/details/38706083 Spring整合MyBatis使用到了mybatis-spring,在配置mybati ...
- Mybatis+Spring整合后Mapper测试类编写
public class UserMapperTest { private ApplicationContext applicationContext; @Before public void ini ...
- springmvc+mybatis+spring 整合源码项目
A集成代码生成器 [正反双向(单表.主表.明细表.树形表,开发利器)+快速构建表单; freemaker模版技术 ,0个代码不用写,生成完整的一个模块,带页面.建表sql脚本,处理类,service等 ...
- springmvc+mybatis+spring 整合
获取[下载地址] [免费支持更新]三大数据库 mysql oracle sqlsever 更专业.更强悍.适合不同用户群体[新录针对本系统的视频教程,手把手教开发一个模块,快速掌握本系统] ...
随机推荐
- Python3-subprocess模块-子进程管理
简单介绍 subprocess模块可以创建新的进程,执行shell命令.Python脚本等 代码示例 import subprocess # 1.执行进程,并获取返回码 return_code = s ...
- 暑假集训Day0
啊这 跟学长学的要写日记 希望到时候能写省选集训的总结 咳咳 今天上午做了一上午苦力好像让老苏夸了难以接受(年纪两百考到年级两千他居然没有干我) 上午搞卫生搞到了十点半………… 替女生拉包提东西了!! ...
- Android 伤敌一千自损八百之萤石摄像头集成(二)
本章主要是结合webview展示直播 app负责配网展示设备 加载webview播放 不介绍别的只说集成,至于APP_KEY.accessToken怎么获取的不予解释,官网都有 获取WiFi名称 这里 ...
- Oracle查询表空间使用率很慢
Oracle查询表空间使用率很慢 问题描述 执行查询表空间的语句,需要接近2min的时间才能执行完成. 以前也在其他客户的生产库遇到过一样的情况,当时是由于回收站的内容过多引起的. 不过这次的情况却不 ...
- java架构-一些设计上的基本常识
最近给团队新人讲了一些设计上的常识,可能会对其它的新人也有些帮助, 把暂时想到的几条,先记在这里. 1.API与SPI分离 框架或组件通常有两类客户,一个是使用者,一个是扩展者. API(Applic ...
- css定义变量_css原生变量的使用和兼容 附带还有更高性能,文件更高压缩率的好处
在开发中,css样式有一些属性往往需要重复使用,为了避免代码冗余,降低维护成本.我们需要使用CSS预编译工具[Sass/Less/Stylus],随着这些工具的流行,CSS变量也开始规范制定,目前很多 ...
- CSS3 nth-child的使用,详解css中nth的作用,以及nth-child的兼容写法
:nth-child是css3的一个比较常用的选择器.它用于匹配属于其父元素中的子元素,不论元素的类型. 它的参数可以是数字.关键词或公式.下面讲介绍它的使用方法, nth-child的使用 html ...
- day81 初识drf
目录 一.web应用模式 二.API接口 1 rpc(远程过程调用/远程服务调用) 2 restful(资源状态转换) 三.RESTful API规范 四.序列化 五.Django Rest_Fram ...
- CVE-2020-5902 简单复现
这几天通报了f5的一个漏洞,想着先弄个环境保存着,说不定后面就用到了.. 1.漏洞描述 近日,F5官方发布公告,修复了流量管理用户界面(TMUI)中存在的一个远程代码执行漏洞(CVE-2020-5 ...
- ES2020的这些新功能令人期待
转载请注明出处:葡萄城官网,葡萄城为开发者提供专业的开发工具.解决方案和服务,赋能开发者. 原文出处:https://blog.bitsrc.io/es2020-has-been-finalized- ...