python自动化高效办公第二期,带你项目实战【二】{数据可视化、发送邮件(定时任务监控)、python聊天机器人(基于微信、钉钉)}
相关文章和数据源:
python自动化高效办公第二期,带你项目实战【一】{excel数据处理、批量化生成word模板、pdf和ppt等自动化操作}
Python自动化办公--Pandas玩转Excel数据分析【二】
Python自动化办公--Pandas玩转Excel数据分析【三】
python处理Excel实现自动化办公教学(含实战)【一】
python处理Excel实现自动化办公教学(含实战)【二】
python处理Excel实现自动化办公教学(数据筛选、公式操作、单元格拆分合并、冻结窗口、图表绘制等)【三】
python入门之后须掌握的知识点(模块化编程、时间模块)【一】
python入门之后须掌握的知识点(excel文件处理+邮件发送+实战:批量化发工资条)【二】
spandas玩转excel码源.zip-数据挖掘文档类资源-CSDN下载
Python自动化办公(2021最新版!有源代码,).zip-
Python自动化办公(可能是B站内容最全的!有源代码,).zip-
上面是对应码源,图方便的话可以直接下载都分类分好了,当然也可以看文章。
1.数据可视化
参考上面pandas文章即可
2.python发送邮件
2.1 发送普通邮件
import smtplibfrom smtplib import SMTP_SSLfrom email.mime.text import MIMETextfrom email.mime.multipart import MIMEMultipartfrom email.header import Headerhost_server = 'smtp.sina.com' #新浪邮箱smtp服务器sender_sina = 'your_email@sina.com' #发件人邮箱pwd = 'your_pwd' #密码sender_sina_mail = 'your_email@sina.com' #发件人邮箱receiver = 'others_email@sina.com' #收件人邮箱mail_title = '这是标题'mail_content = '这是正文'msg = MIMEMultipart() #邮件主题msg['Subject'] = Header(mail_title, 'utf-8') #邮件主题msg['From'] = sender_sina_mailmsg['To'] = Header('mail_title', 'utf-8')msg.attach(MIMEText(mail_content, 'plain', 'utf-8')) #邮件正文smtp = SMTP_SSL(host_server) #ssl登录smtp.login(sender_sina,pwd)smtp.sendmail(sender_sina_mail,receiver,msg.as_string())smtp.quit()
2.2.发送带附件邮件
import smtplibfrom smtplib import SMTP_SSLfrom email.mime.text import MIMETextfrom email.mime.multipart import MIMEMultipartfrom email.mime.application import MIMEApplicationfrom email.header import Headerhost_server = 'smtp.sina.com'sender_sina = 'your_email@sina.com'pwd = 'your_pwd'sender_sina_mail = 'your_email@sina.com'receiver = 'others_email@sina.com'mail_title = '这是标题'mail_content = '这是正文'msg = MIMEMultipart()msg['Subject'] = Header(mail_title, 'utf-8')msg['From'] = sender_sina_mailmsg['To'] = Header('mail_title', 'utf-8')msg.attach(MIMEText(mail_content, 'html', 'utf-8')) #html格式# 添加附件attachment = MIMEApplication(open('student.xls', 'rb').read())attachment.add_header('Content-Disposition', 'attachment', filename='student.xls')msg.attach(attachment)try:smtp = SMTP_SSL(host_server)smtp.set_debuglevel(1) #0关闭 1开启smtp.ehlo(host_server) #和服务器确定状态smtp.login(sender_sina, pwd)smtp.sendmail(sender_sina_mail, receiver, msg.as_string())smtp.quit()print('success')except smtplib.SMTPException:print('error')
2.3 利用zmail接受邮件
安装
pip install zmail
import zmailserver = zmail. server(' pythonauto@sina.com', ' python1234' )mail = server.get_ latest()zmail.show(mail)zmail.show(mail["subject"])#只取标题


2.4 计划任务进行邮箱监控
2.4.1 windows下计划任务设置
首先我们可以同级目录下建一个run.text文档,然后输入:main.py
 ,
,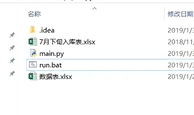
然后后缀名改掉改成bat
然后在windows下搜索计划任务

新建一个任务库:python
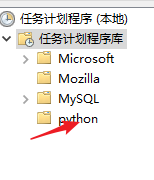
创建一个任务:


新建一个触发器:

操作:添加脚本

之后只需要等待即可。时间到了就会执行main.py

2.4.2计划任务监控邮箱
通过id判断邮件数量:

同级目录:新建一个id的text:写入当前邮件id

定时执行上述文件方法相同。
3.打造python聊天机器人(基于微信、钉钉)
3.1 API调用教学
BAT开源很多的,
以百度云为例:
选择一个API然后购买【天气预报为例】

API参数以及使用指南官网也有给出教程


购买完成之后可以在买家中心的管理控制台中找到这个订单。


基本信息中有个AppCode,点击显示秘钥就能看的到了。
然后去调试

我们也可以进入这个页面中调试,headers的写法相同。
结果如下:

在本地运行就是:
#!/usr/bin/env python# -*- coding: utf-8 -*-import requests# 天气查询-按地名 Python示例代码if __name__ == '__main__':url = 'https://weatherquery.api.bdymkt.com/weather/query/by-area'params = {}params['area'] = '杭州'params['areaId'] = ''headers = {'Content-Type': 'application/json;charset=UTF-8','X-Bce-Signature': 'AppCode/你的appcode'}r = requests.request("POST", url, params=params, headers=headers)print(r.content)
其余的api调用同理。
3.2 python微信自动化
3.2.1 采坑
安装库:
pip install itchat
import itchatitchat.auto_login(enableCmdQR=True)
运行程序:在vscode会得到下面的图,一个不完整的二维码

之后我们去相应文件夹,cmd进入环境,运行我们创建的文件即可:
python main.py
登录后报错:
xml.parsers.expat.ExpatError: mismatched tag: line 63, column 4
搜了一下解决方案:
<p class="msg-desc">由于安全原因,此微信号不能使用网页版微信。你可以前往微信官网 https://weixin.qq.com/ 下载客户端登录。</p>

个人建议:不要把时间浪费到itchat上了,itchat-uos我下了也不行,建议直接换个方法。
3.2.2 wxpy部分人可用
参考文章:
从零开始微信机器人(二):使用图灵机器人和api.ai相关接口 - 简书
gg网页版的都不行,下面知乎有位做的不错的这里推荐一下:
wxpy简单程序我还是提供一下:
- 获取好友地理位置
# pip install wxpyfrom wxpy import *# 初始化一个机器人对象# cache_path缓存路径,给定值为第一次登录生成的缓存文件路径# bot = Bot()bot = Bot(console_qr=-2, cache_path=True) # 移植到linux,console_qr设置True和2都无法扫描登录,设置-2之后正常登录。# 获取好友列表(包括自己)my_friends = bot.friends(update=False)'''stats_text 函数:帮助我们简单统计微信好友基本信息简单的统计结果的文本:param total: 总体数量:param sex: 性别分布:param top_provinces: 省份分布:param top_cities: 城市分布:return: 统计结果文本'''print(my_friends.stats_text())
- 获取好友头像
from wxpy import *import os,sys# 初始化机器人,扫码登陆微信,适用于Windows系统bot = Bot()# # Linux系统,执行登陆请调用下面的这句# bot = Bot(console_qr=2, cache_path="botoo.pkl"# 获取当前路径信息image_dir = os.getcwd()+'\\' + "FriendImgs\\"# 如果保存头像的FriendImgs目录不存在就创建一个if not os.path.exists(image_dir):os.mkdir(image_dir)os.popen('explorer ' + image_dir)my_friends = bot.friends(update=True)# 获取好友头像信息并存储在FriendImgs目录中n = 0for friend in my_friends:print(friend)image_name = image_dir + str(n) + '.jpg'friend.get_avatar(image_name)n = n + 1
- 聊天机器人
from wxpy import *import requests, json, timeimport datetime# 创建机器人bot = Bot()# bot = Bot(console_qr=-2, cache_path=True) # 移植到linux,console_qr设置True和2都无法扫描登录,设置-2之后正常登录。@bot.register(Group)def print_messages(msg):# 登陆微信的用户群昵称user_name = msg.sender.self.name# 信息内容content = msg.raw['Content']# 发信息好友名称friend_name = msg.raw['ActualNickName']# 打印出对方说的话print("{} - 说 - {}".format(friend_name,content))# 类型type = msg.raw['Type']# 请自行添加关键词对应的内容keywords_dic = {'你好': '你好,我是机器人','写作变现': '写作变现系列,真香!http://t.cn/A6xHLdYK','自动化办公': '0基础如何学习自动化办公? http://t.cn/A6xHPxpx',}#把昵称,改为你自己的,某个群里昵称避免所有群都回复if '昵称' in user_name:# 以下代码,不要修改for key in keywords_dic.keys():if key in content:res_keyword_reply = '''{}'''reply_content = res_keyword_reply.format(keywords_dic[key])return reply_content# 堵塞线程,并进入 Python 命令行# embed()bot.join()
3.3 钉钉机器人
配置机器人
步骤如下:先创建一个群:智能群助手--添加机器人--自定义


需要注意的是,在安全设置一栏里,我们选择加签的方式来验证,在此说明一下,钉钉机器人的安全策略有三种,第一种是使用关键字,就是说你推送的消息里必须包含你创建机器人时定义的关键字,如果不包含就推送不了消息,第二种就是使用加密签名,第三种是定义几个ip源,非这些源的请求会被拒绝,综合来看还是第二种又安全又灵活。

代码提供:
import timeimport hmacimport hashlibimport base64import urllib.parsetimestamp = str(round(time.time() * 1000))secret = 'SECfaa7f034bf7b25bcaeccfcce82e5f712c8e1bdcbf16a0934143f542d31058363' #添加你的secret_enc = secret.encode('utf-8')string_to_sign = '{}n{}'.format(timestamp, secret)string_to_sign_enc = string_to_sign.encode('utf-8')hmac_code = hmac.new(secret_enc, string_to_sign_enc, digestmod=hashlib.sha256).digest()sign = urllib.parse.quote(base64.b64encode(hmac_code))# print(timestamp)# print(sign)import requests,json #导入依赖库headers={'Content-Type': 'application/json'} #定义数据类型#添加你的webhook = 'https://oapi.dingtalk.com/robot/send?access_token=2cc56c65710552bb82d2a23ff87d85b8ba42e171e2c8c5c92528765ea9a90248×tamp='+timestamp+"&sign="+sign#定义要发送的数据#"at": {"atMobiles": "['"+ mobile + "']"data = {"msgtype": "text","text": {"content": '欢迎小可爱们'},"isAtAll": True}res = requests.post(webhook, data=json.dumps(data), headers=headers) #发送post请求print(res.text)
3.4 机器人支持格式
参考文章:
https://www.csdn.net/tags/Ntzacg4sNzkzNzMtYmxvZwO0O0OO0O0O.html
- 复制机器人的Webhook,用于向这个群发送消息
https://oapi.dingtalk.com/robot/send?access_token=XXXXXX
3.4.1 text格式
{"at": {"atMobiles":["180xxxxxx"],"atUserIds":["user123"],"isAtAll": false},"text": {"content":"我就是我, @XXX 是不一样的烟火"},"msgtype":"text"}
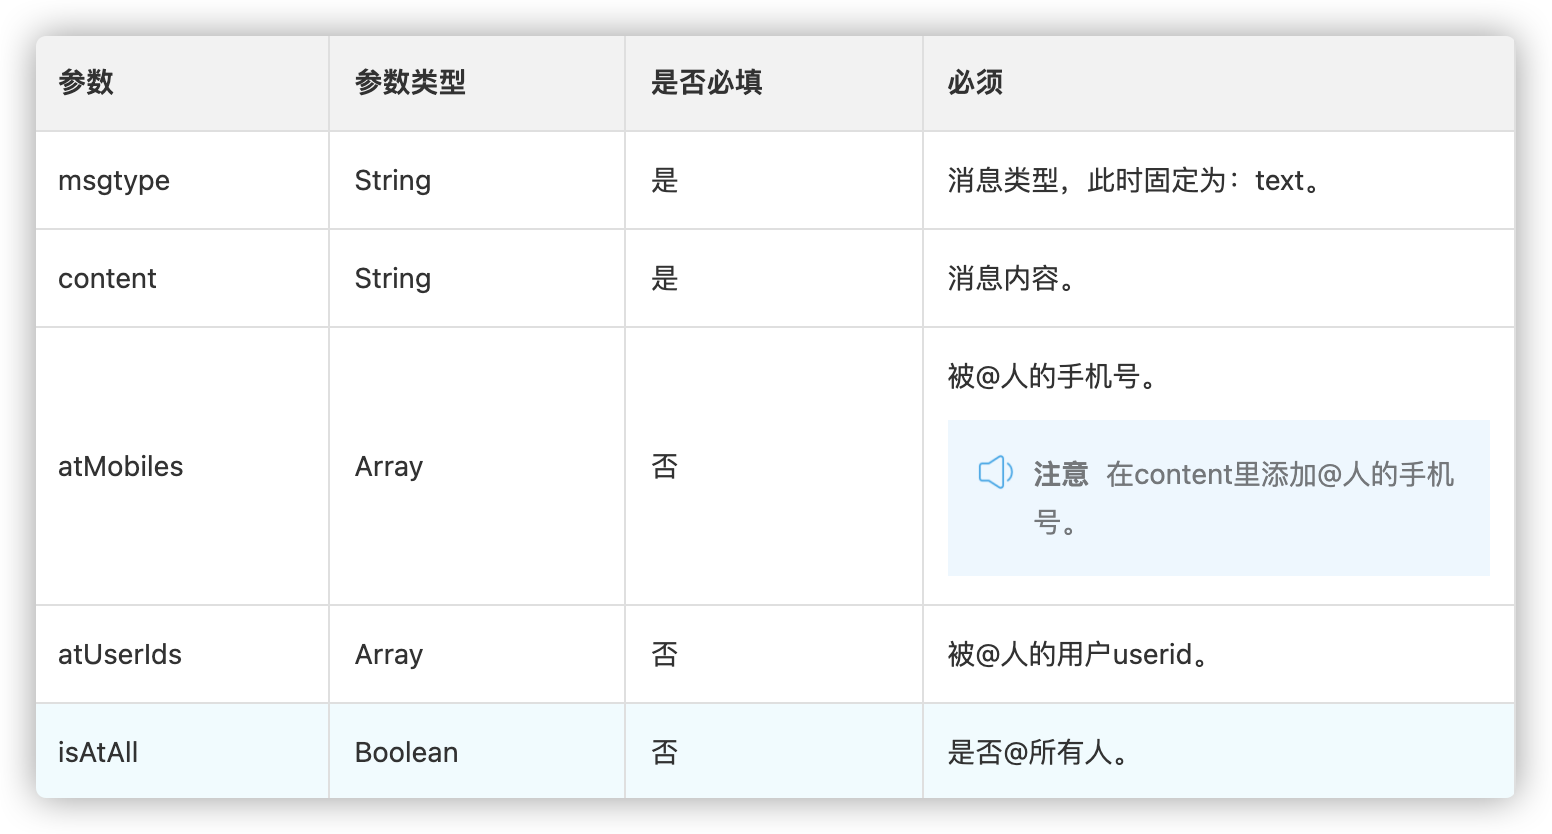
实例-关键词
import jsonimport requestsurl = 'https://oapi.dingtalk.com/robot/send?access_token=2f43cdbca48d42b266632aa52aaf2ef10794d5de625f8c2aa0a9b3c3d4eb99b3'headers = {"Content-Type": "application/json;charset=utf-8"}json_ = {"at": {"isAtAll": True},"text": {"content": "打卡"},"msgtype": "text"}# 将dict转为str类型string_text_msg = json.dumps(json_)res = requests.post(url, data=string_text_msg, headers=headers, verify=False)print(res.json())

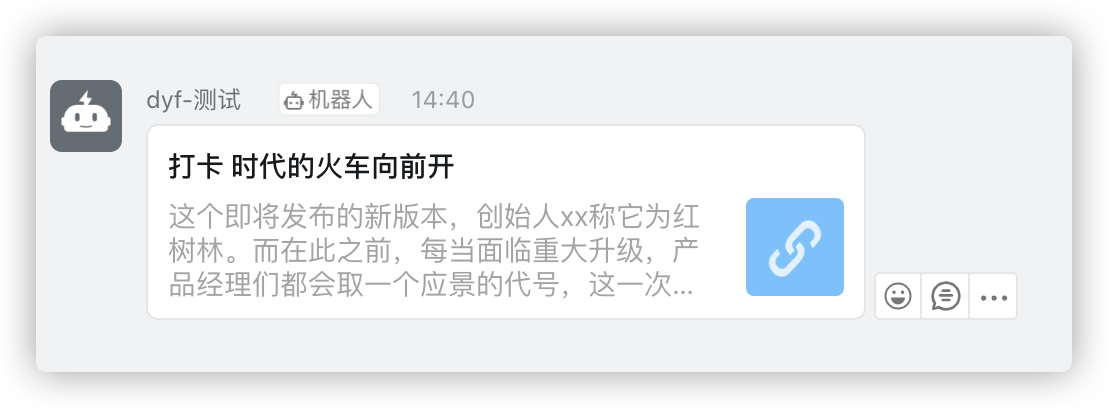
3.4.2 link类型
{"msgtype": "link","link": {"text": "这个即将发布的新版本","title": "时代的火车向前开","picUrl": "","messageUrl": "https://www.dingtalk.com/s"}}
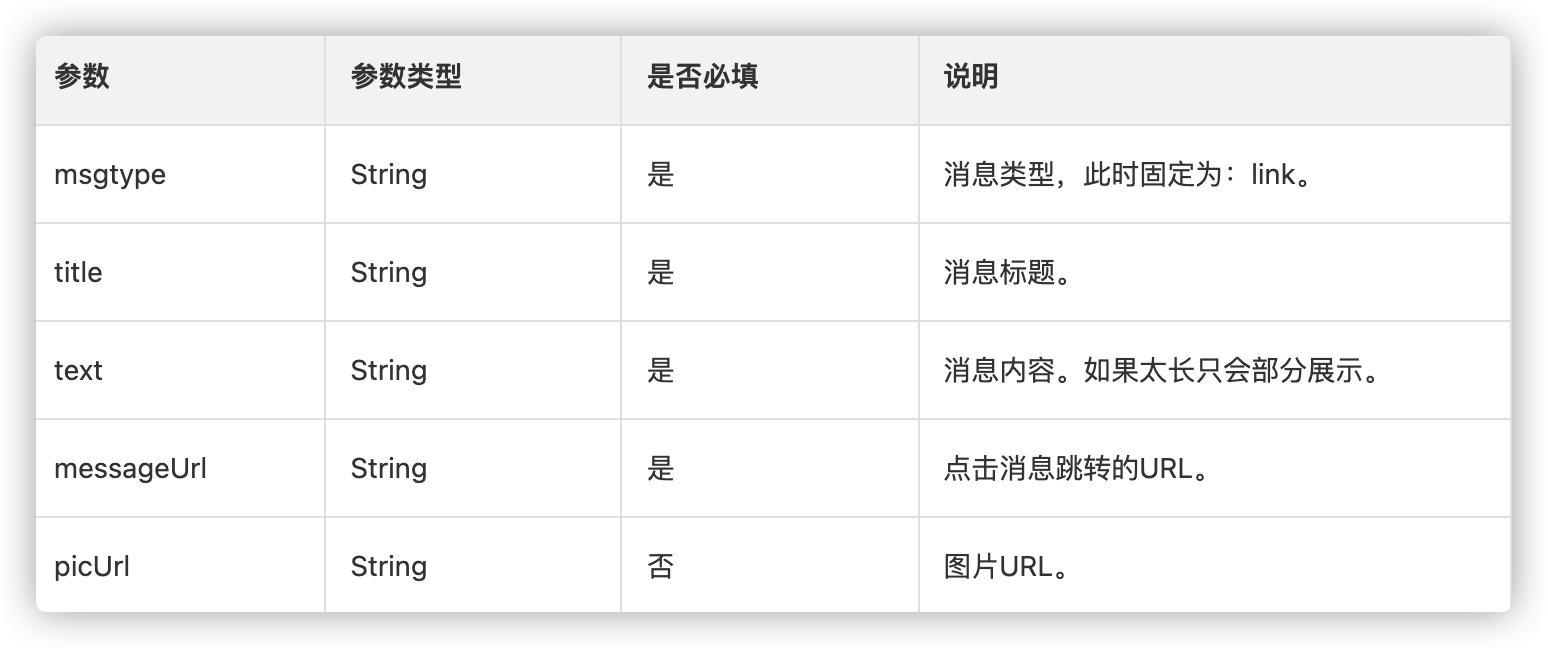
实例-关键词
import jsonimport requestsurl = 'https://oapi.dingtalk.com/robot/send?access_token=xx'headers = {"Content-Type": "application/json;charset=utf-8"}json_ = {"msgtype": "link","link": {"text": "这个即将发布的新版本","title": "打卡 时代的火车向前开","picUrl": "","messageUrl": "https://www.dingtalk.com/s"}}string_text_msg = json.dumps(json_)res = requests.post(url, data=string_text_msg, headers=headers, verify=False)print(res.json())
 \
\
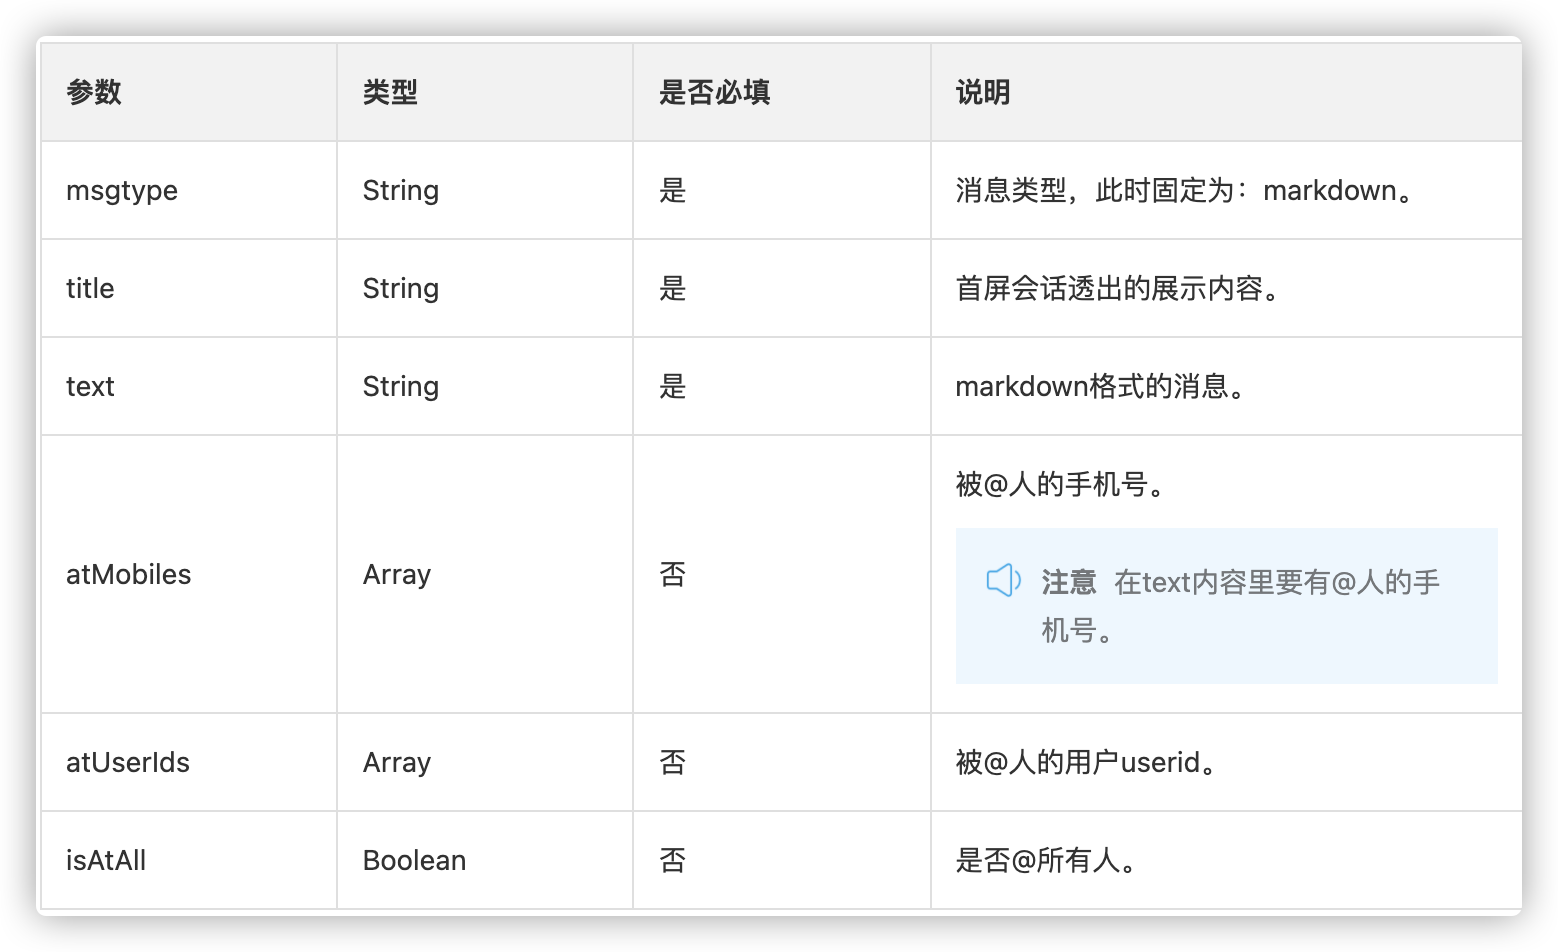
3.4.3、Markdown格式
{"msgtype": "markdown","markdown": {"title":"杭州天气","text": "#### 杭州天气 @150XXXXXXXX \n > 9度,西北风1级,空气良89,相对温度73%\n > \n > ###### 10点20分发布 [天气](https://www.dingtalk.com) \n"},"at": {"atMobiles": ["150XXXXXXXX"],"atUserIds": ["user123"],"isAtAll": false}}
实例-关键词
import jsonimport requestsurl = 'https://oapi.dingtalk.com/robot/send?access_token=xx'headers = {"Content-Type": "application/json;charset=utf-8"}json_ = {"msgtype": "markdown","markdown": {"title": "上海天气","text": "打卡 上海天气 @18056540512 \n > 9度,西北风1级,空气良89,相对温度73%\n > \n > ###### 10点20分发布 [天气](http://weathernew.pae.baidu.com/weathernew/pc?query=%E4%B8%8A%E6%B5%B7%E5%A4%A9%E6%B0%94&srcid=4982&city_name=%E4%B8%8A%E6%B5%B7&province_name=%E4%B8%8A%E6%B5%B7) \n"},"at": {"atMobiles": ["18056540xxxx"],"atUserIds": ["user123"],"isAtAll": False}}string_text_msg = json.dumps(json_)res = requests.post(url, data=string_text_msg, headers=headers, verify=False)print(res.json())

3.4.4、整体跳转ActionCard类型
{"actionCard": {"title": "乔布斯 20 年前想打造一间苹果咖啡厅","text": "![screenshot]","btnOrientation": "0","singleTitle": "打卡 阅读全文","singleURL": "http://xxxx"},"msgtype": "actionCard"}

3.4.5、独立跳转ActionCard类型
{"msgtype": "actionCard","actionCard": {"title": "打卡 我 20 年前想打造一间苹果咖啡厅,而它正是 Apple Store 的前身","text": " \n\n #### 乔布斯 20 年前想打造的苹果咖啡厅 \n\n Apple Store 的设计正从原来满满的科技感走向生活化,而其生活化的走向其实可以追溯到 20 年前苹果一个建立咖啡馆的计划","btnOrientation": "0","btns": [{"title": "去点饭","actionURL": "http://hefan.youfantech.cn/w/#/login"},{"title": "不感兴趣","actionURL": "http://hefan.youfantech.cn/w/#/login"}]}}

实例-关键词
import jsonimport requestsurl = 'https://oapi.dingtalk.com/robot/send?access_token=xxx'headers = {"Content-Type": "application/json;charset=utf-8"}json_ = {"msgtype": "actionCard","actionCard": {"title": "打卡 我 20 年前想打造一间苹果咖啡厅,而它正是 Apple Store 的前身","text": " \n\n #### 乔布斯 20 年前想打造的苹果咖啡厅 \n\n Apple Store 的设计正从原来满满的科技感走向生活化,而其生活化的走向其实可以追溯到 20 年前苹果一个建立咖啡馆的计划","btnOrientation": "0","btns": [{"title": "去点饭","actionURL": "http://hefan.youfantech.cn/w/#/login"},{"title": "不感兴趣","actionURL": "http://hefan.youfantech.cn/w/#/login"}]}}string_text_msg = json.dumps(json_)res = requests.post(url, data=string_text_msg, headers=headers, verify=False)print(res.json())

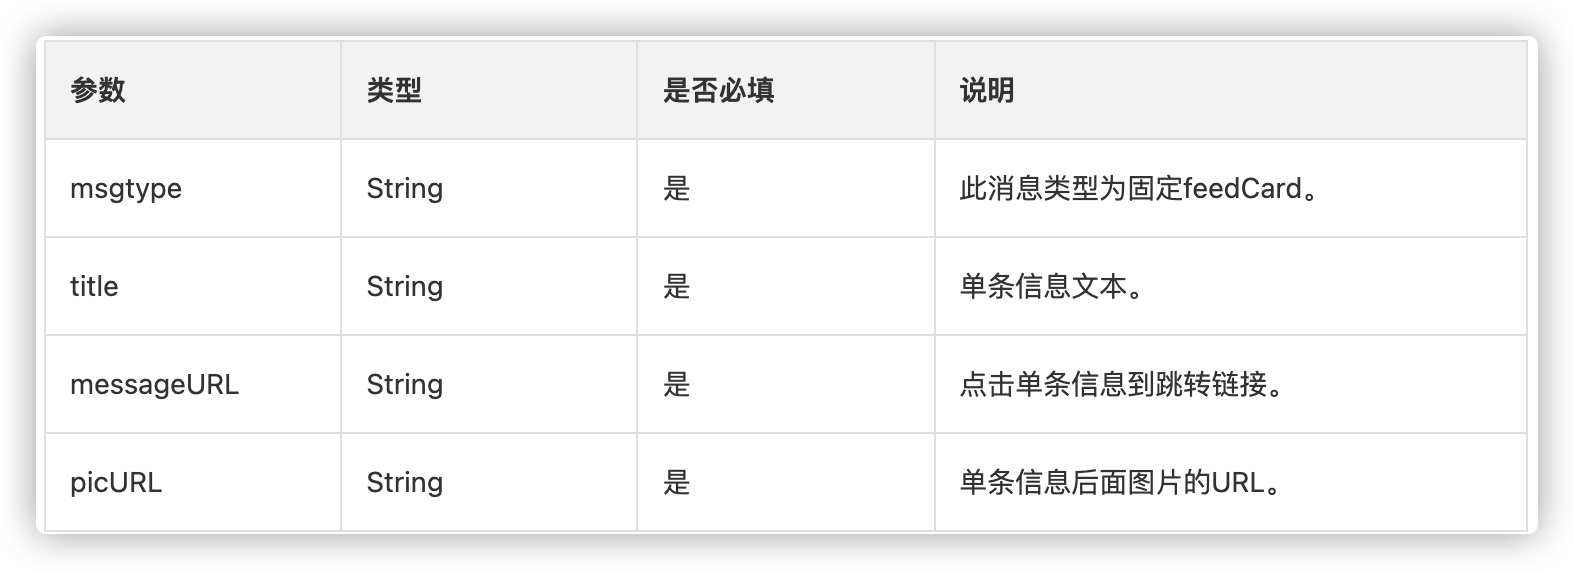
3.4.6、FeedCard类型
{"msgtype":"feedCard","feedCard": {"links": [{"title": "悠饭点餐1","messageURL": "https://www.dingtalk.com/","picURL": "https://gimg2.baidu.com/image_search/src=http%3A%2F%2F5b0988e595225.cdn.sohucs.com%2Fimages%2F20200114%2F1d9277a398584cdcb1284f274532c064.jpeg&refer=http%3A%2F%2F5b0988e595225.cdn.sohucs.com&app=2002&size=f9999,10000&q=a80&n=0&g=0n&fmt=jpeg?sec=1629096721&t=c0fc2015e8963ef750babd9a73522050"},{"title": "打卡 悠饭点餐2","messageURL": "https://www.dingtalk.com/","picURL": "https://gimg2.baidu.com/image_search/src=http%3A%2F%2F5b0988e595225.cdn.sohucs.com%2Fimages%2F20200114%2F1d9277a398584cdcb1284f274532c064.jpeg&refer=http%3A%2F%2F5b0988e595225.cdn.sohucs.com&app=2002&size=f9999,10000&q=a80&n=0&g=0n&fmt=jpeg?sec=1629096721&t=c0fc2015e8963ef750babd9a73522050"}]}}
实例-关键词
import jsonimport requestsurl = 'https://oapi.dingtalk.com/robot/send?access_token=xx'headers = {"Content-Type": "application/json;charset=utf-8"}json_ = {"msgtype":"feedCard","feedCard": {"links": [{"title": "悠饭点餐1","messageURL": "https://www.dingtalk.com/","picURL": "https://gimg2.baidu.com/image_search/src=http%3A%2F%2F5b0988e595225.cdn.sohucs.com%2Fimages%2F20200114%2F1d9277a398584cdcb1284f274532c064.jpeg&refer=http%3A%2F%2F5b0988e595225.cdn.sohucs.com&app=2002&size=f9999,10000&q=a80&n=0&g=0n&fmt=jpeg?sec=1629096721&t=c0fc2015e8963ef750babd9a73522050"},{"title": "打卡 悠饭点餐2","messageURL": "https://www.dingtalk.com/","picURL": "https://gimg2.baidu.com/image_search/src=http%3A%2F%2F5b0988e595225.cdn.sohucs.com%2Fimages%2F20200114%2F1d9277a398584cdcb1284f274532c064.jpeg&refer=http%3A%2F%2F5b0988e595225.cdn.sohucs.com&app=2002&size=f9999,10000&q=a80&n=0&g=0n&fmt=jpeg?sec=1629096721&t=c0fc2015e8963ef750babd9a73522050"}]}}string_text_msg = json.dumps(json_)res = requests.post(url, data=string_text_msg, headers=headers, verify=False)print(res.json())

3.5、常见问题
// 消息内容中不包含任何关键词{"errcode":310000,"errmsg":"keywords not in content"}// timestamp 无效{"errcode":310000,"errmsg":"invalid timestamp"}// 签名不匹配{"errcode":310000,"errmsg":"sign not match"}// IP地址不在白名单{"errcode":310000,"errmsg":"ip X.X.X.X not in whitelist"}
3.5.1、集成
- PostMan -- Newman、Monitor定时自动监控接口
- JMeter -- Jenkins、Shell..
- Python -- sleep、threading模块中的Timer、sched模块
3.5.2、实例讲解
- 钉钉接口
import jsonimport urllibimport requestsimport timeimport hmacimport hashlibimport base64from requests.packages.urllib3.exceptions import InsecureRequestWarningrequests.packages.urllib3.disable_warnings(InsecureRequestWarning)class Ding:"""钉钉机器人"""def __init__(self):# 测试群-钉钉机器人的webhook地址self.url = 'https://oapi.dingtalk.com/robot/send?access_token=xxx'# secretself.secret = 'xxx'def check_secret(self, secret):"""生成secret加签:param secret::return:"""timestamp = str(round(time.time() * 1000))secret_enc = secret.encode('utf-8')string_to_sign = '{}\n{}'.format(timestamp, secret)string_to_sign_enc = string_to_sign.encode('utf-8')hmac_code = hmac.new(secret_enc, string_to_sign_enc, digestmod=hashlib.sha256).digest()sign = urllib.parse.quote_plus(base64.b64encode(hmac_code))return "×tamp=" + timestamp + "&sign=" + signdef send_message(self, message=None):"""发送钉钉消息:param message: 发送内容:return:"""test_url = self.url + self.check_secret(f"{self.secret}")headers = {"Content-Type": "application/json;charset=utf-8"}message = messagestring_text_msg = {"msgtype": "text","text": {"content": message},"at": {"isAtAll": 1 # 如果需要@所有人,这些写1}}string_text_msg = json.dumps(string_text_msg)with requests.post(test_url, data=string_text_msg, headers=headers, verify=False) as res:return resdef send_link(self, message_url):"""发送钉钉链接:param message_url: 指定的url:return:"""test_url = self.url + self.check_secret(f"{self.secret}")headers = {"Content-Type": "application/json;charset=utf-8"}string_link_msg = {"msgtype": "link","link": {"text": "今天吃点啥呢?去悠饭看看吧~","title": "悠饭点饭啦~","picUrl": "https://tvax4.sinaimg.cn/crop.0.0.891.891.180/006Gos8ply8fxgn9viu2fj30ot0orgna.jpg?KID=imgbed,tva&Expires=1626279933&ssig=dsK87pjAuN","messageUrl": message_url}}string_text_msg = json.dumps(string_link_msg)with requests.post(test_url, data=string_text_msg, headers=headers, verify=False) as res:return res
- Task任务
from common.robot import Dingimport datetimeimport pytzrun_time = datetime.datetime.now(pytz.timezone('PRC')).strftime("%Y-%m-%d %H:%M:%S")def lunch():"""提醒:return:"""remind = "朋友们,可以准备准备去吃饭啦~"Ding().send_message(f"饭点时间到了 {remind}")return reminddef dinner():"""提醒晚上点饭:return:"""link = 'http://xxx'Ding().send_link(link)
- 执行方式一:
from task.youfan import lunch, dinnerimport datetimeimport pytzfrom apscheduler.schedulers.blocking import BlockingSchedulerrun_time = datetime.datetime.now(pytz.timezone('PRC')).strftime("%Y-%m-%d %H:%M:%S")scheduler = BlockingScheduler(timezone="Asia/Shanghai")print("start...")scheduler.add_job(lunch, 'cron', day_of_week='mon-fri', hour=11, minute=30, second=00)scheduler.add_job(dinner, 'cron', day_of_week='mon-fri', hour=16, minute=30, second=00)scheduler.start()print("end...")
- 执行方式二:
# 在具体的函数中添加 装饰器from common.robot import Dingimport datetimeimport pytzfrom apscheduler.schedulers.blocking import BlockingSchedulerrun_time = datetime.datetime.now(pytz.timezone('PRC')).strftime("%Y-%m-%d %H:%M:%S")scheduler = BlockingScheduler(timezone="Asia/Shanghai")@scheduler.scheduled_job('cron', day_of_week='mon-fri', hour=11, minute=30, second=00)def lunch():"""提醒:return:"""remind = "朋友们,可以准备准备去吃饭啦~"Ding().send_message(f"饭点时间到了 {remind}")return remind@scheduler.scheduled_job('cron', day_of_week='mon-fri', hour=16, minute=30, second=00)def dinner():"""提醒晚上点饭:return:"""link = 'http://hefan.youfantech.cn/w/#/login'Ding().send_link(link)
3.5.3、scheduler简单使用
import timefrom apscheduler.schedulers.blocking import BlockingSchedulerdef my_job():"""定义一个方法"""print time.strftime('%Y-%m-%d %H:%M:%S', time.localtime(time.time()))# 创建一个BlockingScheduler(调度器)对象sched = BlockingScheduler()# 添加一个作业job_store,第一个参数是可调度的执行,第二个是调用方式(interval,date,cron),第三个是interval中指定的时间sched.add_job(my_job, 'interval', seconds=5)try:# 启动调度器,注意:启动后就不能修改配置参数了,运行程序需要写在start方法前面。sched.start()except (KeyboardInterrupt, SystemExit):sched.shutdown()
- sched = BlockingScheduler()
sched.add_job(func,'interval','date','cron')# datefrom datetime import datetimefrom datetime import datefrom apscheduler.schedulers.blocking import BlockingSchedulerdef job(text):print(text)scheduler = BlockingScheduler(timezone="Asia/Shanghai")# 在 2019-8-30 运行一次 job 方法# args=['这个是方法的一个入参']scheduler.add_job(job, 'date', run_date=date(2021, 7, 20), args=['text1'])# 在 2019-8-30 01:00:00 运行一次 job 方法scheduler.add_job(job, 'date', run_date=datetime(2021, 7, 20, 11, 38, 0), args=['text2'])# 在 2019-8-30 01:00:01 运行一次 job 方法scheduler.add_job(job, 'date', run_date='2021-7-20 11:39:00', args=['text3'])scheduler.start()

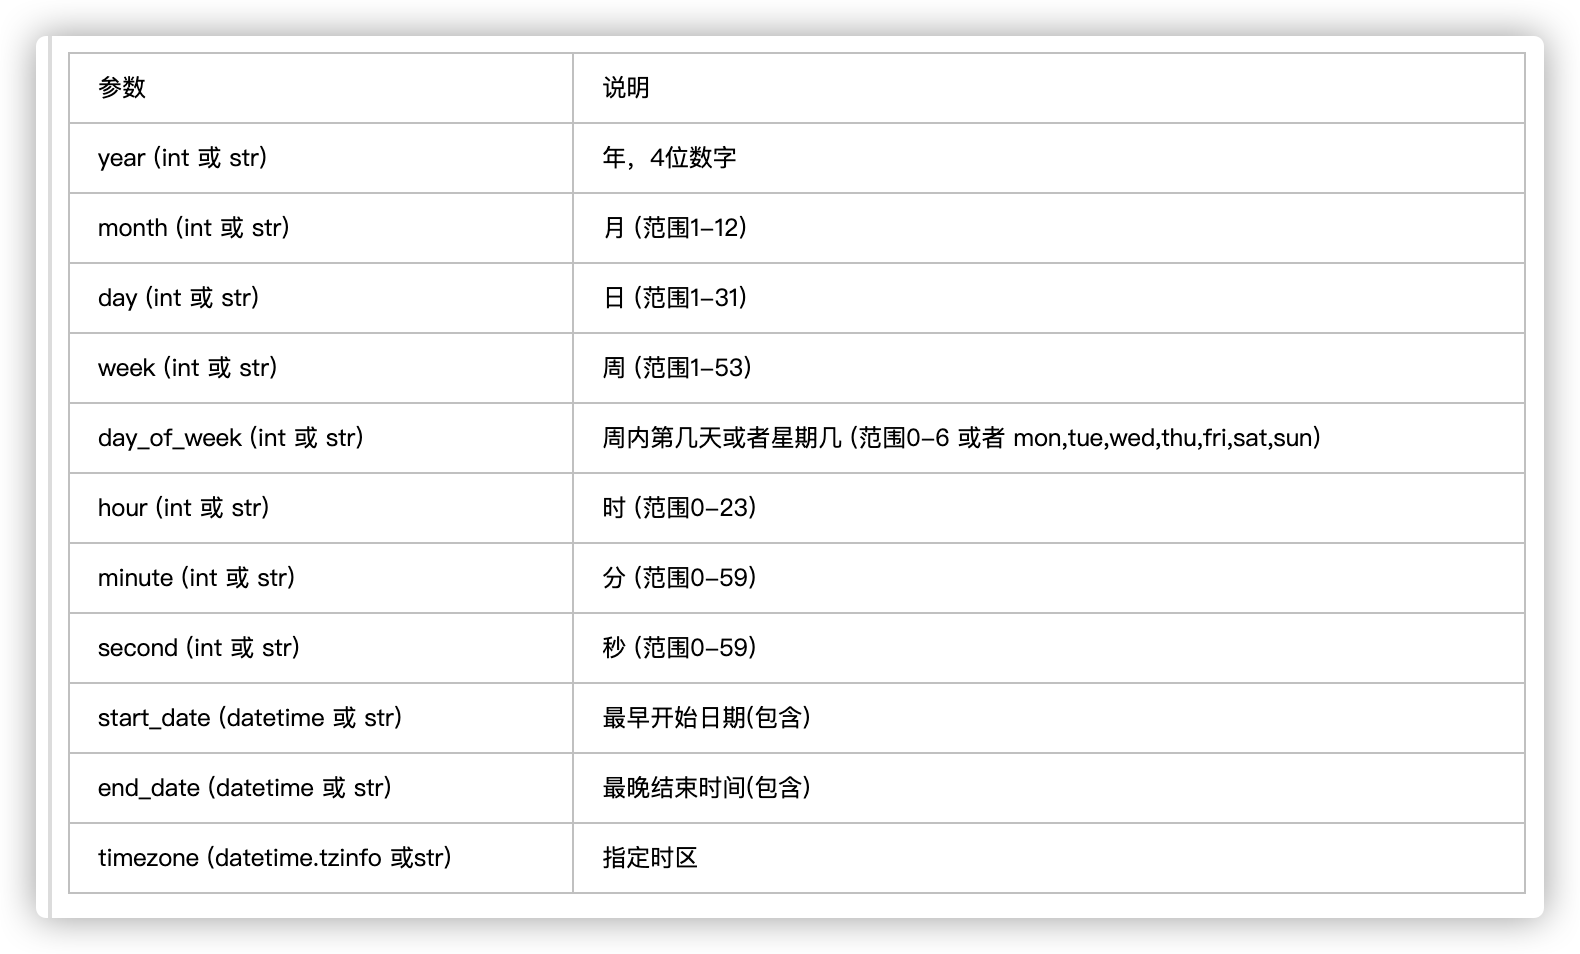
sched.add_job(func,'interval','date','cron')# interval# 在 2021-07-19 20:15:00至2021-07-20 22:17:00期间,每隔1分30秒 运行一次 job 方法scheduler.add_job(job, 'interval', minutes=1, seconds = 30, start_date='2019-08-29 22:15:00', end_date='2019-08-29 22:17:00')

sched.add_job(func,'interval','date','cron')# cron# 在每天22点,每隔 1分钟 运行一次 job 方法scheduler.add_job(job, 'cron', hour=22, minute='*/1')# 在每天22和23点的25分,运行一次 job 方法scheduler.add_job(job, 'cron', hour='22-23', minute='25')# 支持表达式的* 表示任何*/a 表示每a,执行一次a-b 表示 a至b的范围内a-b/c 表示a-b范围内每执行一次last x 表示本月最后一个工作日执行last 表示本月的最后一天执行
4.开通腾讯AI聊天机器人


编写调用聊天接口代码(文件名:interface.py)
import hashlibimport timeimport randomimport stringfrom urllib.parse import quotedef curlmd5(src):m = hashlib.md5(src.encode('UTF-8'))# 将得到的MD5值所有字符转换成大写return m.hexdigest().upper()def get_params(plus_item):# 请求时间戳(秒级),用于防止请求重放(保证签名5分钟有效)t = time.time()time_stamp = str(int(t))# 请求随机字符串,用于保证签名不可预测nonce_str = ''.join(random.sample(string.ascii_letters + string.digits, 10))# 应用标志,这里修改成自己的id和keyapp_id = '你的id号码'app_key = '你的key号码'params = {'app_id': app_id,'question': plus_item,'time_stamp': time_stamp,'nonce_str': nonce_str,'session': '10000'}sign_before = ''# 要对key排序再拼接for key in sorted(params):# 键值拼接过程value部分需要URL编码,URL编码算法用大写字母,例如%E8。quote默认大写。sign_before += '{}={}&'.format(key, quote(params[key], safe=''))# 将应用密钥以app_key为键名,拼接到字符串sign_before末尾sign_before += 'app_key={}'.format(app_key)# 对字符串sign_before进行MD5运算,得到接口请求签名sign = curlmd5(sign_before)params['sign'] = signreturn params
编写运行代码,直接复制下面的就行~
import requestsimport interfacedef get_content(plus_item):# 聊天的API地址url = "https://api.ai.qq.com/fcgi-bin/nlp/nlp_textchat"# 获取请求参数plus_item = plus_item.encode('utf-8')payload = interface.get_params(plus_item)# r = requests.get(url,params=payload)r = requests.post(url, data=payload)return r.json()["data"]["answer"]if __name__ == '__main__':while True:comment = input('我:')if comment == 'q':breakanswer = get_content(comment)print('机器人:' + answer)

云端部署参考这边文章
python自动化高效办公第二期,带你项目实战【二】{数据可视化、发送邮件(定时任务监控)、python聊天机器人(基于微信、钉钉)}的更多相关文章
- python实现的、带GUI界面电影票房数据可视化程序
代码地址如下:http://www.demodashi.com/demo/14588.html 详细说明: Tushare是一个免费.开源的python财经数据接口包.主要实现对股票等金融数据从数据采 ...
- 学习推荐《精通Python网络爬虫:核心技术、框架与项目实战》中文PDF+源代码
随着大数据时代的到来,我们经常需要在海量数据的互联网环境中搜集一些特定的数据并对其进行分析,我们可以使用网络爬虫对这些特定的数据进行爬取,并对一些无关的数据进行过滤,将目标数据筛选出来.对特定的数据进 ...
- python操作三大主流数据库(14)python操作redis之新闻项目实战②新闻数据的展示及修改、删除操作
python操作三大主流数据库(14)python操作redis之新闻项目实战②新闻数据的展示及修改.删除操作 项目目录: ├── flask_redis_news.py ├── forms.py ├ ...
- appium+python自动化项目实战(二):项目工程结构
废话不多说,直接上图: nose.cfg配置文件里,可以指定执行的测试用例.生成测试报告等.以后将详细介绍.
- Python网络爬虫实战(二)数据解析
上一篇说完了如何爬取一个网页,以及爬取中可能遇到的几个问题.那么接下来我们就需要对已经爬取下来的网页进行解析,从中提取出我们想要的数据. 根据爬取下来的数据,我们需要写不同的解析方式,最常见的一般都是 ...
- 【python数据分析实战】电影票房数据分析(二)数据可视化
目录 图1 每年的月票房走势图 图2 年票房总值.上映影片总数及观影人次 图3 单片总票房及日均票房 图4 单片票房及上映月份关系图 在上一部分<[python数据分析实战]电影票房数据分析(一 ...
- 数据可视化开源系统(python开发)
Caravel 是 Airbnb (知名在线房屋短租公司)开源的数据探查与可视化平台(曾用名Panoramix),该工具在可视化.易用性和交互性上非常有特色,用户可以轻松对数据进行可视化分析. 核心功 ...
- Python爬虫入门教程 37-100 云沃客项目外包网数据爬虫 scrapy
爬前叨叨 2019年开始了,今年计划写一整年的博客呢~,第一篇博客写一下 一个外包网站的爬虫,万一你从这个外包网站弄点外快呢,呵呵哒 数据分析 官方网址为 https://www.clouderwor ...
- python操作三大主流数据库(13)python操作redis之新闻项目实战①新闻数据的导入
1.新闻处理页面redis_news.py #coding:utf-8 import math import redis class RedisNews(object): def __init__(s ...
- flow.ci + Github + Slack 一步步搭建 Python 自动化持续集成
理想的程序员必须懒惰,永远追随自动化法则.Automating shapes smarter future. 在一个 Python 项目的开发过程中可能会做的事情:编译.手动或自动化测试.部署环境配置 ...
随机推荐
- SpringBoot 拦截器 统一日志 记录用户请求返回日志
你请求我接口,传了什么参数,我返回了什么值给你,全部记下来.防止扯皮 需求:记录每次用户请求Controller的Body参数, 思路:在每个Controller 该当中记录,容易漏记,如果在拦截器里 ...
- 在原生 html 中使用 vue,在浏览器中直接运行 .vue 文件,在 vue 中使用 leaflet
vue3-in-html 在html中使用vue3,不依赖nodejs和webpack,不依赖脚手架 demo源码 https://gitee.com/s0611163/vue3-in-html 功能 ...
- Spring | 利用Maven搭建Spring的开发环境
本节主要介绍如何利用Maven搭建 Spring 开发环境,使用 Spring 之前需要安装 JDK .Maven和 IDEA 建议一定要从 Maven 项目开始,而不是从空项目开始,空项目开始会出现 ...
- 「HDU-2196」Computer (树形DP、树的直径)
「HDU-2196」Computer 树形dp,树的最长路径(最远点对) 题意 给出一棵nn个结点的无根树,求出每个结点所能到达的最远点的距离. 解法 将无根树转成有根树,并进行两次DFS. 第一次D ...
- 利用PE工具箱安装WINDOWS系统
一. 进入PE系统 U盘插入电脑,开机多次按F12(联想F12,华硕ESC,DELL F9,微星F11,大部分都是这样,实在不行就按F2进BIOS改)键进入类似如下图界面,选择U盘启动,(能选UE ...
- OAuth2.0回调函数用html页面转发给controller
OAuth2.0授权中有个回调函数,就是请求授权服务后,它会将你需要的code(假设code就是你需要的数据)发送给你的回调函数(你对外开放的一个url地址用以接收参数) 注:这个回调函数有点讨厌为什 ...
- vue Promise的使用
一.Promise是什么? Promise是异步编程的一种解决方案. 二.那什么时候我们会来处理异步事件呢? 1. 一种很常见的场景应该就是网络请求了. 我们封装一个网络请求的函数,因为不能立即拿到结 ...
- HanLP — 汉字转拼音,简繁转换 -- JAVA
目录 语料库 训练 加载语料库 训练模型 保存模型 加载模型 计算 调用 HanLP 在汉字转拼音时,可以解决多音字问题,显示输出声调,声母.韵母,通过训练语料库, 本文代码为<自然语言处理入门 ...
- el-menu菜单过长,显示不全问题
- C#设计模式18——迭代器模式的写法
是什么: 迭代器模式是一种行为型设计模式,它允许客户端通过一种统一的方式遍历集合对象中的元素,而无需暴露集合对象的内部结构. 为什么: 使用迭代器模式可以使得客户端程序与集合对象解耦,从而可以更加灵活 ...


