Introduction to 3D Game Programming with DirectX 12 学习笔记之 --- 第十五章:第一人称摄像机和动态索引
原文:Introduction to 3D Game Programming with DirectX 12 学习笔记之 --- 第十五章:第一人称摄像机和动态索引
代码工程地址:
https://github.com/jiabaodan/Direct12BookReadingNotes
学习目标
- 回顾视景坐标系变换的数学算法;
- 熟悉第一人称摄像机的功能;
- 实现第一人称摄像机;
- 理解如何动态索引一组纹理。
1 回顾视景坐标系变换

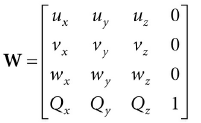
如果QW = (Qx, Qy, Qz, 1), uW = (ux, uy, uz, 0), vW = (vx, vy, vz, 0)并且wW = (wx, wy, wz, 0)。根据第三章4.3节,我们可以知道从视景坐标系变化到世界坐标系的变换矩阵为:
根据第三章4.5节,我们需要的是它的逆矩阵。因为世界坐标系和视景坐标系只变换位置和旋转,所以:

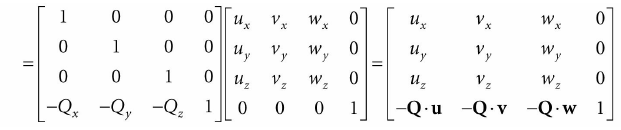
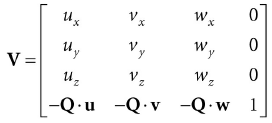
所以视景坐标系变换矩阵为:
2 摄像机类
为了封装摄像机相关的代码,我们封装和实现了一个Camera类。它的数据主要分为下面几类:位置,右向,向上的向量和看向的向量;原点,视景坐标系在世界坐标系下的xyz轴:
class Camera

{

public:

	Camera();

	˜Camera();

	// Get/Set world camera position.

	DirectX::XMVECTOR GetPosition()const;

	DirectX::XMFLOAT3 GetPosition3f()const;

	void SetPosition(float x, float y, float z);

	void SetPosition(const DirectX::XMFLOAT3& v);

	// Get camera basis vectors.

	DirectX::XMVECTOR GetRight()const;

	DirectX::XMFLOAT3 GetRight3f()const;

	DirectX::XMVECTOR GetUp()const;

	DirectX::XMFLOAT3 GetUp3f()const;

	DirectX::XMVECTOR GetLook()const;

	DirectX::XMFLOAT3 GetLook3f()const;

	// Get frustum properties.

	float GetNearZ()const;

	float GetFarZ()const;

	float GetAspect()const;

	float GetFovY()const;

	float GetFovX()const;

	// Get near and far plane dimensions in view space coordinates.

	float GetNearWindowWidth()const;

	float GetNearWindowHeight()const;

	float GetFarWindowWidth()const;

	float GetFarWindowHeight()const;

	// Set frustum.

	void SetLens(float fovY, float aspect, float zn, float zf);

	// Define camera space via LookAt parameters.

	void LookAt(DirectX::FXMVECTOR pos,

	DirectX::FXMVECTOR target,

	DirectX::FXMVECTOR worldUp);

	void LookAt(const DirectX::XMFLOAT3& pos,

	const DirectX::XMFLOAT3& target,

	const DirectX::XMFLOAT3& up);

	// Get View/Proj matrices.

	DirectX::XMMATRIX GetView()const;

	DirectX::XMMATRIX GetProj()const;

	DirectX::XMFLOAT4X4 GetView4x4f()const;

	DirectX::XMFLOAT4X4 GetProj4x4f()const;

	// Strafe/Walk the camera a distance d.

	void Strafe(float d);

	void Walk(float d);

	// Rotate the camera.

	void Pitch(float angle);

	void RotateY(float angle);

	// After modifying camera position/orientation, call to rebuild the view matrix.

	void UpdateViewMatrix();

private:

	// Camera coordinate system with coordinates relative to world space.

	DirectX::XMFLOAT3 mPosition = { 0.0f, 0.0f, 0.0f };

	DirectX::XMFLOAT3 mRight = { 1.0f, 0.0f, 0.0f };

	DirectX::XMFLOAT3 mUp = { 0.0f, 1.0f, 0.0f };

	DirectX::XMFLOAT3 mLook = { 0.0f, 0.0f, 1.0f };

	// Cache frustum properties.

	float mNearZ = 0.0f;

	float mFarZ = 0.0f;

	float mAspect = 0.0f;

	float mFovY = 0.0f;

	float mNearWindowHeight = 0.0f;

	float mFarWindowHeight = 0.0f;

	bool mViewDirty = true;

	// Cache View/Proj matrices.

	DirectX::XMFLOAT4X4 mView = MathHelper::Identity4x4();

	DirectX::XMFLOAT4X4 mProj = MathHelper::Identity4x4();

};
3 选择一些方法实现
3.1 返回XMVECTOR变量
我们提供了一些返回XMVECTOR变量的方法,这个只是为了方便:
XMVECTOR Camera::GetPosition()const

{

	return XMLoadFloat3(&mPosition);

}

XMFLOAT3 Camera::GetPosition3f()const

{

	return mPosition;

}
3.2 SetLens
我们通过SetLens函数来设置视锥体:
void Camera::SetLens(float fovY, float aspect, float zn, float zf)

{

	// cache properties

	mFovY = fovY;

	mAspect = aspect;

	mNearZ = zn;

	mFarZ = zf;

	mNearWindowHeight = 2.0f * mNearZ * tanf(0.5f*mFovY );

	mFarWindowHeight = 2.0f * mFarZ * tanf(0.5f*mFovY );

	XMMATRIX P = XMMatrixPerspectiveFovLH(mFovY, mAspect, mNearZ, mFarZ);

	XMStoreFloat4x4(&mProj, P);

}
3.3 通过视锥体派生出来的数据
float Camera::GetFovX()const

{

	float halfWidth = 0.5f*GetNearWindowWidth();

	return 2.0f*atan(halfWidth / mNearZ);

}

float Camera::GetNearWindowWidth()const

{

	return mAspect * mNearWindowHeight;

}

float Camera::GetNearWindowHeight()const

{

	return mNearWindowHeight;

}

float Camera::GetFarWindowWidth()const

{

	return mAspect * mFarWindowHeight;

}

float Camera::GetFarWindowHeight()const

{

	return mFarWindowHeight;

}
3.4 变换摄像机
对于一个第一人称摄像机,如果无视碰撞检测,我们希望:
- 向看向的方向前进或者后退;
- 左右移动;
- 向上下旋转;
- 左右旋转。
void Camera::Walk(float d)

{

	// mPosition += d*mLook

	XMVECTOR s = XMVectorReplicate(d);

	XMVECTOR l = XMLoadFloat3(&mLook);

	XMVECTOR p = XMLoadFloat3(&mPosition);

	XMStoreFloat3(&mPosition, XMVectorMultiplyAdd(s, l, p));

}

void Camera::Strafe(float d)

{

	// mPosition += d*mRight

	XMVECTOR s = XMVectorReplicate(d);

	XMVECTOR r = XMLoadFloat3(&mRight);

	XMVECTOR p = XMLoadFloat3(&mPosition);

	XMStoreFloat3(&mPosition, XMVectorMultiplyAdd(s, r, p));

}

void Camera::Pitch(float angle)

{

	// Rotate up and look vector about the right vector.

	XMMATRIX R = XMMatrixRotationAxis(XMLoadFloat3(&mRight), angle);

	XMStoreFloat3(&mUp, XMVector3TransformNormal(XMLoadFloat3(&R));

	XMStoreFloat3(&mLook, XMVector3TransformNormal(XMLoadFloat3(&mLook), R));

}

void Camera::RotateY(float angle)

{

	// Rotate the basis vectors about the world yaxis.

	XMMATRIX R = XMMatrixRotationY(angle);

	XMStoreFloat3(&mRight, XMVector3TransformNormal(XMLoadFloat3(&R));

	XMStoreFloat3(&mUp, XMVector3TransformNormal(XMLoadFloat3(&mUp), R));

	XMStoreFloat3(&mLook, XMVector3TransformNormal(XMLoadFloat3(&mLook), R));

}
3.5 创建视景坐标系变换矩阵
UpdateViewMatrix函数的第一部分是重新标准正交化摄像机的向右,向上和看向的向量。因为经过变换后,由于数值问题可能导致它们不再标准正交;第二部分就是计算矩阵:
void Camera::UpdateViewMatrix()

{

	if(mViewDirty)

	{

		XMVECTOR R = XMLoadFloat3(&mRight);

		XMVECTOR U = XMLoadFloat3(&mUp);

		XMVECTOR L = XMLoadFloat3(&mLook);

		XMVECTOR P = XMLoadFloat3(&mPosition);

		// Keep camera’s axes orthogonal to each other and of unit length.

		L = XMVector3Normalize(L);

		U = XMVector3Normalize(XMVector3Cross(L, R));

		// U, L already ortho-normal, so no need to normalize cross product.

		R = XMVector3Cross(U, L);

		// Fill in the view matrix entries.

		float x = -XMVectorGetX(XMVector3Dot(P, R));

		float y = -XMVectorGetX(XMVector3Dot(P, U));

		float z = -XMVectorGetX(XMVector3Dot(P, L));

		XMStoreFloat3(&mRight, R);

		XMStoreFloat3(&mUp, U);

		XMStoreFloat3(&mLook, L);

		mView(0, 0) = mRight.x;

		mView(1, 0) = mRight.y;

		mView(2, 0) = mRight.z;

		mView(3, 0) = x;

		mView(0, 1) = mUp.x;

		mView(1, 1) = mUp.y;

		mView(2, 1) = mUp.z;

		mView(3, 1) = y;

		mView(0, 2) = mLook.x;

		mView(1, 2) = mLook.y;

		mView(2, 2) = mLook.z;

		mView(3, 2) = z;

		mView(0, 3) = 0.0f;

		mView(1, 3) = 0.0f;

		mView(2, 3) = 0.0f;

		mView(3, 3) = 1.0f;

		mViewDirty = false;

	}

}
4 摄像机Demo注释
我们删除以前老的摄像机相关的变量mPhi, mTheta, mRadius, mView, 和mProj,添加新的变量:
Camera mCam;
然后在屏幕尺寸变化的时候,不再直接计算透视矩阵,而是SetLens:
void CameraApp::OnResize()

{

	D3DApp::OnResize();

	mCamera.SetLens(0.25f*MathHelper::Pi, AspectRatio(), 1.0f, 1000.0f);

}
在UpdateScene方法中:
void CameraApp::UpdateScene(float dt)

{

	if( GetAsyncKeyState(‘W’) & 0x8000 )

		mCamera.Walk(10.0f*dt);

	if( GetAsyncKeyState(‘S’) & 0x8000 )

		mCamera.Walk(-10.0f*dt);

	if( GetAsyncKeyState(‘A’) & 0x8000 )

		mCamera.Strafe(-10.0f*dt);

	if( GetAsyncKeyState(‘D’) & 0x8000 )

		mCamera.Strafe(10.0f*dt);
在OnMouseMove方法中:
void CameraAndDynamicIndexingApp::OnMouseMove(WPARAM btnState, int x, int y)

{

	if( (btnState & MK_LBUTTON) != 0 )

	{

		// Make each pixel correspond to a quarter of a degree.

		float dx = XMConvertToRadians(0.25f*static_cast<float>(x - mLastMousePos.x));

		float dy = XMConvertToRadians(0.25f*static_cast<float>(y - mLastMousePos.y));

		mCamera.Pitch(dy);

		mCamera.RotateY(dx);

	}

	mLastMousePos.x = x;

	mLastMousePos.y = y;

}
最终,视景和透视投影矩阵可以通过摄像机实例访问:
mCamera.UpdateViewMatrix();

XMMATRIX view = mCamera.View();

XMMATRIX proj = mCamera.Proj();

5 动态索引
动态索引的思路非常简单,我们在着色器程序中动态索引一组资源,本Demo中,资源是一组纹理。索引可以通过多种方法定义:
- 可以是常量缓冲中的一个元素;
- 可以是一个系统ID:SV_PrimitiveID, SV_VertexID, SV_DispatchThreadID, or SV_InstanceID;
- 可以是通过计算得到的结果;
- 可以是纹理中的值;
- 可以是顶点结构中的组件。
下面是一个常量缓冲中的索引例子:
cbuffer cbPerDrawIndex : register(b0)

{

	int gDiffuseTexIndex;

};

Texture2D gDiffuseMap[4] : register(t0);

float4 texValue = gDiffuseMap[gDiffuseTexIndex].Sample(gsamLinearWrap, pin.TexC);
对于当前Demo,我们的目标是:最小化我们每帧设置的descriptors的数量。我们设置物体的常量缓冲,材质常量缓冲和和漫反射问题贴图。最小化descriptors可以让我们的根签名更小,这代表每个绘制调用造成更少的性能开销;并且这个技术对实例化技术非常有用(下章讲解),我们的策略如下:
- 创建一个结构化缓冲保存所有的材质数据;
- 在物体常量缓冲中添加一个MaterialIndex值来指定使用的材质的索引;
- 绑定所有SRV descriptors每帧一次(之前每个渲染物体绑定一次);
- 在材质数据中添加DiffuseMapIndex值来指定使用的纹理贴图。
根据上面的设置,我们只需要对每个渲染物体设置逐物体的常量缓冲。然后使用MaterialIndex来匹配材质,使用DiffuseMapIndex来匹配纹理。
struct MaterialData

{

	DirectX::XMFLOAT4 DiffuseAlbedo = { 1.0f, 1.0f, 1.0f, 1.0f };

	DirectX::XMFLOAT3 FresnelR0 = { 0.01f, 0.01f, 0.01f };

	float Roughness = 64.0f;

	// Used in texture mapping.

	DirectX::XMFLOAT4X4 MatTransform = MathHelper::Identity4x4();

	UINT DiffuseMapIndex = 0;

	UINT MaterialPad0;

	UINT MaterialPad1;

	UINT MaterialPad2;

};

MaterialBuffer = std::make_unique<UploadBuffer<MaterialData>>(device, materialCount, false);
然后根据着色器,更新根签名:
CD3DX12_DESCRIPTOR_RANGE texTable;

texTable.Init(D3D12_DESCRIPTOR_RANGE_TYPE_SRV, 4, 0, 0);

// Root parameter can be a table, root descriptor or root constants.

CD3DX12_ROOT_PARAMETER slotRootParameter[4];

// Perfomance TIP: Order from most frequent to least frequent.

slotRootParameter[0].InitAsConstantBufferView(0);

slotRootParameter[1].InitAsConstantBufferView(1);

slotRootParameter[2].InitAsShaderResourceView(0, 1);

slotRootParameter[3].InitAsDescriptorTable(1, &texTable, D3D12_SHADER_VISIBILITY_PIXEL);

auto staticSamplers = GetStaticSamplers();

// A root signature is an array of root parameters.

CD3DX12_ROOT_SIGNATURE_DESC rootSigDesc(4,

	slotRootParameter,

	(UINT)staticSamplers.size(),

	staticSamplers.data(),

	D3D12_ROOT_SIGNATURE_FLAG_ALLOW_INPUT_ASSEMBLER_INPUT_
现在,绘制任何渲染物体之前,我们可以绑定所有材质和纹理SRV每帧一次:
void CameraAndDynamicIndexingApp::Draw(const GameTimer& gt)

{

	…

	auto passCB = mCurrFrameResource->PassCB->Resource();

	mCommandList->SetGraphicsRootConstantBufferView(1, passCB->GetGPUVirtualAddress());

	// Bind all the materials used in this scene. For structured buffers,

	// we can bypass the heap and set as a root descriptor.

	auto matBuffer = mCurrFrameResource->MaterialBuffer->Resource();

	mCommandList->SetGraphicsRootShaderResourceView(2, matBuffer->GetGPUVirtualAddress());

	// Bind all the textures used in this scene. Observe

	// that we only have to specify the first descriptor in the table.

	// The root signature knows how many descriptors are expected in the table.

	mCommandList->SetGraphicsRootDescriptorTable(3,

		mSrvDescriptorHeap->GetGPUDescriptorHandleForHeapStart());

	DrawRenderItems(mCommandList.Get(), mOpaqueRitems);

	…

}

void CameraAndDynamicIndexingApp::DrawRenderItems(

	ID3D12GraphicsCommandList* cmdList,

	const std::vector<RenderItem*>& ritems)

{

	…

	// For each render item…

	for(size_t i = 0; i < ritems.size(); ++i)

	{

		auto ri = ritems[i];

		…

		cmdList->SetGraphicsRootConstantBufferView(0, objCBAddress);

		cmdList->DrawIndexedInstanced(ri->IndexCount, 1,

			ri->StartIndexLocation, ri- >BaseVertexLocation, 0);

	}

}
然后更新ObjectConstants结构(已经添加并更新MaterialIndex):
// UpdateObjectCBs…

ObjectConstants objConstants;

XMStoreFloat4x4(&objConstants.World, XMMatrixTranspose(world));

XMStoreFloat4x4(&objConstants.TexTransform, XMMatrixTranspose(texTransform));

**objConstants.MaterialIndex = e->Mat->MatCBIndex;**
着色器代码更新:
// Include structures and functions for lighting.

#include “LightingUtil.hlsl”

struct MaterialData

{

	float4 DiffuseAlbedo;

	float3 FresnelR0;

	float Roughness;

	float4x4 MatTransform;

	uint DiffuseMapIndex;

	uint MatPad0;

	uint MatPad1;

	uint MatPad2;

};

// An array of textures, which is only supported in shader model 5.1+. Unlike

// Texture2DArray, the textures in this array can be different sizes and

// formats, making it more flexible than texture arrays.

Texture2D gDiffuseMap[4] : register(t0);

// Put in space1, so the texture array does not overlap with these resources.

// The texture array will occupy registers t0, t1, …, t3 in space0.

StructuredBuffer<MaterialData> gMaterialData : register(t0, space1);

SamplerState gsamPointWrap : register(s0);

SamplerState gsamPointClamp : register(s1);

SamplerState gsamLinearWrap : register(s2);

SamplerState gsamLinearClamp : register(s3);

SamplerState gsamAnisotropicWrap : register(s4);

SamplerState gsamAnisotropicClamp : register(s5);

// Constant data that varies per frame.

cbuffer cbPerObject : register(b0)

{

	float4x4 gWorld;

	float4x4 gTexTransform;

	uint gMaterialIndex;

	uint gObjPad0;

	uint gObjPad1;

	uint gObjPad2;

};

// Constant data that varies per material.

cbuffer cbPass : register(b1)

{

	float4x4 gView;

	float4x4 gInvView;

	float4x4 gProj;

	float4x4 gInvProj;

	float4x4 gViewProj;

	float4x4 gInvViewProj;

	float3 gEyePosW;

	float cbPerObjectPad1;

	float2 gRenderTargetSize;

	float2 gInvRenderTargetSize;

	float gNearZ;

	float gFarZ;

	float gTotalTime;

	float gDeltaTime;

	float4 gAmbientLight;

	// Indices [0, NUM_DIR_LIGHTS) are directional lights;

	// indices [NUM_DIR_LIGHTS, NUM_DIR_LIGHTS+NUM_POINT_LIGHTS) are point lights;

	// indices [NUM_DIR_LIGHTS+NUM_POINT_LIGHTS,

	//

	NUM_DIR_LIGHTS+NUM_POINT_LIGHT+NUM_SPOT_LIGHTS)

	// are spot lights for a maximum of MaxLights per object.

	Light gLights[MaxLights];

};

struct VertexIn

{

	float3 PosL : POSITION;

	float3 NormalL : NORMAL;

	float2 TexC : TEXCOORD;

};

struct VertexOut

{

	float4 PosH : SV_POSITION;

	float3 PosW : POSITION;

	float3 NormalW : NORMAL;

	float2 TexC : TEXCOORD;

};

VertexOut VS(VertexIn vin)

{

	VertexOut vout = (VertexOut)0.0f;

	// Fetch the material data.

	MaterialData matData = gMaterialData[gMaterialIndex];

	// Transform to world space.

	float4 posW = mul(float4(vin.PosL, 1.0f), gWorld);

	vout.PosW = posW.xyz;

	// Assumes nonuniform scaling; otherwise, need to use inverse-transpose

	// of world matrix.

	vout.NormalW = mul(vin.NormalL, (float3x3)gWorld);

	// Transform to homogeneous clip space.

	vout.PosH = mul(posW, gViewProj);

	// Output vertex attributes for interpolation across triangle.

	float4 texC = mul(float4(vin.TexC, 0.0f, 1.0f), gTexTransform);

	vout.TexC = mul(texC, matData.MatTransform).xy;

	return vout;

}

float4 PS(VertexOut pin) : SV_Target

{

	// Fetch the material data.

	MaterialData matData = gMaterialData[gMaterialIndex];

	float4 diffuseAlbedo = matData.DiffuseAlbedo;

	float3 fresnelR0 = matData.FresnelR0;

	float roughness = matData.Roughness;

	uint diffuseTexIndex = matData.DiffuseMapIndex;

	// Dynamically look up the texture in the array.

	diffuseAlbedo *= gDiffuseMap[diffuseTexIndex].Sample(gsamLinearWrap, pin.TexC);

	// Interpolating normal can unnormalize it, so renormalize it.

	pin.NormalW = normalize(pin.NormalW);

	// Vector from point being lit to eye.

	float3 toEyeW = normalize(gEyePosW - pin.PosW);

	// Light terms.

	float4 ambient = gAmbientLight*diffuseAlbedo;

	Material mat = { diffuseAlbedo, fresnelR0, roughness };

	float4 directLight = ComputeDirectLighting(gLights, mat, pin.PosW, pin.NormalW, toEyeW);

	float4 litColor = ambient + directLight;

	// Common convention to take alpha from diffuse albedo.

	litColor.a = diffuseAlbedo.a;

	return litColor;

}
为了总结本章,动态索引三个额外的用途如下:
- 合并使用不同纹理的网格到一个渲染项目,这样可以在同一个绘制调用中绘制它们。网格可以在顶点结构中保存texture/material属性;
- 一个rendering-pass中包含多个纹理(纹理有不同的大小和格式);
- 使用不用的纹理和材质实例化渲染项目,材质使用SV_InstanceID值作为索引。我们可以在下一章看到例子。
6 总结
- 我们通过摄像机的位置和方向来定义相机坐标系;
- 在相机类中添加透视投影矩阵;
- 添加前后左右移动,以及上下左右旋转;
- 动态索引是新的着色器5.1模型的功能,它可以让我们动态索引一组不同大小和格式的纹理。
7 练习
2、修改摄像机Demo,添加Roll函数,让相机可以围绕前向向量旋转(空战游戏中很有用):
Camera类添加代码:
void Roll(float angle);				// 添加Roll

void Camera::Roll(float angle)

{

	// Rotate up and look vector about the look vector.

	XMMATRIX R = XMMatrixRotationAxis(XMLoadFloat3(&mLook), angle);

	XMStoreFloat3(&mUp, XMVector3TransformNormal(XMLoadFloat3(&mUp), R));

	XMStoreFloat3(&mRight, XMVector3TransformNormal(XMLoadFloat3(&mRight), R));

	mViewDirty = true;

}
然后主App类中的RollAndBoxes::OnKeyboardInput函数中添加代码:
// 添加Roll

if (GetAsyncKeyState('Q') & 0x8000)

	mCamera.Roll(3.0f*dt);

if (GetAsyncKeyState('E') & 0x8000)

	mCamera.Roll(-3.0f*dt);

Introduction to 3D Game Programming with DirectX 12 学习笔记之 --- 第十五章:第一人称摄像机和动态索引的更多相关文章
- Introduction to 3D Game Programming with DirectX 12 学习笔记之 --- 第二十二章:四元数(QUATERNIONS)
原文:Introduction to 3D Game Programming with DirectX 12 学习笔记之 --- 第二十二章:四元数(QUATERNIONS) 学习目标 回顾复数,以及 ...
- Introduction to 3D Game Programming with DirectX 12 学习笔记之 --- 第十九章:法线贴图
原文:Introduction to 3D Game Programming with DirectX 12 学习笔记之 --- 第十九章:法线贴图 学习目标 理解为什么需要法线贴图: 学习法线贴图如 ...
- Introduction to 3D Game Programming with DirectX 12 学习笔记之 --- 第十六章:实例化和截头锥体裁切
原文:Introduction to 3D Game Programming with DirectX 12 学习笔记之 --- 第十六章:实例化和截头锥体裁切 代码工程地址: https://git ...
- Introduction to 3D Game Programming with DirectX 12 学习笔记之 --- 第十四章:曲面细分阶段
原文:Introduction to 3D Game Programming with DirectX 12 学习笔记之 --- 第十四章:曲面细分阶段 代码工程地址: https://github. ...
- Introduction to 3D Game Programming with DirectX 12 学习笔记之 --- 第十二章:几何着色器(The Geometry Shader)
原文:Introduction to 3D Game Programming with DirectX 12 学习笔记之 --- 第十二章:几何着色器(The Geometry Shader) 代码工 ...
- Introduction to 3D Game Programming with DirectX 12 学习笔记之 --- 第十八章:立方体贴图
原文:Introduction to 3D Game Programming with DirectX 12 学习笔记之 --- 第十八章:立方体贴图 代码工程地址: https://github.c ...
- Introduction to 3D Game Programming with DirectX 12 学习笔记之 --- 全书总结
原文:Introduction to 3D Game Programming with DirectX 12 学习笔记之 --- 全书总结 本系列文章中可能有很多翻译有问题或者错误的地方:并且有些章节 ...
- Introduction to 3D Game Programming with DirectX 12 学习笔记之 --- Direct12优化
原文:Introduction to 3D Game Programming with DirectX 12 学习笔记之 --- Direct12优化 第一章:向量代数 1.向量计算的时候,使用XMV ...
- Introduction to 3D Game Programming with DirectX 12 学习笔记之 --- 第二十三章:角色动画
原文:Introduction to 3D Game Programming with DirectX 12 学习笔记之 --- 第二十三章:角色动画 学习目标 熟悉蒙皮动画的术语: 学习网格层级变换 ...
随机推荐
- Spring Cloud中Eureka开启密码认证
转载自 https://blog.csdn.net/u011499747/article/details/77410997 Eureka服务端配置 添加spring-boot-starter-secu ...
- 10 种最常见的 Javascript 错误(频率最高)
本文是小编给大家收藏的JavaScript 中频度最高的 10 种错误,我们会告诉你什么原因导致了这些错误,以及如何防止这些错误发生.写的十分的全面细致,具有一定的参考价值,对此有需要的朋友可以参考学 ...
- 数据库访问技术 odbc dao rdo uda jet oledb
一.UDA(UniversalDataAccess) 这是微软提供的通用数据访问策略.包括ADO.OLEDB和ODBC.它不光提供了数据库的访 问能力,对于其它的数据存储技术也同样支持,如目录服务.E ...
- 访问hbase的内部大致流程
hbase 访问表过程.Client(客户端)----->访问ZK(拿到meta表的region位置)----->访问meta 表的region------>拿到user表的regi ...
- T2485 汉诺塔升级版(普及)(递归)
https://www.luogu.org/problem/show?pid=T2485 题目背景 汉诺塔升级了 题目描述 现在我们有N个圆盘和N个柱子,每个圆盘大小都不一样,大的圆盘不能放在小的圆盘 ...
- Leetcode520Detect Capital检测大写字母
给定一个单词,你需要判断单词的大写使用是否正确. 我们定义,在以下情况时,单词的大写用法是正确的: 全部字母都是大写,比如"USA". 单词中所有字母都不是大写,比如"l ...
- IOException parsing XML document from ServletContext resource
错误是我们学习的机会,不要错过明白明这个错误原因的机会,那么我们就可以更加深刻得理解这个问题. 在启动springmvc的程序去访问的时候,报IO异常,一般情况下IO异常就是文件找不到. 详细错误如下 ...
- beanstalkd 消息队列发邮件
放入消息 /** * 获取beanstalk实例 * * @staticvar resource|bool $beanstalk * @return resource */ function get_ ...
- HTML+JS---限制表单多次提交
限制表单多次提交: 表单只能提交一次 function check_form_data(){ $("#once_submit").attr("disabled" ...
- jeecms内容管理系统使用了哪些技术
jeeecms作为国内Java开源内容管理系统的龙头老大(感谢jeecms研发小组的辛苦劳作),技术架构也是比较成熟的,当然涉及到的技术也就相对多一些 看看jeecms内容管理系统使用了哪些技术 we ...