spring事物(一),@EnableTransactionManagement @Transactional 启动解析
1.事物的声明阶段
@EnableTransactionManagement,是我们开启注解事物的第一步,我们来看下这个类为我们干了什么
@Target(ElementType.TYPE)

@Retention(RetentionPolicy.RUNTIME)

@Documented

@Import(TransactionManagementConfigurationSelector.class)

public @interface EnableTransactionManagement {

    boolean proxyTargetClass() default false;

    AdviceMode mode() default AdviceMode.PROXY;

    int order() default Ordered.LOWEST_PRECEDENCE;

}
我们主要看 TransactionManagementConfigurationSelector 干了件什么事情。它主要往spring 容器中导入了 AutoProxyRegistrar , ProxyTransactionManagementConfiguration两个对象。
public class TransactionManagementConfigurationSelector extends AdviceModeImportSelector<EnableTransactionManagement> {

    @Override

    protected String[] selectImports(AdviceMode adviceMode) {

        switch (adviceMode) {

            case PROXY:

                return new String[] {AutoProxyRegistrar.class.getName(), ProxyTransactionManagementConfiguration.class.getName()};

            case ASPECTJ:

                return new String[] {TransactionManagementConfigUtils.TRANSACTION_ASPECT_CONFIGURATION_CLASS_NAME};

            default:

                return null;

        }

    }

}
ProxyTransactionManagementConfiguration的作用,我们可以看到此类是一个配置类,主要为spring容器中导入了3个bean。这三个bean分别的作用,我们下来详说
@Configuration

public class ProxyTransactionManagementConfiguration extends AbstractTransactionManagementConfiguration {

    @Bean(name = TransactionManagementConfigUtils.TRANSACTION_ADVISOR_BEAN_NAME)

    @Role(BeanDefinition.ROLE_INFRASTRUCTURE)

    public BeanFactoryTransactionAttributeSourceAdvisor transactionAdvisor() {

        BeanFactoryTransactionAttributeSourceAdvisor advisor = new BeanFactoryTransactionAttributeSourceAdvisor();

        advisor.setTransactionAttributeSource(transactionAttributeSource());

        advisor.setAdvice(transactionInterceptor());

        advisor.setOrder(this.enableTx.<Integer>getNumber("order"));

        return advisor;

    }

    @Bean

    @Role(BeanDefinition.ROLE_INFRASTRUCTURE)

    public TransactionAttributeSource transactionAttributeSource() {

        return new AnnotationTransactionAttributeSource();

    }

    @Bean

    @Role(BeanDefinition.ROLE_INFRASTRUCTURE)

    public TransactionInterceptor transactionInterceptor() {

        TransactionInterceptor interceptor = new TransactionInterceptor();

        interceptor.setTransactionAttributeSource(transactionAttributeSource());

        if (this.txManager != null) {

            interceptor.setTransactionManager(this.txManager);

        }

        return interceptor;

    }

}
AutoProxyRegistrar 这个类,实现了ImportBeanDefinitionRegistrar接口,主要是为容器中注入了 InfrastructureAdvisorAutoProxyCreator 这个bean。
public class AutoProxyRegistrar implements ImportBeanDefinitionRegistrar {

    private final Log logger = LogFactory.getLog(getClass());

    @Override

    public void registerBeanDefinitions(AnnotationMetadata importingClassMetadata, BeanDefinitionRegistry registry) {

        boolean candidateFound = false;

        Set<String> annoTypes = importingClassMetadata.getAnnotationTypes();

        for (String annoType : annoTypes) {

            AnnotationAttributes candidate = AnnotationConfigUtils.attributesFor(importingClassMetadata, annoType);

            if (candidate == null) {

                continue;

            }

            Object mode = candidate.get("mode");

            Object proxyTargetClass = candidate.get("proxyTargetClass");

            if (mode != null && proxyTargetClass != null && AdviceMode.class == mode.getClass() &&

                    Boolean.class == proxyTargetClass.getClass()) {

                candidateFound = true;

                if (mode == AdviceMode.PROXY) {

                    AopConfigUtils.registerAutoProxyCreatorIfNecessary(registry);

                    if ((Boolean) proxyTargetClass) {

                        AopConfigUtils.forceAutoProxyCreatorToUseClassProxying(registry);

                        return;

                    }

                }

            }

        }

    }
public static BeanDefinition registerAutoProxyCreatorIfNecessary(BeanDefinitionRegistry registry) {
return registerAutoProxyCreatorIfNecessary(registry, null);
}
public static BeanDefinition registerAutoProxyCreatorIfNecessary(BeanDefinitionRegistry registry, Object source) {
return registerOrEscalateApcAsRequired(InfrastructureAdvisorAutoProxyCreator.class, registry, source);
}
}
我们首先来看一下这个类的继承关系图。
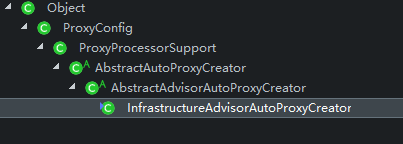
这个类首先是beanpostprocessor的实现类,他会对所有的bean做一次后置增强处理,我们在AbstractAutoProxyCreator中的 postProcessAfterInitialization 方法中可以看到,他会根据规则去对bean包装从而创造满足条件的代理。
/**

     * Create a proxy with the configured interceptors if the bean is

     * identified as one to proxy by the subclass.

     * @see #getAdvicesAndAdvisorsForBean

     */

    @Override

    public Object postProcessAfterInitialization(Object bean, String beanName) throws BeansException {

        if (bean != null) {

            Object cacheKey = getCacheKey(bean.getClass(), beanName);

            if (!this.earlyProxyReferences.contains(cacheKey)) {

                return wrapIfNecessary(bean, beanName, cacheKey);

            }

        }

        return bean;

    }
我们接下来进入 wrapIfNecessary 方法
    // 如果需要的话,包装给定的bean,也就是说它是否有资格代理。

    protected Object wrapIfNecessary(Object bean, String beanName, Object cacheKey) {

        if (beanName != null && this.targetSourcedBeans.contains(beanName)) {

            return bean;

        }

        if (Boolean.FALSE.equals(this.advisedBeans.get(cacheKey))) {

            return bean;

        }

        if (isInfrastructureClass(bean.getClass()) || shouldSkip(bean.getClass(), beanName)) {

            this.advisedBeans.put(cacheKey, Boolean.FALSE);

            return bean;

        }

        // Create proxy if we have advice.

        Object[] specificInterceptors = getAdvicesAndAdvisorsForBean(bean.getClass(), beanName, null);

        if (specificInterceptors != DO_NOT_PROXY) {

            this.advisedBeans.put(cacheKey, Boolean.TRUE);

            Object proxy = createProxy(

                    bean.getClass(), beanName, specificInterceptors, new SingletonTargetSource(bean));

            this.proxyTypes.put(cacheKey, proxy.getClass());

            return proxy;

        }

        this.advisedBeans.put(cacheKey, Boolean.FALSE);

        return bean;

    }
我们着重关注一下 getAdvicesAndAdvisorsForBean 方法
    @Override

    protected Object[] getAdvicesAndAdvisorsForBean(Class<?> beanClass, String beanName, TargetSource targetSource) {

        List<Advisor> advisors = findEligibleAdvisors(beanClass, beanName);

        if (advisors.isEmpty()) {

            return DO_NOT_PROXY;

        }

        return advisors.toArray();

    }
这个方法没什么说的,主要表达的意思是为bean找到合格的增强器。
protected List<Advisor> findEligibleAdvisors(Class<?> beanClass, String beanName) {
     // 找到所有的候选者
        List<Advisor> candidateAdvisors = findCandidateAdvisors();

        // 从候选者中找到合格的
     List<Advisor> eligibleAdvisors = findAdvisorsThatCanApply(candidateAdvisors, beanClass, beanName);

        extendAdvisors(eligibleAdvisors);

        if (!eligibleAdvisors.isEmpty()) {

            eligibleAdvisors = sortAdvisors(eligibleAdvisors);

        }

        return eligibleAdvisors;

    }
在 findCandidateAdvisors 方法中,我们可以看到我们上文中注入的三个bean中的其中一个 BeanFactoryTransactionAttributeSourceAdvisor,这个bean可以理解为我们的事物增强器。
    public List<Advisor> findAdvisorBeans() {

        // Determine list of advisor bean names, if not cached already.

        String[] advisorNames = null;

        synchronized (this) {

            advisorNames = this.cachedAdvisorBeanNames;

            if (advisorNames == null) {

                // 找到上文注入的 BeanFactoryTransactionAttributeSourceAdvisor

                advisorNames = BeanFactoryUtils.beanNamesForTypeIncludingAncestors(

                        this.beanFactory, Advisor.class, true, false);

                this.cachedAdvisorBeanNames = advisorNames;

            }

        }

        if (advisorNames.length == 0) {

            return new LinkedList<Advisor>();

        }return advisors;

    }
接下来我们看 findAdvisorsThatCanApply 方法,这个方法主要实现了,候选的增强器是否可以对当前bean使用。
    public static List<Advisor> findAdvisorsThatCanApply(List<Advisor> candidateAdvisors, Class<?> clazz) {

        if (candidateAdvisors.isEmpty()) {

            return candidateAdvisors;

        }

        List<Advisor> eligibleAdvisors = new LinkedList<Advisor>();

        for (Advisor candidate : candidateAdvisors) {

            if (candidate instanceof IntroductionAdvisor && canApply(candidate, clazz)) {

                eligibleAdvisors.add(candidate);

            }

        }

        boolean hasIntroductions = !eligibleAdvisors.isEmpty();

        for (Advisor candidate : candidateAdvisors) {

            if (candidate instanceof IntroductionAdvisor) {

                // already processed

                continue;

            }

            if (canApply(candidate, clazz, hasIntroductions)) {

                eligibleAdvisors.add(candidate);

            }

        }

        return eligibleAdvisors;

    }
我们进入方法走到canApply处,继续往下跟。
    public static boolean canApply(Advisor advisor, Class<?> targetClass, boolean hasIntroductions) {

        if (advisor instanceof IntroductionAdvisor) {

            return ((IntroductionAdvisor) advisor).getClassFilter().matches(targetClass);

        }

        else if (advisor instanceof PointcutAdvisor) {

            PointcutAdvisor pca = (PointcutAdvisor) advisor;

            return canApply(pca.getPointcut(), targetClass, hasIntroductions);

        }

        else {

            // It doesn't have a pointcut so we assume it applies.

            return true;

        }

    }
先判断类型后做一次转化,再次进入canApply方法
public static boolean canApply(Pointcut pc, Class<?> targetClass, boolean hasIntroductions) {

        Assert.notNull(pc, "Pointcut must not be null");

        if (!pc.getClassFilter().matches(targetClass)) {

            return false;

        }

        MethodMatcher methodMatcher = pc.getMethodMatcher();

        if (methodMatcher == MethodMatcher.TRUE) {

            // No need to iterate the methods if we're matching any method anyway...

            return true;

        }

        IntroductionAwareMethodMatcher introductionAwareMethodMatcher = null;

        if (methodMatcher instanceof IntroductionAwareMethodMatcher) {

            introductionAwareMethodMatcher = (IntroductionAwareMethodMatcher) methodMatcher;

        }

        Set<Class<?>> classes = new LinkedHashSet<Class<?>>(ClassUtils.getAllInterfacesForClassAsSet(targetClass));

        classes.add(targetClass);

        for (Class<?> clazz : classes) {

            Method[] methods = ReflectionUtils.getAllDeclaredMethods(clazz);

            for (Method method : methods) {

                if ((introductionAwareMethodMatcher != null &&

                        introductionAwareMethodMatcher.matches(method, targetClass, hasIntroductions)) ||

                        methodMatcher.matches(method, targetClass)) {

                    return true;

                }

            }

        }

        return false;

    }
进入matches方法,下来的代码我会合并的连贯一些
@Override

    public boolean matches(Method method, Class<?> targetClass) {

        if (targetClass != null && TransactionalProxy.class.isAssignableFrom(targetClass)) {

            return false;

        }

        TransactionAttributeSource tas = getTransactionAttributeSource();

        return (tas == null || tas.getTransactionAttribute(method, targetClass) != null);

    }
// 进入AbstractFallbackTransactionAttributeSource.getTransactionAttribute()
  TransactionAttribute txAttr = computeTransactionAttribute(method, targetClass);
  TransactionAttribute txAttr = findTransactionAttribute(specificMethod);
进入解析的流程
public class SpringTransactionAnnotationParser implements TransactionAnnotationParser, Serializable {

    @Override

    public TransactionAttribute parseTransactionAnnotation(AnnotatedElement ae) {

        AnnotationAttributes attributes = AnnotatedElementUtils.getMergedAnnotationAttributes(ae, Transactional.class);

        if (attributes != null) {

            return parseTransactionAnnotation(attributes);

        }

        else {

            return null;

        }

    }

    public TransactionAttribute parseTransactionAnnotation(Transactional ann) {

        return parseTransactionAnnotation(AnnotationUtils.getAnnotationAttributes(ann, false, false));

    }

    protected TransactionAttribute parseTransactionAnnotation(AnnotationAttributes attributes) {

        RuleBasedTransactionAttribute rbta = new RuleBasedTransactionAttribute();

        Propagation propagation = attributes.getEnum("propagation");

        rbta.setPropagationBehavior(propagation.value());

        Isolation isolation = attributes.getEnum("isolation");

        rbta.setIsolationLevel(isolation.value());

        rbta.setTimeout(attributes.getNumber("timeout").intValue());

        rbta.setReadOnly(attributes.getBoolean("readOnly"));

        rbta.setQualifier(attributes.getString("value"));

        ArrayList<RollbackRuleAttribute> rollBackRules = new ArrayList<RollbackRuleAttribute>();

        Class<?>[] rbf = attributes.getClassArray("rollbackFor");

        for (Class<?> rbRule : rbf) {

            RollbackRuleAttribute rule = new RollbackRuleAttribute(rbRule);

            rollBackRules.add(rule);

        }

        String[] rbfc = attributes.getStringArray("rollbackForClassName");

        for (String rbRule : rbfc) {

            RollbackRuleAttribute rule = new RollbackRuleAttribute(rbRule);

            rollBackRules.add(rule);

        }

        Class<?>[] nrbf = attributes.getClassArray("noRollbackFor");

        for (Class<?> rbRule : nrbf) {

            NoRollbackRuleAttribute rule = new NoRollbackRuleAttribute(rbRule);

            rollBackRules.add(rule);

        }

        String[] nrbfc = attributes.getStringArray("noRollbackForClassName");

        for (String rbRule : nrbfc) {

            NoRollbackRuleAttribute rule = new NoRollbackRuleAttribute(rbRule);

            rollBackRules.add(rule);

        }

        rbta.getRollbackRules().addAll(rollBackRules);

        return rbta;

    }

}
此方法会先拿到标记为 Transcantional 注解的方法,然后遍历属性。最后返回attr,如果解析到的attr不为空,则会将此增强器对待增强的bean做增强处理。
protected Object wrapIfNecessary(Object bean, String beanName, Object cacheKey) {

        if (beanName != null && this.targetSourcedBeans.contains(beanName)) {

            return bean;

        }

        if (Boolean.FALSE.equals(this.advisedBeans.get(cacheKey))) {

            return bean;

        }

        if (isInfrastructureClass(bean.getClass()) || shouldSkip(bean.getClass(), beanName)) {

            this.advisedBeans.put(cacheKey, Boolean.FALSE);

            return bean;

        }

        // Create proxy if we have advice.

        Object[] specificInterceptors = getAdvicesAndAdvisorsForBean(bean.getClass(), beanName, null);

        if (specificInterceptors != DO_NOT_PROXY) {

            this.advisedBeans.put(cacheKey, Boolean.TRUE);

            Object proxy = createProxy(

                    bean.getClass(), beanName, specificInterceptors, new SingletonTargetSource(bean));

            this.proxyTypes.put(cacheKey, proxy.getClass());

            return proxy;

        }

        this.advisedBeans.put(cacheKey, Boolean.FALSE);

        return bean;

    }
我们回到 wrapIfNecessary方法,如果返回的advisor不为空,我们会为他生成代理对象。
Object proxy = createProxy(bean.getClass(), beanName, specificInterceptors, new SingletonTargetSource(bean));
这里就跟我们的使用AOP创建代理无缝融合,在找到当前bean确定要进行增强处理和增强的advisor后,使用动态代理的方式创建代理对象。
spring事物(一),@EnableTransactionManagement @Transactional 启动解析的更多相关文章
- Spring源码解析02:Spring IOC容器之XmlBeanFactory启动流程分析和源码解析
一. 前言 Spring容器主要分为两类BeanFactory和ApplicationContext,后者是基于前者的功能扩展,也就是一个基础容器和一个高级容器的区别.本篇就以BeanFactory基 ...
- Spring源码解析 | 第二篇:Spring IOC容器之XmlBeanFactory启动流程分析和源码解析
一. 前言 Spring容器主要分为两类BeanFactory和ApplicationContext,后者是基于前者的功能扩展,也就是一个基础容器和一个高级容器的区别.本篇就以BeanFactory基 ...
- spring 事物的一些理解
推荐一个我认为Spring事物写得很好的文章. 文章链接:http://www.codeceo.com/article/spring-transactions.html 文章作者:码农网 – 吴极心 ...
- Spring事物
简介 Spring并不直接管理事务,而是提供了多种事务管理器,他们将事务管理的职责委托给Hibernate或者JTA等持久化机制所提供的相关平台框架的事务来实现. Spring事务管理器的接口是org ...
- MyBatis6:MyBatis集成Spring事物管理(下篇)
前言 前一篇文章<MyBatis5:MyBatis集成Spring事物管理(上篇)>复习了MyBatis的基本使用以及使用Spring管理MyBatis的事物的做法,本文的目的是在这个的基 ...
- spring事物的传播行为
1.spring事物的传播行为,主要是用来解决业务层拥有事物的方法,相互调用的问题. 2.声明事物, 在代码执行前,开启事务.代码执行完,提交事务 3.spring并没有提供事务具体的处理,而只是调用 ...
- Spring 事物Transaction
日常开发中Spring 为我们提供了两种事物的定义方式 XML 配置 方式 :这种方式配置起来比较麻烦,但后期比较好进行维护 注解方式:配置起来比较方便,也是日常开发常用的: 我们这里进行第二种注解的 ...
- spring事物深入了解
1.问题 1.以前对事物的了解只是停留在声明式事物,配置xml,或使用注解,事物的传播行为也只用过REQUIRED和SUPPORTS,可以说对事物的了解很模糊. 2.直到在开发中遇到问题.. 问题的描 ...
- 事物注解方式: @Transactional
当标于类前时, 标示类中所有方法都进行事物处理 , 例子: 1 @Transactional public class TestServiceBean implements TestService { ...
随机推荐
- Copy-On-Write容器(转载)
Copy-On-Write简称COW,是一种用于程序设计中的优化策略.其基本思路是,从一开始大家都在共享同一个内容,当某个人想要修改这个内容的时候,才会真正把内容Copy出去形成一个新的内容然后再改, ...
- Day11 - F - A Dangerous Maze LightOJ - 1027
求期望注意期望的定义,这题我们可以分正负数情况,设所求期望为E 正数: 1/n*x_i 负数:1/n*(E+x_j) 此时概率为1/n,根据期望定义,他回到起点后出去的期望为E,花费回起点的时间为x_ ...
- php 基础知识 post 和get 两种传输方式的区别
1.post更安全(不会作为url的一部分,不会被缓存.保存在服务器日志.以及浏览器浏览记录中) 2.post发送的数据量更大(get有url长度限制) 3.post能发送更多的数据类型(get只能发 ...
- Steam 游戏 《The Vagrant(流浪者)》修改器制作-[先使用CE写,之后有时间的话改用CheatMaker](2020年寒假小目标08)
日期:2020.02.07 博客期:146 星期五 [温馨提示]: 只是想要修改器的网友,可以直接点击此链接下载: 只是想拿CT文件的网友,可以直接点击此链接下载: 没有博客园账号的网友,可以将页面下 ...
- HA: Armour-Write-up
下载地址:点我 bilibili:点我 信息收集 nmap扫存活找到IP为:192.168.116.140 ➜ ~ nmap -sn 192.168.116.1/24 Starting Nmap 7. ...
- 去重sort|uniq -d
#!/bin/bash ############################################################### #Author :Bing # #Create ...
- elk单机安装部署
es 下载地址:wget https://artifacts.elastic.co/downloads/elasticsearch/elasticsearch-7.1.0-linux-x86_64.t ...
- kvm的分层控制
第五层 virsh virt-manager(和libvirtd)利用了libvirt-api virsh pool-list --all virsh pool-define xxx/xml会 ...
- 吴裕雄--天生自然PythonDjangoWeb企业开发:学员管理系统后台
需求 提供一个学员管理系统,一个前台页面,展示现有学员,并供新学员提交申请,一个后台,能够处理申请. pip install django==1.11.2 创建项目 使用控制台进入到一个目录下,具体是 ...
- Uart学习笔记
分享一个蛮好的链接:https://blog.csdn.net/wordwarwordwar/article/details/73662379 今天在看的资料是S家的DW_apb_uart的官方文档. ...