SSM框架中的前后端分离
认识前后端分离
在传统的web应用开发中,大多数的程序员会将浏览器作为前后端的分界线。将浏览器中为用户进行页面展示的部分称之为前端,而将运行在服务器,为前端提供业务逻辑和数据准备的所有代码统称为后端。
由于前后端分离这个概念相对来说刚出现不久,很多人都是只闻其声,不见其形,所以可能会对它产生一些误解,误以为前后端分离只是一种web应用开发模式,只要在web应用的开发期进行了前后端开发工作的分工就是前后端分离。
其实前后端分离并不只是开发模式,而是web应用的一种架构模式。在开发阶段,前后端工程师约定好数据交互接口,实现并行开发和测试;在运行阶段前后端分离模式需要对web应用进行分离部署,前后端之前使用HTTP或者其他协议进行交互请求。然而作为一种架构模式,我们在实施的过程中主要对以下四个方面来进行比较和重新认识。
前后端分离大概可以从四个方面来理解:
- 交互形式
- 代码组织方式
- 开发模式
- 数据接口规范流程
一、交互形式
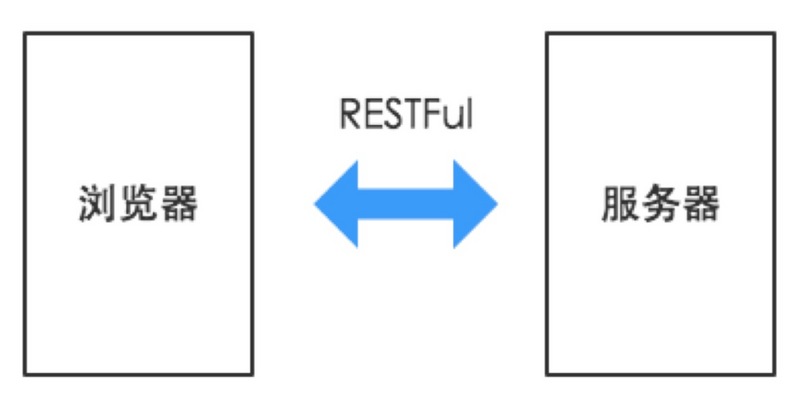
在前后端分离架构中,后端只需要负责按照约定的数据格式向前端提供可调用的API服务即可。前后端之间通过HTTP请求进行交互,前端获取到数据后,进行页面的组装和渲染,最终返回给浏览器。
二、代码组织方式
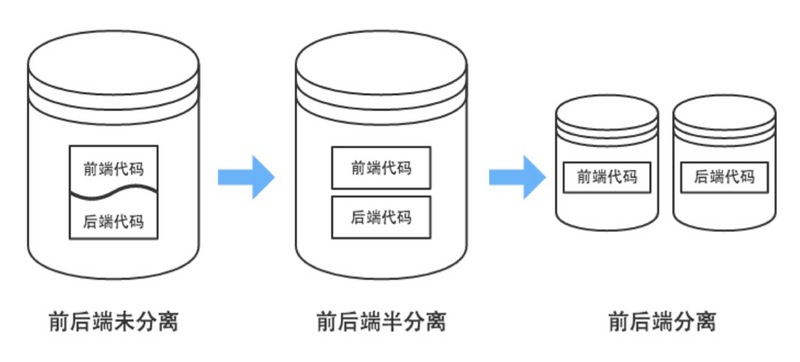
在传统架构模式中,前后端代码存放于同一个代码库中,甚至是同一工程目录下。页面中还夹杂着后端代码。前后端工程师进行开发时,都必须把整个项目导入到开发工具中。
而前后端分离模式在代码组织形式上有以下两种:
- 半分离
前后端共用一个代码库,但是代码分别存放在两个工程中。后端不关心或很少 关心前端元素的输出情况,前端不能独立进行开发和测试,项目中缺乏前后端 交互的测试用例。 - 分离
前后端代码库分离,前端代码中有可以进行Mock测试(通过构造虚拟测试对 象以简化测试环境的方法)的伪后端,能支持前端的独立开发和测试。而后端 代码中除了功能实现外,还有着详细的测试用例,以保证API的可用性,降低 集成风险。
三、开发模式
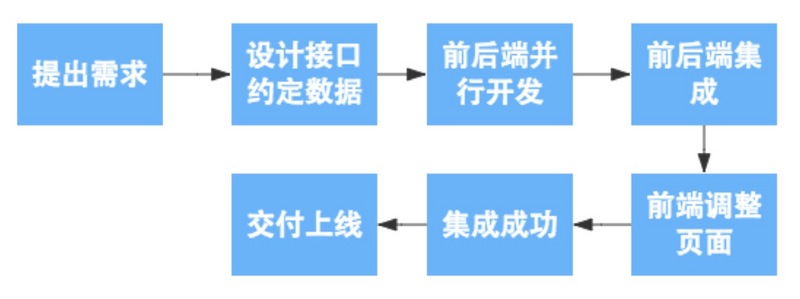
我们之前的架构属于传统的MVC架构,整体没有进行前后端分离,在项目的开发阶段,前端工程师负责编写HTML,完成前端的页面设计并套页面,然后再使用模板技术将写好的前端代码转换为Smarty脚本,同时内嵌一些后端提供的模板变量和一些逻辑操作。应用运行期,将全部代码进行打包,和后端代码部署到同一服务器上,同时会进行简单的动静态分离部署。
此时,应用的开发流程如下图所示。

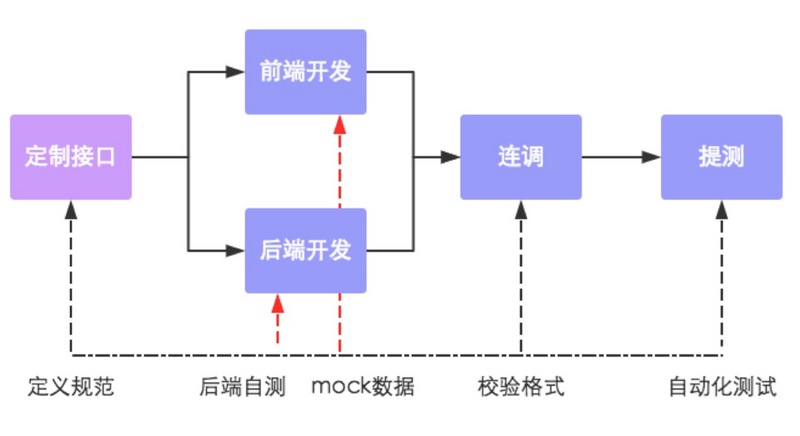
而在实现前后端分离架构之后,前端工程师只需要编写HTML、js、CSS等前端资源,然后通 过HTTP请求调用后端提供的服务即可。除了开发期的分离,在运行期前后端资源也 会进行分离部署。
前后端分离之后,开发流程将如下图所示。
通过上面的两幅流程图,不难发现,在开发模式上,前后段分离不仅仅只是工程师的分工开发,更重要的意义在于实现了前后端的并行开发,简化了开发流程。
四、数据接口规范流程
在开发期间前后端共同商定好数据接口的交互形式和数据格式。然后实现前后端的并行开发,其中前端工程师再开发完成之后可以独自进行mock测试,而后端也可以使用接口测试平台进行接口自测,然后前后端一起进行功能联调并校验格式,最终进行自动化测试。
分离的四个好处
前后端分离模式和传统的web应用架构相比有很大的不同,到底分还是不分,这还真是个问题。
从目前应用软件开发的发展趋势来看,主要有两方面需要注意:
- 越来越注重用户体验,随着互联网的发展,开始多终端化。
- 大型应用架构模式正在向云化、微服务化发展。
我们主要通过前后端分离架构,为我们带来以下四个方面的提升:
- 为优质产品打造精益团队
通过将开发团队前后端分离化,让前后端工程师只需要专注于前端或后端的开发工作,是的前后端工程师实现自治,培养其独特的技术特性,然后构建出一个全栈式的精益开发团队。 - 提升开发效率
前后端分离以后,可以实现前后端代码的解耦,只要前后端沟通约定好应用所需接口以及接口参数,便可以开始并行开发,无需等待对方的开发工作结束。与此同时,即使需求发生变更,只要接口与数据格式不变,后端开发人员就不需要修改代码,只要前端进行变动即可。如此一来整个应用的开发效率必然会有质的提升。 - 完美应对复杂多变的前端需求
如果开发团队能完成前后端分离的转型,打造优秀的前后端团队,开发独立化,让开发人员做到专注专精,开发能力必然会有所提升,能够完美应对各种复杂多变的前端需求。 - 增强代码可维护性
前后端分离后,应用的代码不再是前后端混合,只有在运行期才会有调用依赖关系。
应用代码将会变得整洁清晰,不论是代码阅读还是代码维护都会比以前轻松。
以上转自前后端分离实践(一)
利用JSON串来实现前后端分离
在自己最近做的项目中,使用的是利用SSM框架中的controller层来传出JSON串,再通过jQuery中的.getJSON()来进行解析,再将数据传到前端页面。
controller层
部分代码省略,放出关键代码:
ShopManagementController
@Controller

@RequestMapping("/shopadmin")

public class ShopManagementController {

    @Autowired

    private ShopService shopService;

    @Autowired

    private ShopCategoryService shopCategoryService;

    @Autowired

    private AreaService areaService;

    @RequestMapping(value = "/getshopmanagementinfo",method = RequestMethod.GET)

    @ResponseBody

    private Map<String,Object> getShopManagementInfo(HttpServletRequest request) {

        Map<String,Object> modelMap = new HashMap<String, Object>();

        long shopId = HttpServletRequestUtil.getLong(request,"shopId");

        if(shopId <= 0){

            Object currentShopObj = request.getSession().getAttribute("shopId");

            if(currentShopObj == null){

                modelMap.put("redirect",true);

                modelMap.put("url","/shopadmin/shoplist");

            }else {

                Shop currentShop = (Shop) currentShopObj;

                modelMap.put("redirect",false);

                modelMap.put("shopId",currentShop.getShopId());

            }

        }else{

            Shop currentShop = new Shop();

            currentShop.setShopId(shopId);

            request.getSession().setAttribute("currentShop",currentShop);

            modelMap.put("redirect",false);

        }

        return modelMap;

    }

    @RequestMapping(value = "/getshoplist",method = RequestMethod.GET)

    @ResponseBody

    private Map<String,Object> getShopList(HttpServletRequest request){

        Map<String,Object> modelMap = new HashMap<String, Object>();

        PersonInfo user = new PersonInfo();

        user.setUserId(1L);

        user.setName("test");

        request.getSession().setAttribute("user",user);

        user = (PersonInfo) request.getSession().getAttribute("user");

        try{

            Shop shopCondition;

            shopCondition = new Shop();

            shopCondition.setOwner(user);

            ShopExecution se = shopService.getShopList(shopCondition,0,100);

            modelMap.put("shopList",se.getShopList());

            modelMap.put("user",user);

            modelMap.put("success",true);

        }catch (Exception e){

            modelMap.put("success",false);

            modelMap.put("errMsg",e.getMessage());

        }

        return modelMap;

    }

    @RequestMapping(value = "/getshopbyid",method = RequestMethod.GET)

    @ResponseBody

    private Map<String,Object> getShopById(HttpServletRequest request){

        Map<String,Object> modelMap = new HashMap<String,Object>();

        Long shopId = HttpServletRequestUtil.getLong(request,"shopId");

        if(shopId > -1){

            try {

                Shop shop = shopService.getByShopId(shopId);

                List<Area> areaList = areaService.getAreaList();

                modelMap.put("shop",shop);

                modelMap.put("areaList",areaList);

                modelMap.put("success",true);

            }catch (Exception e){

                modelMap.put("success",false);

                modelMap.put("errMsg",e.getMessage());

            }

        }else {

            modelMap.put("success",false);

            modelMap.put("errMsg","empty shopId");

        }

        return modelMap;

    }

    @RequestMapping(value = "/getshopinitinfo",method = RequestMethod.GET)

    @ResponseBody

    public Map<String,Object> getShopInitInfo(){

        Map<String,Object> modelMap = new HashMap<String, Object>();

        List<ShopCategory> shopCategoryList = new ArrayList<ShopCategory>();

        List<Area> areaList = new ArrayList<Area>();

        try {

            shopCategoryList = shopCategoryService.getShopCategoryList(new ShopCategory());

            areaList = areaService.getAreaList();

            modelMap.put("shopCategoryList",shopCategoryList);

            modelMap.put("areaList",areaList);

            modelMap.put("success",true);

        }catch (Exception e){

            modelMap.put("success",false);

            modelMap.put("errMsg",e.getMessage());

        }

        return modelMap;

    }

    @RequestMapping(value = "/modifyshop",method = {RequestMethod.POST})

    @ResponseBody

    public Map<String,Object> modifyShop(HttpServletRequest request) throws IOException {

        Map<String,Object> modelMap = new HashMap<String, Object>();

        //判断验证码是否正确

        if(!CodeUtil.checkVerifyCode(request)){

            modelMap.put("success",false);

            modelMap.put("errMsg","输入了错误的验证码");

            return modelMap;

        }

        //1.接收并转化相应的参数,包括店铺信息以及图片信息

        String shopStr = HttpServletRequestUtil.getString(request,"shopStr");

        ObjectMapper mapper = new ObjectMapper();

        Shop shop = null;

        try {

            shop = mapper.readValue(shopStr,Shop.class);

        }catch (Exception e){

            modelMap.put("success",false);

            modelMap.put("errMsg",e.getMessage());

            return modelMap;

        }

        CommonsMultipartFile shopImg = null;

        CommonsMultipartResolver commonsMultipartResolver =new CommonsMultipartResolver(

                request.getSession().getServletContext());

        // 检测文件是否有上传文件流

        if (commonsMultipartResolver.isMultipart(request)){

            MultipartHttpServletRequest multipartHttpServletRequest = (MultipartHttpServletRequest) request;

            shopImg = (CommonsMultipartFile) multipartHttpServletRequest.getFile("shopImg");

        }

        //2.修改店铺信息

        if(shop != null && shop.getShopId() != null){

            PersonInfo owner =(PersonInfo) request.getSession().getAttribute("user");

            // session

            owner.setUserId(1L);

            shop.setOwner(owner);

            ShopExecution se;

            try {

                if (shopImg == null){

                    se = shopService.modifyShop(shop, new ImageHolder(null, null));

                }else {

                    se = shopService.modifyShop(shop,

                            new ImageHolder(shopImg.getInputStream(), shopImg.getOriginalFilename()));

                }

                if(se.getState()==ShopStateEnum.SUCCESS.getState()){

                    modelMap.put("success",true);

                }else {

                    modelMap.put("success",false);

                    modelMap.put("errMsg",se.getStateInfo());

                }

            }catch (ShopOperationException e){

                modelMap.put("success",false);

                modelMap.put("errMsg",e.getMessage());

            } catch (IOException e){

                modelMap.put("success",false);

                modelMap.put("errMsg",e.getMessage());

            }

            return modelMap;

        }else {

            modelMap.put("success",false);

            modelMap.put("errMsg","请输入店铺Id");

            return  modelMap;

        }

    }

}
拿getShopById做分析
	//返回/getshopbyid的url,方法为get

	@RequestMapping(value = "/getshopbyid",method = RequestMethod.GET)

	//返回JSON串

    @ResponseBody

    private Map<String,Object> getShopById(HttpServletRequest request){

        //初始化要返回的JSON串

        Map<String,Object> modelMap = new HashMap<String,Object>();

        //从Http请求中获得shopId值

        Long shopId = HttpServletRequestUtil.getLong(request,"shopId");

        if(shopId > -1){

            try {

                /**

                * 下面代码做service层查询,获得商店Id为shopId的商店信息

                */

                Shop shop = shopService.getByShopId(shopId);

                List<Area> areaList = areaService.getAreaList();

                modelMap.put("shop",shop);

                modelMap.put("areaList",areaList);

                modelMap.put("success",true);

            }catch (Exception e){

                modelMap.put("success",false);

                modelMap.put("errMsg",e.getMessage());

            }

        }else {

            modelMap.put("success",false);

            modelMap.put("errMsg","empty shopId");

        }

        return modelMap;

    }
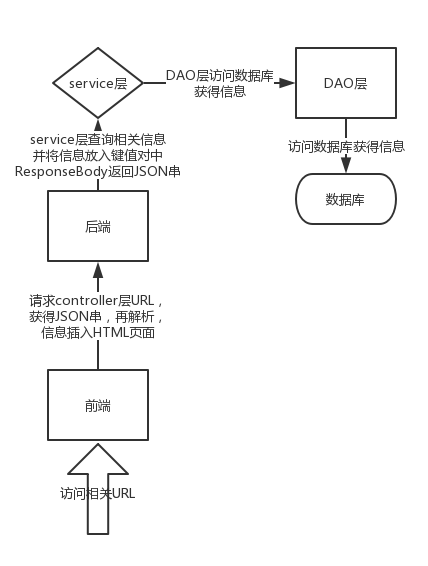
再来看看前端页面是如何处理的。
(function() {

    var shopId = getQueryString('shopId');

    var isEdit = shopId?true:false;

    var initUrl = '/shopadmin/getshopinitinfo';

    var registerShopUrl = '/shopadmin/registershop';

    //访问/shopadmin/getshopbyid这个url

    var shopInfoUrl = "/shopadmin/getshopbyid?shopId=" + shopId;
//从/shopadmin/getshopbyid?shopId这个url中获得controller层返回的JSON串,通过$.getJSON函数进行解析。

//获取相关的键值对,然后插入前端HTML页面。

function getShopInfoUrl(shopId) {

        $.getJSON(shopInfoUrl,function (data) {

            if(data.success){

                var shop = data.shop;

                $('#shop-name').val(shop.shopName);

                $('#shop-addr').val(shop.shopAddr);

                $('#shop-phone').val(shop.phone);

                $('#shop-desc').val(shop.shopDesc);

                var shopCategory = '<option data-id="'

                    + shop.shopCategory.shopCategoryId +'"selected>'

                    + shop.shopCategory.shopCategoryName +'</option>';

                var tempAreaHtml = '';

                data.areaList.map(function (item,index) {

                    tempAreaHtml += '<option data-id="' + item.areaId+'"selected>'

                        + item.areaName+'</option>';

                });

                $('#shop-category').html(shopCategory);

                $('#shop-category').attr('disable','disable');

                $('#shop-area').html(tempAreaHtml);

                $("#shop-area option[data-id='"+shop.area.areaId+"']").attr("selected","selected");

            }

        });

    }
访问url,即可获得商店信息

流程图:
SSM框架中的前后端分离的更多相关文章
- python django框架+vue.js前后端分离
本文用于学习django+vue.js实现web前后端分离协作开发.以一个添加和删除数据库书籍应用为实例. django框架官方地址:https://www.djangoproject.com/ vu ...
- AngularJS中在前后端分离模式下实现权限控制 - 基于RBAC
一:RBAC 百科解释: 基于角色的访问控制(Role-Based Access Control)作为传统访问控制(自主访问,强制访问)的有前景的代替受到广泛的关注.在RBAC中,权限与角色相关联,用 ...
- Webform中的前后端分离
Webform常用的开发方式 (1)运用服务器端控件的aspx页面 (2)一般处理程序+html静态页面+Ajax(所谓的前后端分离) (3)一般处理程序+html模板引擎 这里简单记录html+ ...
- 在k8s中部署前后端分离项目进行访问的两种配置方式
第一种方式 (1) nginx配置中只写前端项目的/根路径配置 前端项目使用的Dockerfile文件内容 把前端项目编译后生成的dist文件夹放在nginx的html默认目录下,浏览器访问前端项目时 ...
- 空气质量管理系统+SSM(Spring+SpringMVC+Mybatis)+前后端分离总结
作者:故事我忘了¢个人微信公众号:程序猿的月光宝盒 点我进SSM演示地址 1.目录结构: 2.需要注意的地方 2.1在WEB-INFO下新建 2.1.1 springMVC-servlet.xml & ...
- [原创]基于VueJs的前后端分离框架搭建之完全攻略
首先请原谅本文标题取的有点大,但并非为了哗众取宠.本文取这个标题主要有3个原因,这也是写作本文的初衷: (1)目前国内几乎搜索不到全面讲解如何搭建前后端分离框架的文章,讲前后端分离框架思想的就更少了, ...
- 基于shiro+jwt的真正rest url权限管理,前后端分离
代码地址如下:http://www.demodashi.com/demo/13277.html bootshiro & usthe bootshiro是基于springboot+shiro+j ...
- SpringBoot电商项目实战 — 前后端分离后的优雅部署及Nginx部署实现
在如今的SpringBoot微服务项目中,前后端分离已成为业界标准使用方式,通过使用nginx等代理方式有效的进行解耦,并且前后端分离会为以后的大型分布式架构.弹性计算架构.微服务架构.多端化服务(多 ...
- centos7部署前后端分离项目的过程
概述 本文主要讲解在安装了centos7的Linux主机中部署前后端分离项目的过程. 前端项目名为:vue_project:后端项目名为:django_project. 将这两个项目放在/opt/wh ...
随机推荐
- Linux系统特殊变量
系统给定的特殊变量: 变量名 作用 $0 当前脚本的名字 $n 传递给脚本或者函数的参数,n表示第几个参数 $# 传递给脚本或函数的参数个数 $* 传递给脚本或函数的所有参数 $@ 传递给脚本或者函数 ...
- WinForm 简易仿360界面控件
因为经常要做一些1.2千行的小工具,WinForm自带的TabCtrl又不美观,所以想做成360的样子,在网上找来找去,都只有散乱的代码,没有可以通用的结构,于是自己写了一个简易的通用控件. 控件主要 ...
- 分布式监控系统Zabbix-批量添加聚合图形
之前部署了Zabbix(3.4.4版本)监控环境,由于主机比较多,分的主机组也比较多,添加聚合图形比较麻烦,故采用python脚本进行批量添加聚合图形.脚本下载地址:https://pan.baidu ...
- su: 无法设置用户ID: 资源暂时不可用
登录非root用户,报错如下:[root@test ~]# su - appsu: 无法设置用户ID: 资源暂时不可用 或者用ssh 命令连接服务器之后,如果一段时间不操作,再次进入 Terminal ...
- Ubuntu14.04安装PyMuPDF
最近写的一个东西需要将pdf转成图片然后放在网页上展示,找到了个非常好用的轮子叫做PyMuPDF,在windows上测试的时候跑的666,在ubuntu上安装依赖的时候,简直万脸懵逼.github上给 ...
- Daily Scrum NO.10
工作概况 今天是两周正是开发的最后一个工作日,虽然也是编译的DEADLINE,但成员们还是较为积极.计划内的工作基本都能够完成:线程池.异常清理器和动态爬取的功能.异常清理器界面的第一版也在今晚做了出 ...
- input file multiple 批量上传文件
这几天维护系统,有一个批量上传文件功能,出现了一点小问题 我的笔记本选择要上传的文件很正常 但在测试环境上,别人的电脑上,选择上传文件之后 一开始,以为是代码问题,网上找了很多的资料,但还是没用,然后 ...
- Spring配置常识
(1)数据源配置 <bean id="dataSource" class="com.alibaba.druid.pool.DruidDataSource" ...
- CentOS查看版本及架构信息
https://blog.csdn.net/shuaigexiaobo/article/details/78030008
- vue原理探索--响应式系统
Vue.js 是一款 MVVM 框架,数据模型仅仅是普通的 JavaScript 对象,但是对这些对象进行操作时,却能影响对应视图,它的核心实现就是「响应式系统」. 首先看一下 Object.defi ...