swoft| 源码解读系列二: 启动阶段, swoft 都干了些啥?
date: 2018-8-01 14:22:17
title: swoft| 源码解读系列二: 启动阶段, swoft 都干了些啥?
description: 阅读 sowft 框架源码, 了解 sowft 启动阶段的那些事儿
小伙伴刚接触 swoft 的时候会感觉 压力有点大, 更直观的说法是 难. 开发组是不赞成 难 这个说法的, swoft 的代码都是 php 实现的, 而 php 又是 世界上最好的语言, swoft 的代码阅读起来是很轻松的.
之后开发组会用 系列源码 解读文章, 深入解析 swoft. 我们相信, 这会成为一段轻松之旅.
swoft 源码解读系列一: 好难! swoft demo 都跑不起来怎么破? docker 了解一下呗~
swoft 源码解读系列二: 启动阶段, swoft 都干了些啥?
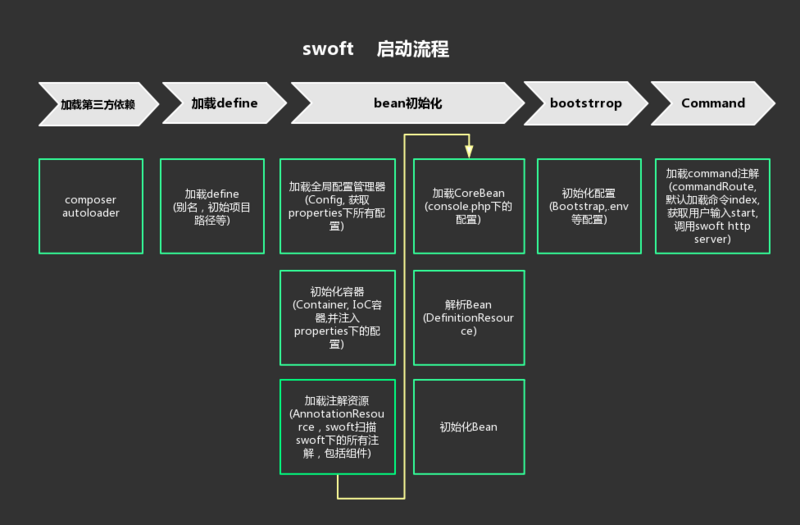
附上社区小伙伴 随风 制作的流程图:
程序入口
看过 官方文档-服务启动与管理 章节, 就知道 swoft 的入口时 php bin/swoft start, 用来启动 http server. 运行这个命令, 就为我们打开了新世界的大门
```root@e38a7e5aff40 /v/w/s/swoft# ps aux
PID USER TIME COMMAND
1 root 0:00 php -a
708 root 0:01 php-swoft master process (bin/swoft)
709 root 0:00 php-swoft manager process
711 root 0:01 php-swoft task process
712 root 0:01 php-swoft worker process
713 root 0:49 php-swoft reload process
779 root 0:00 ps aux
```
熟悉 swoole-wiki 的小伙伴, 就能看到熟悉的:
- master 进程
- manager 进程
- worker 进程
- task-worker 进程
swoole-wiki 上的 运行流程图 和 进程/线程结构图 值得细细品味, 这是我们之后理解和使用 swoole 进行服务器开发的基础, 这里按下暂时不表.
而我们为了弄懂 swoft启动阶段都干了些啥, 可以直接运行 php bin/swoft, 慢慢 调试/输出 即可. 是的, 没有什么高级技巧, var_dump() + die() 即可
使用工具阅读源码的小技巧
没错, 这个工具就是 phpstorm, 没使用 phpstorm 的小伙伴赶紧用起来, 下面以 window 下的快捷键为例:
- 快捷键说明: C->ctrl A->alt S->shift
- C-b / C-鼠标点击: 跳转到方法/函数定义的地方
- C-A-左右方向键: 切换光标前后所在的位置
- C-e: 查看最近打开的文件
- C-q: 查看函数的注释说明(知道写注释有多重要了吧)
- C-p: 查看函数的参数(还是注释的重要性)
还有很多好用的功能, 请查看菜单栏的 navigate 菜单栏, 去发现惊喜吧~
PS: 注释! 注释! 注释!
入口源码: bootstrap
bin/swoft 文件很简单:
#!/usr/bin/env php

<?php

require_once __DIR__ . '/bootstrap.php';

$console = new \Swoft\Console\Console();

$console->run();
我们先来看 bin/bootstrap.php:
require_once dirname(__DIR__) . '/vendor/autoload.php';

require_once dirname(__DIR__) . '/config/define.php';

// init the factory of bean

\Swoft\Bean\BeanFactory::init();

/* @var \Swoft\Bootstrap\Boots\Bootable $bootstrap*/

$bootstrap = \Swoft\App::getBean(\Swoft\Bootstrap\Bootstrap::class);

$bootstrap->bootstrap();
第一步加载 composer 的 autoload 文件, 使用 composer 的同学应该都知道吧, 不过你知道 autoload 的原理么?
第二步是 config/define.php 文件, 我们进去看看:
// Project base path

! defined('BASE_PATH') && define('BASE_PATH', dirname(__DIR__, 1));

// Register alias

$aliases = [

    '@root'       => BASE_PATH,

];

\Swoft\App::setAliases($aliases);
做了 2 件事:
- 定义 PHP 常量
- swoft 的别名机制
swoft 的第一个特性 -- 别名机制 来了. 挺新鲜的词儿, 本质很简单 -- 字符串替换 而已, 比如上面我们设置 @root, 我们直接打印看看:
$tmp = \Swoft\App::getAlias('@root');

var_dump($tmp);die;

root@e38a7e5aff40 /v/w/s/swoft# php bin/swoft

string(21) "/var/www/swoole/swoft"
使用看看:
$tmp1 = \Swoft\App::getAlias('@root');

$tmp2 = \Swoft\App::getAlias('@root/foo/bar');

var_dump($tmp1, $tmp2);die;

root@e38a7e5aff40 /v/w/s/swoft# php bin/swoft

string(21) "/var/www/swoole/swoft"

string(29) "/var/www/swoole/swoft/foo/bar"
目前 swoft 中的别名机制在用在 文件目录/路径 上, 熟悉 yii框架 的小伙伴知道, yii中别名机制用的场景更多一些, 还能拼接 url 等地方. 不过不管使用多少场景, 本质都是 字符串替换.
那为什么不直接使用 PHP常量 这种常规方式, 而要使用别名机制呢? 别名机制不是更优雅么
框架核心: BeanFactory
到了框架的核心部分了, 阅读这块的代码要有耐心一点:
// init the factory of bean

\Swoft\Bean\BeanFactory::init();
进入 init(), 先看第一个:
$properties = self::getProperties(); // 获取 property 配置

var_dump($properties);die;
看源码和调试验证辅助: 读取 config/properties 下的配置(文件), merge 到同一个数组里了
再看第二步, 核心的核心, 容器Container 来了, 这里不再赘述 依赖注入DI/控制反转IoC 等基础知识, 不熟悉的小伙伴要去补补哦~
self::$container = new Container();

self::$container->setProperties($properties);

self::$container->autoloadServerAnnotation();

    /**

     * Register the annotation of server

     */

    public function autoloadServerAnnotation()

    {

        $bootScan = $this->getScanNamespaceFromProperties('bootScan'); // 获取 property 配置中的 bootScan 配置项

        var_dump($bootScan);

        $resource = new ServerAnnotationResource($this->properties);

        $resource->addScanNamespace($bootScan); // 关键在这一句, 要扫描哪些命名空间(文件)

        $definitions = $resource->getDefinitions();

        var_dump($definitions);die;

        $this->definitions = array_merge($definitions, $this->definitions);

    }
重点来看看 $resource->addScanNamespace($bootScan)
注解的前半生: 要扫描哪些文件
$resource->addScanNamespace($bootScan) 继承了抽象基类绕了一下, 最后其实走到了这里
<?php

namespace Swoft\Bean\Resource;

use Swoft\App;

use Swoft\Helper\ComponentHelper;

/**

 * The annotation resource of server

 */

class ServerAnnotationResource extends AnnotationResource

{

    /**

     * Register the scaned namespace

     */

    public function registerNamespace() // 继承了抽象基类绕了一下, 最后其实走到了这里

    {

        $swoftDir      = dirname(__FILE__, 5); // 默认扫描路径, swoft 框架各个组件目录

        var_dump($swoftDir);

        var_dump(App::getAlias('@vendor/swoft')); // 使用 alias 可以得出一样的结果, 可以思考一下为什么这里不用别名机制呢?

        $componentDirs = scandir($swoftDir);

        foreach ($componentDirs as $component) {

            if ($component == '.' || $component == '..') {

                continue;

            }

            $componentDir = $swoftDir . DS . $component;

            $componentCommandDir = $componentDir . DS . 'src';

            if (! is_dir($componentCommandDir)) {

                continue;

            }

            $ns = ComponentHelper::getComponentNamespace($component, $componentDir);

            $this->componentNamespaces[] = $ns;

            // console component

            if ($component == $this->consoleName) { // console 组件特殊处理

                $this->scanNamespaces[$ns] = $componentCommandDir;

                continue;

            }

            foreach ($this->serverScan as $dir) { // 预定义的命名空间

                $scanDir = $componentCommandDir . DS . $dir;

                if (!is_dir($scanDir)) {

                    continue;

                }

                $scanNs                        = $ns . "\\" . $dir;

                $this->scanNamespaces[$scanNs] = $scanDir;

            }

        }

    }

}

    /**

     * @var array

     */

    protected $serverScan

        = [

            'Command',

            'Bootstrap',

            'Aop',

        ];
// $this->scanNamespaces 的内容示例

  ["Swoft\WebSocket\Server\Bootstrap"]=>

  string(65) "/var/www/swoole/swoft/vendor/swoft/websocket-server/src/Bootstrap"
恭喜你, 到这里你已经理解了一半的注解功能:
- swoft 框架是由一个一个功能组件组成, 详细内容可以移步 swoft框架组件化改造
- 默认扫描注解包含 2 部分内容:
config/properties下bootScan配置的命名空间
swoft所有组件下的Command Bootstrap Aop命名空间, 其中console组件特殊处理
如果到这里你感觉比较难理解, 你需要补充一下基础知识:
- composer 基础知识: autoload 机制, 命名空间
- swoft 组件相关知识, 在 composer 基础知识之上
另外, 上面加的测试代码 var_dump(App::getAlias('@vendor/swoft'));, 可以思考一下 swoft 的别名机制就是为了解决 路径问题, 为什么这里又不用呢?
注解的后半生: 扫描出的结果
$definitions = $resource->getDefinitions(); 对应的内容:
    /**

     * 获取已解析的配置beans

     *

     * @return array

     * <pre>

     * [

     *     'beanName' => ObjectDefinition,

     *      ...

     * ]

     * </pre>

     */

    public function getDefinitions()

    {

        // 获取扫描的PHP文件

        $classNames     = $this->registerLoaderAndScanBean(); // 扫描上一步注册进来的命名空间

        $fileClassNames = $this->scanFilePhpClass(); // 额外配置的扫描文件, 大家可以尝试一下在哪配置的哦

        $classNames     = array_merge($classNames, $fileClassNames); // 获取到所有需要扫面的类

        foreach ($classNames as $className) {

            $this->parseBeanAnnotations($className); // 解析bean注解

        }

        $this->parseAnnotationsData(); // 解析注解数据, 存放到 $this->definitions 中

        return $this->definitions; // 最后, 我们使用这个就可以获取到注解解析出来的了类啦

    }
// 看一看注解解析出来的例子

  ["Swoft\WebSocket\Server\Bootstrap\CoreBean"]=>

  object(Swoft\Bean\ObjectDefinition)#126 (7) {

    ["name":"Swoft\Bean\ObjectDefinition":private]=>

    string(41) "Swoft\WebSocket\Server\Bootstrap\CoreBean"

    ["className":"Swoft\Bean\ObjectDefinition":private]=>

    string(41) "Swoft\WebSocket\Server\Bootstrap\CoreBean"

    ["scope":"Swoft\Bean\ObjectDefinition":private]=>

    int(1)

    ["ref":"Swoft\Bean\ObjectDefinition":private]=>

    string(0) ""

    ["constructorInjection":"Swoft\Bean\ObjectDefinition":private]=>

    NULL

    ["propertyInjections":"Swoft\Bean\ObjectDefinition":private]=>

    array(0) {

    }

    ["methodInjections":"Swoft\Bean\ObjectDefinition":private]=>

    array(0) {

    }

  }
这里隐藏了扫描不同类型注解的细节, 因为我们后面阅读不同组件源码时会一一遇到, 这里只要理解大致原理即可
后面的 2 句比较简单:
$definition = self::getServerDefinition();

self::$container->addDefinitions($definition);

    /**

     * @return array

     * @throws \InvalidArgumentException

     */

    private static function getServerDefinition(): array

    {

        $file             = App::getAlias('@console');

        $configDefinition = [];

        if (\is_readable($file)) {

            $configDefinition = require_once $file;

        }

        $coreBeans  = self::getCoreBean(BootBeanCollector::TYPE_SERVER);

        var_dump($coreBeans);die;

        return ArrayHelper::merge($coreBeans, $configDefinition);

    }
简单打印一下就可以知道结果:
root@e38a7e5aff40 /v/w/s/swoft# php bin/swoft

array(1) {

  ["commandRoute"]=>

  array(1) {

    ["class"]=>

    string(35) "Swoft\Console\Router\HandlerMapping"

  }

}
大功告成: 初始化 Bean
self::$container->initBeans(); // 进去查看

    /**

     * @throws \InvalidArgumentException

     * @throws \ReflectionException

     */

    public function initBeans()

    {

        $autoInitBeans = $this->properties['autoInitBean'] ?? false;

        if (!$autoInitBeans) {

            return;

        }

        // 循环初始化

        foreach ($this->definitions as $beanName => $definition) {

            $this->get($beanName);

        }

    }

    /**

     * 获取一个bean

     *

     * @param string $name 名称

     *

     * @return mixed

     * @throws \ReflectionException

     * @throws \InvalidArgumentException

     */

    public function get(string $name)

    {

        // 已经创建

        if (isset($this->singletonEntries[$name])) { // 单例, 初始化过就直接返回

            return $this->singletonEntries[$name];

        }

        // 未定义

        if (!isset($this->definitions[$name])) {

            throw new \InvalidArgumentException(sprintf('Bean %s not exist', $name));

        }

        /* @var ObjectDefinition $objectDefinition */

        $objectDefinition = $this->definitions[$name];

        return $this->set($name, $objectDefinition); // 没有初始化则进行初始化

    }

    /**

     * 创建bean

     *

     * @param string           $name             名称

     * @param ObjectDefinition $objectDefinition bean定义

     *

     * @return object

     * @throws \ReflectionException

     * @throws \InvalidArgumentException

     */

    private function set(string $name, ObjectDefinition $objectDefinition)

    {

        // bean创建信息

        $scope             = $objectDefinition->getScope();

        $className         = $objectDefinition->getClassName();

        $propertyInjects   = $objectDefinition->getPropertyInjections();

        $constructorInject = $objectDefinition->getConstructorInjection();

        if ($refBeanName = $objectDefinition->getRef()) {

            return $this->get($refBeanName);

        }

        // 构造函数

        $constructorParameters = [];

        if ($constructorInject !== null) {

            $constructorParameters = $this->injectConstructor($constructorInject);

        }

        $reflectionClass = new \ReflectionClass($className);

        $properties      = $reflectionClass->getProperties();

        // new实例

        $isExeMethod = $reflectionClass->hasMethod($this->initMethod);

        $object      = $this->newBeanInstance($reflectionClass, $constructorParameters);

        // 属性注入

        $this->injectProperties($object, $properties, $propertyInjects);

        // 执行初始化方法

        if ($isExeMethod) {

            $object->{$this->initMethod}();

        }

        if (!$object instanceof AopInterface) {

            $object = $this->proxyBean($name, $className, $object);

        }

        // 单例处理

        if ($scope === Scope::SINGLETON) {

            $this->singletonEntries[$name] = $object;

        }

        return $object;

    }
Bean 初始化的所有细节都在这里了:
- 注解解析后获取到的类相关的所有信息
- 注入构造函数(construct)
- 初始化类(new), 此时会执行构造函数
- 注入属性(property)
- 执行初始化方法, 这就是为什么 Bean 里面定义的
init()也会执行的 - AOP处理, 找到实际代理的类
- 单例处理
- 返回生成好的 Bean 对象
到这里 整个 swoft 核心中的核心 就已经呈现在你面前了, 总结起来也很简单:
- swoft启动时要去哪里扫描注解
- swoft扫描到的注解如何初始化 Bean
有了 \Swoft\Bean\BeanFactory::init(); 以后, 我们需要使用 Bean, 只需要:
\Swoft\Bean\BeanFactory::getBean('xxx');

// 下面的写法只是一层封装而已

\Swoft\App::getBean('xxx');

    /**

     * get bean

     *

     * @param string $name 名称

     *

     * @return mixed

     */

    public static function getBean(string $name)

    {

        return ApplicationContext::getBean($name);

    }
bootstrap阶段的最后: 各项配置
通过在合适的地方打印:
/* @var \Swoft\Bootstrap\Boots\Bootable $bootstrap*/

$bootstrap = \Swoft\App::getBean(\Swoft\Bootstrap\Bootstrap::class);

var_dump($bootstrap);

$bootstrap->bootstrap();

    /**

     * bootstrap

     */

    public function bootstrap()

    {

        $bootstraps = BootstrapCollector::getCollector(); // 需要执行哪些 bootstrap

        var_dump($bootstraps);die;

        $temp = \array_column($bootstraps, 'order');

        \array_multisort($temp, SORT_ASC, $bootstraps);

        foreach ($bootstraps as $bootstrapBeanName => $name){

            /* @var Bootable $bootstrap*/

            $bootstrap = App::getBean($bootstrapBeanName);

            $bootstrap->bootstrap();

        }

    }
结果如下:
root@e38a7e5aff40 /v/w/s/swoft# php bin/swoft

object(Bootstrap_5b6dd8716a6dc)#209 (1) {

  ["__handler_5b6dd8716a6dc":"Bootstrap_5b6dd8716a6dc":private]=>

  object(Swoft\Proxy\Handler\AopHandler)#188 (1) { # 用到了 aop

    ["target":"Swoft\Proxy\Handler\AopHandler":private]=>

    object(Swoft\Bootstrap\Bootstrap)#186 (0) {

    }

  }

}

array(3) { # 真正执行的 bootstrap

  ["Swoft\Bootstrap\Boots\InitPhpEnv"]=> # init php env

  array(2) {

    ["name"]=>

    string(0) ""

    ["order"]=>

    int(2)

  }

  ["Swoft\Bootstrap\Boots\LoadEnv"]=> # 加载 .env 文件

  array(2) {

    ["name"]=>

    string(0) ""

    ["order"]=>

    int(1)

  }

  ["Swoft\Bootstrap\Boots\LoadInitConfiguration"]=> # 加载 config 目录的其他配置

  array(2) {

    ["name"]=>

    string(0) ""

    ["order"]=>

    int(3)

  }

}
至此, bootstrap 阶段的所有工作就完成了
swoft 中的 bean 到底是啥咧
回答 bean 是啥之前, 先记住: 一切皆对象
我们使用对面对象的方式来对问题进行抽象, 并使用抽象出来的类实例化后的对象来解决问题, 而实例化后的对象, 就是 swoft 中一个又一个的 Bean
回顾我们整个 bootstrap 阶段, 可以概括为自动化做了 2 件事情:
- 根据默认的注解扫描机制, 实例化 Bean
- 根据
config/.env等配置中中的 bean/property, 对 swoft 中的 Bean 进行配置(实例化 Bean, 或者配置 Bean 的 property)
这样通过配置来示例化类和配置对象属性的方式, 在 php 框架中大型其道, 典型的如 yii/laravel.
原文地址:https://segmentfault.com/a/1190000015966514
swoft| 源码解读系列二: 启动阶段, swoft 都干了些啥?的更多相关文章
- swoft| 源码解读系列一: 好难! swoft demo 都跑不起来怎么破? docker 了解一下呗~
title: swoft| 源码解读系列一: 好难! swoft demo 都跑不起来怎么破? docker 了解一下呗~description: 阅读 sowft 框架源码, swoft 第一步, ...
- Alamofire源码解读系列(二)之错误处理(AFError)
本篇主要讲解Alamofire中错误的处理机制 前言 在开发中,往往最容易被忽略的内容就是对错误的处理.有经验的开发者,能够对自己写的每行代码负责,而且非常清楚自己写的代码在什么时候会出现异常,这样就 ...
- PhotoSwipe源码解读系列(二)
作者: 铁锚 日期: 2013年12月19日 说明: 本系列文章为草稿,等待后期完善.源码是jQuery版本的,code.photoswipe-3.0.5.js 1. 代码开头,就是一些版权申明,没什 ...
- Alamofire源码解读系列(十二)之时间轴(Timeline)
本篇带来Alamofire中关于Timeline的一些思路 前言 Timeline翻译后的意思是时间轴,可以表示一个事件从开始到结束的时间节点.时间轴的概念能够应用在很多地方,比如说微博的主页就是一个 ...
- Alamofire源码解读系列(十二)之请求(Request)
本篇是Alamofire中的请求抽象层的讲解 前言 在Alamofire中,围绕着Request,设计了很多额外的特性,这也恰恰表明,Request是所有请求的基础部分和发起点.这无疑给我们一个Req ...
- Alamofire源码解读系列(十)之序列化(ResponseSerialization)
本篇主要讲解Alamofire中如何把服务器返回的数据序列化 前言 和前边的文章不同, 在这一篇中,我想从程序的设计层次上解读ResponseSerialization这个文件.更直观的去探讨该功能是 ...
- Alamofire源码解读系列(四)之参数编码(ParameterEncoding)
本篇讲解参数编码的内容 前言 我们在开发中发的每一个请求都是通过URLRequest来进行封装的,可以通过一个URL生成URLRequest.那么如果我有一个参数字典,这个参数字典又是如何从客户端传递 ...
- Alamofire源码解读系列(三)之通知处理(Notification)
本篇讲解swift中通知的用法 前言 通知作为传递事件和数据的载体,在使用中是不受限制的.由于忘记移除某个通知的监听,会造成很多潜在的问题,这些问题在测试中是很难被发现的.但这不是我们这篇文章探讨的主 ...
- Alamofire源码解读系列(五)之结果封装(Result)
本篇讲解Result的封装 前言 有时候,我们会根据现实中的事物来对程序中的某个业务关系进行抽象,这句话很难理解.在Alamofire中,使用Response来描述请求后的结果.我们都知道Alamof ...
随机推荐
- Bing必应地图中国API-显示兴趣点 (转)
Bing必应地图中国API-显示兴趣点 2011-05-24 14:29:55| 分类: Bing&Google|字号 订阅 在地图上显示一个兴趣点,这个应用可以说是最简单但是最广泛 ...
- 1998 NOIP 拼数 string 和sort的新理解
题目:https://www.luogu.org/problemnew/show/P1012 今天真是长了见识.这道题做了十几分钟,用模拟愣是调不出来.直到我看了题解——(当场去世)…… 题的意思是n ...
- debian下使用dpkg来安装/卸载deb包 (转载)
转自:http://blog.csdn.net/zhou_2008/article/details/6076900 在debian下,你可以使用dpkg(Debian package system)来 ...
- 为什么JavaWeb项目要分层
首先让我们坐着时光机回到n年前的web开发.那个时候最早都是静态的html页面,后来有了数据库,有了所谓的动态页面,然后程序猿在编码的时候,会把所有的代码都写在页面上,包括数据库连接,包括事务控制,接 ...
- bzoj 1754: [Usaco2005 qua]Bull Math【高精乘法】
高精乘法板子 然而WA了两次也是没救了 #include<iostream> #include<cstdio> #include<cstring> using na ...
- 洛谷 P1233 木棍加工
题目描述 一堆木头棍子共有n根,每根棍子的长度和宽度都是已知的.棍子可以被一台机器一个接一个地加工.机器处理一根棍子之前需要准备时间.准备时间是这样定义的: 第一根棍子的准备时间为1分钟: 如果刚处理 ...
- 429c Leha and Function
题目 解题报告 F(n, k)是在集合{1, 2, 3, ..., n}中所有的具有k个元素的子集中分别取最小值,相加后的期望. 例如:要求F(4, 2),根据定义有{1, 2}, {1, 3}, { ...
- linux学习之路6 Vi文本编辑器
vim是vi的增强版本 vim拥有三种模式: 命令模式(常规模式) vim启动后,默认进入命令模式.任何模式都可以通过按esc键回到命令模式(可以多按几次.命令模式可以通过键入不同的命令完成选择.复制 ...
- Manacher HDOJ 5371 Hotaru's problem
题目传送门 /* 题意:求形如(2 3 4) (4 3 2) (2 3 4)的最长长度,即两个重叠一半的回文串 Manacher:比赛看到这题还以为套个模板就行了,因为BC上有道类似的题,自己又学过M ...
- vue中数据接收成功,页面渲染失败
1.vue中数据接收成功,页面渲染失败.代码如下 经过查找资料修改代码为 或是 原因是: 由于 JavaScript 的限制, Vue 不能检测以下变动的数组: 当你利用索引直接设置一个项时,例如: ...