Angular2.x-显示heroes列表
在此页面中,您将展开Tour of Heroes应用程序以显示heroes列表,并允许用户选择heroes并显示heroes的详细信息。
6.X
你需要一些heroes来展示。
最终你会从远程数据服务器获取它们。现在,你会创建一些模拟heroes,并假装他们来自服务器。
创建一个文件夹中调用mock-heroes.ts的src/app/文件。定义一个HEROES由十个heroes组成的数组并将其导出。该文件应该看起来像这样。
//src/app/mock-heroes.ts

import { Hero } from './hero';

export const HEROES: Hero[] = [

  { id: 11, name: 'Mr. Nice' },

  { id: 12, name: 'Narco' },

  { id: 13, name: 'Bombasto' },

  { id: 14, name: 'Celeritas' },

  { id: 15, name: 'Magneta' },

  { id: 16, name: 'RubberMan' },

  { id: 17, name: 'Dynama' },

  { id: 18, name: 'Dr IQ' },

  { id: 19, name: 'Magma' },

  { id: 20, name: 'Tornado' }

];
6.1-显示hereos
您即将在顶部显示heroes列表HeroesComponent。
打开HeroesComponent类文件并导入模拟HEROES。
src/app/heroes/heroes.component.ts

import { HEROES } from '../mock-heroes';
import { Component, OnInit } from '@angular/core';

import { HEROES } from '../mock-heroes';

import { Hero } from '../hero';

@Component({

  selector: 'app-heroes',

  templateUrl: './heroes.component.html',

  styleUrls: ['./heroes.component.css']

})

export class HeroesComponent implements OnInit {

  hero: Hero = {

    id: 1,

    name: 'Windstorm'

  };

  heroes = HEROES;

  constructor() { }

  ngOnInit() {

  }

}
6.2-用 * ngFor列出heroes
打开HeroesComponent模板文件并进行以下更改:
<h2>在顶部添加一个,- 在它下面添加一个HTML无序列表(
<ul>) - 插入一个
<li>内<ul>显示的属性hero。 - 为样式添加一些CSS类(您将很快添加CSS样式)。
让它看起来像这样:
<h2>My Heroes</h2>

<ul class="heroes">

  <li>

    <span class="badge">{{hero.id}}</span> {{hero.name}}

  </li>

</ul>
现在改变<li>为
<li *ngFor="let hero of heroes">
源码:
<h2>My Heroes</h2>

<ul class="heroes">

  <li *ngFor="let hero of heroes">

    <span class="badge">{{hero.id}}</span> {{hero.name}}

  </li>

</ul>
这*ngFor是Angular的repeater指令。它重复列表中每个元素的主机元素。
在这个例子中
<li>是主机元素heroes是HeroesComponent班上的名单。hero通过列表保存每次迭代的当前heroes对象。
不要忘记前面的星号(*)ngFor。这是语法的关键部分。
7.X-heroes的style
heroes名单应该是有吸引力的,并且当用户将鼠标悬停在列表中并从中选择heroes时,应该以可视方式作出响应。
在第一篇教程中,您将为整个应用程序设置基本样式styles.css。该样式表不包含这个heroes列表的样式。
styles.css在添加组件时,您可以添加更多样式并继续增加样式表。
您可能更倾向于为特定组件定义私有样式,并将组件需要的所有内容(代码,HTML和CSS)保存在一个地方。
这种方法使得在其他地方重新使用组件更容易,并且即使全局样式不同,也可以提供组件的预期外观。
您可以在数组中内联定义私有样式,也可以将其定义为阵列中标识的样式表文件。@Component.styles@Component.styleUrls
当CLI生成时HeroesComponent,它heroes.component.css为此创建了一个空的样式表,HeroesComponent 并像这样指向它。@Component.styleUrls
// src / app / heroes / heroes.component.ts(@Component)

@Component({

  selector: 'app-heroes',

  templateUrl: './heroes.component.html',

  styleUrls: ['./heroes.component.css']

})
打开该heroes.component.css文件并粘贴私人CSS样式HeroesComponent。您可以在本指南底部的最终代码审查中找到它们。
元数据中标识的样式和样式表被限定为特定组件。这些样式仅适用于和不影响任何其他组件中的外部HTML或HTML。
@Componentheroes.component.cssHeroesComponent
8.X
当用户点击主列表中的heroes时,该组件应该在页面底部显示所选heroes的详细信息。
在本节中,您将听取heroes项目点击事件并更新heroes细节。
8.1-添加一个点击事件绑定
添加一个点击事件绑定到<li>这样的:
<li *ngFor="let hero of heroes" (click)="onSelect(hero)">
这是Angular的事件绑定语法的一个例子。
周围的圆括号click告诉Angular倾听<li>元素的 click事件。当用户点击时<li>,Angular执行onSelect(hero)表达式。
onSelect()是HeroesComponent你即将写的一种方法。Angular用hero点击显示的对象进行调用,与之前在表达式中定义<li>的相同。hero*ngFor
8.2-添加单击事件处理程序
重命名组件的hero属性,selectedHero但不分配它。应用程序启动时没有选定的heroes。
添加以下onSelect()方法,该方法将模板中单击的heroes分配给组件selectedHero。
// src / app / heroes / heroes.component.ts(onSelect)

selectedHero: Hero;

onSelect(hero: Hero): void {

  this.selectedHero = hero;

}
8.3-更新详细信息模板
模板仍然引用hero不再存在的组件的旧属性。重命名hero为selectedHero。
//heroes.component.html

<h2>{{ selectedHero.name | uppercase }} Details</h2>

<div><span>id: </span>{{selectedHero.id}}</div>

<div>

  <label>name:

    <input [(ngModel)]="selectedHero.name" placeholder="name">

  </label>

</div>
8.4-使用 * ngIf隐藏空白详细信息
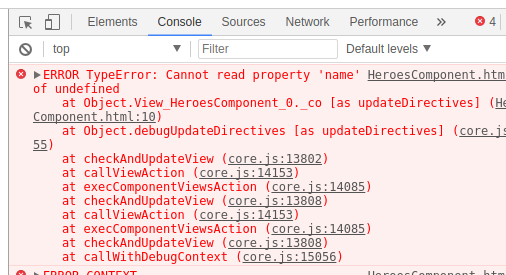
浏览器刷新后,应用程序被破坏。
打开浏览器开发人员工具,然后在控制台中查找像这样的错误消息:
现在点击其中一个列表项。该应用程序似乎再次工作。heroes出现在列表中,并且关于被点击的heroes的详细信息出现在页面的底部。
发生了什么?
当应用程序启动时,这selectedHero是undefined 设计。
在模板中引用selectedHero像{{selectedHero.name}}- 这样的表达式的属性的绑定表达式必须失败,因为没有选定的heroes。
修复
如果selectedHero存在,组件应该只显示选定的heroes细节。
将heroes细节HTML包装在一个<div>。将Angular的指令添加到并设置为。*ngIf<div>selectedHero
不要忘记前面的星号(*)ngIf。这是语法的关键部分。
src / app / heroes / heroes.component.html(* ngIf)
<div *ngIf="selectedHero">

  <h2>{{ selectedHero.name | uppercase }} Details</h2>

  <div><span>id: </span>{{selectedHero.id}}</div>

  <div>

    <label>name:

      <input [(ngModel)]="selectedHero.name" placeholder="name">

    </label>

  </div>

</div>
浏览器刷新后,名称列表重新出现。详细信息区域为空白。点击一个heroes并显示其详细信息。
为什么它的作品
何时selectedHero未定义,ngIf从DOM中删除heroes细节。没有selectedHero绑定担心。
当用户选择heroes时,selectedHero有一个值 ngIf并将heroes详细信息放入DOM中。
8.5-样式选择的heroes
当所有元素看起来相似时,很难在列表中识别选定的heroes<li>。
如果用户点击“Magneta”,那么这个heroes应该用一个独特但微妙的背景颜色渲染,如下所示:
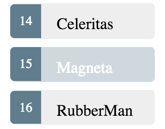
这个选定的heroes着色是你在前面添加.selected的样式中的CSS类的工作。您只需将该.selected类应用到<li>用户点击该类时。
Angular 类的绑定可以很容易地有条件地添加和删除一个CSS类。只需添加[class.some-css-class]="some-condition"到你想要的样式。
下面添加[class.selected]绑定到<li>的HeroesComponent模板:
heroes.component.html(切换'所选'CSS类)
[class.selected]="hero === selectedHero"
当前行的heroes是相同的selectedHero,Angular添加了selectedCSS类。当两位heroes不一样时,Angular会删除这个班级。
完成<li>看起来像这样:
<li *ngFor="let hero of heroes"

  [class.selected]="hero === selectedHero"

  (click)="onSelect(hero)">

  <span class="badge">{{hero.id}}</span> {{hero.name}}

</li>
最终源码:
//heroes.component.ts

<h2>My Heroes</h2>

<ul class="heroes">

  <li *ngFor="let hero of heroes"

  //选择所选类

    [class.selected]="hero === selectedHero"

  //添加单击事件

    (click)="onSelect(hero)">

    <span class="badge">{{hero.id}}</span> {{hero.name}}

  </li>

</ul>

<div *ngIf="selectedHero">

  <h2>{{ selectedHero.name | uppercase }} Details</h2>

  <div><span>id: </span>{{selectedHero.id}}</div>

  <div>

    <label>name:

      <input [(ngModel)]="selectedHero.name" placeholder="name">

    </label>

  </div>

</div>
/* HeroesComponent's private CSS styles */

.selected {

  background-color: #CFD8DC !important;

  color: white;

}

.heroes {

  margin: 0 0 2em 0;

  list-style-type: none;

  padding:;

  width: 15em;

}

.heroes li {

  cursor: pointer;

  position: relative;

  left:;

  background-color: #EEE;

  margin: .5em;

  padding: .3em 0;

  height: 1.6em;

  border-radius: 4px;

}

.heroes li.selected:hover {

  background-color: #BBD8DC !important;

  color: white;

}

.heroes li:hover {

  color: #607D8B;

  background-color: #DDD;

  left: .1em;

}

.heroes .text {

  position: relative;

  top: -3px;

}

.heroes .badge {

  display: inline-block;

  font-size: small;

  color: white;

  padding: 0.8em 0.7em 0 0.7em;

  background-color: #607D8B;

  line-height: 1em;

  position: relative;

  left: -1px;

  top: -4px;

  height: 1.8em;

  margin-right: .8em;

  border-radius: 4px 0 0 4px;

}
//heroes.component.ts

import { Component, OnInit } from '@angular/core';

import { Hero } from '../hero';

import { HEROES } from '../mock-heroes';

@Component({

  selector: 'app-heroes',

  templateUrl: './heroes.component.html',

  styleUrls: ['./heroes.component.css']

})

export class HeroesComponent implements OnInit {

  heroes = HEROES;

  selectedHero: Hero;

  constructor() { }

  ngOnInit() {

  }

  onSelect(hero: Hero): void {

    this.selectedHero = hero;

  }

}
Angular2.x-显示heroes列表的更多相关文章
- Angular 显示英雄列表
在本页面,你将扩展<英雄指南>应用,让它显示一个英雄列表, 并允许用户选择一个英雄,查看该英雄的详细信息. 创建模拟(mock)英雄数据 你需要一些英雄数据以供显示. 最终,你会从远端的数 ...
- Laravel大型项目系列教程(四)显示文章列表和用户修改文章
小编心语:不知不觉已经第四部分了,非常感谢很多人给小编提的意见,改了很多bug,希望以后能继续帮小编找找茬~小编也不希望误导大家~这一节,主要讲的 是如何显示文章列表和让用户修改文章,小编预告一下(一 ...
- 一段显示隐藏列表HTML代码
一段显示隐藏列表HTML代码, 技巧在于把页面上的元素(“返回首页”)和控制显示/隐藏的元素(id=navs-menu)放在一个共同的div上,并在该div上绑定onmouseover和onmouse ...
- centos中设置apache显示目录列表
apache中显示目录列表 在http.conf中加入如下代码(如有虚拟主机配置,加在虚拟主机配置段内),并把主目录内的index.pho,index.html,index.htm文件删除 复制代码 ...
- wxPython制作跑monkey工具(python3)-带显示设备列表界面
一. wxPython制作跑monkey工具(python3)-带显示设备列表界面 源代码 Run Monkey.py #!/usr/bin/env python import wx import ...
- sublime text 格式化html css 与显示函数列表
sublime 格式化html css 1.ctrl + shift + p 2.输入install package,选择install package 3.输入:HTML-CSS-JS Pretti ...
- Struts2(六.用标签显示用户列表及Value Stack和Stack Context)
一.用Struts2标签显示用户列表 原理: 在struts中可以通过在action中将所有用户的信息存入到某个范围中,然后转向userlist.jsp,进行访问 原则: 在jsp网页上,尽量不要出现 ...
- 扩展AutoCompleteTextView让其默认显示一组列表。setThreshold
很多时候, 在做自动下拉框时,默认点上去时需要显示一组默认的下拉数据.但是默认的AutoCompleteTextView是实现不了的, 因为setThreshold方法最小值是1,就算你设的值为0,也 ...
- QT使用tableWidget显示双排列表 而且选中用红框圈出来
如需转载请标明出处:http://blog.csdn.net/itas109 整个project下载地址:http://download.csdn.net/detail/itas109/7607735 ...
随机推荐
- SQL Server 2008 阻止保存要求重新创建表的更改
取消[阻止保存要求重新创建表的更改]复选框
- swift详解之十-------------异常处理、类型转换 ( Any and AnyObject )
异常处理.类型转换 ( Any and AnyObject ) 1.错误处理 (异常处理) swift 提供第一类错误支持 ,包括在运行时抛出 ,捕获 , 传送和控制可回收错误.在swift中 ,错误 ...
- vueshengmingzhouqi
首先,每个Vue实例在被创建之前都要经过一系列的初始化过程,这个过程就是vue的生命周期.首先看一张图吧~这是官方文档上的图片相信大家一定都会很熟悉: 可以看到在vue一整个的生命周期中会有很多钩子函 ...
- <Jenkins> 入门一
1.Continous integration 持续集成 2.Continous Delivery 持续交付 3.Java 写的
- SQL语句操作SQL SERVER数据库登录名、用户及权限
要想成功访问 SQL Server 数据库中的数据, 我们需要两个方面的授权: 获得准许连接 SQL Server 服务器的权利: 获得访问特定数据库中数据的权利(select, update, de ...
- 17. PROCESSLIST
17. PROCESSLIST PROCESSLIST表提供有关正在运行的线程的信息. PROCESSLIST表有以下列: ID :连接标识符. 这是SHOW PROCESSLIST语句的Id列中显示 ...
- BeautifulSoup与aiohttp的简单应用-爬取《网上中华五千年》音频
香港电台的节目素质都比较不错,其中有个<中华五千年>的节目是以情景剧与旁白的形式来展示历史故事,由传说时代一直到民国,1983年首播至2000年,非常长寿的一个节目.网上能找到版本声音非常 ...
- ajax跨域访问总结
1,jsonp的使用 就是script引用别的站点js,利用回调把内容传给这个js。 a需要引入b,在页面上引入b的js,里面有b的函数,在a中执行,就能拿到json了。 程序B中test.js的代码 ...
- 大数据学习——yum安装tomcat
https://www.cnblogs.com/jtlgb/p/5726161.html 安装tomcat6 yum install tomcat6 tomcat6-webapps tomcat6-a ...
- hexo干货系列:(一)hexo+gitHub搭建个人独立博客
前言 一直想要一个自己的独立博客,但是觉得申请域名+服务器的太麻烦了就一直没有实现.偶然机会发现Hexo这个优秀的静态博客框架,再搭配现在流行的gitHub,简直是完美写博客的黄金搭档(免费+方便). ...