JDK源码分析(四)——LinkedHashMap
LinkedHashMap概述
JDK对LinkedHashMap的介绍:
Hash table and linked list implementation of the Map interface, with predictable iteration order. This implementation differs from HashMap in that it maintains a doubly-linked list running through all of its entries. This linked list defines the iteration ordering, which is normally the order in which keys were inserted into the map (insertion-order). Note that insertion order is not affected if a key is re-inserted into the map. (A key k is reinserted into a map m if m.put(k, v) is invoked when m.containsKey(k) would return true immediately prior to the invocation.)
大意是:LinkedHashMap是通过哈希表和链表来实现Map接口,它通过维护一个链表来保证对哈希表迭代时的有序性,而这个有序是指键值对插入的顺序。另外,当向哈希表中重复插入某个键的时候,不会影响到原来的有序性。
继承结构

可以看到LinkedHashMap直接继承了HashMap,复用了HashMap的很多方法,比如put、resize等方法,LinkedHashMap是在HashMap的基础上实现了自己的功能:有序插入。
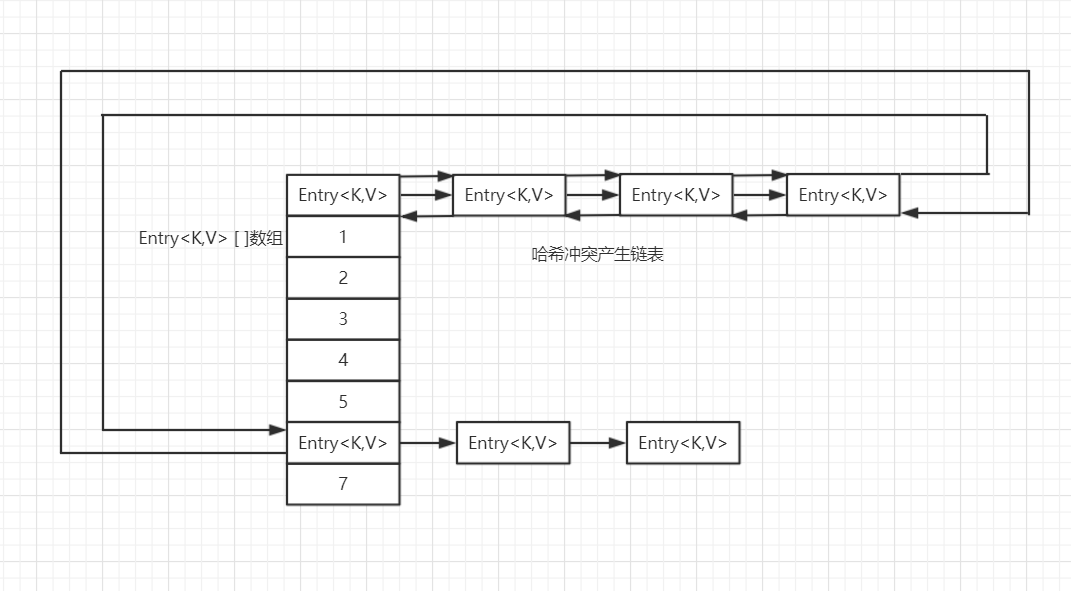
数据结构

可以看到,LinkedHashMap数据结构相比较于HashMap来说,添加了双向指针,其中before指向节点的前继节点,after指向节点的后继节点,从而将所有的节点串联在一起形成一个双向链表。
内部字段及构造方法
内部字段
	//双链表头节点

	transient Entry<K,V> head;

	//双链表尾节点

    transient Entry<K,V> tail;

	//accessOrder为true则表示按照基于访问的顺序来排列,意思就是最近使用的entry,

	//放在链表的最末尾,为false表示按照基于插入的顺序来排列,后插入的放在链表末尾,不指定默认为false

    final boolean accessOrder;

    static class Entry<K,V> extends HashMap.Node<K,V> {

		//双链表前继、后继节点

        Entry<K,V> before, after;

        Entry(int hash, K key, V value, Node<K,V> next) {

            super(hash, key, value, next);

        }

    }
构造方法
可以看到,LinkedHashMap调用了父类的构造方法,而且默认的accessOrder是false,至于是怎么通过accessOrder控制元素顺序,我们将在方法讲到。
	//指定accessOrder的值

    public LinkedHashMap(int initialCapacity,

                         float loadFactor,

                         boolean accessOrder) {

        super(initialCapacity, loadFactor);

        this.accessOrder = accessOrder;

    }

	//按照默认值初始化

    public LinkedHashMap() {

        super();

        accessOrder = false;

    }

	//指定初始化时的容量

    public LinkedHashMap(int initialCapacity) {

        super(initialCapacity);

        accessOrder = false;

    }

	//指定初始化时的容量,和扩容的加载因子

    public LinkedHashMap(int initialCapacity, float loadFactor) {

        super(initialCapacity, loadFactor);

        accessOrder = false;

    }
存储元素
LinkedHashMap并没有重写父类的put方法,所以增加元素调用的是父类方法,具体来说是putVal方法,下面是HashMap的putVal方法:
    final V putVal(int hash, K key, V value, boolean onlyIfAbsent,

                   boolean evict) {

       ...

            tab[i] = newNode(hash, key, value, null);

       ...

                afterNodeAccess(e);

       ...

        afterNodeInsertion(evict);

       ...
LinkedHashMap重写了newNode和回调方法afterNodeAccess、afterNodeInsertion:
    //在构建新节点时,构建的是LinkedHashMap.Entry 不再是Node.

    Node<K,V> newNode(int hash, K key, V value, Node<K,V> e) {

        Entry<K,V> p =

            new Entry<K,V>(hash, key, value, e);

        linkNodeLast(p);

        return p;

    }

    //将新增的节点,连接在链表的尾部

    private void linkNodeLast(Entry<K,V> p) {

        Entry<K,V> last = tail;

        tail = p;

        //若集合是空的

        if (last == null)

            head = p;

		//新节点插到链表顶部

        else {

            p.before = last;

            last.after = p;

        }

    }

    //仅仅在accessOrder为true时进行,把当前访问的元素移动到链表尾部

    void afterNodeAccess(Node<K,V> e) { // move node to last

        Entry<K,V> last;

        //当accessOrder的值为true,且e不是尾节点

        if (accessOrder && (last = tail) != e) {

            //将e赋值临时节点p, b是e的前一个节点, a是e的后一个节点

            Entry<K,V> p =

                (Entry<K,V>)e, b = p.before, a = p.after;

            //设置p的后一个节点为null,因为执行后p在链表末尾,after肯定为null

            p.after = null;

            //p的前一个节点不存在,p就是头节点,那么把p放到最后,a就是头节点

            if (b == null)

                head = a;

            //p的前一个节点存在,p放到最后,b的后一个节点指向a

            else

                b.after = a;

            //p的后一个节点存在,p放到最后,a的前一个节点指向a

            if (a != null)

                a.before = b;

            //p的后一个节点不存在

            else

                last = b;

            //只有一个p节点

            if (last == null)

                head = p;

            //last不为空,把p放到last节点后面

            else {

                p.before = last;

                last.after = p;

            }

            //p为尾节点

            tail = p;

            ++modCount;

        }

    }

    //回调函数,新节点插入之后回调 , 根据evict和accessOrder判断是否需要删除最老/早插入的节点。

	//如果实现LruCache会用到这个方法。

    //removeEldestEntry制定删除规则,JDK8中默认返回false

    void afterNodeInsertion(boolean evict) { // possibly remove eldest

        Entry<K,V> first;

        if (evict && (first = head) != null && removeEldestEntry(first)) {

            K key = first.key;

            removeNode(hash(key), key, null, false, true);

        }

    }
注:HashMap定义了三个回调方法,用于LinkedHashMap维持有序:
    // Callbacks to allow LinkedHashMap post-actions

    void afterNodeAccess(Node<K,V> p) { }

    void afterNodeInsertion(boolean evict) { }

    void afterNodeRemoval(Node<K,V> p) { }
取出元素
LinkedHashMap的get方法,调用HashMap的getNode方法后,对accessOrder的值进行了判断,我们之前提到:accessOrder为true时进行,把当前访问的元素移动到链表尾部,调用重写的afterNodeAccess方法来调整顺序。
    public V get(Object key) {

        Node<K,V> e;

        if ((e = getNode(hash(key), key)) == null)

            return null;

        if (accessOrder)

            afterNodeAccess(e);

        return e.value;

    }
删除元素
LinkedHashMap删除元素调用的是弗雷德remove方法,在removeNode设置了回调方法afterNodeRemoval
    final Node<K,V> removeNode(int hash, Object key, Object value,

                               boolean matchValue, boolean movable) {

        ...

                afterNodeRemoval(node);

        ...
LinkedHashMap回调方法的实现:
    //在删除节点e时,同步将e从双向链表上删除

    void afterNodeRemoval(Node<K,V> e) { // unlink

        Entry<K,V> p =

            (Entry<K,V>)e, b = p.before, a = p.after;

        //待删除节点 p 的前置后置节点都置空,相当于从双链表上取下来

        p.before = p.after = null;

        //p是尾节点,它的前一个节点为空,那么它的后一个节点做头节点

        if (b == null)

            head = a;

        //p的前一个节点不为空,把它的后一个节点指向a

        else

            b.after = a;

        //同理,a为空,b就是尾节点

        if (a == null)

            tail = b;

        //a不为空,

        else

            a.before = b;

    }
迭代器
    abstract class LinkedHashIterator {

        //记录下一个迭代的节点

        Entry<K,V> next;

        //当前迭代的节点

        Entry<K,V> current;

        //用于fail-fast机制

        int expectedModCount;

        //迭代器初始化next指向head

        LinkedHashIterator() {

            next = head;

            expectedModCount = modCount;

            current = null;

        }

        public final boolean hasNext() {

            return next != null;

        }

        //链表方式迭代

        final Entry<K,V> nextNode() {

            Entry<K,V> e = next;

            if (modCount != expectedModCount)

                throw new ConcurrentModificationException();

            if (e == null)

                throw new NoSuchElementException();

            current = e;

            //双链表的后继节点节点指向next

            next = e.after;

            return e;

        }

        public final void remove() {

            Node<K,V> p = current;

            if (p == null)

                throw new IllegalStateException();

            if (modCount != expectedModCount)

                throw new ConcurrentModificationException();

            current = null;

            K key = p.key;

            removeNode(hash(key), key, null, false, false);

            expectedModCount = modCount;

        }

    }
利用LinkedHashMap简单实现LRU算法
在查阅相关资料时,都提到利用LinkedHashMap实现LRU算法,首先介绍一下LRU(Least Recently Used)算法:
LRU(Least recently used,最近最少使用)算法根据数据的历史访问记录来进行淘汰数据,其核心思想是“如果数据最近被访问过,那么将来被访问的几率也更高”。也就是说,当有限的空间已存满数据时,应当把最久没有被访问到的数据淘汰。
根据上面的源码,我们知道当把accessOrder设为true时,LinkedHashMap就会根据访问顺序排序,把最近访问过的元素放在链表的尾部,而没有访问的元素就放在链表头部,只要重写removeEldestEntry设置丢弃头部节点条件就行了。这样就可以简单实现LRU算法了
public class LRUCache<K, V> {

    private final int   CACHE_SIZE;

    private final float DEFAULT_LOAD_FACTORY = 0.75f;

    LinkedHashMap<K, V> map;

    public LRUCache(int cacheSize) {

        CACHE_SIZE = cacheSize;

        int capacity = (int)Math.ceil(CACHE_SIZE / DEFAULT_LOAD_FACTORY) + 1;

        map = new LinkedHashMap<K,V>(capacity, DEFAULT_LOAD_FACTORY, true) {

            @Override

            protected boolean removeEldestEntry(Map.Entry<K, V> eldest) {

                return map.size() > cacheSize;

            }

        };

    }

    public void put(K key, V value) {

        map.put(key, value);

    }

    public V get(K key) {

        return map.get(key);

    }

    public void remove(K key) {

        map.remove(key);

    }

    @Override

    public String toString() {

        StringBuilder stringBuilder = new StringBuilder();

        for (Map.Entry<K, V> entry : map.entrySet()) {

            stringBuilder.append(String.format("%s: %s  ", entry.getKey(), entry.getValue()));

        }

        return stringBuilder.toString();

    }

    public static void main(String[] args) {

        LRUCache<Integer, Integer> cache = new LRUCache<>(5);

        cache.put(1,1);

        cache.put(2,2);

        cache.put(3,3);

        System.out.println(cache);

        cache.get(1);

        cache.put(4,4);

        cache.put(5,5);

        cache.put(6,6);

        System.out.println(cache);

    }

}
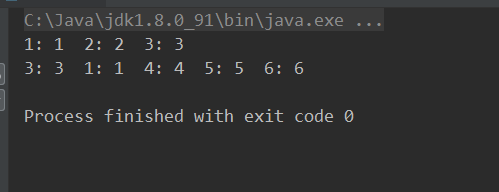
结果:

超出范围后,1:1键值对被访问过,最早没有被访问过的2:2键值对就被丢弃了。
总结
LinkedHashMap基于HashMap,所谓大树底下好乘凉,重写了部分代码就能够实现有序插入。LinkedHashMap总体上较为简单,在理解了HashMap的基础上就能很快理解LinkedHashMap的实现。
JDK源码分析(四)——LinkedHashMap的更多相关文章
- JDK 源码分析(4)—— HashMap/LinkedHashMap/Hashtable
JDK 源码分析(4)-- HashMap/LinkedHashMap/Hashtable HashMap HashMap采用的是哈希算法+链表冲突解决,table的大小永远为2次幂,因为在初始化的时 ...
- 【JDK】JDK源码分析-LinkedHashMap
概述 前文「JDK源码分析-HashMap(1)」分析了 HashMap 主要方法的实现原理(其他问题以后分析),本文分析下 LinkedHashMap. 先看一下 LinkedHashMap 的类继 ...
- JDK源码分析—— ArrayBlockingQueue 和 LinkedBlockingQueue
JDK源码分析—— ArrayBlockingQueue 和 LinkedBlockingQueue 目的:本文通过分析JDK源码来对比ArrayBlockingQueue 和LinkedBlocki ...
- 【JDK】JDK源码分析-HashMap(1)
概述 HashMap 是 Java 开发中最常用的容器类之一,也是面试的常客.它其实就是前文「数据结构与算法笔记(二)」中「散列表」的实现,处理散列冲突用的是“链表法”,并且在 JDK 1.8 做了优 ...
- 【JDK】JDK源码分析-TreeMap(2)
前文「JDK源码分析-TreeMap(1)」分析了 TreeMap 的一些方法,本文分析其中的增删方法.这也是红黑树插入和删除节点的操作,由于相对复杂,因此单独进行分析. 插入操作 该操作其实就是红黑 ...
- 【JDK】JDK源码分析-Vector
概述 上文「JDK源码分析-ArrayList」主要分析了 ArrayList 的实现原理.本文分析 List 接口的另一个实现类:Vector. Vector 的内部实现与 ArrayList 类似 ...
- 【JDK】JDK源码分析-AbstractQueuedSynchronizer(2)
概述 前文「JDK源码分析-AbstractQueuedSynchronizer(1)」初步分析了 AQS,其中提到了 Node 节点的「独占模式」和「共享模式」,其实 AQS 也主要是围绕对这两种模 ...
- JDK源码分析(三)—— LinkedList
参考文档 JDK源码分析(4)之 LinkedList 相关
- JDK源码分析(一)—— String
dir 参考文档 JDK源码分析(1)之 String 相关
随机推荐
- Python练习-sys.argv的无聊用法
代码如下: # 编辑者:闫龙 #将三次登陆锁定的作业改为: # python login.py -u alex -p 123456 输入的形式 # (-u,-p是固定的,分别代表用户名和密码) imp ...
- 文件读取 FILE
需要了解的概念 [数据流][缓冲区(Buffer)][文件类型][文件存取方式][借助文件指针读写文件] 需要理解的知识点包括:数据流.缓冲区.文件类型.文件存取方式 1.1 数据流: 指程序与数据的 ...
- 【codeforces】【比赛题解】#868 CF Round #438 (Div.1+Div.2)
这次是Div.1+Div.2,所以有7题. 因为时间较早,而且正好赶上训练,所以机房开黑做. 然而我们都只做了3题.:(. 链接. [A]声控解锁 题意: Arkady的宠物狗Mu-mu有一只手机.它 ...
- java浅复制与深手动构造实现
首先来看看浅拷贝和深拷贝的定义: 浅拷贝:使用一个已知实例对新创建实例的成员变量逐个赋值,这个方式被称为浅拷贝. 深拷贝:当一个类的拷贝构造方法,不仅要复制对象的所有非引用成员变量值,还要为引用类型的 ...
- asp.net mvc发送邮件
参考文献: 第一篇:http://www.cnblogs.com/qinpengming/archive/2011/06/08/2075040.html 第二篇:http://www.cnblogs. ...
- php CI框架
CodeIgniter 是一个小巧但功能强大的 PHP 框架,作为一个简单而“优雅”的工具包,它可以为 PHP 程序员建立功能完善的 Web 应用程序.如果你是一个使用共享主机,并且为客户所要求的期限 ...
- vue项目下使用iview总结
iview在IE浏览器下有问题,打开页面是空白
- HDU 4632 Palindrome subsequence(区间DP求回文子序列数)
题目链接:http://acm.hdu.edu.cn/showproblem.php?pid=4632 题目大意:给你若干个字符串,回答每个字符串有多少个回文子序列(可以不连续的子串).解题思路: 设 ...
- RobotCraft 2017 第二届国际机器人学暑期学校 2nd Edition of International Robotics Summer School
原文网址:http://www.ros.org/news/2017/02/2nd-edition-of-international-robotics-summer-school-robotcraft- ...
- Filebeat入门
一.安装filebeat 简介 Beats 是安装在服务器上的数据中转代理. Beats 可以将数据直接传输到 Elasticsearch 或传输到 Logstash . Beats 有多种类型,可以 ...
