Qt Quick快速入门之qml布局
Qml里面布局主要有两种,锚点布局、Grid布局。
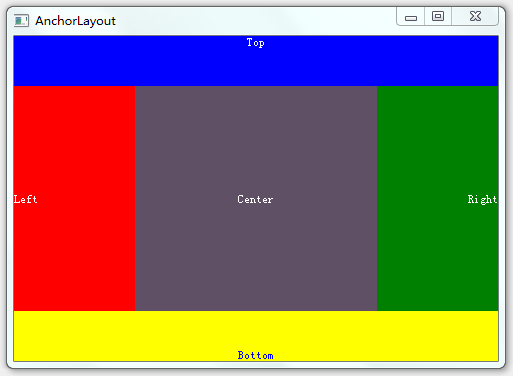
锚点布局使用anchors附件属性将一个元素的边定位到另一个元素的边,从而确定元素的位置和大小。下面是示例
 import QtQuick 2.3

 import QtQuick.Window 2.0

 Window {

     id:anchorLayoutWindow;

     width:;

     height:;

     title: "AnchorLayout";

     Rectangle{

         id:rect1;

         width: parent.width;

         height:;

         color:"blue";

         anchors.top: parent.top;

         Text{ text: "Top"; anchors.horizontalCenter: parent.horizontalCenter;anchors.top:parent.top; color:"white"; }

     }

     Rectangle{

         id:rect2;

         width: parent.width/4;

         color: "red";

         anchors.top:rect1.bottom;

         anchors.bottom: rect4.top

         anchors.left: parent.left;

         Text{ text: "Left"; anchors.verticalCenter: parent.verticalCenter; anchors.left: parent.left;color:"white"; }

     }

     Rectangle{

         id:rect3;

         color: "green";

         width:rect2.width;

         anchors.top:rect1.bottom;

         anchors.bottom: rect4.top;

         anchors.right:parent.right;

         Text{ text: "Right";anchors.right: parent.right;anchors.verticalCenter: parent.verticalCenter;color:"white"; }

     }

     Rectangle{

         id:rect4;

         width: parent.width;

         height:;

         color:"yellow";

         anchors.bottom: parent.bottom;

         Text{ text: "Bottom"; anchors.horizontalCenter: parent.horizontalCenter;anchors.bottom: parent.bottom;color:"blue";}

     }

     Rectangle{

         id:rect5;

         color:"#FF605066";

         anchors.top:rect1.bottom;

         anchors.bottom: rect4.top;

         anchors.left: rect2.right;

         anchors.right: rect3.left;

         Text{ text: "Center";anchors.centerIn: parent; color:"white";}

     }

 }
效果如下图
Grid布局有GridLayout、ColumnLayout、RowLayout、Column、Row,其中ColumnLayout、RowLayout只是GridLayout的一种特例,ColumnLayout表示只有一列,RowLayout表示只有一行。
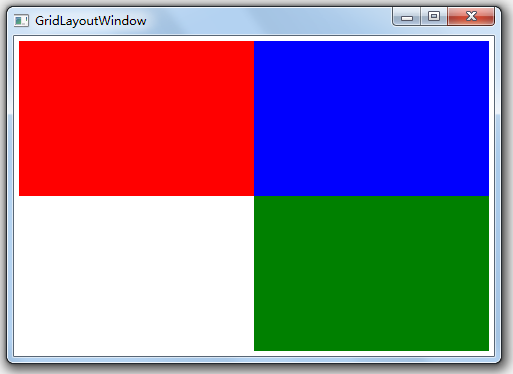
GridLayout使用columns、rows属性将空间分成若干单元格,使用columnSpacing、rowSpacing确立单元格之间的间隔。而GridLayout内部元素的大小由Layout.fillWidth、Layout.fillHeight以及Layout.preferredWidth、Layout.preferredHeight来确定,如Layout.fillWidth:true表示宽度填充整个单元格,Layout.preferredWidth则指定一个建议宽度。Layout.row、Layout.column确定内部元素处于哪个单元格。注意,不要将内部元素的宽度、高度、x、y与GridLayout进行绑定,容易导致绑定循环。
Column、Row类似于html中的float或是wpf中的StackPanel,会直接将元素一个个挨在一起,元素间的间隔使用spacing控制
下面是GridLayout布局的一个示例
 import QtQuick 2.3

 import QtQuick.Window 2.0

 import QtQuick.Layouts 1.1

 Window {

     id:gridLayoutWindow;

     title:"GridLayoutWindow";

     width:;

     height:;

     GridLayout{

         id: gridLayout1

         columns: 2;

         rows:;

         anchors.fill: parent;

         anchors.margins:;

         columnSpacing:;

         rowSpacing:;

         Rectangle{

             id:rect00;

             color: "red";

             Layout.fillWidth: true;

             Layout.fillHeight: true;

         }

         Rectangle{

             id:rect01;

             color: "blue";

             Layout.fillWidth: true;

             Layout.fillHeight: true;

         }

         Rectangle{

             id:rect10;

             color: "green";

             Layout.fillWidth: true;

             Layout.fillHeight: true;

             Layout.row:;

             Layout.column:;

         }

     }

 }
效果如下所图
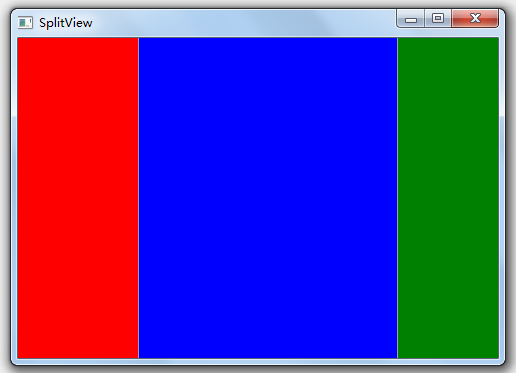
SplitView用于提供带切分条的布局,下面是示例
import QtQuick 2.3

import QtQuick.Window 2.0

import QtQuick.Layouts 1.1

import QtQuick.Controls 1.2

Window {

    width:;

    height:;

    title: "SplitView";

    SplitView{

        anchors.fill:parent;

        orientation: Qt.Horizontal;

        Rectangle{

            id:rect1;

            width:;

            color:"red";

        }

        Rectangle{

            id:rect2;

            Layout.fillWidth: true;

            Layout.minimumWidth:;

            color:"blue";

        }

        Rectangle{

            id:rect3;

            width:;

            color:"green";

        }

    }

}
下面是效果图,注意实际情况可以拖拉切分条
OK,有了以上几种布局方式,通过一定的组合相信可以应对大部分布局需求了
Qt Quick快速入门之qml布局的更多相关文章
- Qt Quick快速入门之qml与C++交互
C++中使用qml对象,直接使用findChild获取qml对象,然后调用setProperty方法设置属性,当然必须在加载qml之后才能使用,不然findChild找不到对象,用法如下. engin ...
- Qt Quick快速入门之线程基础
首先必须明确的是,Qt中的线程使用是相对复杂的,并不像C#中那么随意,特别是结合串口.网络编程等,使用时稍有不慎就会出问题,然后Qt里面经常出了问题就直接崩溃(这个真是谁用谁知道),所以如果在功能上用 ...
- Qt Quick快速入门之信号、槽
信号和槽主要用于组件之间的通信,类似于.net和java中的委托. 使用QObject::connect方法将信号与槽关联起来,然后信号的发起者发出信号,接受者中的槽函数就会执行. 比如connect ...
- [Qt Creator 快速入门] 第5章 应用程序主窗口
对于日常见到的应用程序而言,许多都是基于主窗口的,主窗口中包含了菜单栏.工具栏.状态栏和中心区域等.这一章会详细介绍主窗口的每一个部分,还会涉及资源管理.富文本处理.拖放操作和文档打印等相关内容.重点 ...
- [Qt Creator 快速入门] 第1章 Qt Creator简介
Qt Creator 是一个跨平台的.完整的 Qt 集成开发环境,其中包括了高级C++代码编辑器.项目和生成管理工具.集成的上下文相关的帮助系统.图形化调试器.代码管理和浏览工具等.这一章先对 Qt ...
- [Qt Creator 快速入门] 第2章 Qt程序编译和源码详解
一.编写 Hello World Gui程序 Hello World程序就是让应用程序显示"Hello World"字符串.这是最简单的应用,但却包含了一个应用程序的基本要素,所以 ...
- [Qt Creator 快速入门] 第0篇 开始学习Qt 与Qt Creator
Qt官方信息 Qt官网:http://qt.digia.com/ Qt开源官网:http://qt-project.org/ Qt最新版本下载:http://qt-project.org/downlo ...
- 从头学Qt Quick(2)-- QML语法从一个简单的例子说起
在上一篇文章中,我们对QtQuick做了简单的介绍,体验了使用QML语言构建一个UI的便捷.这里我们简要介绍一下QML的语法. QML将界面分成一些更小的元素,这些元素可以组成一个组件,QML语言描述 ...
- Qt 动画快速入门(一)
Qt-4.6动画Animation快速入门三字决 Qt-4.6新增了Animation Framework(动画框架),让我们能够方便的写一些生动的程序.不必像以前的版本一样,所有的控件都枯燥的呆在伟 ...
随机推荐
- http方式传递参数值转义或乱码的处理(base64)
如果通过http方式传递参数url编码了,可用urlEncode和urlDecode,这种方式不同开发语言编码出来的可能不同,所以不同开发语言最好用base64编码和解码来处理: base64加密: ...
- MUI项目基础框架
码云SVN仓库地址:https://gitee.com/lim2018/vx/tree/master MUI项目基础框架,底部导航栏切换 目录结构 index为入口页主体,sub1-4为要切换的子页面 ...
- 10种CSS3实现的Loading效果
原文链接:http://www.cnblogs.com/jr1993/p/4622039.html 第一种效果: 代码如下: <div class="loading"> ...
- Spring4笔记10--SSH整合1--Spring与Hibernate整合
SSH 框架整合技术: 1. Spring与Hibernate整合(对比Spring与JDBC模板): Service业务层代码和测试类都不变,添加实体类的映射配置文件: <?xml versi ...
- python 爬虫简单的demo
''' @author :Eric-chen @contact:809512722@qq.com @time :2018/1/3 17:55 @desc :通过爬取http://movie.douba ...
- 查看linux服务器内存信息
查看服务器内存信息 dmidecode|grep -P -A5 "Memory\s+Device"|grep Size [root@localhost home]# dmideco ...
- ASP.net-空白页的问题
protected void Application_Error(object sender, EventArgs e) { ILog log = LogMan ...
- mysql高可用架构 -> MHA简介-01
作者简介 松信嘉範:MySQL/Linux专家2001年索尼公司入职2001年开始使用oracle2004年开始使用MySQL2006年9月-2010年8月MySQL从事顾问2010年-2012年 D ...
- 四、Springboot Debug调试
描述: 在使用maven插件执行spring-boot:run进行启动的时候,如果设置的断点进不去,要进行以下的设置. 1.添加jvm参数配置 在spring-boot的maven插件加上jvmArg ...
- Python 安装requests模块
window下安装: 注:不要使用 easy_install requests 命令 这种方式安装后不能卸载,建议使用pip 方法 1.自动安装 输入cmd命令进入命令行窗口,执行 pip insta ...