Flume-NG源码分析-整体结构及配置载入分析
在 http://flume.apache.org 上下载flume-1.6.0版本,将源码导入到Idea开发工具后如下图所示:

一、主要模块说明
flume-ng-channels 里面包含了filechannel,jdbcchannel,kafkachannel,memorychannel通道的实现。
flume-ng-clients 实现了log4j相关的几个Appender,使得log4j的日志输出可以直接发送给flume-agent;其中有一个LoadBalancingLog4jAppender的实现,提供了多个flume-agent的load balance和ha功能,采用flume作为日志收集的可以考虑将这个appender引入内部的log4j中。
flume-ng-configuration 这个主要就是Flume配置信息相关的类,包括载入flume-config.properties配置文件并解析。其中包括了Source的配置,Sink的配置,Channel的配置,在阅读源码前推荐先梳理这部分关系再看其他部分的。
flume-ng-core flume整个核心框架,包括了各个模块的接口以及逻辑关系实现。其中instrumentation是flume内部实现的一套metric机制,metric的变化和维护,其核心也就是在MonitoredCounterGroup中通过一个Map<key, AtomicLong>来实现metric的计量。ng-core下几乎大部分代码任然几种在channel、sink、source几个子目录下,其他目录基本完成一个util和辅助的功能。
flume-ng-node 实现启动flume的一些基本类,包括main函数的入口(Application.java中)。在理解configuration之后,从application的main函数入手,可以较快的了解整个flume的代码。
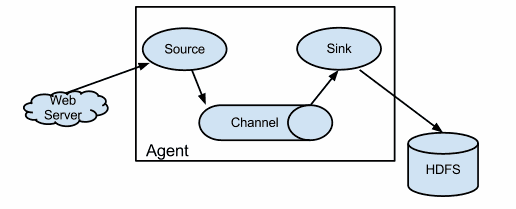
二、Flume逻辑结构图
三、flume-ng启动文件介绍
################################# constants#################################设置常量值,主要是针对不同的参数执行相应的类,以启动Flume环境FLUME_AGENT_CLASS="org.apache.flume.node.Application"FLUME_AVRO_CLIENT_CLASS="org.apache.flume.client.avro.AvroCLIClient"FLUME_VERSION_CLASS="org.apache.flume.tools.VersionInfo"FLUME_TOOLS_CLASS="org.apache.flume.tools.FlumeToolsMain"#真正启动Flume环境的方法run_flume() {local FLUME_APPLICATION_CLASSif [ "$#" -gt 0 ]; thenFLUME_APPLICATION_CLASS=$1shiftelseerror "Must specify flume application class" 1fiif [ ${CLEAN_FLAG} -ne 0 ]; thenset -xfi#执行这一行命令,执行相应的启动类,比如org.apache.flume.node.Application$EXEC $JAVA_HOME/bin/java $JAVA_OPTS $FLUME_JAVA_OPTS "${arr_java_props[@]}" -cp "$FLUME_CLASSPATH" \-Djava.library.path=$FLUME_JAVA_LIBRARY_PATH "$FLUME_APPLICATION_CLASS" $*}################################# main################################# set default params# 在启动的过程中使用到的参数FLUME_CLASSPATH=""FLUME_JAVA_LIBRARY_PATH=""#默认占用堆空间大小,这一块都可以根据JVM进行重新设置JAVA_OPTS="-Xmx20m"LD_LIBRARY_PATH=""opt_conf=""opt_classpath=""opt_plugins_dirs=""arr_java_props=()arr_java_props_ct=0opt_dryrun=""# 根据不同的参数,执行不同的启动类,每个常量所对应的类路径在代码前面有过介绍。if [ -n "$opt_agent" ] ; thenrun_flume $FLUME_AGENT_CLASS $argselif [ -n "$opt_avro_client" ] ; thenrun_flume $FLUME_AVRO_CLIENT_CLASS $argselif [ -n "${opt_version}" ] ; thenrun_flume $FLUME_VERSION_CLASS $argselif [ -n "${opt_tool}" ] ; thenrun_flume $FLUME_TOOLS_CLASS $argselseerror "This message should never appear" 1fi
这是其中最主要的一部分flume-ng命令行,根据重要性摘取了一段,感兴趣的读者可以自己到bin目录下查看全部。
四、从Flume-NG启动过程开始说起
从bin/flume-ng这个shell脚本可以看到Flume的起始于org.apache.flume.node.Application类,这是flume的main函数所在。
main方法首先会先解析shell命令,如果指定的配置文件不存在就抛出异常。
代码如下所示:
Options options = new Options();Option option = new Option("n", "name", true, "the name of this agent");option.setRequired(true);options.addOption(option);option = new Option("f", "conf-file", true,"specify a config file (required if -z missing)");option.setRequired(false);options.addOption(option);option = new Option(null, "no-reload-conf", false,"do not reload config file if changed");options.addOption(option);// Options for Zookeeperoption = new Option("z", "zkConnString", true,"specify the ZooKeeper connection to use (required if -f missing)");option.setRequired(false);options.addOption(option);option = new Option("p", "zkBasePath", true,"specify the base path in ZooKeeper for agent configs");option.setRequired(false);options.addOption(option);option = new Option("h", "help", false, "display help text");options.addOption(option);#命令行解析类CommandLineParser parser = new GnuParser();CommandLine commandLine = parser.parse(options, args);if (commandLine.hasOption('h')) {new HelpFormatter().printHelp("flume-ng agent", options, true);return;}String agentName = commandLine.getOptionValue('n');boolean reload = !commandLine.hasOption("no-reload-conf");if (commandLine.hasOption('z') || commandLine.hasOption("zkConnString")) {isZkConfigured = true;}
以上代码是Application类中校验shell命令行的代码,举个例子在启动flume的时候,使用如下命令行:
./bin/flume-ng agent -n agent -c conf -f conf/hw.conf -Dflume.root.logger=INFO,console
里面的-n -f等参数都是在上面代码中校验的。
再往下看main方法里的代码:
File configurationFile = new File(commandLine.getOptionValue('f'));/** The following is to ensure that by default the agent will fail on* startup if the file does not exist.*/if (!configurationFile.exists()) {// If command line invocation, then need to fail fastif (System.getProperty(Constants.SYSPROP_CALLED_FROM_SERVICE) ==null) {String path = configurationFile.getPath();try {path = configurationFile.getCanonicalPath();} catch (IOException ex) {logger.error("Failed to read canonical path for file: " + path,ex);}throw new ParseException("The specified configuration file does not exist: " + path);}}List<LifecycleAware> components = Lists.newArrayList();if (reload) {EventBus eventBus = new EventBus(agentName + "-event-bus");PollingPropertiesFileConfigurationProvider configurationProvider =new PollingPropertiesFileConfigurationProvider(agentName, configurationFile, eventBus, 30);components.add(configurationProvider);application = new Application(components);eventBus.register(application);} else {PropertiesFileConfigurationProvider configurationProvider =new PropertiesFileConfigurationProvider(agentName, configurationFile);application = new Application();application.handleConfigurationEvent(configurationProvider.getConfiguration());}}application.start();
说明:
根据命令中含有”no-reload-conf”参数,决定采用那种加载配置文件方式:
一、没有此参数,会动态加载配置文件,默认每30秒加载一次配置文件,因此可以动态修改配置文件;
二、有此参数,则只在启动时加载一次配置文件。实现动态加载功能采用了发布订阅模式,使用guava中的EventBus实现。
三、PropertiesFileConfigurationProvider这个类是配置文件加载类。
类图如下:
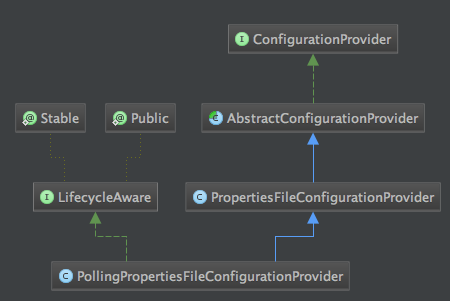
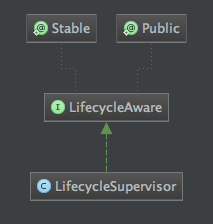
从图中可以看出在整个PollingPropertiesFileConfigurationProvider类中,它实现了LifecycleAware接口,而这个接口是掌管整个Flume生命周期的一个核心接口,LifecycleSupervisor实现了这个接口,通过上面代码中application.start方法触发LifecyleAware的start方法,下面是这个接口的方法定义及相关类代码:
public interface LifecycleAware {/*** <p>* Starts a service or component.* </p>* @throws LifecycleException* @throws InterruptedException*/public void start();/*** <p>* Stops a service or component.* </p>* @throws LifecycleException* @throws InterruptedException*/public void stop();/*** <p>* Return the current state of the service or component.* </p>*/public LifecycleState getLifecycleState();}
Application.start()方法内容:
public synchronized void start() {for(LifecycleAware component : components) {supervisor.supervise(component,new SupervisorPolicy.AlwaysRestartPolicy(), LifecycleState.START);}}
LifecycleSupervisor.supervise方法内容如下:
public synchronized void supervise(LifecycleAware lifecycleAware,SupervisorPolicy policy, LifecycleState desiredState) {if(this.monitorService.isShutdown()|| this.monitorService.isTerminated()|| this.monitorService.isTerminating()){throw new FlumeException("Supervise called on " + lifecycleAware + " " +"after shutdown has been initiated. " + lifecycleAware + " will not" +" be started");}Preconditions.checkState(!supervisedProcesses.containsKey(lifecycleAware),"Refusing to supervise " + lifecycleAware + " more than once");if (logger.isDebugEnabled()) {logger.debug("Supervising service:{} policy:{} desiredState:{}",new Object[] { lifecycleAware, policy, desiredState });}Supervisoree process = new Supervisoree();process.status = new Status();process.policy = policy;process.status.desiredState = desiredState;process.status.error = false;MonitorRunnable monitorRunnable = new MonitorRunnable();monitorRunnable.lifecycleAware = lifecycleAware;monitorRunnable.supervisoree = process;monitorRunnable.monitorService = monitorService;supervisedProcesses.put(lifecycleAware, process);ScheduledFuture<?> future = monitorService.scheduleWithFixedDelay(monitorRunnable, 0, 3, TimeUnit.SECONDS);monitorFutures.put(lifecycleAware, future);}
在上面的代码中,会创建MonitorRunnable对象,这个对象是个定时对象,里面的run方法主要是根据supervisoree.status.desiredState的值执行对应的操作。
包括:START,STOP等状态, 大家注意scheduleWithFixedDelay这个方法,这是java线程池自带的,要求每次任务执行完以后再延迟3秒,而不是每隔3秒执行一次,大家注意这一点。
又有同学会问循环调用会不会有问题,这里回应大家其实也没问题,这么做是为了重试机制,看下面代码:
if (!lifecycleAware.getLifecycleState().equals( supervisoree.status.desiredState))
在MonitorRunnable内部有这样一个判断,当getLifecycleState与supervisoree.status.desiredState状态不相等的时候才会执行,而ifecycleAware.getLifecycleState()初始状态是IDLE。
时序调用图如下所示
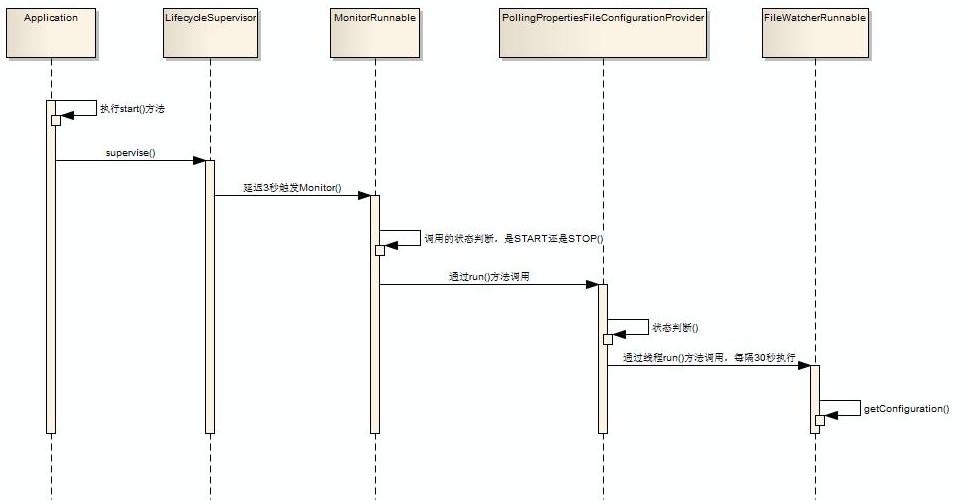
注:
PollingPropertiesFileConfigurationProvider.start()方法会启动一个单线程FileWatcherRunnable每隔30s去加载一次配置文件:
eventBus.post(getConfiguration())。
getConfiguration()解析了配置文件并且获取所有组件及配置属性
五、配置文件加载详细分析
先看一下FileWatcherRunnable内部的代码:
public MaterializedConfiguration getConfiguration() {//初始化三大组件的配置Map,source,channel,sinkMaterializedConfiguration conf = new SimpleMaterializedConfiguration();FlumeConfiguration fconfig = getFlumeConfiguration();AgentConfiguration agentConf = fconfig.getConfigurationFor(getAgentName());if (agentConf != null) {Map<String, ChannelComponent> channelComponentMap = Maps.newHashMap();Map<String, SourceRunner> sourceRunnerMap = Maps.newHashMap();Map<String, SinkRunner> sinkRunnerMap = Maps.newHashMap();try {loadChannels(agentConf, channelComponentMap);loadSources(agentConf, channelComponentMap, sourceRunnerMap);loadSinks(agentConf, channelComponentMap, sinkRunnerMap);Set<String> channelNames =new HashSet<String>(channelComponentMap.keySet());for(String channelName : channelNames) {ChannelComponent channelComponent = channelComponentMap.get(channelName);if(channelComponent.components.isEmpty()) {LOGGER.warn(String.format("Channel %s has no components connected" +" and has been removed.", channelName));channelComponentMap.remove(channelName);Map<String, Channel> nameChannelMap = channelCache.get(channelComponent.channel.getClass());if(nameChannelMap != null) {nameChannelMap.remove(channelName);}} else {LOGGER.info(String.format("Channel %s connected to %s",channelName, channelComponent.components.toString()));conf.addChannel(channelName, channelComponent.channel);}}for(Map.Entry<String, SourceRunner> entry : sourceRunnerMap.entrySet()) {conf.addSourceRunner(entry.getKey(), entry.getValue());}for(Map.Entry<String, SinkRunner> entry : sinkRunnerMap.entrySet()) {conf.addSinkRunner(entry.getKey(), entry.getValue());}} catch (InstantiationException ex) {LOGGER.error("Failed to instantiate component", ex);} finally {channelComponentMap.clear();sourceRunnerMap.clear();sinkRunnerMap.clear();}} else {LOGGER.warn("No configuration found for this host:{}", getAgentName());}return conf;}
说明:
一、在哪里加载的配置文件
其实是在这里,FlumeConfiguration fconfig = getFlumeConfiguration();
getFlumeConfiguration()这个方法是一个抽象方法,可以通过下图的方式查找加载方式。

我们选择PollingPropertiesFileConfigurationProvider这个,可以看到:
@Overridepublic FlumeConfiguration getFlumeConfiguration() {BufferedReader reader = null;try {reader = new BufferedReader(new FileReader(file));Properties properties = new Properties();properties.load(reader);return new FlumeConfiguration(toMap(properties));} catch (IOException ex) {LOGGER.error("Unable to load file:" + file+ " (I/O failure) - Exception follows.", ex);} finally {if (reader != null) {try {reader.close();} catch (IOException ex) {LOGGER.warn("Unable to close file reader for file: " + file, ex);}}}return new FlumeConfiguration(new HashMap<String, String>());}
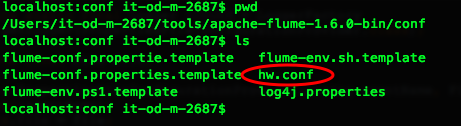
就是上面这个方法通过JAVA最基本的流的方式加载的配置文件,也就是图上面我配置的flume的hw.conf配置文件。方法读取配置文件,然后解析成name(输姓名全称,即等号左侧的全部)、value(等号的右侧)对,存入一个Map当中,返回一个封装了这个Map的FlumeConfiguration对象。
FlumeConfiguration类的构造函数会遍历这个Map的所有<name,value>对,调用addRawProperty(String name, String value)处理<name,value>对,addRawProperty方法会先做一些合法性检查,启动Flume的时候会构造一个AgentConfiguration对象aconf,然后agentConfigMap.put(agentName, aconf),以后动态加载配置文件时只需要AgentConfiguration aconf = agentConfigMap.get(agentName)就可以得到,然后调用aconf.addProperty(configKey, value)处理。
二、我们重点看一下addProperty方法内部的parseConfigKey方法,这里会深入解析每一行配置文件内容。
我们举一个配置文件的例子:
agent.sources=s1agent.channels=c1 c2agent.sinks=k1 k2agent.sources.s1.type=execagent.sources.s1.command=tail -F /Users/it-od-m-2687/Downloads/abc.logagent.sources.s1.channels=c1agent.channels.c1.type=memoryagent.channels.c1.capacity=10000agent.channels.c1.transactionCapacity=100agent.sinks.k1.type= org.apache.flume.sink.kafka.KafkaSinkagent.sinks.k1.brokerList=127.0.0.1:9092agent.sinks.k1.topic=testKJ1agent.sinks.k1.serializer.class=kafka.serializer.StringEncoderagent.sinks.k1.channel=c1
解析上面的文件就是使用下面parseConfigKey这个方法:
cnck = parseConfigKey(key, BasicConfigurationConstants.CONFIG_SINKGROUPS_PREFIX);
public final class BasicConfigurationConstants {public static final String CONFIG_SOURCES = "sources";public static final String CONFIG_SOURCES_PREFIX = CONFIG_SOURCES + ".";public static final String CONFIG_SOURCE_CHANNELSELECTOR_PREFIX = "selector.";public static final String CONFIG_SINKS = "sinks";public static final String CONFIG_SINKS_PREFIX = CONFIG_SINKS + ".";public static final String CONFIG_SINK_PROCESSOR_PREFIX = "processor.";public static final String CONFIG_SINKGROUPS = "sinkgroups";public static final String CONFIG_SINKGROUPS_PREFIX = CONFIG_SINKGROUPS + ".";public static final String CONFIG_CHANNEL = "channel";public static final String CONFIG_CHANNELS = "channels";public static final String CONFIG_CHANNELS_PREFIX = CONFIG_CHANNELS + ".";public static final String CONFIG_CONFIG = "config";public static final String CONFIG_TYPE = "type";private BasicConfigurationConstants() {// disable explicit object creation}
1、我们用agent.sources.s1.command=s1来举例:
变量prefix指的是:sink,source,channel等关键字。
如下面代码:
public final class BasicConfigurationConstants {public static final String CONFIG_SOURCES = "sources";public static final String CONFIG_SOURCES_PREFIX = CONFIG_SOURCES + ".";public static final String CONFIG_SOURCE_CHANNELSELECTOR_PREFIX = "selector.";public static final String CONFIG_SINKS = "sinks";public static final String CONFIG_SINKS_PREFIX = CONFIG_SINKS + ".";public static final String CONFIG_SINK_PROCESSOR_PREFIX = "processor.";public static final String CONFIG_SINKGROUPS = "sinkgroups";public static final String CONFIG_SINKGROUPS_PREFIX = CONFIG_SINKGROUPS + ".";public static final String CONFIG_CHANNEL = "channel";public static final String CONFIG_CHANNELS = "channels";public static final String CONFIG_CHANNELS_PREFIX = CONFIG_CHANNELS + ".";public static final String CONFIG_CONFIG = "config";public static final String CONFIG_TYPE = "type";private BasicConfigurationConstants() {// disable explicit object creation}
2、上面parseConfigKey方法,首先根据prefix判断prefix的后面,有少多字符。比如:sources.s1.command,在sources后面s1.command一共有10个字符。
3、解析出name变量,如s1,这个是自己定义的。
4、解析出configKey固定关键字,如command,这个是系统定义的。
5、封装new ComponentNameAndConfigKey(name, configKey)返回。
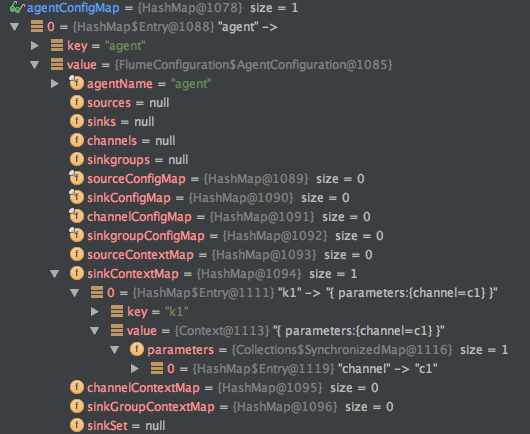
6、将sources、channel、sink配置信息,分别存放到sourceContextMap、channelConfigMap、sinkConfigMap三个HashMap,最后统一封装到AgentConfiguration对象中,然后再把AgentConfiguration存放到agentConfigMap中,key是agentName。说了这么多相信很多同学都已经晕了,agentConfigMap的结构如下图所示:
读源码是一个很痛苦的过程,不仅要分析整体框架的架构,还要理解作者的用意和设计思想,但只要坚持下来你会发现还是能学到很多东西的。
Flume-NG源码分析-整体结构及配置载入分析的更多相关文章
- WorldWind源码剖析系列:配置载入器类ConfigurationLoader
配置载入器类ConfigurationLoader主要从指定的路径中加载保存星球相关参数的xml文件,从中读取数据来构造星球对象及其所关联的可渲染子对象列表并返回.该类的类图如下所示. 该类所包含的主 ...
- Mybatis 系列7-结合源码解析核心CRUD 配置及用法
[Mybatis 系列10-结合源码解析mybatis 执行流程] [Mybatis 系列9-强大的动态sql 语句] [Mybatis 系列8-结合源码解析select.resultMap的用法] ...
- 基于SpringBoot的Environment源码理解实现分散配置
前提 org.springframework.core.env.Environment是当前应用运行环境的公开接口,主要包括应用程序运行环境的两个关键方面:配置文件(profiles)和属性.Envi ...
- Asp.NetCore源码学习[1-2]:配置[Option]
Asp.NetCore源码学习[1-2]:配置[Option] 在上一篇文章中,我们知道了可以通过IConfiguration访问到注入的ConfigurationRoot,但是这样只能通过索引器IC ...
- Web API 源码剖析之默认配置(HttpConfiguration)
Web API 源码剖析之默认配置(HttpConfiguration) 我们在上一节讲述了全局配置和初始化.本节我们将就全局配置的Configuration只读属性进行展开,她是一个类型为HttpC ...
- Web API 源码剖析之全局配置
Web API 源码剖析之全局配置 Web API 均指Asp.net Web API .本节讲述的是基于Web API 系统在寄宿于IIS. 本节主要讲述Web API全局配置.它是如何优雅的实现 ...
- CentOS 7上源码编译安装和配置LNMP Web+phpMyAdmin服务器环境
CentOS 7上源码编译安装和配置LNMP Web+phpMyAdmin服务器环境 什么是LNMP? LNMP(别名LEMP)是指由Linux, Nginx, MySQL/MariaDB, PHP/ ...
- Asp.NetCore源码学习[2-1]:配置[Configuration]
Asp.NetCore源码学习[2-1]:配置[Configuration] 在Asp. NetCore中,配置系统支持不同的配置源(文件.环境变量等),虽然有多种的配置源,但是最终提供给系统使用的只 ...
- flume【源码分析】分析Flume的启动过程
h2 { color: #fff; background-color: #7CCD7C; padding: 3px; margin: 10px 0px } h3 { color: #fff; back ...
随机推荐
- C#在VS2005开发环境中利用异步模式来对一个方法的执行时间进行超时控制
using System.Threading; using System; namespace ConsoleApplication4 { public class Program { static ...
- bootstrapTable的数据后端分页排序
数据后端分页排序,其实就是sql语句中oeder by做一些限制. 之前在写sql语句中的order by是写死,既然要写活,就要传参数到后台. 之前讲到bootstrapTable的queryPar ...
- 一张图掌握移动Web前端所有技术(大前端、工程化、预编译、自动化)
你要的移动web前端都在这里! 大前端方向:移动Web前端.Native客户端.Node.js. 大前端框架:React.Vue.js.Koa 跨终端技术:HTML 5.CSS 3.JavaScri ...
- 前端js优化方案(一)
最近在读<高性能javascript>,在这里记录一下读后的一些感受,顺便加上自己的一些理解,如果有兴趣的话可以关注的我的博客http://www.bloggeng.com/,我会不定期发 ...
- Thymeleaf的模板使用介绍
参考网址: https://blog.csdn.net/hry2015/article/details/73476973 先定义一个html文件, 如下: 文件路径: templates/templa ...
- centos7.4 安装后的基本设置
centos7.4 安装后的基本设置 设置主机名称 设置IP地址,网关 修改网卡名称 内核优化 系统安全设置 防火墙设置 ssh设置 同步系统时间 安装基础软件包 软件配置 设置主机名称 hostna ...
- C#中split的方法汇总
字符串的处理往往离不开split方法,下面介绍几种split的用法: 1.对单个字符进行分割(注意这里是字符,不是字符串,故只能用单引号‘’) string s=abcdeabcdeabcde; st ...
- cms-友情链接实现静态化
service: package com.open1111.service.impl; import java.util.List; import javax.servlet.ServletConte ...
- IOS 控件器的创建方式(ViewController)
● 控制器常见的创建方式有以下几种 ➢ 通过storyboard创建 ➢ 直接创建 NJViewController *nj = [[NJViewController alloc] init]; ➢ ...
- POJ 3666 Making the Grade(区间dp)
修改序列变成非递减序列,使得目标函数最小.(这题数据有问题,只要求非递减 从左往右考虑,当前a[i]≥前一个数的取值,当固定前一个数的取值的时候我们希望前面操作的花费尽量小. 所以状态可以定义为dp[ ...