【Keepalived+MySQL】MySQL双主互备+高可用
一、基本信息说明
【DB1】
IP: 192.168.102.144
hostname: LVS-Real1
【DB2】
IP: 192.168.102.145
hostname: LVS-Real2
【VIP】
IP: 192.168.102.146
二、MySQL配置主主互备
1.配置DB1和DB2的/etc/my.cnf
【DB1】
[root@LVS-Real1 ~]# more /etc/my.cnf
[client]

port =

socket = /tmp/mysql.sock

[mysqld]

user=mysql

port =

server_id = 1                        #需保证唯一性

socket=/tmp/mysql.sock

basedir =/usr/local/mysql

datadir =/usr/local/mysql/data

pid-file=/usr/local/mysql/data/mysqld.pid

log-error=/usr/local/mysql/log/mysql-error.log

log-bin=mysql-bin                     #开启二进制日志

relay-log=mysql-relay-bin

replicate-wild-ignore-table=mysql.%   #忽略复制mysql数据库下的所有对象,以下依次类推

replicate-wild-ignore-table=test.%

replicate-wild-ignore-table=information_schema.%
【DB2】
[root@LVS-Real2 ~]# more /etc/my.cnf

[client]

port =

socket = /tmp/mysql.sock

[mysqld]

user=mysql

port =

server_id = 2                       #需保证唯一性

socket=/tmp/mysql.sock

basedir =/usr/local/mysql

datadir =/usr/local/mysql/data

pid-file=/usr/local/mysql/data/mysqld.pid

log-error=/usr/local/mysql/log/mysql-error.log

log-bin=mysql-bin                  #开启二进制日志

relay-log=mysql-relay-bin

replicate-wild-ignore-table=mysql.%

replicate-wild-ignore-table=test.%

replicate-wild-ignore-table=information_schema.%
2.手动同步数据库
如果DB1上有数据,在执行主主互备之前,需要将DB1和DB2上两个数据库保持同步,首先在DB1上执行备份,执行如下语句:
mysql>flush tables with read lock;
在关闭上述终端的情况下,新开启一个终端打包数据库。
3.创建复制用户并授权
- 首先在【DB1】上的MySQL库中创建复制用户
mysql>grant replication slave on *.* to 'repl_user'@'192.168.102.145' identified by 'repl_passwd';
- 在【DB1】上执行如下语句,并记下File和Position的值
mysql> show master status;

+------------------+----------+--------------+------------------+-------------------+

| File             | Position | Binlog_Do_DB | Binlog_Ignore_DB | Executed_Gtid_Set |

+------------------+----------+--------------+------------------+-------------------+

| mysql-bin.000002 |     1004 |              |                  |                   |

+------------------+----------+--------------+------------------+-------------------+

 row in set (0.02 sec)
- 然后在【DB2】上将DB1设为自己的主服务器,如下:
change master to \

master_host='192.168.102.144',           #DB1的IP地址

master_user='repl_user',

master_password='repl_passwd',

master_log_file='mysql-bin.000002',      #DB1上查询出的File值

master_log_pos=;                     #DB1上查询出的Position值
- 在【DB2】上启动slave服务,并查询slave的运行状态
mysql>start slave;
查看Slave的运行状态,这里需要关注Slave_IO_Running和Slave_SQL_Running.这两个就是在Slave节点上运行的主从复制线程,正常情况下两个值都应该为Yes.
mysql> show slave status\G;

*************************** . row ***************************

               Slave_IO_State: Waiting for master to send event

                  Master_Host: 192.168.102.144

                  Master_User: repl_user

                  Master_Port:

                Connect_Retry:

              Master_Log_File: mysql-bin.

          Read_Master_Log_Pos:

               Relay_Log_File: mysql-relay-bin.

                Relay_Log_Pos:

        Relay_Master_Log_File: mysql-bin.

             Slave_IO_Running: Yes

            Slave_SQL_Running: Yes

              Replicate_Do_DB:

          Replicate_Ignore_DB:

           Replicate_Do_Table:

       Replicate_Ignore_Table:

      Replicate_Wild_Do_Table:

  Replicate_Wild_Ignore_Table: mysql.%,test.%,information_schema.%

                   Last_Errno:

                   Last_Error:

                 Skip_Counter:

          Exec_Master_Log_Pos:

              Relay_Log_Space:

              Until_Condition: None

               Until_Log_File:

                Until_Log_Pos:

           Master_SSL_Allowed: No

           Master_SSL_CA_File:

           Master_SSL_CA_Path:

              Master_SSL_Cert:

            Master_SSL_Cipher:

               Master_SSL_Key:

        Seconds_Behind_Master:

Master_SSL_Verify_Server_Cert: No

                Last_IO_Errno:

                Last_IO_Error:

               Last_SQL_Errno:

               Last_SQL_Error:

  Replicate_Ignore_Server_Ids:

             Master_Server_Id:

                  Master_UUID: 64e9b20f-2eee-11e8-ab62-000c29889112

             Master_Info_File: /usr/local/mysql/data/master.info

                    SQL_Delay:

          SQL_Remaining_Delay: NULL

      Slave_SQL_Running_State: Slave has read all relay log; waiting for more updates

           Master_Retry_Count:

                  Master_Bind:

      Last_IO_Error_Timestamp:

     Last_SQL_Error_Timestamp:

               Master_SSL_Crl:

           Master_SSL_Crlpath:

           Retrieved_Gtid_Set:

            Executed_Gtid_Set:

                Auto_Position:

         Replicate_Rewrite_DB:

                 Channel_Name:

           Master_TLS_Version:

 row in set (0.00 sec)
- 接下来开始配置从DB2到DB1的MySQL主从复制,这个配置过程和上面一样。
- 首先在【DB2】上的MySQL库中创建复制用户,并查看数据库状态,记下File和Position值。
grant replication slave on *.* to 'repl_user'@'192.168.102.144' identified by 'repl_passwd';
mysql> show master status;

+------------------+----------+--------------+------------------+-------------------+

| File             | Position | Binlog_Do_DB | Binlog_Ignore_DB | Executed_Gtid_Set |

+------------------+----------+--------------+------------------+-------------------+

| mysql-bin.000002 |     1004 |              |                  |                   |

+------------------+----------+--------------+------------------+-------------------+

 row in set (0.02 sec)
- 然后在【DB1】上将DB2设为自己的主服务器
change master to \

master_host='192.168.102.145',

master_user='repl_user',

master_password='repl_passwd',

master_log_file='mysql-bin.000002',

master_log_pos=;
- 在【DB1】上启动slave服务
mysql>start slave;
在【DB1】查看Slave的运行状态,这里需要关注Slave_IO_Running和Slave_SQL_Running.这两个就是在Slave节点上运行的主从复制线程,正常情况下两个值都应该为Yes.
mysql> show slave status\G;

*************************** . row ***************************

               Slave_IO_State: Waiting for master to send event

                  Master_Host: 192.168.102.145

                  Master_User: repl_user

                  Master_Port:

                Connect_Retry:

              Master_Log_File: mysql-bin.

          Read_Master_Log_Pos:

               Relay_Log_File: mysql-relay-bin.

                Relay_Log_Pos:

        Relay_Master_Log_File: mysql-bin.

             Slave_IO_Running: Yes

            Slave_SQL_Running: Yes

              Replicate_Do_DB:

          Replicate_Ignore_DB:

           Replicate_Do_Table:

       Replicate_Ignore_Table:

      Replicate_Wild_Do_Table:

  Replicate_Wild_Ignore_Table: mysql.%,test.%,information_schema.%

                   Last_Errno:

                   Last_Error:

                 Skip_Counter:

          Exec_Master_Log_Pos:

              Relay_Log_Space:

              Until_Condition: None

               Until_Log_File:

                Until_Log_Pos:

           Master_SSL_Allowed: No

           Master_SSL_CA_File:

           Master_SSL_CA_Path:

              Master_SSL_Cert:

            Master_SSL_Cipher:

               Master_SSL_Key:

        Seconds_Behind_Master:

Master_SSL_Verify_Server_Cert: No

                Last_IO_Errno:

                Last_IO_Error:

               Last_SQL_Errno:

               Last_SQL_Error:

  Replicate_Ignore_Server_Ids:

             Master_Server_Id:

                  Master_UUID: a35a032d-2ef8-11e8-bd3c-000c2910f959

             Master_Info_File: /usr/local/mysql/data/master.info

                    SQL_Delay:

          SQL_Remaining_Delay: NULL

      Slave_SQL_Running_State: Slave has read all relay log; waiting for more updates

           Master_Retry_Count:

                  Master_Bind:

      Last_IO_Error_Timestamp:

     Last_SQL_Error_Timestamp:

               Master_SSL_Crl:

           Master_SSL_Crlpath:

           Retrieved_Gtid_Set:

            Executed_Gtid_Set:

                Auto_Position:

         Replicate_Rewrite_DB:

                 Channel_Name:

           Master_TLS_Version:

 row in set (0.00 sec)
- 至此,主主复制配置完毕;
三、Keepalived的安装与配置
1.下载Keepalived
http://www.keepalived.org/download.html
2.安装Keepalived
#.安装依赖包

yum -y install gcc openssl-devel  libnfnetlink libnfnetlink-devel

#.开始安装

tar -xvf keepalived-1.2..tar.gz

cd keepalived-1.2.

./configure --prefix=/usr/local/keepalived
make
make install
3.复制文件到相应目录
cp /usr/local/keepalived/sbin/keepalived               /usr/sbin/

cp /usr/local/keepalived/etc/rc.d/init.d/keepalived   /etc/init.d/

cp /usr/local/keepalived/etc/sysconfig/keepalived     /etc/sysconfig/


mkdir -p /etc/keepalived

cp -r /usr/local/keepalived/etc/keepalived/keepalived.conf  /etc/keepalived
4.配置keepalived.conf
【DB1】
[root@LVS-Real1 keepalived]# more /etc/keepalived/keepalived.conf

global_defs {

     notification_email {

         guanyy0911@.com

     }

     notification_email_from guanyy0911@.com

     smtp_server 127.0.0.1

     smtp_connect_timeout

     router_id MySQL-ha

}

vrrp_instance VI_1 {

     state BACKUP

     interface eth0

     virtual_router_id

     priority 100       #设置优先级

     advert_int

     nopreempt          #设置不抢占,当因为故障切换到DB2后,如果DB1恢复,则不再切回DB1,直到DB2出现故障才切换回DB1

     authentication {

         auth_type PASS

         auth_pass

     }

     virtual_ipaddress {

         192.168.102.146    #设置虚拟IP,即VIP

     }

}

virtual_server 192.168.102.146  {

     delay_loop

     lb_algo wrr

     lb_kind DR

     persistence_timeout

     protocol TCP

     real_server 192.168.102.144  {

         weight

         notify_down /etc/keepalived/mysql.sh

         TCP_CHECK {

             connect_timeout

             nb_get_retry

             delay_before_retry

             connect_port

         }

     }

}
mysql.sh脚本的内容如下:
[root@LVS-Real1 keepalived]# more /etc/keepalived/mysql.sh

#!/bin/bash

pkill keepalived
说明:该脚本主要用来当MySQL服务关闭时杀掉keepalived进程,进而达到切换的目的。
【DB2】
[root@LVS-Real2 keepalived]# more /etc/keepalived/keepalived.conf

global_defs {

     notification_email {

         guanyy0911@.com

     }

     notification_email_from guanyy0911@.com

     smtp_server 127.0.0.1

     smtp_connect_timeout

     router_id MySQL-ha

}

vrrp_instance VI_1 {

     state BACKUP

     interface eth0

     virtual_router_id

     priority 90        #设置优先级,要比DB1低

     advert_int

     authentication {

         auth_type PASS

         auth_pass

     }

     virtual_ipaddress {

         192.168.102.146    #设置虚拟IP,即VIP

     }

}

virtual_server 192.168.102.146  {

     delay_loop

     lb_algo wrr

     lb_kind DR

     persistence_timeout

     protocol TCP

     real_server 192.168.102.145  {

         weight

         notify_down /etc/keepalived/mysql.sh

         TCP_CHECK {

             connect_timeout

             nb_get_retry

             delay_before_retry

             connect_port

         }

     }

}
mysql.sh脚本的内容如下:
[root@LVS-Real1 keepalived]# more /etc/keepalived/mysql.sh

#!/bin/bash

pkill keepalived
说明:该脚本主要用来当MySQL服务关闭时杀掉keepalived进程,进而达到切换的目的。
5.启动keepalived
service keepalived start
5.检查并测试VIP是否可用
如果在/var/log/messages文件中有如下信息,说明VIP已经可用。
Mar  :: LVS-Real1 Keepalived[]: Stopping Keepalived v1.2.18 (/,)

Mar  :: LVS-Real1 Keepalived[]: Starting Keepalived v1.2.18 (/,)

Mar  :: LVS-Real1 Keepalived[]: Starting Healthcheck child process, pid=

Mar  :: LVS-Real1 Keepalived[]: Starting VRRP child process, pid=

Mar  :: LVS-Real1 Keepalived_vrrp[]: Netlink reflector reports IP 192.168.102.144 added

Mar  :: LVS-Real1 Keepalived_vrrp[]: Netlink reflector reports IP fe80::20c:29ff:fe88: added

Mar  :: LVS-Real1 Keepalived_vrrp[]: Registering Kernel netlink reflector

Mar  :: LVS-Real1 Keepalived_vrrp[]: Registering Kernel netlink command channel

Mar  :: LVS-Real1 Keepalived_healthcheckers[]: Netlink reflector reports IP 192.168.102.144 added

Mar  :: LVS-Real1 Keepalived_vrrp[]: Registering gratuitous ARP shared channel

Mar  :: LVS-Real1 Keepalived_vrrp[]: Opening file '/etc/keepalived/keepalived.conf'.

Mar  :: LVS-Real1 Keepalived_healthcheckers[]: Netlink reflector reports IP fe80::20c:29ff:fe88: added

Mar  :: LVS-Real1 Keepalived_vrrp[]: Configuration is using :  Bytes

Mar  :: LVS-Real1 Keepalived_healthcheckers[]: Registering Kernel netlink reflector

Mar  :: LVS-Real1 Keepalived_healthcheckers[]: Registering Kernel netlink command channel

Mar  :: LVS-Real1 Keepalived_healthcheckers[]: Opening file '/etc/keepalived/keepalived.conf'.

Mar  :: LVS-Real1 Keepalived_vrrp[]: Using LinkWatch kernel netlink reflector...

Mar  :: LVS-Real1 Keepalived_healthcheckers[]: Configuration is using :  Bytes

Mar  :: LVS-Real1 Keepalived_vrrp[]: VRRP_Instance(VI_1) Entering BACKUP STATE

Mar  :: LVS-Real1 Keepalived_vrrp[]: VRRP sockpool: [ifindex(), proto(), unicast(), fd(,)]

Mar  :: LVS-Real1 Keepalived_healthcheckers[]: Using LinkWatch kernel netlink reflector...
此时从外部的客户端可以ping通该VIP.
C:\Users\Sakura>ping 192.168.102.146

正在 Ping 192.168.102.146 具有  字节的数据:

来自 192.168.102.146 的回复: 字节= 时间<1ms TTL=

来自 192.168.102.146 的回复: 字节= 时间<1ms TTL=

来自 192.168.102.146 的回复: 字节= 时间<1ms TTL=

来自 192.168.102.146 的回复: 字节= 时间<1ms TTL=

192.168.102.146 的 Ping 统计信息:

    数据包: 已发送 = ,已接收 = ,丢失 =  (% 丢失),

往返行程的估计时间(以毫秒为单位):

    最短 = 0ms,最长 = 0ms,平均 = 0ms
6. 同时启动DB1和DB2上的mysql和keepalived服务
service mysql.server start

service keepalived start
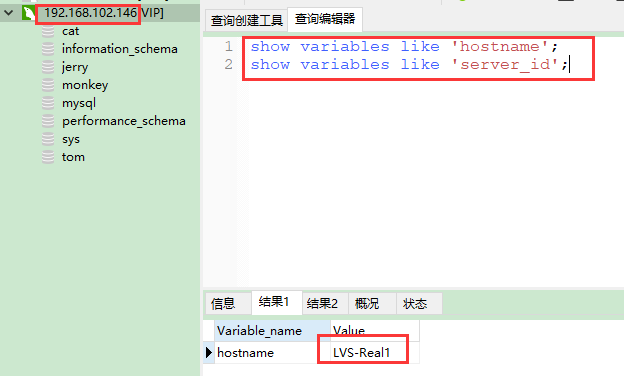
7.从第三方客户端通过VIP来登录数据库。看是否可以登录。
我们通过navicat进行登录,发现是可以通过VIP登录。之后查询当前使用是哪个数据库。如下图查询到,使用的是DB1.
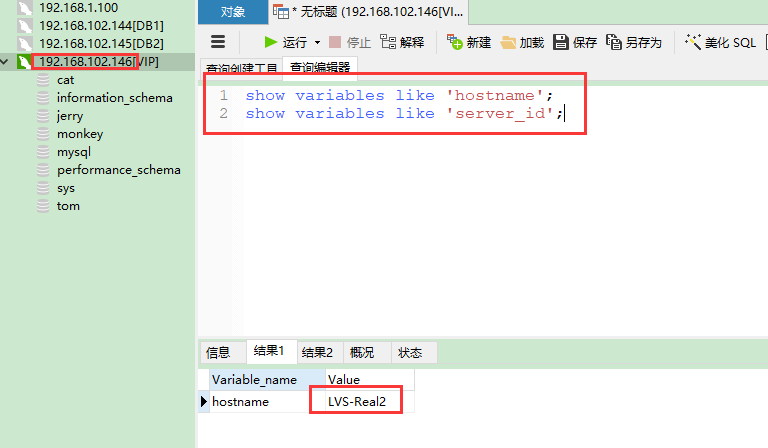
7.我们停掉DB1数据库,看是否会切换到DB2上。
通过实验发现,发现已经切换到DB2上了。
8. 我们再次启动DB1上的Mysql服务和keepalived服务(已经通过脚本实现MySQL服务关闭的同时,脚本会杀掉keepalived进程)
通过实验发现,由于我们设置的是不抢占,在DB1启动后,并没有切换回DB2. 达到预期的目的。

9.这次我们停掉DB2上的MySQL服务,看是否会切换回DB1.
通过实验发现,在停掉DB2上的MySQL服务后,已经自动切换回DB1上。达到预期目的。

特别提示:当MySQL被关闭时,其所在的主机的keepalived也同时被关闭。但在重新启动MySQL服务时,keepalived不会自动启动,需要手动启动。
10.至此,整个配置过程完毕!
【Keepalived+MySQL】MySQL双主互备+高可用的更多相关文章
- 企业级-Mysql双主互备高可用负载均衡架构(基于GTID主从复制模式)(原创)
前言: 原理与思想 这里选用GTID主从复制模式Mysql主从复制模式,是为了更加确保主从复制的正确性.健康性与易配性.这里做的是两服务器A,B各有Mysql实例331 ...
- Mysql+Keepalived双主热备高可用操作记录
我们通常说的双机热备是指两台机器都在运行,但并不是两台机器都同时在提供服务.当提供服务的一台出现故障的时候,另外一台会马上自动接管并且提供服务,而且切换的时间非常短.MySQL双主复制,即互为Mast ...
- 使用Keepalived实现Nginx的自动重启及双主热备高可用
1.概述 之前我们使用Keepalived实现了Nginx服务的双机主备高可用,但是有几个问题没有解决,今天一起探讨一下. 1)在双机主备机制中,Keepalived服务如果宕了,会自动启用备机进行服 ...
- mysql+keepalived 双主热备高可用
理论介绍:我们通常说的双机热备是指两台机器都在运行,但并不是两台机器都同时在提供服务.当提供服务的一台出现故障的时候,另外一台会马上自动接管并且提供服务,而且切换的时间非常短.MySQL双主复制,即互 ...
- haproxy + keepalived 实现web 双主模型的高可用负载均衡
参考文章 http://xz159065974.blog.51cto.com/8618592/1405812 http://blog.chinaunix.net/uid-25266990-id-398 ...
- [Mysql高可用]——双主互备+keepalived
实验架构图 实验环境 主机名 操作系统 Mysql版本 keepalived版本 主机IP VIP lyj1(Master/Slave) Red Hat release 6.5 Mysql5.6 ...
- Mysql双主互备+keeplived高可用架构介绍
一.Mysql双主互备+keeplived高可用架构介绍 Mysql主从复制架构可以在很大程度保证Mysql的高可用,在一主多从的架构中还可以利用读写分离将读操作分配到从库中,减轻主库压力.但是在这种 ...
- Mysql双主互备+keeplived高可用架构(部分)
一.Mysql双主互备+keeplived高可用架构介绍 Mysql主从复制架构可以在很大程度保证Mysql的高可用,在一主多从的架构中还可以利用读写分离将读操作分配到从库中,减轻主库压力.但是在这种 ...
- mysql双主互备
mysql主从同步使得数据可以从一个数据库服务器复制到其他服务器上,在复制数据时,一个服务器充当主服务器(master),其余的服务器充当从服务器(slave),备服务器从主服务器同步数据,完成数据的 ...
随机推荐
- 浅谈WebService的调用
0.前言 前段时间,公司和电信有个合作,产品对接电信的某个平台,使用了WebService接口的调用,实现了业务受理以及单点登录.终于使用到了WebService,楼主还是比较兴奋的,目前功能已经上线 ...
- centos7.3.1611安装及初始配置
安装前规划: 主机名称 网络配置 分区配置 分区配置 自定义分区,标准分区 /boot 200M (可选) swap 内存1.5倍到2倍(不大于8G) / 根分区(100G到200G) 其余的备用(数 ...
- 捷宇高拍仪XY530 网页集成总结
应甲方要求,需要把高拍仪集成到B/S系统中来,在集成过程中遇到的几点问题做为总结,以备查找. 1.甲方送来的高拍仪是淘宝上买来的,型号是XY530,功能非常简单,成像效果也很一般.如果没有其它要求,可 ...
- nrm—源管理工具
全局安装 npm install -g nrm 查看可选源 nrm ls 其中,带*的是当前使用的源,上面的输出表明当前源是hiknpm 切换源 nrm use taobao 新增源 nrm add ...
- LeetCode OJ Container With Most Water 容器的最大装水量
题意:在坐标轴的x轴上的0,1,2,3,4....n处有n+1块木板,长度不一,任两块加上x轴即可构成一个容器,其装水面积为两板的间距与较短板长之积,以vector容器给出一系列值,分别代表在0,1, ...
- HDU 1008 电梯( 水题)
题意: 电梯当前在0层,每在1层需要停5秒,往上走每层需6秒,往下走每层需要4秒. 思路: 在接收输入的时候直接计算了它,不用再弄一个循环.每计算一个请求就更新当前层,停留5秒的等到输出时再加上5*n ...
- pta编程题19 Saving James Bond 2
其它pta数据结构编程题请参见:pta 题目 和简单版本不同的是,简单版本只需判断能否到达岸边,而这个版本要求求出最少跳数的路径. 简单版本用dfs实现,而这道题用BFS实现. 注意: 岛半径为7.5 ...
- python资料汇总
http://www.cnblogs.com/vamei/archive/2012/09/13/2682778.html
- mysql 疑难问题-django
1不能存储中文 问题解决1: 确认表设计时,字段name_vn字符集是utf8,改成utf8后可以存储中文
- 2018.10.29 NOIP2018模拟赛 解题报告
得分: \(70+60+0=130\)(\(T3\)来不及打了,结果爆\(0\)) \(T1\):简单的求和(点此看题面) 原题: [HDU4473]Exam 这道题其实就是上面那题的弱化版,只不过把 ...