图像识别的前期工作——使用pillow进行图像处理
pillow是个很好用的python图像处理库,可以到官方网站下载最新的文件。如果官网的任何PIL版本都不能与自己的python版本对应,或安装成功后发现运行出错,可以尝试从一个非官方的whl网站下载:http://www.lfd.uci.edu/~gohlke/pythonlibs/#scipy 这个网站的内容相当丰富,而且版本齐全。
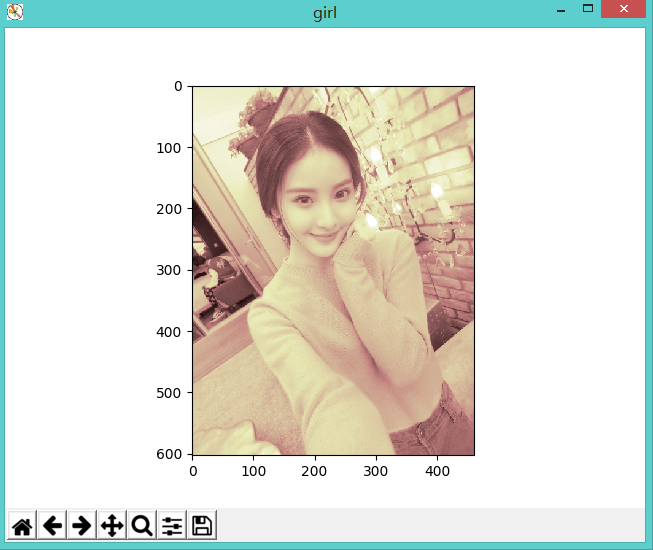
打开图片
- from PIL import Image
- import matplotlib.pyplot as plt
- img = Image.open('girl.png')
- img.show()

控制台显示:size=(461, 603), mode=RGBA, format=PNG
代码很简单,但PIL使用操作系统的默认方式打开图片,我们需要用一些更牛叉的方式打开:
- from PIL import Image
- import matplotlib.pyplot as plt
- img = Image.open('girl0.png')
- model = img.convert('L')
- plt.figure("girl")
- #the argument comp is Colormap
- plt.imshow(model, cmap='pink')
- plt.show()
其中img.convert指定一种色彩模式:
- 1 (1-bit pixels, black and white, stored with one pixel per byte)
- L (8-bit pixels, black and white)
- P (8-bit pixels, mapped to any other mode using a colour palette)
- RGB (3x8-bit pixels, true colour)
- RGBA (4x8-bit pixels, true colour with transparency mask)
- CMYK (4x8-bit pixels, colour separation)
- YCbCr (3x8-bit pixels, colour video format)
- I (32-bit signed integer pixels)
- F (32-bit floating point pixels)
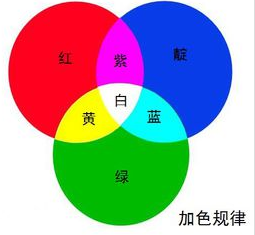
分离rgba
rgb指红绿蓝光色三原色,a指alpha通道,一般用作不透明度参数
- img = Image.open('girl0.png')
- # 分离rgba
- r, g, b, a = img.split()
- plt.figure("girl0")
- plt.imshow(r)
- plt.show()
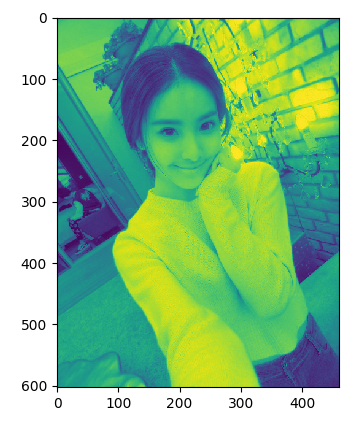
需要注意的是,并非所有图片都有alpha通道,此时 img.split()仅能返回r,g,b
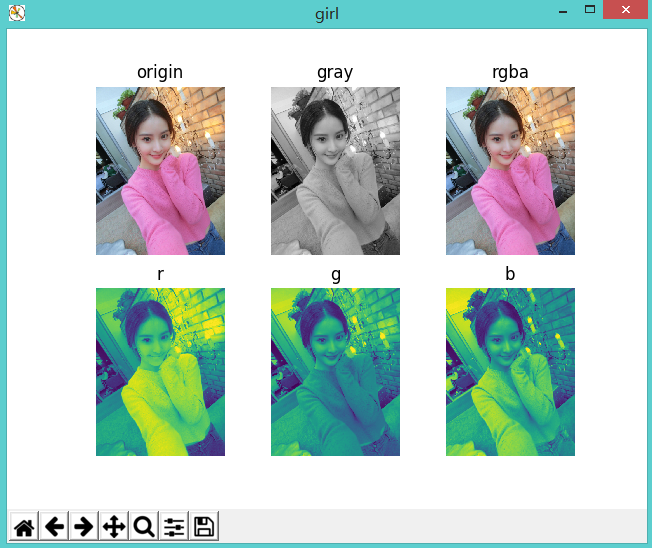
显示多个图片
- from PIL import Image
- import matplotlib.pyplot as plt
- img = Image.open('girl0.png')
- gray = img.convert('L')
- # 分离rgba
- r, g, b, a = img.split()
- plt.figure("girl")
- def setPlot(num, title):
- #subplot(nrows, ncols, plot_number)
- #图表的整个绘图区域被等分为numRows行和numCols列,然后按照从左到右、从上到下的顺序对每个区域进行编号,左上区域的编号为1
- plt.subplot(2, 3, num)
- plt.title(title)
- plt.axis('off')
- setPlot(1, 'origin')
- plt.imshow(img)
- setPlot(2, 'gray')
- plt.imshow(gray, cmap='gray')
- setPlot(3, 'rgba')
- # 合并rgba
- plt.imshow(Image.merge('RGBA', (r, g, b, a)))
- setPlot(4, 'r')
- plt.imshow(r)
- setPlot(5, 'g')
- plt.imshow(g)
- setPlot(6, 'b')
- plt.imshow(b)
二值化处理
到了关键时刻
- from PIL import Image
- import matplotlib.pyplot as plt
- #二值化处理
- img = Image.open('girl0.png')
- gray = img.convert('L')
- WHITE, BLACK = 1, 0
- img_new = gray.point(lambda x: WHITE if x > 128 else BLACK)
- plt.imshow(img_new, cmap='gray')
- plt.show()
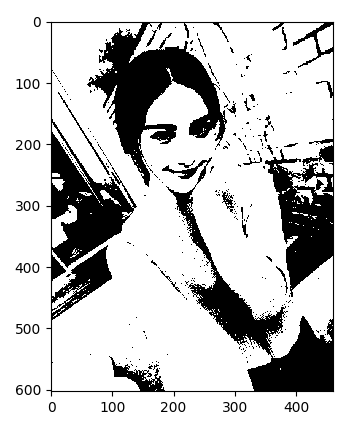
图片由像素组成,每个像素对应着rgb值,整个图片可以看成一个矩阵。我们将大于128的像素点转换为1,其它转换为0。如果有一张背景色是彩色的手写文字,经过二值化处理后得到这样的图片:

图片压缩
如果图片大小不一,不利于下一步工作,在此需要将图片压缩成统一大小,对于手写数字,可将其压缩为32*32
- #等比例压缩图片
- #参考 http://fc-lamp.blog.163.com/blog/static/174566687201282424018946/
- def resizeImg(**args):
- #dst_w,dst_h 目标图片大小, save_q 图片质量
- args_key = {'ori_img':'', 'dst_img':'', 'dst_w':'', 'dst_h':'', 'save_q':75}
- arg = {}
- for key in args_key:
- if key in args:
- arg[key] = args[key]
- im = Image.open(arg['ori_img'])
- ori_w, ori_h = im.size
- widthRatio = heightRatio = None
- ratio = 1
- if (ori_w and ori_w > arg['dst_w']) or (ori_h and ori_h > arg['dst_h']):
- if arg['dst_w'] and ori_w > arg['dst_w']:
- widthRatio = float(arg['dst_w']) / ori_w
- if arg['dst_h'] and ori_h > arg['dst_h']:
- heightRatio = float(arg['dst_h']) / ori_h
- if widthRatio and heightRatio:
- if widthRatio < heightRatio:
- ratio = widthRatio
- else:
- ratio = heightRatio
- if widthRatio and not heightRatio:
- ratio = widthRatio
- if heightRatio and not widthRatio:
- ratio = heightRatio
- newWidth = int(ori_w * ratio)
- newHeight = int(ori_h * ratio)
- else:
- newWidth = ori_w
- newHeight = ori_h
- im.resize((newWidth, newHeight), Image.ANTIALIAS).save(arg['dst_img'], quality=arg['save_q'])
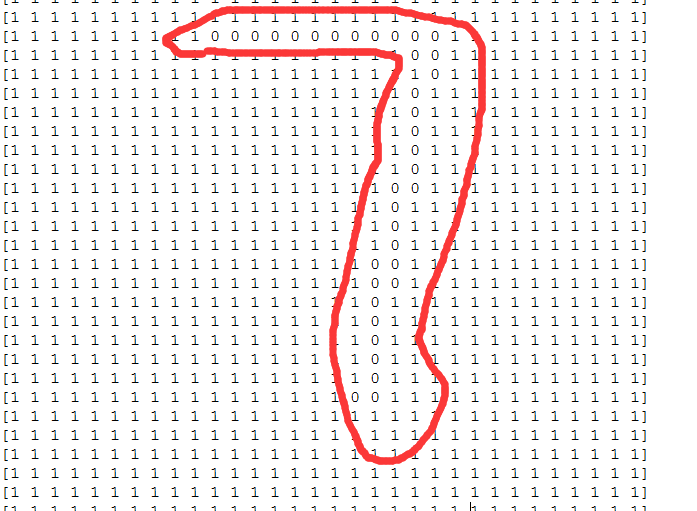
可以将二值化处理后的图片打印出来
- resizeImg(ori_img='7.jpg', dst_img='7_1.jpg', dst_w=32, dst_h=32, save_q=60)
- #二值化处理
- img = Image.open('7_1.jpg')
- gray = img.convert('L')
- WHITE, BLACK = 1, 0
- img_new = gray.point(lambda x: WHITE if x > 128 else BLACK)
- arr = nmp.array(img_new)
- for i in range(arr.shape[0]):
- print(arr[i].flatten())
于是手写数字变成了这样:
这就好玩了。其基本思路是将多维特征转换为容易识别的二维特征,使用KNN或神经网络等方法进行学习,从而使计算机识别出正确的数字。后续文章将会介绍如何设别。
出处:微信公众号 "我是8位的"
本文以学习、研究和分享为主,如需转载,请联系本人,标明作者和出处,非商业用途!
扫描二维码关注作者公众号“我是8位的”

图像识别的前期工作——使用pillow进行图像处理的更多相关文章
- 《基于Node.js实现简易聊天室系列之项目前期工作》
前期工作主要包括:项目的创建,web服务器的创建和数据库的连接. 项目创建 网上关于Node.js项目的创建的教程有很多,这里不必赘述.Demo所使用的Node.js的框架是express,版本为4. ...
- py库: PIL 、pillow(图像处理)
https://www.liaoxuefeng.com/wiki/0014316089557264a6b348958f449949df42a6d3a2e542c000/0014320027235877 ...
- Li的前期工作Level_Set_Evolution_Without_Re-initialization_A_New_Variational_Formulation
注意:因为页面显示原因.里头的公式没能做到完美显示,有须要的朋友请到我的资源中下载 无需进行又一次初始化的水平集演化:一个新的变分公式 Chunming Li , Chenyang Xu , Chan ...
- 硬杠后端(后端坑系列)——Django前期工作
Django是一个开放源代码的Web应用框架,由Python写成,采用了MVC的框架模式. MVC MVC是一种软件设计典范,用一种业务逻辑.数据.界面显示分离的方法组织代码,将业务逻辑聚集到一个部件 ...
- YII配置rabbitMQ时前期工作各种坑
背景如下: 项目需要做一个订阅/发布的功能,然后一大堆讨论不做说明,确认使用rabbitMQ来做: okay,既然 要这个来做,我们下载这个东西吧!在官网上下载就okay了,不做说明,下载安装的时候会 ...
- haml scss转换编写html css的前期工作
http://www.w3cplus.com/sassguide/install.html 先下载ruby $ gem sources $ gem sources --remove https://r ...
- ELMO及前期工作 and Transformer及相关论文
论文1 https://arxiv.org/pdf/1705.00108.pdf Semi-supervised sequence tagging with bidirectional languag ...
- RMAN 前期准备工作和实例
理解恢复目录,RMAN可以在没有恢复目录(NOCATALOG)下运行,这个时候备份信息保存在控制文件.保存在控制文件的备份信息是很危险的,如果控制文件的破坏将导致备份信息的丢失与恢复的失败,而且,没有 ...
- 赴美工作常识(Part 2 - 申请)
在<Part 1 - 签证>的评论中有人提到,说我还没说如何申请职位就说签证的事情了.一方面,签证的周期决定了你申请职位的时间,错过关键时间点的话就可能错过重要的机会.另一方面,传统意义上 ...
随机推荐
- 干货分享!DevExpress v17.1最新版帮助文档下载大全
DevExpress v17.1.5帮助文档下载列表大全来啦!包含.NET.VCL.HTML/JS系列所有帮助文档,提供CHM和PDF两个版本.除已停止更新的Silverlight.Windows 8 ...
- marquee 的浏览器兼容性
marquee 在IE,firefox,chrome ,safari下都能正常的实现走马灯效果,兼容性没有问题 并且两个关键属性scrollamount(滚动速度)direction(滚动方向) 所有 ...
- setTimeout 与 闭包。。。
先看下面一个比较坑的代码 for (var i=1; i<=5; i++) { setTimeout( function timer() { console.log(i); }, i*1000 ...
- Spring Boot项目中使用Swagger2
Swagger2是一款restful接口文档在线生成和在线接口调试工具,Swagger2在Swagger1.x版本的基础上做了些改进,下面是在一个Spring Boot项目中引入Swagger2的简要 ...
- python-—计算器
python-练习—计算器 一.要求传入字符串,计算结果string='1 - 2 * ( (60-30 +(-40/5) * (9-2*5/3 + 7 /3*99/4*2998 +10 * 568/ ...
- 2019-03-27-day020-单继承与多继承
昨日回顾 类的加载顺序 类内部的代码什么时候执行? 除了方法里面的代码 其余的所有内容都是在执行这个文件的时候就从上到下依次执行的 不需要调用 如果有同名的方法.属性,总是写在后面的会生 class ...
- Oralce 11g新特性 转载
Oracle 11g于2007年7月11日美国东部时间11时(北京时间11日22时)正式发布,11g是甲骨文公司30年来发布的最重要的数据库版本,根据用户的需求实现了信息生命周期管理(Informat ...
- HTTPS双向认证+USB硬件加密锁(加密狗)配置
环境: Ubuntu14.04,apache2.4.7, openssl1.0.1f 安装apache2 apt-get install apache2 -y 一般openssl默认已经安装 开启a ...
- SQL注入之Sqli-labs系列第十二关
开始挑战第十二关(Error Based- Double quotes- String) 12点半了,不困,继续,继续,继续 先看看页面,通常的使用单引号等进行操作,看看啥么情况先 咦,出现错误信息了 ...
- [转]How rival bots battled their way to poker supremacy
How rival bots battled their way to poker supremacy http://www.nature.com/news/how-rival-bots-battle ...