springboot-rabbitmq的使用
一.RabbitMQ的介绍
RabbitMQ是消息中间件的一种,消息中间件即分布式系统中完成消息的发送和接收的基础软件.这些软件有很多,包括ActiveMQ(apache公司的),RocketMQ(阿里巴巴公司的,现已经转让给apache).
消息中间件的工作过程可以用生产者消费者模型来表示.即,生产者不断的向消息队列发送信息,而消费者从消息队列中消费信息.具体过程如下:
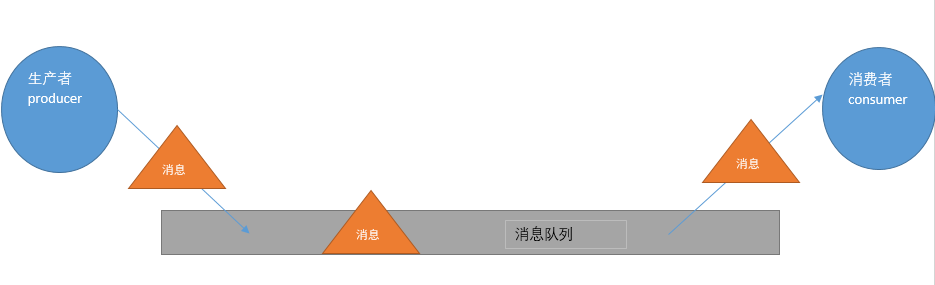
从上图可看出,对于消息队列来说,生产者,消息队列,消费者是最重要的三个概念,生产者发消息到消息队列中去,消费者监听指定的消息队列,并且当消息队列收到消息之后,接收消息队列传来的消息,并且给予相应的处理.消息队列常用于分布式系统之间互相信息的传递.
对于RabbitMQ来说,除了这三个基本模块以外,还添加了一个模块,即交换机(Exchange).它使得生产者和消息队列之间产生了隔离,生产者将消息发送给交换机,而交换机则根据调度策略把相应的消息转发给对应的消息队列.那么RabitMQ的工作流程如下所示:
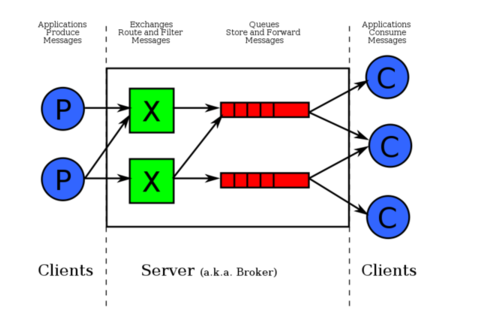
紧接着说一下交换机.交换机的主要作用是接收相应的消息并且绑定到指定的队列.交换机有四种类型,分别为Direct,topic,headers,Fanout.
Direct是RabbitMQ默认的交换机模式,也是最简单的模式.即创建消息队列的时候,指定一个BindingKey.当发送者发送消息的时候,指定对应的Key.当Key和消息队列的BindingKey一致的时候,消息将会被发送到该消息队列中.
topic转发信息主要是依据通配符,队列和交换机的绑定主要是依据一种模式(通配符+字符串),而当发送消息的时候,只有指定的Key和该模式相匹配的时候,消息才会被发送到该消息队列中.
headers也是根据一个规则进行匹配,在消息队列和交换机绑定的时候会指定一组键值对规则,而发送消息的时候也会指定一组键值对规则,当两组键值对规则相匹配的时候,消息会被发送到匹配的消息队列中.
Fanout是路由广播的形式,将会把消息发给绑定它的全部队列,即便设置了key,也会被忽略.
二.项目工程的依赖
<parent>

        <groupId>org.springframework.boot</groupId>

        <artifactId>spring-boot-starter-parent</artifactId>

        <version>2.1..RELEASE</version>

    </parent>

    <properties>

        <java.version>1.7</java.version>

        <project.build.sourceEncoding>UTF-</project.build.sourceEncoding>

    </properties>

    <dependencies>

        <dependency>

            <groupId>org.springframework.boot</groupId>

            <artifactId>spring-boot-starter</artifactId>

        </dependency>

        <dependency>

            <groupId>org.springframework.boot</groupId>

            <artifactId>spring-boot-devtools</artifactId>

            <optional>true</optional>

            <scope>true</scope>

        </dependency>

        <dependency>

            <groupId>org.springframework.boot</groupId>

            <artifactId>spring-boot-starter-test</artifactId>

            <scope>test</scope>

        </dependency>

        <dependency>

            <groupId>org.springframework.boot</groupId>

            <artifactId>spring-boot-starter-actuator</artifactId>

        </dependency>

        <!-- 添加springboot对amqp的支持 -->

        <dependency>

            <groupId>org.springframework.boot</groupId>

            <artifactId>spring-boot-starter-amqp</artifactId>

        </dependency>

        <dependency>

            <groupId>org.springframework.boot</groupId>

            <artifactId>spring-boot-starter-tomcat</artifactId>

            <scope>provided</scope>

        </dependency>

        <dependency>

            <groupId>org.apache.tomcat.embed</groupId>

            <artifactId>tomcat-embed-jasper</artifactId>

            <scope>provided</scope>

        </dependency>

    </dependencies>
三、配置文件
spring:

    rabbitmq:

    host: 115.29.140.222

    port: 5672

    username: guest

    password: guest

    virtualHost: /

    publisher-returns: true #开启发送失败退回

    publisher-confirms: true #开启发送确认

    listener:

      direct:

        prefetch: 1000

        concurrency: 2000

        max-concurrency: 5000
四、依次写rabbitmq的 Direct模式、top、Fanout的模式
(1)Direct模式:此模式是点对点模式,即:发送消息的队列名称和接收队列的名称一致,否则接收方接收不到消息;例: 发送者队列A 接收者只能接收A
Direct的配置:
@Configuration

public class DirectConfig {

           @Bean

         public Queue queueA() {

              return new Queue("queueA");

         }

           @Bean

         public Queue queueB() {

              return new Queue("queueB");

         }

           @Bean

         public Queue queueC() {

              return new Queue("queueC");

         }

}
(2) Direct 发送消息端
import org.springframework.amqp.core.AmqpTemplate;

import org.springframework.beans.factory.annotation.Autowired;

import org.springframework.stereotype.Component;

@Component

public class DirectSend {

    @Autowired

    private AmqpTemplate rabbitTemplate;

    public void send() {

        for(int i=0;i<3;i++) {

            if(i==0) {

                rabbitTemplate.convertAndSend("queueA","a");

            }else if(i==1) {

                rabbitTemplate.convertAndSend("queueB","b");

            } if(i==2) {

                rabbitTemplate.convertAndSend("queueC","c");

            }

        }

    }

}
(2) Direct 接收消息端
import org.springframework.amqp.rabbit.annotation.RabbitListener;

import org.springframework.stereotype.Component;

@Component

public class DirectReceiver {

    @RabbitListener(queues="queueA")

    public void processA(String str) {

        System.out.println("processA"+str);

    }

    @RabbitListener(queues="queueB")

    public void processB(String str) {

        System.out.println("queueB"+str);

    }

    @RabbitListener(queues="queueC")

    public void processC(String str) {

        System.out.println("queueC"+str);

    }

}
(3)测试
import org.junit.Test;

import org.junit.runner.RunWith;

import org.springframework.beans.factory.annotation.Autowired;

import org.springframework.boot.test.context.SpringBootTest;

import org.springframework.test.context.junit4.SpringRunner;

import com.supers.system.SystemApp;

import com.supers.system.rabbitmq.DirectSend;

import com.supers.system.rabbitmq.FanoutSender;

import com.supers.system.rabbitmq.TopSend;

@RunWith(SpringRunner.class)

@SpringBootTest(classes = SystemApp.class)  //自己的启动类

public class RabbitMqHelloTest {

    @Autowired

    private DirectSend directSend;

    @Test

    public void directSend() throws Exception {

        directSend.send();

    }

}

(2)Fanout Exchange形式 : 需要配置队列Queue,再配置交换机(Exchange),再把队列按照相应的规则绑定到交换机上:
@Configuration

public class TopConfig {

        @Bean(name="message")

        public Queue queueMessage() {

            return new Queue("topic.message");

        }

        @Bean(name="messages")

        public Queue queueMessages() { //队列绑定的路由键规则

            return new Queue("topic.messages");

        }

        //交换机

        @Bean

        public TopicExchange exchange() {

            return new TopicExchange("exchange");

        }

        @Bean //将队列绑定此交换机上,路由的键是topic

        Binding bindingExchangeMessage(@Qualifier("message") Queue queueMessage, TopicExchange exchange) {

            return BindingBuilder.bind(queueMessage).to(exchange).with("topic.message"); //topic.message 路由键

        }

        @Bean

        Binding bindingExchangeMessages(@Qualifier("messages") Queue queueMessages, TopicExchange exchange) {

            return BindingBuilder.bind(queueMessages).to(exchange).with("topic.#");//*表示一个词,#表示零个或多个词

        }

}
发送端的配置:
@Component

public class TopSend {

    @Autowired

    private AmqpTemplate rabbitTemplate;

    public void send() {

        rabbitTemplate.convertAndSend("exchange","topic.message","hello,topic.message");

        rabbitTemplate.convertAndSend("exchange","topic.messages","hello,topic.messages");

    }

}
接收端的:
@Component

public class TopReceiver {

    @RabbitListener(queues="topic.message")

    public void process1(String str) {

        System.out.println("message:"+str);

    }

    @RabbitListener(queues="topic.messages")

    public void process2(String str) {

        System.out.println("messages:"+str);

    }

}
测试:
@RunWith(SpringRunner.class)

@SpringBootTest(classes = SystemApp.class)

public class RabbitMqHelloTest {

    @Autowired

    private DirectSend directSend;

    @Autowired

    private TopSend topSend;

    @Test

    public void directSend() throws Exception {

        directSend.send();

    }

    @Test

    public void TopSend() throws Exception {

        topSend.send();

    }

}

rabbitTemplate.convertAndSend("exchange","topic.message","hello,topic.message");
rabbitTemplate.convertAndSend("exchange","topic.messages","hello,topic.messages");
方法的第一个参数是交换机名称,第二个参数是发送的key,第三个参数是发送的消息;由于messages的路由键的规则为topic.# ,所以messages队列可以接收到message的消息,#的意思匹配零个或多个;
Fanout Exchange: 广播式,们发送到路由器的消息会使得绑定到该路由器的每一个Queue接收到消息,发送端配置如下:
@Configuration

public class FanoutConfig {

    @Bean(name="debugMessage")

    public Queue debugMessage() {

        return new Queue("fanout.debug");

    }

    @Bean(name="infoMessage")

    public Queue infoMessage() {

        return new Queue("fanout.info");

    }

    @Bean(name="WarnMessage")

    public Queue WarnMessage() {

        return new Queue("fanout.warn");

    }

    @Bean

    FanoutExchange fanoutExchange() {

        return new FanoutExchange("fanoutExchange");//配置广播路由器

    }

    @Bean

    Binding bindingExchangeDebug(@Qualifier("debugMessage") Queue debugMessage, FanoutExchange fanoutExchange) {

        return BindingBuilder.bind(debugMessage).to(fanoutExchange());

    }

    @Bean

    Binding bindingExchangeInfo(@Qualifier("infoMessage") Queue infoMessage, FanoutExchange fanoutExchange) {

        return BindingBuilder.bind(infoMessage).to(fanoutExchange());

    }

    @Bean

    Binding bindingExchangeWarn(@Qualifier("WarnMessage") Queue WarnMessage, FanoutExchange fanoutExchange) {

        return BindingBuilder.bind(WarnMessage).to(fanoutExchange());

    }

}
发送端的代码
@Component

public class FanoutSender {

    @Autowired

    private AmqpTemplate rabbitTemplate;

    public void send() {

        rabbitTemplate.convertAndSend("fanoutExchange","","abcdefg");

    }

}
接收端的代码
@Component

public class FanoutReceiver {

    @RabbitListener(queues="fanout.debug")

    public void processA(String str1) {

        System.out.println("ReceiveA:"+str1);

    }

    @RabbitListener(queues="fanout.info")

    public void processB(String str) {

        System.out.println("ReceiveB:"+str);

    }

    @RabbitListener(queues="fanout.warn")

    public void processC(String str) {

        System.out.println("ReceiveC:"+str);

    }

}
测试:
@RunWith(SpringRunner.class)

@SpringBootTest(classes = SystemApp.class)

public class RabbitMqHelloTest {

    @Autowired

    private DirectSend directSend;

    @Autowired

    private TopSend topSend;

    @Autowired

    FanoutSender fanoutSender;

    @Test

    public void directSend() throws Exception {

        directSend.send();

    }

    @Test

    public void TopSend() throws Exception {

        topSend.send();

    }

    @Test

    public void fanoutSend() throws Exception {

        fanoutSender.send();

    }

}

以上三种模式:top模式最为灵活
springboot-rabbitmq的使用的更多相关文章
- springboot+rabbitmq整合示例程
关于什么是rabbitmq,请看另一篇文: http://www.cnblogs.com/boshen-hzb/p/6840064.html 一.新建maven工程:springboot-rabbit ...
- SpringBoot RabbitMQ 延迟队列代码实现
场景 用户下单后,如果30min未支付,则删除该订单,这时候就要可以用延迟队列 准备 利用rabbitmq_delayed_message_exchange插件: 首先下载该插件:https://ww ...
- springboot rabbitmq 死信队列应用场景和完整demo
何为死信队列? 死信队列实际上就是,当我们的业务队列处理失败(比如抛异常并且达到了retry的上限),就会将消息重新投递到另一个Exchange(Dead Letter Exchanges),该Exc ...
- springboot + rabbitmq 做智能家居,我也没想到会这么简单
本文收录在个人博客:www.chengxy-nds.top,共享技术资源,共同进步 前一段有幸参与到一个智能家居项目的开发,由于之前都没有过这方面的开发经验,所以对智能硬件的开发模式和技术栈都颇为好奇 ...
- springboot + rabbitmq 用了消息确认机制,感觉掉坑里了
本文收录在个人博客:www.chengxy-nds.top,技术资源共享,一起进步 最近部门号召大伙多组织一些技术分享会,说是要活跃公司的技术氛围,但早就看穿一切的我知道,这 T M 就是为了刷KPI ...
- 带着新人学springboot的应用07(springboot+RabbitMQ 下)
说一两句废话,强烈推荐各位小伙伴空闲时候也可以写写自己的博客!不管水平高低,不管写的怎么样,不要觉得写不好或者水平不够就不写了(咳,我以前就是这样的想法...自我反省!). 但是开始写博客之后,你会发 ...
- 带着新人学springboot的应用06(springboot+RabbitMQ 中)
上一节说了这么多废话,看也看烦了,现在我们就来用鼠标点点点,来简单玩一下这个RabbitMQ. 注意:这一节还是不用敲什么代码,因为上一节我们设置了那个可视化工具,我们先用用可视化工具熟悉一下流程. ...
- springboot rabbitmq整合
这一篇我们来把消息中间件整合到springboot中 ===================================================================== 首先在 ...
- springboot + rabbitmq 整合示例
几个概念说明:Broker:简单来说就是消息队列服务器实体.Exchange:消息交换机,它指定消息按什么规则,路由到哪个队列.Queue:消息队列载体,每个消息都会被投入到一个或多个队列.Bindi ...
- SpringBoot RabbitMQ 整合使用
 ### 前提 上次写了篇文章,[<SpringBoot ...
随机推荐
- 【VS开发】RIbbon编程
多彩界面,Ribbon编程 Ribbon是类似于office2007样式的界面,它替代了传统的MFC程序里的菜单和工具栏,MFC默认生成的Ribbon功能少,需要我们自己添加一些控件和图片等元素使界面 ...
- linux ctrl 快捷键
ctrl+a: 光标跳到行首. ctrl+b: 光标左移一个字母. ctrl+c: 杀死当前进程. ctrl+d: 删除光标后一个字符或exit.logout. ctrl+e: 光标移到行尾. ctr ...
- windows下,给golang编译的exe添加一个图标
通过go build生成的exe文件,通常是一个默认的图标,发给别人的时候,总觉得像病毒,下面我们来给他加一个好看的图标,让他看起来正经一些. 1.找到一个喜欢的图片. 2.通过工具或是在线工具生成. ...
- 【Python】【demo实验21】【练习实例】【求球反弹高度】
原题: 一球从100米高度自由落下,每次落地后反跳回原高度的一半:再落下,求它在第10次落地时,共经过多少米?第10次反弹多高? 我的源码: #!/usr/bin/python # encoding= ...
- WijmoJS V2019.0 Update2发布:再度增强 React 和 Vue 框架的组件功能
前端开发工具包 WijmoJS 在2019年的第二个主要版本 V2019.0 Update2 已经发布,本次发布涵盖了React 和 Vue 框架下 WijmoJS 前端组件的功能增强,并加入更为易用 ...
- Hello World!!!
C #include <stdio.h> int main() #main 入口函数 { printf("Hello,World!"); #printf 函数打印 ; ...
- nginx代理 tomcat获得真实用户IP
nginx代理 tomcat获得真实用户IP 2017年04月08日 21:34:17 cf 阅读数 1825更多 分类专栏: nginx html/js/ajax 版权声明:本文为博主原创文章, ...
- [C#.net]使用Thread.Sleep界面卡死的问题解决方法
很多初学者在写C#程序的时候,需要程序等待某个时间,但是又不想用比较繁琐的线程等操作,因此用Thread.Sleep()函数,但是这个函数在等待过程中会操作界面的卡死,那么,如何能保证既不卡死又能达到 ...
- vue项目中的登录鉴权
用vue做一个简单的登录鉴权功能. 项目目录结构如下: Login 组件 登录成功后做本地存储和store存储,并进行跳转. Login.vue关键代码: async handleLogin(e) { ...
- JXOI 2018滚粗记
--Update5.2 成绩出了,见后文 听说省选VAN写游记是传统,本蒟蒻也来发一篇吧. DAY 0 本来以为省选不在JKFZ举行的结果又是在JKFZ,本校作战感觉终究会是好一些吧,和jyh一起向教 ...