springboot之oauth2
一、OAuth2.0是OAuth协议的延续版本,但不向后兼容OAuth 1.0即完全废止了OAuth1.0。 OAuth 2.0关注客户端开发者的简易性。要么通过组织在资源拥有者和HTTP服务商之间的被批准的交互动作代表用户,要么允许第三方应用代表用户获得访问的权限。同时为Web应用,桌面应用和手机,和起居室设备提供专门的认证流程。
二、使用场景:
1、自己开发应用时,需要获取其他应用的资源。比如:使用QQ登录,然后获取QQ头像等信息
2、SSO认证服务器,在自己开发应用时使用统一的认证过程,不需要单独重写重写认证体系
三、概念
(1) Third-party application:第三方应用程序,本文中又称"客户端"(client)。
(2)HTTP service:HTTP服务提供商,本文中简称"服务提供商"。
(3)Resource Owner:资源所有者,本文中又称"用户"(user)。
(4)User Agent:用户代理,本文中就是指浏览器。
(5)Authorization server:认证服务器,即服务提供商专门用来处理认证的服务器。
(6)Resource server:资源服务器,即服务提供商存放用户生成的资源的服务器。它与认证服务器,可以是同一台服务器,也可以是不同的服务器。
OAuth在"客户端"与"服务提供商"之间,设置了一个授权层(authorization layer)。"客户端"不能直接登录"服务提供商",只能登录授权层,以此将用户与客户端区分开来。"客户端"登录授权层所用的令牌(token),与用户的密码不同。用户可以在登录的时候,指定授权层令牌的权限范围和有效期。
"客户端"登录授权层以后,"服务提供商"根据令牌的权限范围和有效期,向"客户端"开放用户储存的资料。
四、模式运行流程
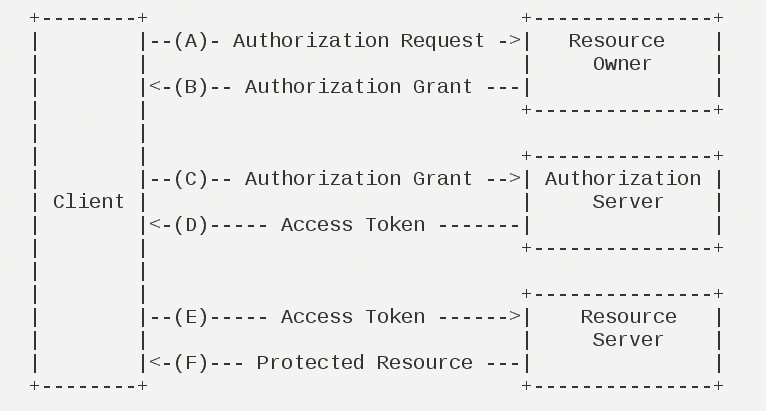
(A)用户打开客户端以后,客户端要求用户给予授权。
(B)用户同意给予客户端授权。
(C)客户端使用上一步获得的授权,向认证服务器申请令牌。
(D)认证服务器对客户端进行认证以后,确认无误,同意发放令牌。
(E)客户端使用令牌,向资源服务器申请获取资源。
(F)资源服务器确认令牌无误,同意向客户端开放资源。
五、授权模式
- 授权码模式(authorization code)
- 简化模式(implicit)
- 密码模式(resource owner password credentials)
- 客户端模式(client credentials)
1)授权码模式
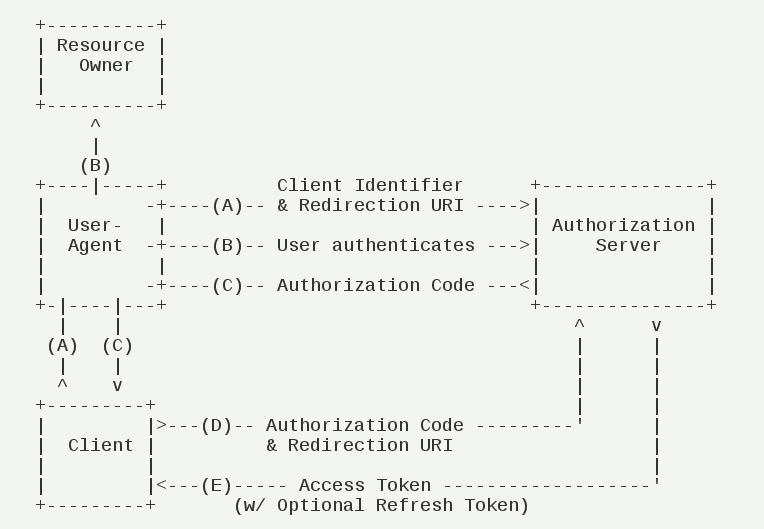
(A)用户访问客户端,后者将前者导向认证服务器。
(B)用户选择是否给予客户端授权。
(C)假设用户给予授权,认证服务器将用户导向客户端事先指定的"重定向URI"(redirection URI),同时附上一个授权码。
(D)客户端收到授权码,附上早先的"重定向URI",向认证服务器申请令牌。这一步是在客户端的后台的服务器上完成的,对用户不可见。
(E)认证服务器核对了授权码和重定向URI,确认无误后,向客户端发送访问令牌(access token)和更新令牌(refresh token)。
2)简化模式
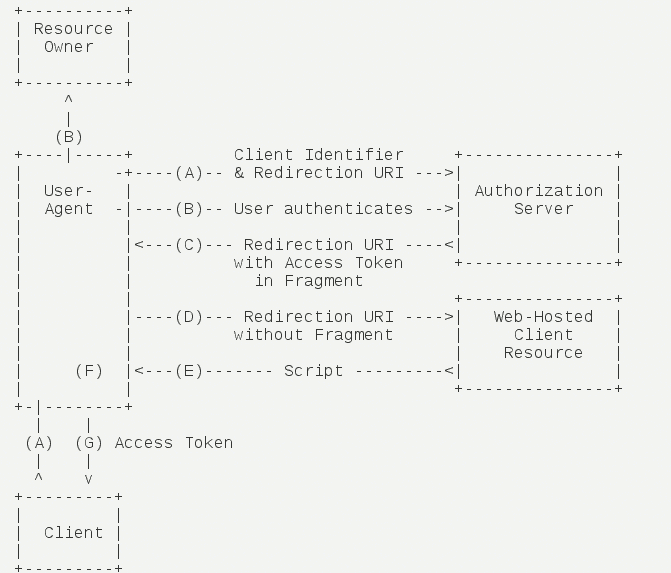
(A)客户端将用户导向认证服务器。
(B)用户决定是否给于客户端授权。
(C)假设用户给予授权,认证服务器将用户导向客户端指定的"重定向URI",并在URI的Hash部分包含了访问令牌。
(D)浏览器向资源服务器发出请求,其中不包括上一步收到的Hash值。
(E)资源服务器返回一个网页,其中包含的代码可以获取Hash值中的令牌。
(F)浏览器执行上一步获得的脚本,提取出令牌。
(G)浏览器将令牌发给客户端。
3)密码模式
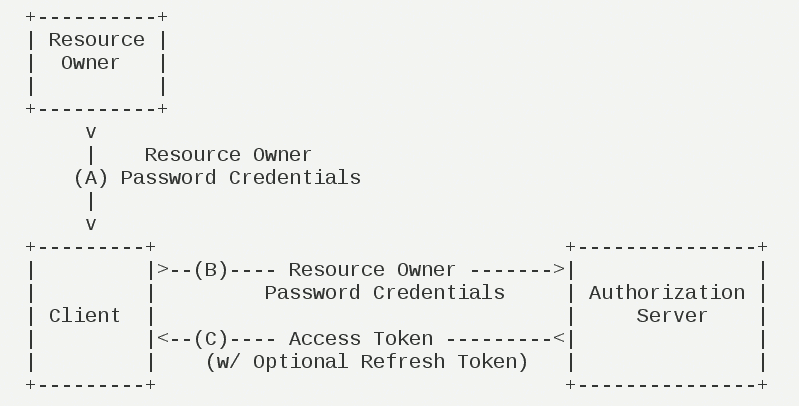
(A)用户向客户端提供用户名和密码。
(B)客户端将用户名和密码发给认证服务器,向后者请求令牌。
(C)认证服务器确认无误后,向客户端提供访问令牌。
4)客户端模式

(A)客户端向认证服务器进行身份认证,并要求一个访问令牌。
(B)认证服务器确认无误后,向客户端提供访问令牌。
六、授权码模式例子
这里说明一下这里主要只通过授权码模式来讲解oauth2的使用过程。
授权码模式(authorization code)是功能最完整、流程最严密的授权模式。它的特点就是通过客户端的后台服务器,与"服务提供商"的认证服务器进行互动。
简化模式(implicit grant type)不通过第三方应用程序的服务器,直接在浏览器中向认证服务器申请令牌,跳过了"授权码"这个步骤,因此得名。所有步骤在浏览器中完成,令牌对访问者是可见的,且客户端不需要认证。
密码模式(Resource Owner Password Credentials Grant)中,用户向客户端提供自己的用户名和密码。客户端使用这些信息,向"服务商提供商"索要授权。
客户端模式(Client Credentials Grant)指客户端以自己的名义,而不是以用户的名义,向"服务提供商"进行认证。严格地说,客户端模式并不属于OAuth框架所要解决的问题。在这种模式中,用户直接向客户端注册,客户端以自己的名义要求"服务提供商"提供服务,其实不存在授权问题。
相对来说授权码的方式使用上面,是非常严谨的。不存在,其他模式的相对弊病。
7、代码部分
1)需要的依赖
<parent>

        <groupId>org.springframework.boot</groupId>

        <artifactId>spring-boot-starter-parent</artifactId>

        <version>2.0.0.RELEASE</version>

    </parent>

    <dependencies>

        <dependency>

            <groupId>org.springframework.boot</groupId>

            <artifactId>spring-boot-starter-web</artifactId>

        </dependency>

        <dependency>

            <groupId>org.springframework.boot</groupId>

            <artifactId>spring-boot-starter-security</artifactId>

        </dependency>

        <dependency>

            <groupId>org.springframework.security.oauth.boot</groupId>

            <artifactId>spring-security-oauth2-autoconfigure</artifactId>

            <version>2.1.2.RELEASE</version>

        </dependency>

    </dependencies>
2)认证服务器
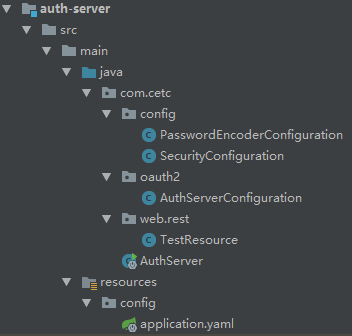
主要配置:SecurityConfiguration、AuthServerConfiguration
@Configuration

@EnableWebSecurity

public class SecurityConfiguration extends WebSecurityConfigurerAdapter {

    @Autowired

    private BCryptPasswordEncoder passwordEncoder;

    @Override

    protected void configure(HttpSecurity http) throws Exception {

        http

            .csrf().disable()

            .exceptionHandling()

        .and()

            .authorizeRequests()

            .anyRequest().authenticated()

        .and()

            .formLogin();

    }

    @Override

    protected void configure(AuthenticationManagerBuilder builder) throws Exception {

        //内存用户不多解释

        builder.inMemoryAuthentication()

                .withUser("admin")

                .password(passwordEncoder.encode("admin"))

                .roles("ADMIN");

    }

    @Override

    @Bean

    public AuthenticationManager authenticationManagerBean() throws Exception {

        return super.authenticationManagerBean();

    }
   @Bean
   @Override
   protected UserDetailsService userDetailsService() {
      return super.userDetailsService();
   }
}
@Configuration

@EnableAuthorizationServer

public class AuthServerConfiguration extends AuthorizationServerConfigurerAdapter {

    @Autowired

    private BCryptPasswordEncoder passwordEncoder;

    @Autowired

    private AuthenticationManager authenticationManager;

    @Override

    public void configure(ClientDetailsServiceConfigurer clients) throws Exception {

        //这里client使用存在模式,可以实际过程调整为jdbc的方式

        //这里说明一下,redirectUris的连接可以是多个,这里通过access_token都可以访问的

        //简单点,就是授权的过程

        clients.inMemory()

                .withClient("client")

                .secret(passwordEncoder.encode("secret"))

                .authorizedGrantTypes("authorization_code", "refresh_token")

                .scopes("All")

                .autoApprove(true)

                .redirectUris("http://localhost:9001/login", "http://localhost:9002/login", "http://localhost:9003/authorize/login");

    }

    @Override

    public void configure(AuthorizationServerSecurityConfigurer security) throws Exception {

        //权限控制

        security.tokenKeyAccess("permitAll()")

                .checkTokenAccess("isAuthenticated()")

                .allowFormAuthenticationForClients();

    }

    @Override

    public void configure(AuthorizationServerEndpointsConfigurer endpoints) throws Exception {

        //认证体系使用security的方式

        endpoints.authenticationManager(authenticationManager);
//允许调用方式
     endpoints.allowedTokenEndpointRequestMethods(HttpMethod.GET, HttpMethod.POST);
     endpoints.userDetailsService(userDetailsService);
}
说明:这里我为了更好的区分,把认证服务器和资源服务器分开的,实际上可以使用认证服务器作为资源服务器
yaml配置
server:

  port: 9000

  servlet:

    context-path: /auth #这里一定要加上contextPath,这个坑自己体会吧
3)资源服务器
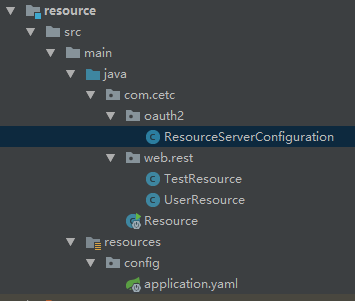
主要配置:ResourceServerConfiguration、application.yaml
/**

 * 资源服务器的配置也很简单

 * 主要是EnableResourceServer,以及资源的控制

 */

@Configuration

@EnableResourceServer

public class ResourceServerConfiguration extends ResourceServerConfigurerAdapter {

    @Override

    public void configure(HttpSecurity http) throws Exception {

        http

            .csrf().disable()

            .exceptionHandling()

        .and()

            .authorizeRequests()

            .anyRequest().authenticated();

    }

}
server:

  port: 9002

security:

  oauth2:

    client:

      client-id: client

      client-secret: secret

      access-token-uri: http://localhost:9000/auth/oauth/token

      user-authorization-uri: http://localhost:9000/auth/oauth/authorize

    resource:

      token-info-uri: http://localhost:9000/auth/oauth/check_token
说明:资源服务器主要用于资源拦截,需要获取授权码才能访问
4)sso客户端

主要配置:SecurityConfiguration、application.yaml
/**

 * 这里使用的是sso的方式,可以用于单点登录

 * 构造方式也很简单,主要是sso的配置

 */

@Configuration

@EnableOAuth2Sso

public class SecurityConfiguration extends WebSecurityConfigurerAdapter {

    @Override

    protected void configure(HttpSecurity http) throws Exception {

        http

            .csrf().disable()

            .authorizeRequests()

            .anyRequest().authenticated();

    }

}
server:

  port: 9001

security:

  oauth2:

    client:

      client-id: client

      client-secret: secret

      access-token-uri: http://localhost:9000/auth/oauth/token

      user-authorization-uri: http://localhost:9000/auth/oauth/authorize

    resource:

      token-info-uri: http://localhost:9000/auth/oauth/check_token

      #user-info-uri: http://localhost:9002/user/me

      #这里两种获取用户的方式,都可以。但是只能存在一种
5)客户端:当然浏览器可以为一种客户端,自己开发的应用也可以为客户端
浏览器:
a、获取授权码
oauth/authorize?response_type=code&client_id=&redirect_uri=
本文中:
http://localhost:9000/auth/oauth/authorize?response_type=code&client_id=client&redirect_uri=http://localhost:9002/login

这里我们就获取到了code值
b、通过code获取令牌
oauth/token?client_id=&client_secret=&grant_type=authorization_code&redirect_uri=&code=
本文中:
http://localhost:9000/auth/oauth/token?client_id=client&client_secret=secret&grant_type=authorization_code&redirect_uri=http://localhost:9002/login&code=jrbBZS

获取的对应值
{

    "access_token": "06c1db9b-aac3-4a9a-acaf-56f5a5d0ea21",

    "token_type": "bearer",

    "refresh_token": "046d3fe7-52c4-43e5-902a-673ab2b0d3d4",

    "expires_in": 42981,

    "scope": "All"

}
- access_token:表示访问令牌,必选项。
- token_type:表示令牌类型,该值大小写不敏感,必选项,可以是bearer类型或mac类型。
- expires_in:表示过期时间,单位为秒。如果省略该参数,必须其他方式设置过期时间。
- refresh_token:表示更新令牌,用来获取下一次的访问令牌,可选项。
- scope:表示权限范围,如果与客户端申请的范围一致,此项可省略。
c、更新令牌
oauth/token?grant_type=refresh_token&refresh_token=
本文:
http://localhost:9000/auth/oauth/token?grant_type=refresh_token&refresh_token=046d3fe7-52c4-43e5-902a-673ab2b0d3d4
注意:在使用refresh_token刷新令牌的时候,需要在认证服务器上面设置
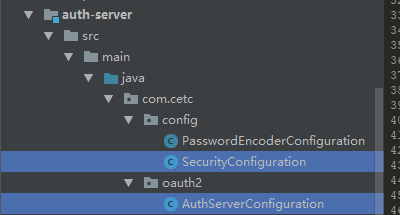
SecurityConfiguration加入UserDetailsService
    @Bean

    @Override

    protected UserDetailsService userDetailsService() {

        return super.userDetailsService();

    }
AuthServerConfiguration也加入UserDetailsService
    @Autowired

    private UserDetailsService userDetailsService;

    @Override

    public void configure(AuthorizationServerEndpointsConfigurer endpoints) throws Exception {

        //认证体系使用security的方式

        endpoints.authenticationManager(authenticationManager);

        endpoints.allowedTokenEndpointRequestMethods(HttpMethod.GET, HttpMethod.POST);

        endpoints.userDetailsService(userDetailsService);

    }
否者报错:
Handling error: IllegalStateException, UserDetailsService is required.
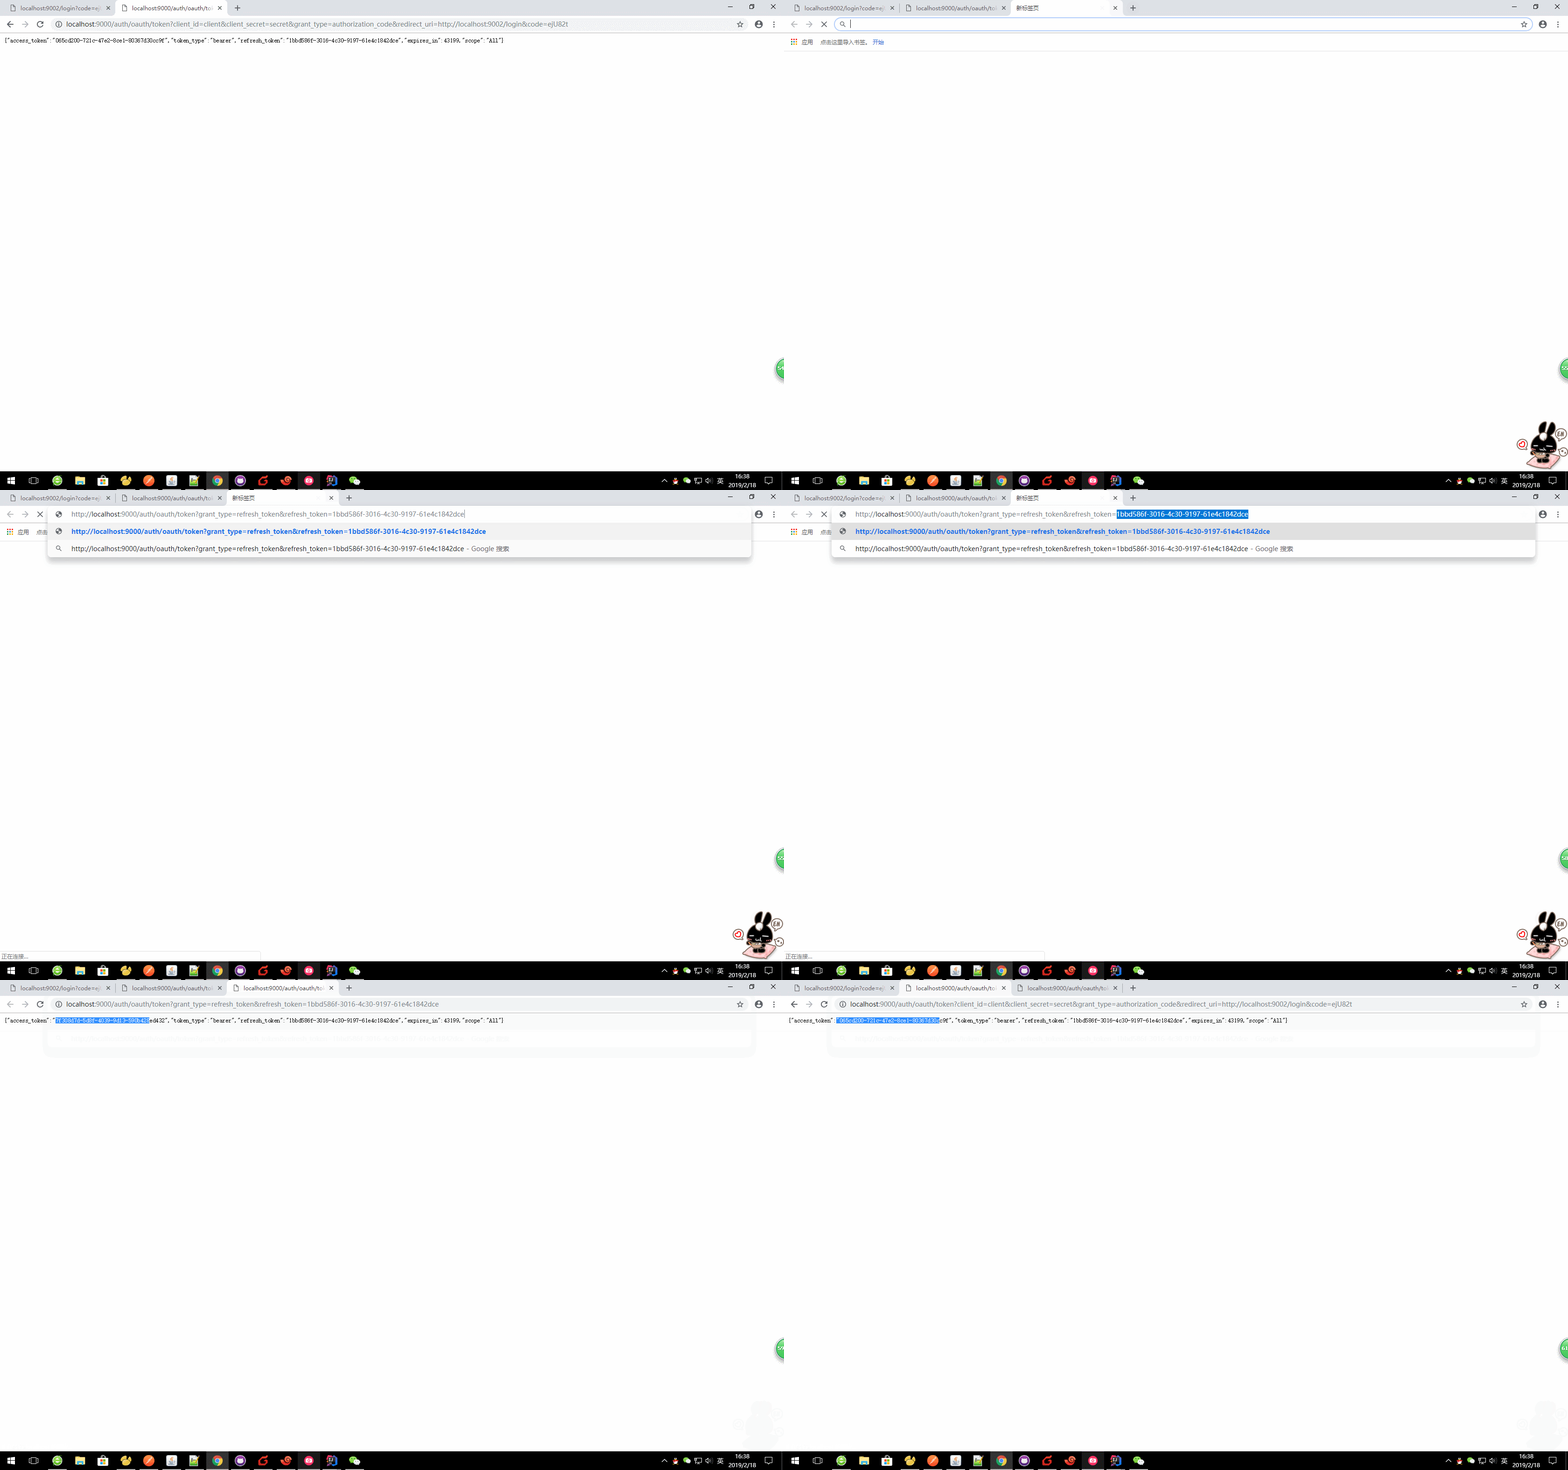
d、访问资源
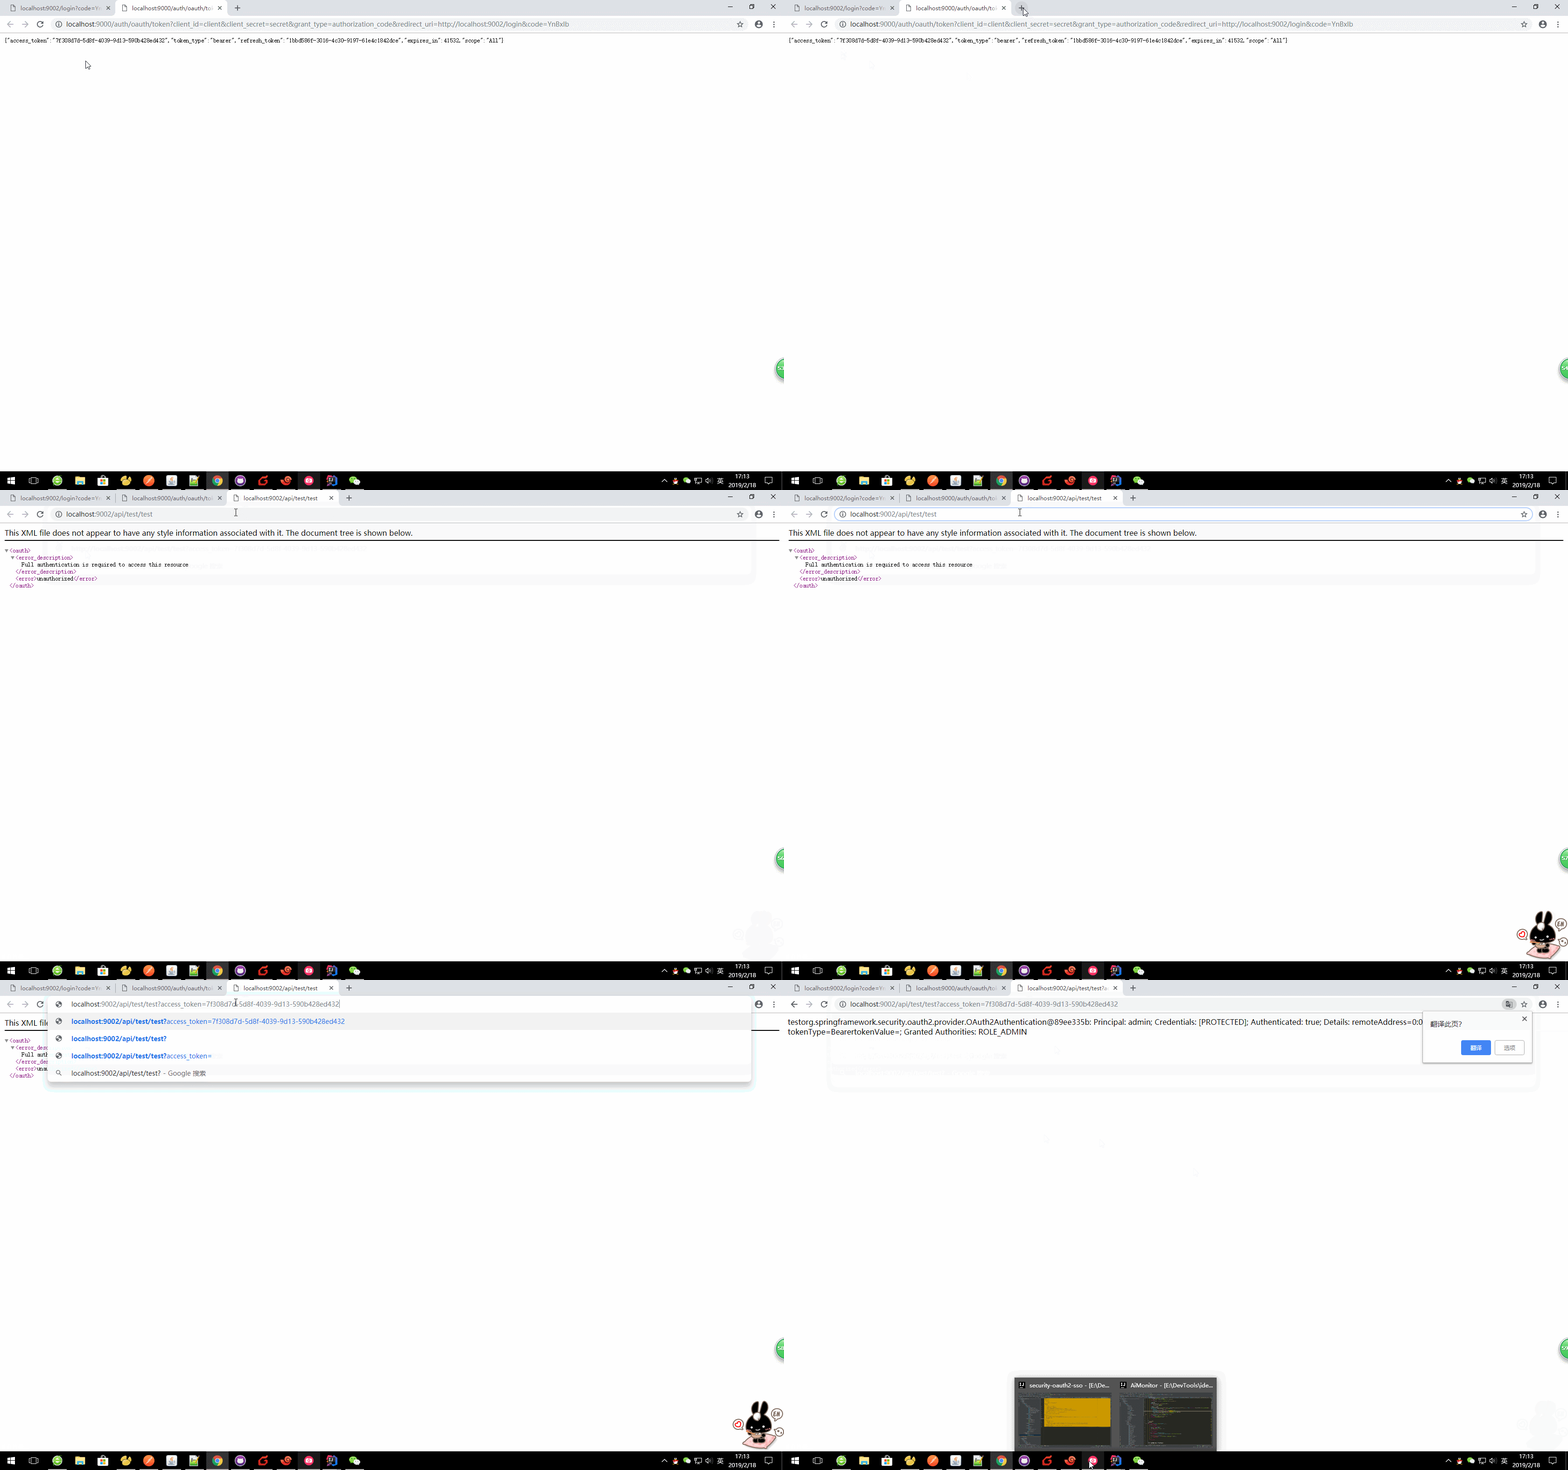
url?access_token=06c1db9b-aac3-4a9a-acaf-56f5a5d0ea21
应用:
a、默认方式获取code
http://localhost:9000/auth/oauth/authorize?response_type=code&client_id=client&redirect_uri=http://localhost:9003/authorize/login

第一步基本上都是通过浏览器进行登录的。
b、程序获取令牌
       LinkedMultiValueMap<String, Object> valueMap = new LinkedMultiValueMap<>();

            valueMap.add("client_id", authorizationCodeResourceDetails.getClientId());

            valueMap.add("client_secret", authorizationCodeResourceDetails.getClientSecret());

            valueMap.add("grant_type", authorizationCodeResourceDetails.getGrantType());

            valueMap.add("redirect_uri", authorizationCodeResourceDetails.getPreEstablishedRedirectUri());

            valueMap.add("code", code);

            Map<String, String> map = HttpUtils.doFrom(authorizationCodeResourceDetails.getAccessTokenUri(), valueMap, Map.class);
c、单点登录
        //获取用户信息,说明这里主要目的就是通过资源服务器去获取用户信息

            Map principal = HttpUtils.doGet(resourceServerProperties.getUserInfoUri() + "?access_token=" + map.get("access_token"), Map.class);

            //这里通过本地登录单点登录

            String username = principal.get("name").toString();

            //如果用户存在则不添加,这里如果生产应用中,可以更具规则修改

            if (userRepository.findByUsername(username) == null) {

                Role role = roleRepository.findByRoleType(Role.RoleType.USER);

                User newUser = new User();

                newUser.setUsername(username);

                newUser.setPassword(passwordEncoder.encode(username));

                newUser.getRoles().add(role);

                userRepository.save(newUser);

            }

            //这里通过本地登录的方式来获取会话

            HttpHeaders httpHeaders = new HttpHeaders();

            httpHeaders.setContentType(MediaType.APPLICATION_FORM_URLENCODED);

            LinkedMultiValueMap<String, Object> params = new LinkedMultiValueMap<>();

            params.add("username", username);

            params.add("password", username);

            HttpEntity<LinkedMultiValueMap<String, ? extends Object>> httpEntity = new HttpEntity(params, httpHeaders);

            String url = request.getScheme() + "://" + request.getServerName() + ":" + request.getServerPort() + "/login";

            ResponseEntity<Object> exchange = restTemplate.exchange(url, HttpMethod.POST, httpEntity, Object.class);

            //将登录后的header原本的给浏览器,这就是当前浏览器的会话

            HttpHeaders headers = exchange.getHeaders();

            for (Map.Entry<String, List<String>> entry : headers.entrySet()) {

                entry.getValue().stream().forEach(value -> response.addHeader(entry.getKey(), value));

            }

            //这个状态是根据security的返回数据设定的

            response.setStatus(exchange.getStatusCode().value());
d、登录的实现过程
@RestController

@RequestMapping("/authorize")

public class AuthorizedResource {

    @Autowired

    private AuthorizationCodeResourceDetails authorizationCodeResourceDetails;

    @Autowired

    private ResourceServerProperties resourceServerProperties;

    @Autowired

    private RestTemplate restTemplate;

    @Autowired

    private BCryptPasswordEncoder passwordEncoder;

    @Autowired

    private UserRepository userRepository;

    @Autowired

    private RoleRepository roleRepository;

    @RequestMapping("/login")

    public void login(String code, HttpServletRequest request, HttpServletResponse response) throws Exception {

        if (!StringUtils.isEmpty(code)) {

            LinkedMultiValueMap<String, Object> valueMap = new LinkedMultiValueMap<>();

            valueMap.add("client_id", authorizationCodeResourceDetails.getClientId());

            valueMap.add("client_secret", authorizationCodeResourceDetails.getClientSecret());

            valueMap.add("grant_type", authorizationCodeResourceDetails.getGrantType());

            valueMap.add("redirect_uri", authorizationCodeResourceDetails.getPreEstablishedRedirectUri());

            valueMap.add("code", code);

            Map<String, String> map = HttpUtils.doFrom(authorizationCodeResourceDetails.getAccessTokenUri(), valueMap, Map.class);

            System.out.println(map);

            //获取用户信息,说明这里主要目的就是通过资源服务器去获取用户信息

            Map principal = HttpUtils.doGet(resourceServerProperties.getUserInfoUri() + "?access_token=" + map.get("access_token"), Map.class);

            //这里通过本地登录单点登录

            String username = principal.get("name").toString();

            //如果用户存在则不添加,这里如果生产应用中,可以更具规则修改

            if (userRepository.findByUsername(username) == null) {

                Role role = roleRepository.findByRoleType(Role.RoleType.USER);

                User newUser = new User();

                newUser.setUsername(username);

                newUser.setPassword(passwordEncoder.encode(username));

                newUser.getRoles().add(role);

                userRepository.save(newUser);

            }

            //这里通过本地登录的方式来获取会话

            HttpHeaders httpHeaders = new HttpHeaders();

            httpHeaders.setContentType(MediaType.APPLICATION_FORM_URLENCODED);

            LinkedMultiValueMap<String, Object> params = new LinkedMultiValueMap<>();

            params.add("username", username);

            params.add("password", username);

            HttpEntity<LinkedMultiValueMap<String, ? extends Object>> httpEntity = new HttpEntity(params, httpHeaders);

            String url = request.getScheme() + "://" + request.getServerName() + ":" + request.getServerPort() + "/login";

            ResponseEntity<Object> exchange = restTemplate.exchange(url, HttpMethod.POST, httpEntity, Object.class);

            //将登录后的header原本的给浏览器,这就是当前浏览器的会话

            HttpHeaders headers = exchange.getHeaders();

            for (Map.Entry<String, List<String>> entry : headers.entrySet()) {

                entry.getValue().stream().forEach(value -> response.addHeader(entry.getKey(), value));

            }

            //这个状态是根据security的返回数据设定的

            response.setStatus(exchange.getStatusCode().value());

        }

    }

}
说明:这里这是简单的应用,实际用户名等可以和密码都可以绑定现有账号,或者深度加密!
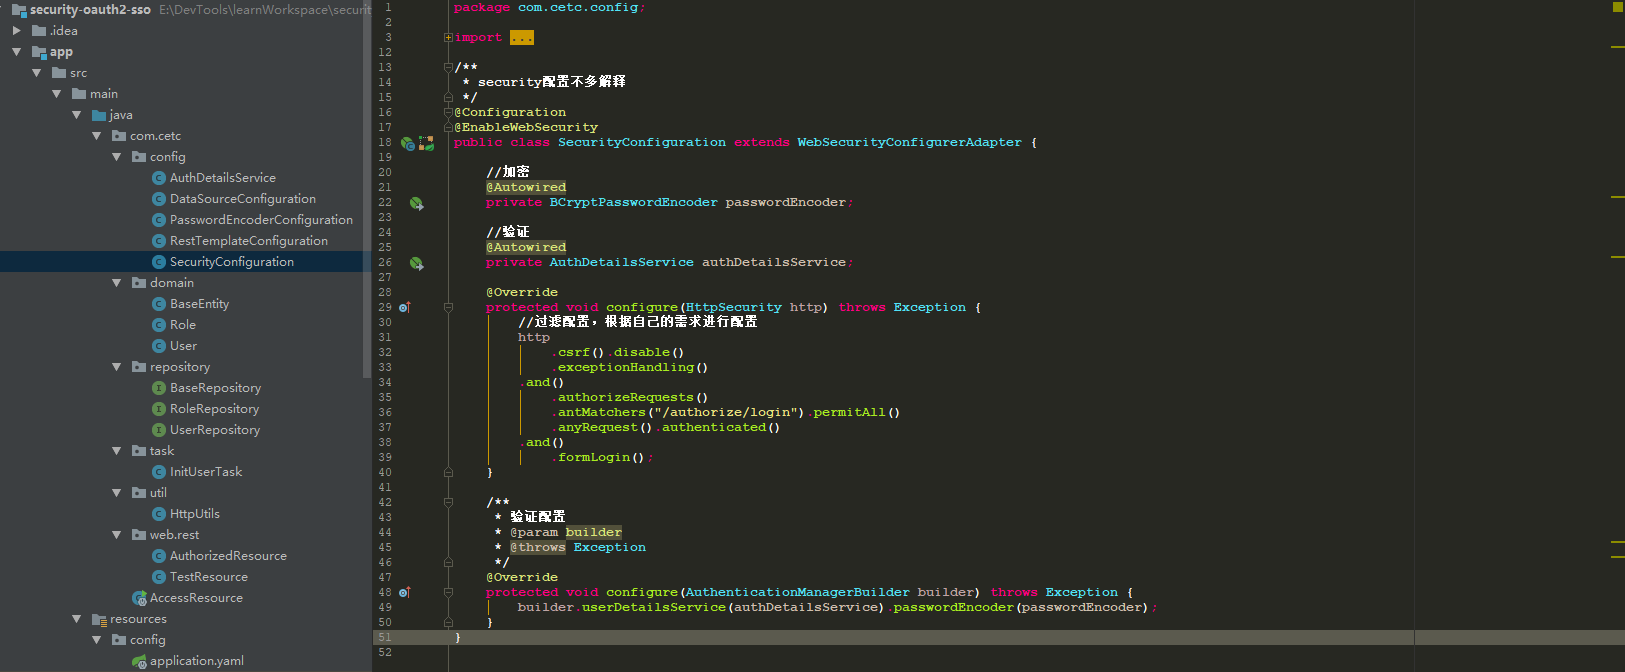
e、其他没有什么大的配置
application.yaml
server:

  port: 9003

  servlet:

    session:

      cookie:

        name: ACCESS_SESSION

security:

  oauth2:

    client:

      client-id: client

      client-secret: secret

      grant-type: authorization_code

      access-token-uri: http://localhost:9000/auth/oauth/token

      user-authorization-uri: http://localhost:9000/auth/oauth/authorize

      pre-established-redirect-uri: http://localhost:9003/authorize/login

    resource:

      user-info-uri: http://localhost:9002/user/me

    sso:

      login-path: /authorize/login

spring:

  datasource:

    driver-class-name: com.mysql.jdbc.Driver

    url: jdbc:mysql://127.0.0.1:3306/model?useUnicode=true&characterEncoding=utf-8&useSSL=false&allowMultiQueries=true

    username: root

    password:

  jpa:

    hibernate:

      ddl-auto: update

      naming:

        physical-strategy: org.springframework.boot.orm.jpa.hibernate.SpringPhysicalNamingStrategy

        implicit-strategy: org.springframework.boot.orm.jpa.hibernate.SpringImplicitNamingStrategy

    show-sql: true

    database-platform: org.hibernate.dialect.MySQL5InnoDBDialect

    database: mysql
6)sso客户端

说明:个人还是很喜欢sso的模式的,简单方便高效
八、源码:https://github.com/lilin409546297/security-oauth2-sso
九、此博客借鉴阮一峰的理解OAuth 2.0
springboot之oauth2的更多相关文章
- SpringBoot之oauth2.0学习之服务端配置快速上手
现在第三方登录的例子数见不鲜.其实在这种示例当中,oauth2.0是使用比较多的一种授权登录的标准.oauth2.0也是从oauth1.0升级过来的.那么关于oauth2.0相关的概念及其原理,大家可 ...
- SpringBoot之OAuth2.0学习之客户端快速上手
2.1.@EnableOAuth2Sso 这个注解是为了开启OAuth2.0的sso功能,如果我们配置了WebSecurityConfigurerAdapter,它通过添加身份验证过滤器和身份验证(e ...
- springboot 集成oauth2
未实现.首先实现spring security. 1. 关于oauth2 隐隐觉得集成oauth2,用好它是一个不太简单的事儿,需要对oauth2了解一番. oauth2比较好的参考,都是别人原创文章 ...
- SpringBoot实现OAuth2认证服务器
一.最简单认证服务器 1. pom依赖 <dependency> <groupId>org.springframework.boot</groupId> <a ...
- Spring Boot 2.0 利用 Spring Security 实现简单的OAuth2.0认证方式2
0.前言 经过前面一小节已经基本配置好了基于SpringBoot+SpringSecurity+OAuth2.0的环境.这一小节主要对一些写固定InMemory的User和Client进行扩展.实现动 ...
- springboot security 安全
spring security几个概念 “认证”(Authentication) 是建立一个他声明的主体的过程(一个“主体”一般是指用户,设备或一些可以在你的应用程序中执行动作的其他系统) . “授权 ...
- Spring Security OAuth2.0认证授权一:框架搭建和认证测试
一.OAuth2.0介绍 OAuth(开放授权)是一个开放标准,允许用户授权第三方应用访问他们存储在另外的服务提供者上的信息,而不 需要将用户名和密码提供给第三方应用或分享他们数据的所有内容. 1.s ...
- Security-OAuth2.0 密码模式之服务端实现
第一步:配置数据库 ,固定创建三张表 ,OAuth2 框架需要默认使用这三张表 我使用的时Mysql,工具为navcat CREATE TABLE `oauth_access_token` ( `to ...
- Spring Security OAuth 笔记
1 单点登录 关于单点登录的原理,我觉得下面这位老哥讲的比较清楚,有兴趣可以看一下,下面我把其中的重点在此做个笔记总结 https://juejin.cn/post/6844904079274197 ...
随机推荐
- mongo数据库导入导出数据
一.Mongodb导出工具mongoexport Mongodb中的mongoexport工具可以把一个collection导出成JSON格式或CSV格式的文件.可以通过参数指定导出的数据项,也可以根 ...
- Excel对同样项求和
版权声明:本文为博主原创文章.未经博主同意不得转载. https://blog.csdn.net/yeweiouyang/article/details/32107423 方法一(SUMIF公式求和) ...
- BZOJ4446:[SCOI2015]小凸玩密室(树形DP)
Description 小凸和小方相约玩密室逃脱,这个密室是一棵有n个节点的完全二叉树,每个节点有一个灯泡.点亮所有灯泡即可逃出密室. 每个灯泡有个权值Ai,每条边也有个权值bi.点亮第1个灯泡不需要 ...
- 【NOIP2017】宝藏
题目描述 参与考古挖掘的小明得到了一份藏宝图,藏宝图上标出了 \(n\) 个深埋在地下的宝藏屋, 也给出了这 \(n\) 个宝藏屋之间可供开发的 \(m\) 条道路和它们的长度. 小明决心亲自前往挖掘 ...
- 【JavaScript】explode动画
这是一个js实现的粒子聚合文字或图片的动画特效 部分程序如下 n.container = n.container[0] || n.container; /*有且仅有一个container*/ var ...
- ASP.NET如何批量保存动态生成的文本框?
对于OA系统,表单签核功能必不可少.而根据公司的情况,表单自然又五花八门,所以就要求能够让用户自己建立表单并设定表单的流程.填写内容等等.我之前写过一篇文章[地址:pivot的用法(SQL SERVE ...
- UVA - 1197 (简单并查集计数)
Severe acute respiratory syndrome (SARS), an atypical pneumonia of unknown aetiology, was recognized ...
- 在 S5PV210 的 开发板上 点亮 一个 LED 灯
参考学习教程:周立功嵌入式Linux开发教程-(上册) 材料:首先 准备一个 安装好 Linux 的 开发板 使用 xshell 工具 连接 开发板 ,winscp 工具 连接 开发板 , 准 ...
- .NET Core中NETSDK1061错误解决(转载)
NETSDK1061错误解决 在vs生成和运行都正常,发布的时候报错 .netcore控制台项目引用另一个类库 错误信息 NETSDK1061: 项目是使用 Microsoft.NETCore.App ...
- LINUX下安装pcre出现WARNING: 'aclocal-1.15' is missing on your system错误的解决办法
1.下载安装包 wget https://ftp.gnu.org/gnu/automake/automake-1.15.tar.gz 2.解压 tar -xzvf automake-1.15.tar. ...
