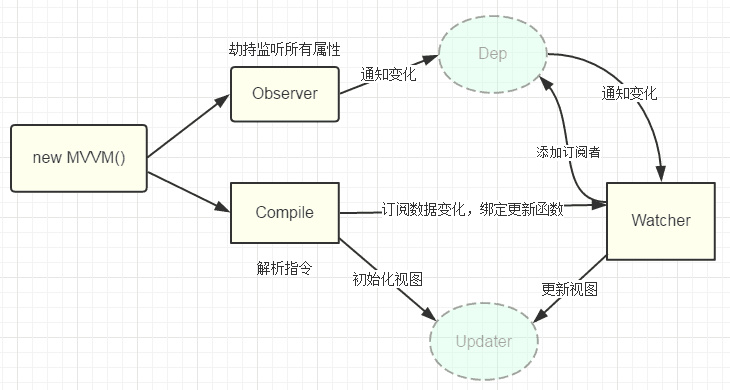
vue的双向数据绑定实现原理
在目前的前端面试中,vue的双向数据绑定已经成为了一个非常容易考到的点,即使不能当场写出来,至少也要能说出原理。本篇文章中我将会仿照vue写一个双向数据绑定的实例,名字就叫myVue吧。结合注释,希望能让大家有所收获。
1、原理
Vue的双向数据绑定的原理相信大家也都十分了解了,主要是通过 Object对象的defineProperty属性,重写data的set和get函数来实现的,这里对原理不做过多描述,主要还是来实现一个实例。为了使代码更加的清晰,这里只会实现最基本的内容,主要实现v-model,v-bind 和v-click三个命令,其他命令也可以自行补充。
添加网上的一张图

2、实现
页面结构很简单,如下
<div id="app">

    <form>

      <input type="text"  v-model="number">

      <button type="button" v-click="increment">增加</button>

    </form>

    <h3 v-bind="number"></h3>

  </div>
包含:
 1. 一个input,使用v-model指令

 2. 一个button,使用v-click指令

 3. 一个h3,使用v-bind指令。
我们最后会通过类似于vue的方式来使用我们的双向数据绑定,结合我们的数据结构添加注释
var app = new myVue({

      el:'#app',

      data: {

        number: 0

      },

      methods: {

        increment: function() {

          this.number ++;

        },

      }

    })
首先我们需要定义一个myVue构造函数:
function myVue(options) {

}
为了初始化这个构造函数,给它添加一 个_init属性
function myVue(options) {

  this._init(options);

}

myVue.prototype._init = function (options) {

    this.$options = options;  // options 为上面使用时传入的结构体,包括el,data,methods

    this.$el = document.querySelector(options.el); // el是 #app, this.$el是id为app的Element元素

    this.$data = options.data; // this.$data = {number: 0}

    this.$methods = options.methods;  // this.$methods = {increment: function(){}}

  }
接下来实现_obverse函数,对data进行处理,重写data的set和get函数
并改造_init函数
 myVue.prototype._obverse = function (obj) { // obj = {number: 0}

    var value;

    for (key in obj) {  //遍历obj对象

      if (obj.hasOwnProperty(key)) {

        value = obj[key];

        if (typeof value === 'object') {  //如果值还是对象,则遍历处理

          this._obverse(value);

        }

        Object.defineProperty(this.$data, key, {  //关键

          enumerable: true,

          configurable: true,

          get: function () {

            console.log(`获取${value}`);

            return value;

          },

          set: function (newVal) {

            console.log(`更新${newVal}`);

            if (value !== newVal) {

              value = newVal;

            }

          }

        })

      }

    }

  }

 myVue.prototype._init = function (options) {

    this.$options = options;

    this.$el = document.querySelector(options.el);

    this.$data = options.data;

    this.$methods = options.methods;

    this._obverse(this.$data);

  }
接下来我们写一个指令类Watcher,用来绑定更新函数,实现对DOM元素的更新
function Watcher(name, el, vm, exp, attr) {

    this.name = name;         //指令名称,例如文本节点,该值设为"text"

    this.el = el;             //指令对应的DOM元素

    this.vm = vm;             //指令所属myVue实例

    this.exp = exp;           //指令对应的值,本例如"number"

    this.attr = attr;         //绑定的属性值,本例为"innerHTML"

    this.update();

  }

  Watcher.prototype.update = function () {

    this.el[this.attr] = this.vm.$data[this.exp]; //比如 H3.innerHTML = this.data.number; 当number改变时,会触发这个update函数,保证对应的DOM内容进行了更新。

  }
更新_init函数以及_obverse函数
myVue.prototype._init = function (options) {

    //...

    this._binding = {};   //_binding保存着model与view的映射关系,也就是我们前面定义的Watcher的实例。当model改变时,我们会触发其中的指令类更新,保证view也能实时更新

    //...

  }

  myVue.prototype._obverse = function (obj) {

    //...

      if (obj.hasOwnProperty(key)) {

        this._binding[key] = {    // 按照前面的数据,_binding = {number: _directives: []}

          _directives: []

        };

        //...

        var binding = this._binding[key];

        Object.defineProperty(this.$data, key, {

          //...

          set: function (newVal) {

            console.log(`更新${newVal}`);

            if (value !== newVal) {

              value = newVal;

              binding._directives.forEach(function (item) {  // 当number改变时,触发_binding[number]._directives 中的绑定的Watcher类的更新

                item.update();

              })

            }

          }

        })

      }

    }

  }
那么如何将view与model进行绑定呢?接下来我们定义一个_compile函数,用来解析我们的指令(v-bind,v-model,v-clickde)等,并在这个过程中对view与model进行绑定。
 myVue.prototype._init = function (options) {

   //...

    this._complie(this.$el);

  }

myVue.prototype._complie = function (root) { root 为 id为app的Element元素,也就是我们的根元素

    var _this = this;

    var nodes = root.children;

    for (var i = 0; i < nodes.length; i++) {

      var node = nodes[i];

      if (node.children.length) {  // 对所有元素进行遍历,并进行处理

        this._complie(node);

      }

      if (node.hasAttribute('v-click')) {  // 如果有v-click属性,我们监听它的onclick事件,触发increment事件,即number++

        node.onclick = (function () {

          var attrVal = nodes[i].getAttribute('v-click');

          return _this.$methods[attrVal].bind(_this.$data);  //bind是使data的作用域与method函数的作用域保持一致

        })();

      }

      if (node.hasAttribute('v-model') && (node.tagName == 'INPUT' || node.tagName == 'TEXTAREA')) { // 如果有v-model属性,并且元素是INPUT或者TEXTAREA,我们监听它的input事件

        node.addEventListener('input', (function(key) {

          var attrVal = node.getAttribute('v-model');

           //_this._binding['number']._directives = [一个Watcher实例]

           // 其中Watcher.prototype.update = function () {

           //    node['vaule'] = _this.$data['number'];  这就将node的值保持与number一致

           // }

          _this._binding[attrVal]._directives.push(new Watcher(

            'input',

            node,

            _this,

            attrVal,

            'value'

          ))

          return function() {

            _this.$data[attrVal] =  nodes[key].value; // 使number 的值与 node的value保持一致,已经实现了双向绑定

          }

        })(i));

      }

      if (node.hasAttribute('v-bind')) { // 如果有v-bind属性,我们只要使node的值及时更新为data中number的值即可

        var attrVal = node.getAttribute('v-bind');

        _this._binding[attrVal]._directives.push(new Watcher(

          'text',

          node,

          _this,

          attrVal,

          'innerHTML'

        ))

      }

    }

  }
至此,我们已经实现了一个简单vue的双向绑定功能,包括v-bind, v-model, v-click三个指令。效果如下图

附上全部代码,不到150行
<!DOCTYPE html>

<head>

  <title>myVue</title>

</head>

<style>

  #app {

    text-align: center;

  }

</style>

<body>

  <div id="app">

    <form>

      <input type="text"  v-model="number">

      <button type="button" v-click="increment">增加</button>

    </form>

    <h3 v-bind="number"></h3>

  </div>

</body>

<script>

  function myVue(options) {

    this._init(options);

  }

  myVue.prototype._init = function (options) {

    this.$options = options;

    this.$el = document.querySelector(options.el);

    this.$data = options.data;

    this.$methods = options.methods;

    this._binding = {};

    this._obverse(this.$data);

    this._complie(this.$el);

  }

  myVue.prototype._obverse = function (obj) {

    var value;

    for (key in obj) {

      if (obj.hasOwnProperty(key)) {

        this._binding[key] = {

          _directives: []

        };

        value = obj[key];

        if (typeof value === 'object') {

          this._obverse(value);

        }

        var binding = this._binding[key];

        Object.defineProperty(this.$data, key, {

          enumerable: true,

          configurable: true,

          get: function () {

            console.log(`获取${value}`);

            return value;

          },

          set: function (newVal) {

            console.log(`更新${newVal}`);

            if (value !== newVal) {

              value = newVal;

              binding._directives.forEach(function (item) {

                item.update();

              })

            }

          }

        })

      }

    }

  }

  myVue.prototype._complie = function (root) {

    var _this = this;

    var nodes = root.children;

    for (var i = 0; i < nodes.length; i++) {

      var node = nodes[i];

      if (node.children.length) {

        this._complie(node);

      }

      if (node.hasAttribute('v-click')) {

        node.onclick = (function () {

          var attrVal = nodes[i].getAttribute('v-click');

          return _this.$methods[attrVal].bind(_this.$data);

        })();

      }

      if (node.hasAttribute('v-model') && (node.tagName == 'INPUT' || node.tagName == 'TEXTAREA')) {

        node.addEventListener('input', (function(key) {

          var attrVal = node.getAttribute('v-model');

          _this._binding[attrVal]._directives.push(new Watcher(

            'input',

            node,

            _this,

            attrVal,

            'value'

          ))

          return function() {

            _this.$data[attrVal] =  nodes[key].value;

          }

        })(i));

      }

      if (node.hasAttribute('v-bind')) {

        var attrVal = node.getAttribute('v-bind');

        _this._binding[attrVal]._directives.push(new Watcher(

          'text',

          node,

          _this,

          attrVal,

          'innerHTML'

        ))

      }

    }

  }

  function Watcher(name, el, vm, exp, attr) {

    this.name = name;         //指令名称,例如文本节点,该值设为"text"

    this.el = el;             //指令对应的DOM元素

    this.vm = vm;             //指令所属myVue实例

    this.exp = exp;           //指令对应的值,本例如"number"

    this.attr = attr;         //绑定的属性值,本例为"innerHTML"

    this.update();

  }

  Watcher.prototype.update = function () {

    this.el[this.attr] = this.vm.$data[this.exp];

  }

  window.onload = function() {

    var app = new myVue({

      el:'#app',

      data: {

        number: 0

      },

      methods: {

        increment: function() {

          this.number ++;

        },

      }

    })

  }

</script>
转载来源:https://segmentfault.com/a/1190000014274840
vue的双向数据绑定实现原理的更多相关文章
- vue实现双向数据绑定的原理
vue实现双向数据绑定的原理就是利用了 Object.defineProperty() 这个方法重新定义了对象获取属性值(get)和设置属性值(set)的操作来实现的. 在MDN上对该方法的说明是:O ...
- 转 vue实现双向数据绑定之原理及实现篇
转自:https://www.cnblogs.com/canfoo/p/6891868.html vue的双向绑定原理及实现 前言 先上个成果图来吸引各位: 代码: ...
- Vue的双向数据绑定的原理
Vue数据双向绑定的原理就是采用数据劫持结合发布者-订阅者模式,通过object.defineProperty()来劫持各个属性的setter,getter,在数据变动时发布消息给订阅者,触发相应的监 ...
- vue的双向数据绑定实现原理(简单)
如果有人问你,学vue学到了什么,那双向数据绑定,是必然要说的. 我们都知道,在vue中,使用数据双向绑定我们都知道是v-modle实现的. 实现原理是通过Object.defineProperty的 ...
- vue双向数据绑定的原理-object.defineProperty() 用法
有关双向数据绑定的原理 关于数据双向绑定的理解:利用了 Object.defineProperty() 这个方法重新给对象定义了新属性,在操作新属性分别为为获取属性值(调用get方法)和设置属性值(调 ...
- 面试题:你能写一个Vue的双向数据绑定吗?
在目前的前端面试中,vue的双向数据绑定已经成为了一个非常容易考到的点,即使不能当场写出来,至少也要能说出原理.本篇文章中我将会仿照vue写一个双向数据绑定的实例,名字就叫myVue吧.结合注释,希望 ...
- 详解 vue 双向数据绑定的原理,并实现一组双向数据绑定
1:vue 双向数据绑定的原理: Object.defineProperty是ES5新增的一个API,其作用是给对象的属性增加更多的控制Object.defineProperty(obj, prop, ...
- Vue基础01vue的基本示例,vue的双向数据绑定,vue中常见的几种用法,vue相关常见指令
自学vue框架,每天记录重要的知识点,与大家分享!有不足之处,希望大家指正. 本篇将讲述:vue的基本示例,vue的双向数据绑定,vue中常见的几种用法,vue相关常见指令 前期学习基础,使用vue. ...
- 浅析vue的双向数据绑定
vue 的双向数据绑定是基于es5的 object对象的defineProperty属性,重写data的set和get函数来实现的.1.defineProperty 数据展示 Object.defin ...
随机推荐
- sql server 语法 MSDN
https://docs.microsoft.com/en-us/sql/t-sql/statements/create-view-transact-sql
- windows 服务管理器使用系统内置帐户时密码的输入
windows 服务管理器使用系统内置帐户时在选择帐户如network services后不需要输入密码,直接确认即可,系统会自动附加密码.
- mysqldump备份时保持数据一致性
对MySQL数据进行备份,常见的方式如以下三种,可能有很多人对备份时数据一致性并不清楚 1.直接拷贝整个数据目录下的所有文件到新的机器.优点是简单.快速,只需要拷贝:缺点也很明显,在整个备份过程中新机 ...
- SecureCRT使用本地公钥 SSH 免密码登录Linux
其原理与Linux系统之间的SSH通道原理是一样的 下文中如果创建公钥的格式是:标准公钥和VanDyke私钥格式,需要用ssh-keygen -i -f 转换.如果是OpenSSH密钥格式可直接修改文 ...
- c 时间 学习
linux #include <stdio.h> #include <time.h> int main(int argc,char **argv) { //两种时间的获取方法 ...
- 360Top奢侈品演示站 - 纯手工纪念品
一个纯手写的过程化编程商城项目,留作纪念. 360Top奢侈品演示站 http://360top.farwish.com
- 【原创】利用Office宏实现powershell payload远控
本文将演示使用Veil-Evasion生成远控所需要的payload以及监听器,然后使用MacroShop生成payload 相关的VBA代码,最后演示将VBA代码写入.doc文本文档的宏中. 环境: ...
- shiro中的授权
- linux基本命令练习
1. 熟悉linux命令并且练习用法以及应用场景. 初学者完成Linux系统分区及安装之后,需熟练掌握Linux系统管理必备命令,命令包括:cd.ls.pwd.clear. chmod.chown.c ...
- CentsOS6 Tomcat7 报javax.management.InstanceNotFoundException 解决办法
警告: Failed to unregister MBean with name [Catalina:j2eeType=Servlet,name=UploadServlet,WebModule=//l ...
