kaggle 欺诈信用卡预测——Smote+LR
from:https://zhuanlan.zhihu.com/p/30461746
- 本项目需解决的问题
本项目通过利用信用卡的历史交易数据,进行机器学习,构建信用卡反欺诈预测模型,提前发现客户信用卡被盗刷的事件。
- 建模思路
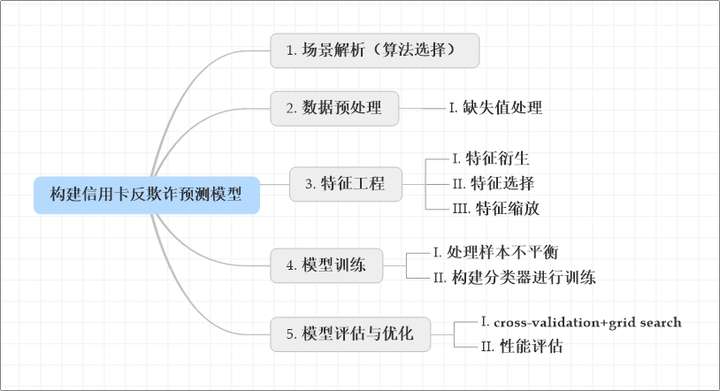
项目背景
数据集包含由欧洲持卡人于2013年9月使用信用卡进行交的数据。此数据集显示两天内发生的交易,其中284,807笔交易中有492笔被盗刷。数据集非常不平衡,积极的类(被盗刷)占所有交易的0.172%。
它只包含作为PCA转换结果的数字输入变量。不幸的是,由于保密问题,我们无法提供有关数据的原始功能和更多背景信息。特征V1,V2,... V28是使用PCA获得的主要组件,没有用PCA转换的唯一特征是“时间”和“量”。特征'时间'包含数据集中每个事务和第一个事务之间经过的秒数。特征“金额”是交易金额,此特征可用于实例依赖的成本认知学习。特征'类'是响应变量,如果发生被盗刷,则取值1,否则为0。
以上取自Kaggle官网对本数据集部分介绍(谷歌翻译),关于数据集更多介绍请参考《Credit Card Fraud Detection》。
1 场景解析(算法选择)
1)首先,我们拿到的数据是持卡人两天内的信用卡交易数据,这份数据包含很多维度,要解决的问题是预测持卡人是否会发生信用卡被盗刷。信用卡持卡人是否会发生被盗刷只有两种可能,发生被盗刷或不发生被盗刷。又因为这份数据是打标好的(字段Class是目标列),也就是说它是一个监督学习的场景。于是,我们判定信用卡持卡人是否会发生被盗刷是一个二元分类问题,意味着可以通过二分类相关的算法来找到具体的解决办法,本项目选用的算法是逻辑斯蒂回归(Logistic Regression)。
2)分析数据:数据是结构化数据 ,不需要做特征抽象。特征V1至V28是经过PCA处理,而特征Time和Amount的数据规格与其他特征差别较大,需要对其做特征缩放,将特征缩放至同一个规格。在数据质量方面 ,没有出现乱码或空字符的数据,可以确定字段Class为目标列,其他列为特征列。
3)这份数据是全部打标好的数据,可以通过交叉验证的方法对训练集生成的模型进行评估。70%的数据进行训练,30%的数据进行预测和评估。
现对该业务场景进行总结如下:
- 根据历史记录数据学习并对信用卡持卡人是否会发生被盗刷进行预测,二分类监督学习场景,选择逻辑斯蒂回归(Logistic Regression)算法。
- 数据为结构化数据,不需要做特征抽象,但需要做特征缩放。
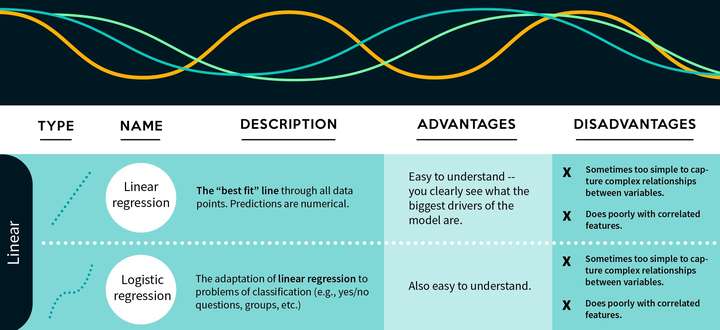
2 数据预处理(Pre-processing Data)
- 前期准备
# Imports# Numpy,Pandasimport numpy as npimport pandas as pdimport datetime# matplotlib,seaborn,pyechartsimport matplotlib.pyplot as pltimport matplotlib.gridspec as gridspec# plt.style.use('ggplot') #风格设置近似R这种的ggplot库import seaborn as snssns.set_style('whitegrid')%matplotlib inlineimport missingno as msno# import sklearnfrom sklearn.linear_model import LogisticRegressionfrom sklearn.ensemble import RandomForestClassifierfrom sklearn.model_selection import GridSearchCVfrom sklearn.model_selection import train_test_splitfrom sklearn.metrics import confusion_matrixfrom sklearn.metrics import precision_recall_curvefrom sklearn.metrics import aucfrom sklearn.metrics import roc_auc_scorefrom sklearn.metrics import roc_curvefrom sklearn.metrics import recall_scorefrom sklearn.metrics import classification_reportfrom sklearn.metrics import accuracy_scorefrom sklearn.preprocessing import StandardScaler# 忽略弹出的warningsimport warningswarnings.filterwarnings('ignore')pd.set_option('display.float_format', lambda x: '%.4f' % x)from imblearn.over_sampling import SMOTEimport itertools
- 数据获取与解析
data_cr = pd.read_csv('creditcard.csv' , encoding='latin-1') #读取数据data_cr.head() #查看表格默认前5行

从上面可以看出,数据为结构化数据,不需要抽特征转化,但特征Time和Amount的数据规格和其他特征不一样,需要对其做特征做特征缩放。
data_cr.shape #查看数据集的大小

本数据集大小为28万行,31列。
data_cr.info() # 查看数据的基本信息
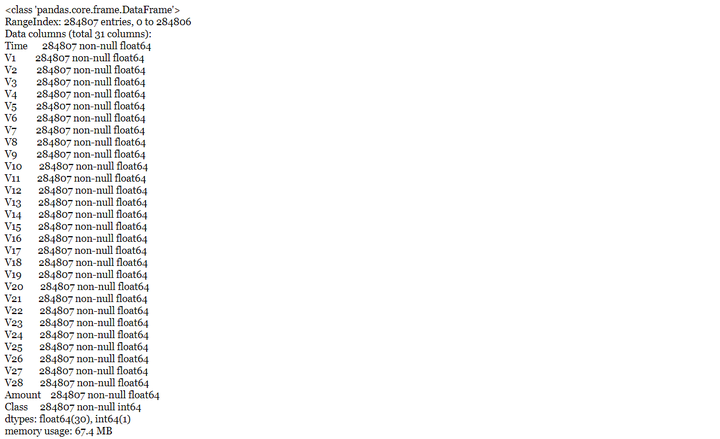
通过查看数据信息得知,数据的类型基本是float64和int64数据类型。
data_cr.describe().T #查看数据基本统计信息
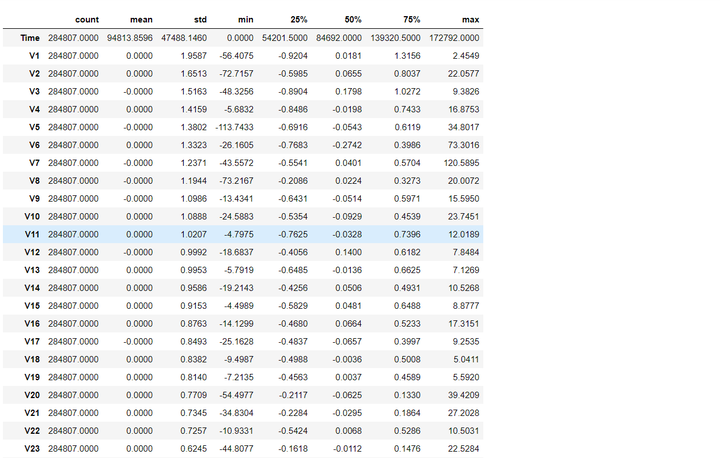
msno.matrix(data_cr) # 查看缺失值情况
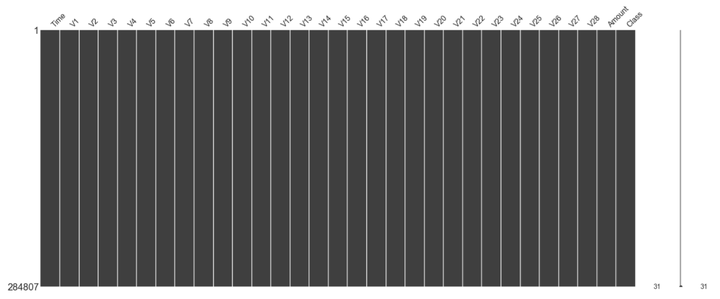
通过上图可以获知,数据集不存在缺失值,因此不需作缺失值处理。
3 特征工程(Feature Engineering)
# 目标变量分布可视化fig, axs = plt.subplots(1,2,figsize=(14,7))sns.countplot(x='Class',data=data_cr,ax=axs[0])axs[0].set_title("Frequency of each Class")data_cr['Class'].value_counts().plot(x=None,y=None, kind='pie', ax=axs[1],autopct='%1.2f%%')axs[1].set_title("Percentage of each Class")plt.show()
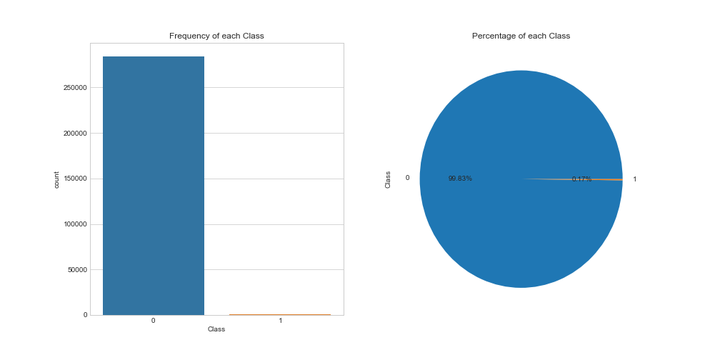
# 查看目标列的情况data_cr.groupby('Class').size()

数据集284,807笔交易中有492笔是信用卡被盗刷交易,信用卡被盗刷交易占总体比例为0.17%,信用卡交易正常和被盗刷两者数量不平衡,样本不平衡影响分类器的学习,稍后我们将会使用过采样的方法解决样本不平衡的问题。
- 特征衍生
特征Time的单为秒,我们将其转化为以小时为单位对应每天的时间。
data_cr['Hour'] =data_cr["Time"].apply(lambda x : divmod(x, 3600)[0]) #单位转换
- 特征选择(数据探索)

查看信用卡正常用户与被盗刷用户之间的区别。
Xfraud = data_cr.loc[data_cr["Class"] == 1] # update Xfraud & XnonFraud with cleaned dataXnonFraud = data_cr.loc[data_cr["Class"] == 0]correlationNonFraud = XnonFraud.loc[:, data_cr.columns != 'Class'].corr()mask = np.zeros_like(correlationNonFraud)indices = np.triu_indices_from(correlationNonFraud)mask[indices] = Truegrid_kws = {"width_ratios": (.9, .9, .05), "wspace": 0.2}f, (ax1, ax2, cbar_ax) = plt.subplots(1, 3, gridspec_kw=grid_kws, \figsize = (14, 9))cmap = sns.diverging_palette(220, 8, as_cmap=True)ax1 =sns.heatmap(correlationNonFraud, ax = ax1, vmin = -1, vmax = 1, \cmap = cmap, square = False, linewidths = 0.5, mask = mask, cbar = False)ax1.set_xticklabels(ax1.get_xticklabels(), size = 16);ax1.set_yticklabels(ax1.get_yticklabels(), size = 16);ax1.set_title('Normal', size = 20)correlationFraud = Xfraud.loc[:, data_cr.columns != 'Class'].corr()ax2 = sns.heatmap(correlationFraud, vmin = -1, vmax = 1, cmap = cmap, \ax = ax2, square = False, linewidths = 0.5, mask = mask, yticklabels = False, \cbar_ax = cbar_ax, cbar_kws={'orientation': 'vertical', \'ticks': [-1, -0.5, 0, 0.5, 1]})ax2.set_xticklabels(ax2.get_xticklabels(), size = 16);ax2.set_title('Fraud', size = 20);cbar_ax.set_yticklabels(cbar_ax.get_yticklabels(), size = 14);
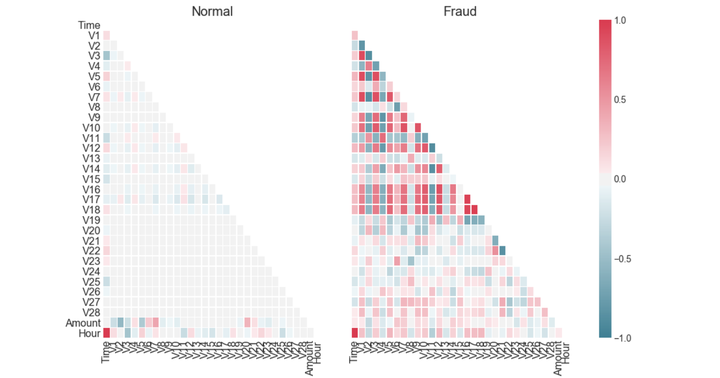
从上图可以看出,信用卡被盗刷的事件中,部分变量之间的相关性更明显。其中变量V1、V2、V3、V4、V5、V6、V7、V9、V10、V11、V12、V14、V16、V17和V18以及V19之间的变化在信用卡被盗刷的样本中呈性一定的规律。
- 盗刷交易、交易金额和交易次数的关系
f, (ax1, ax2) = plt.subplots(2, 1, sharex=True, figsize=(16,4))bins = 30ax1.hist(data_cr["Amount"][data_cr["Class"]== 1], bins = bins)ax1.set_title('Fraud')ax2.hist(data_cr["Amount"][data_cr["Class"] == 0], bins = bins)ax2.set_title('Normal')plt.xlabel('Amount ($)')plt.ylabel('Number of Transactions')plt.yscale('log')plt.show()

信用卡被盗刷发生的金额与信用卡正常用户发生的金额相比呈现散而小的特点,这说明信用卡盗刷者为了不引起信用卡卡主的注意,更偏向选择小金额消费。
- 大家哪个时间段最爱消费?
sns.factorplot(x="Hour", data=data_cr, kind="count", palette="ocean", size=6, aspect=3)

每天早上9点到晚上11点之间是信用卡消费的高频时间段。
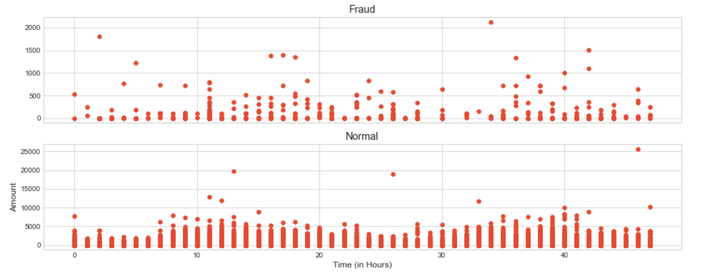
- 盗刷交易、交易金额和交易时间的关系
f, (ax1, ax2) = plt.subplots(2, 1, sharex=True, figsize=(16,6))ax1.scatter(data_cr["Hour"][data_cr["Class"] == 1], data_cr["Amount"][data_cr["Class"] == 1])ax1.set_title('Fraud')ax2.scatter(data_cr["Hour"][data_cr["Class"] == 0], data_cr["Amount"][data_cr["Class"] == 0])ax2.set_title('Normal')plt.xlabel('Time (in Hours)')plt.ylabel('Amount')plt.show()
print ("Fraud Stats Summary")print (data_cr["Amount"][data_cr["Class"] == 1].describe())print ()print ("Normal Stats Summary")print (data_cr["Amount"][data_cr["Class"] == 0].describe())
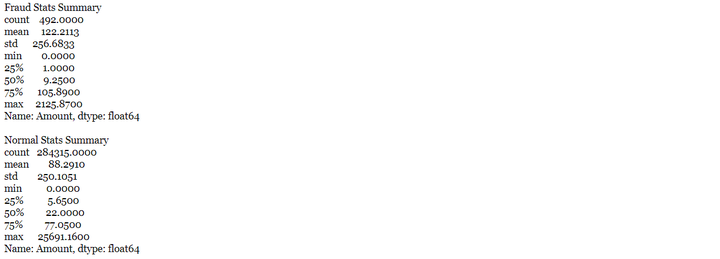
从上图可以看出,在信用卡被盗刷样本中,离群值发生在客户使用信用卡消费更低频的时间段。信用卡被盗刷数量案发最高峰在第一天上午11点达到43次,其余发生信用卡被盗刷案发时间在晚上时间11点至第二早上9点之间,说明信用卡盗刷者为了不引起信用卡卡主注意,更喜欢选择信用卡卡主睡觉时间和消费频率较高的时间点作案;同时,信用卡发生被盗刷的最大值也就只有2,125.87美元。
#Select only the anonymized features.v_feat = data_cr.ix[:,1:29].columnsplt.figure(figsize=(16,28*4))gs = gridspec.GridSpec(28, 1)for i, cn in enumerate(data_cr[v_feat]):ax = plt.subplot(gs[i])sns.distplot(data_cr[cn][data_cr["Class"] == 1], bins=50)sns.distplot(data_cr[cn][data_cr["Class"] == 0], bins=100)ax.set_xlabel('')ax.set_title('histogram of feature: ' + str(cn))
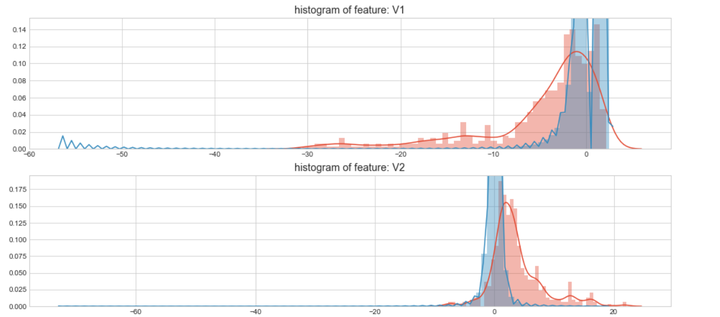
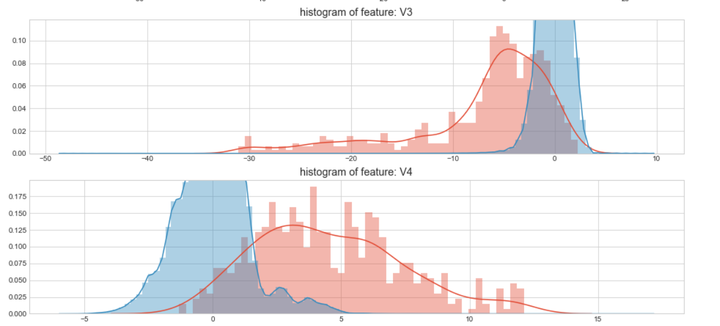
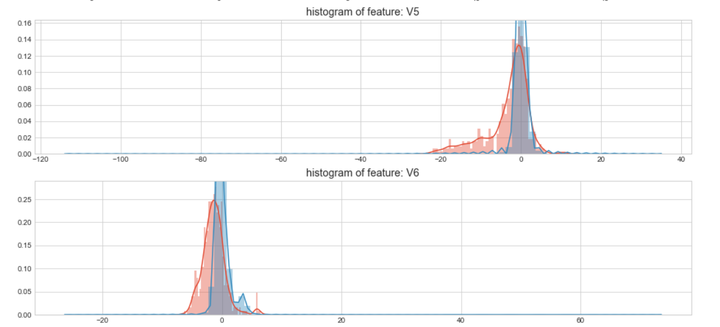
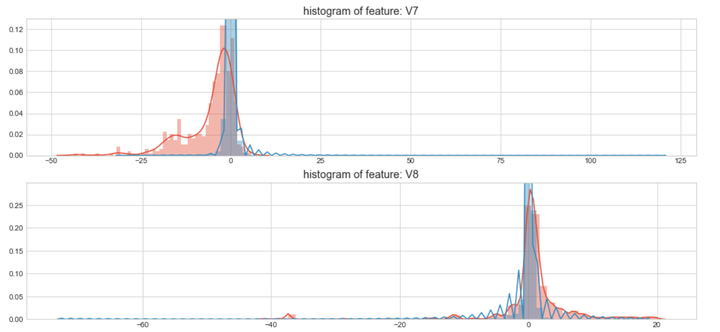
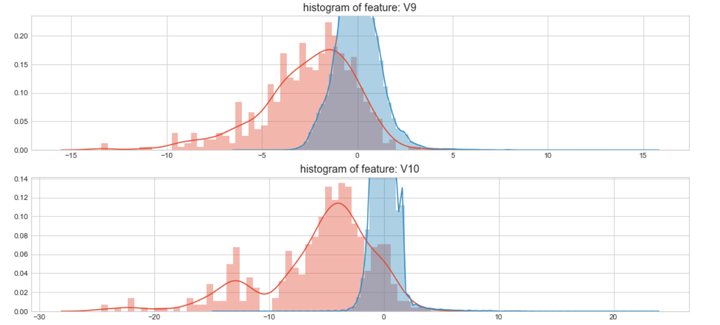
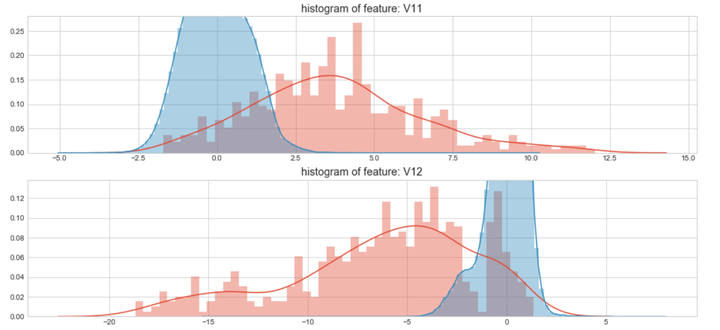
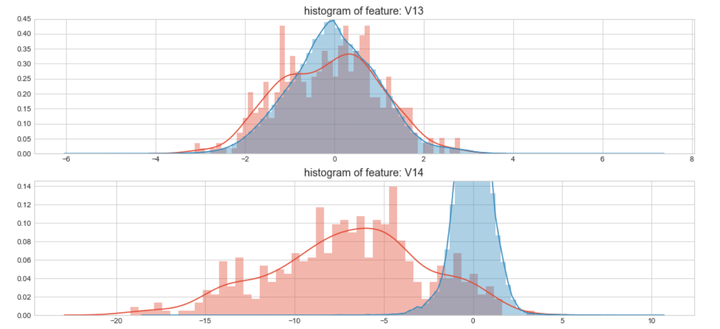
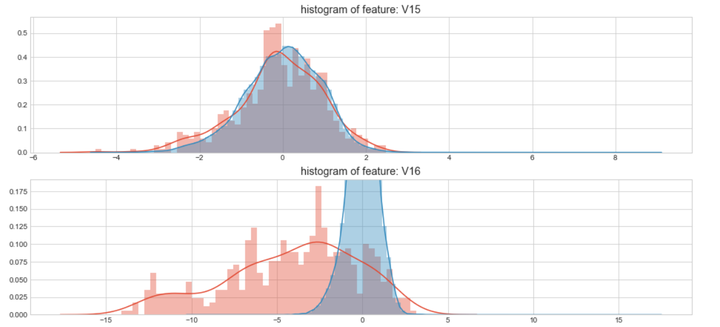
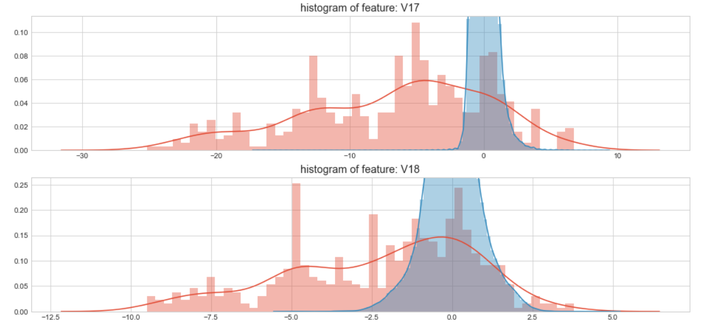
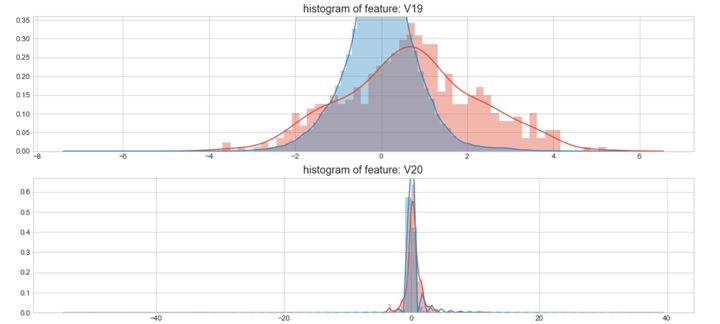
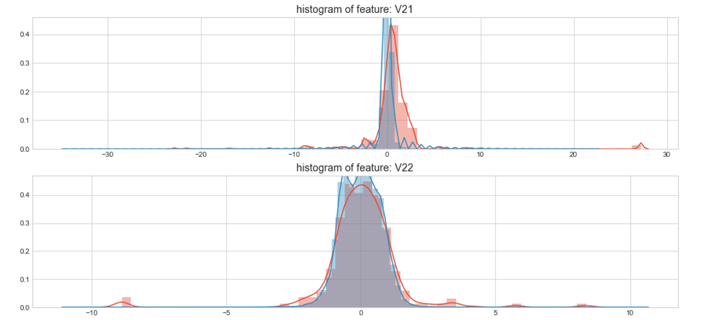
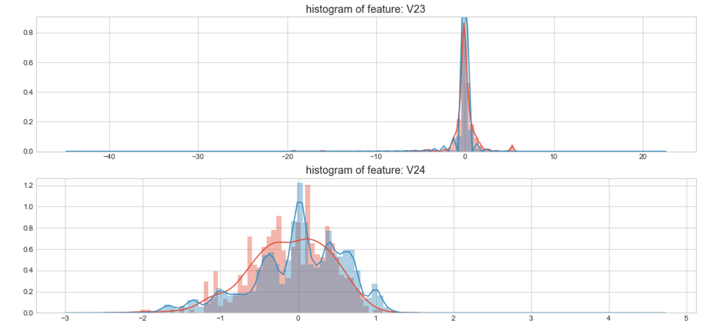
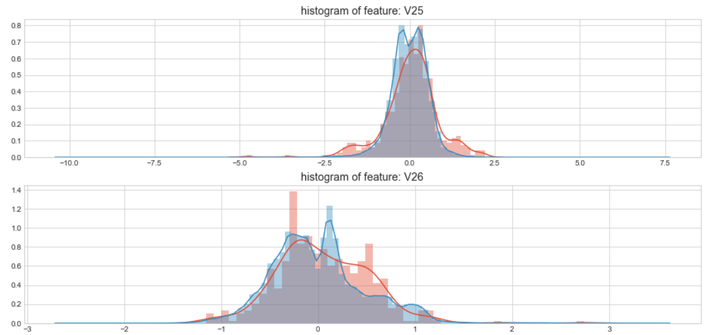
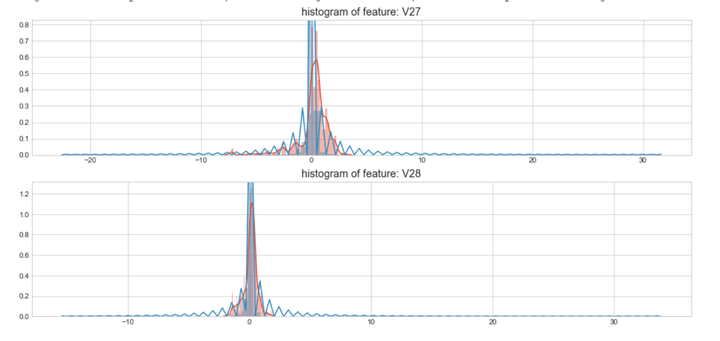
上图是不同变量在信用卡被盗刷和信用卡正常的不同分布情况,我们将选择在不同信用卡状态下的分布有明显区别的变量。因此剔除变量V8、V13 、V15 、V20 、V21 、V22、 V23 、V24 、V25 、V26 、V27 和V28变量。这也与我们开始用相关性图谱观察得出结论一致。同时剔除变量Time,保留离散程度更小的Hour变量。
droplist = ['V8', 'V13', 'V15', 'V20', 'V21', 'V22', 'V23', 'V24', 'V25', 'V26', 'V27', 'V28','Time']data_new = data_cr.drop(droplist, axis = 1)data_new.shape # 查看数据的维度

特征从31个缩减至18个(不含目标变量)。
- 特征缩放
由于特征Hour和Amount的规格和其他特征相差较大,因此我们需对其进行特征缩放。
# 对Amount和Hour 进行特征缩放col = ['Amount','Hour']from sklearn.preprocessing import StandardScaler # 导入模块sc =StandardScaler() # 初始化缩放器data_new[col] =sc.fit_transform(data_new[col])#对数据进行标准化data_new.head()

- 对特征的重要性进行排序
构建X变量和Y变量。
x_feature = list(data_new.columns)x_feature.remove('Class')x_val = data_new[x_feature]y_val = data_new['Class']
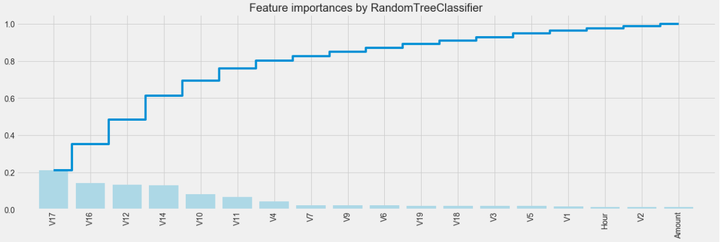
利用随机森林的feature importance对特征的重要性进行排序。
names = data_cr[x_feature].columnsfrom sklearn.ensemble import RandomForestClassifierclf=RandomForestClassifier(n_estimators=10,random_state=123)#构建分类随机森林分类器clf.fit(x_val, y_val) #对自变量和因变量进行拟合names, clf.feature_importances_for feature in zip(names, clf.feature_importances_):print(feature)

plt.style.use('fivethirtyeight')plt.rcParams['figure.figsize'] = (12,6)## feature importances 可视化##importances = clf.feature_importances_feat_names = namesindices = np.argsort(importances)[::-1]fig = plt.figure(figsize=(20,6))plt.title("Feature importances by RandomTreeClassifier")plt.bar(range(len(indices)), importances[indices], color='lightblue', align="center")plt.step(range(len(indices)), np.cumsum(importances[indices]), where='mid', label='Cumulative')plt.xticks(range(len(indices)), feat_names[indices], rotation='vertical',fontsize=14)plt.xlim([-1, len(indices)])
4 模型训练

- 处理样本不平衡
前面提到,目标列Class呈现较大的样本不平衡,会对模型学习造成困扰。样本不平衡常用的解决方法有过采样和欠采样,本项目处理样本不平衡采用的是过采样的方法,具体操作使用SMOTE(Synthetic Minority Oversampling Technique)。关于处理样本不平衡的方法介绍,可以参考我上一篇报告《Lending Club——构建贷款违约预测模型》对样本不平衡处理的方法介绍。
# 构建自变量和因变量X = data_cr[x_feature]y = data_cr["Class"]n_sample = y.shape[0]n_pos_sample = y[y == 0].shape[0]n_neg_sample = y[y == 1].shape[0]print('样本个数:{}; 正样本占{:.2%}; 负样本占{:.2%}'.format(n_sample,n_pos_sample / n_sample,n_neg_sample / n_sample))print('特征维数:', X.shape[1])

from imblearn.over_sampling import SMOTE # 导入SMOTE算法模块# 处理不平衡数据sm = SMOTE(random_state=42) # 处理过采样的方法X, y = sm.fit_sample(X, y)print('通过SMOTE方法平衡正负样本后')n_sample = y.shape[0]n_pos_sample = y[y == 0].shape[0]n_neg_sample = y[y == 1].shape[0]print('样本个数:{}; 正样本占{:.2%}; 负样本占{:.2%}'.format(n_sample,n_pos_sample / n_sample,

- 构建分类器进行训练
from sklearn.linear_model import LogisticRegressionclf1 = LogisticRegression() # 构建逻辑回归分类器clf1.fit(X, y)

predicted1 = clf.predict(X) # 通过分类器产生预测结果print("Test set accuracy score: {:.5f}".format(accuracy_score(predicted1, y,)))

def plot_confusion_matrix(cm, classes,title='Confusion matrix',cmap=plt.cm.Blues):"""This function prints and plots the confusion matrix."""plt.imshow(cm, interpolation='nearest', cmap=cmap)plt.title(title)plt.colorbar()tick_marks = np.arange(len(classes))plt.xticks(tick_marks, classes, rotation=0)plt.yticks(tick_marks, classes)thresh = cm.max() / 2.for i, j in itertools.product(range(cm.shape[0]), range(cm.shape[1])):plt.text(j, i, cm[i, j],horizontalalignment="center",color="white" if cm[i, j] > thresh else "black")plt.tight_layout()plt.ylabel('True label')plt.xlabel('Predicted label')################################################################################### Compute confusion matrixcnf_matrix = confusion_matrix(y, predicted1) # 生成混淆矩阵np.set_printoptions(precision=2)print("Recall metric in the testing dataset: ", cnf_matrix[1,1]/(cnf_matrix[1,0]+cnf_matrix[1,1]))# Plot non-normalized confusion matrixclass_names = [0,1]plt.figure()plot_confusion_matrix(cnf_matrix, classes=class_names, title='Confusion matrix')plt.show()
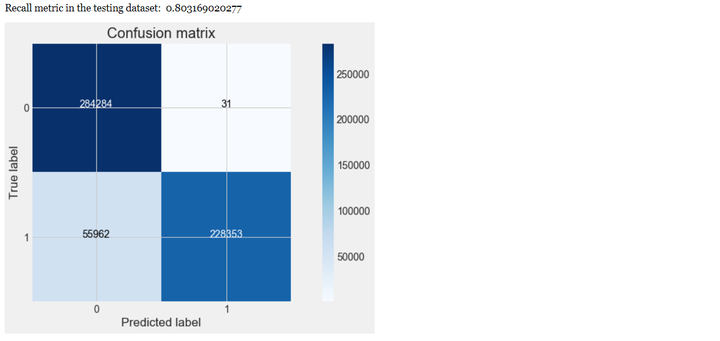
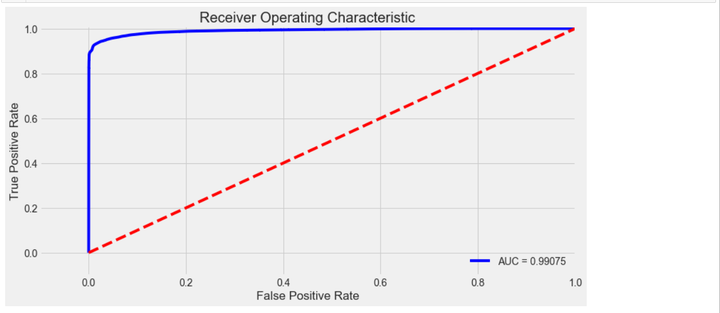
y_pred1_prob = clf1.predict_proba(X)[:, 1] # 阈值默认值为0.5fpr, tpr, thresholds = roc_curve(y,y_pred1_prob)roc_auc = auc(fpr,tpr)# 绘制 ROC曲线plt.title('Receiver Operating Characteristic')plt.plot(fpr, tpr, 'b',label='AUC = %0.5f'% roc_auc)plt.legend(loc='lower right')plt.plot([0,1],[0,1],'r--')plt.xlim([-0.1,1.0])plt.ylim([-0.1,1.01])plt.ylabel('True Positive Rate')plt.xlabel('False Positive Rate')plt.show()
5 模型评估与优化
上一个步骤中,我们的模型训练和测试都在同一个数据集上进行,这样导致模型产生过拟合的问题。
一般来说,将数据集划分为训练集和测试集有3种处理方法:1、留出法(hold-out),2、交叉验证法(cross-validation),3、自助法(bootstrapping)
本次项目采用的是交叉验证法划分数据集,将数据划分为3部分:训练集(training set)、验证集(validation set)和测试集(test set)。让模型在训练集进行学习,在验证集上进行参数调优,最后使用测试集数据评估模型的性能。
模型调优我们采用网格搜索调优参数(grid search),通过构建参数候选集合,然后网格搜索会穷举各种参数组合,根据设定评定的评分机制找到最好的那一组设置。
结合cross-validation和grid search,具体操作我们采用scikit learn模块model_selection中的GridSearchCV方法。关于GridSearchCV的更多介绍可以参考我上一篇报告《Lending Club——构建贷款违约预测模型》。
- cross-validation+grid search
X_train, X_test, y_train, y_test = train_test_split(X, y, test_size = 0.3, random_state = 0) # random_state = 0 每次切分的数据都一样# 构建参数组合param_grid = {'C': [0.01,0.1, 1, 10, 100, 1000,],'penalty': [ 'l1', 'l2']}grid_search = GridSearchCV(LogisticRegression(), param_grid, cv=10) # 确定模型LogisticRegression,和参数组合param_grid ,cv指定10折grid_search.fit(X_train, y_train) # 使用训练集学习算法

results = pd.DataFrame(grid_search.cv_results_)best = np.argmax(results.mean_test_score.values)print("Best parameters: {}".format(grid_search.best_params_))print("Best cross-validation score: {:.5f}".format(grid_search.best_score_))

y_pred = grid_search.predict(X_test)print("Test set accuracy score: {:.5f}".format(accuracy_score(y_test, y_pred,)))

print(classification_report(y_test, y_pred))

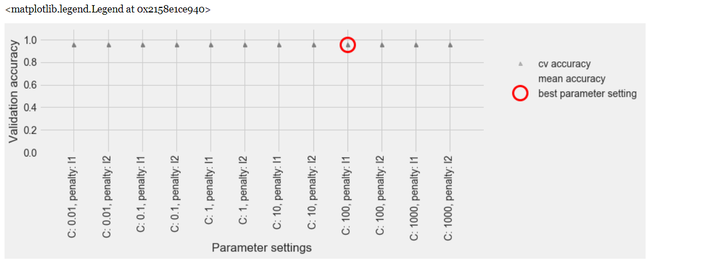
print("Best parameters: {}".format(grid_search.best_params_))print("Best cross-validation score: {:.5f}".format(grid_search.best_score_))

对混淆矩阵可视化。
# Compute confusion matrixcnf_matrix = confusion_matrix(y_test, y_pred) # 生成混淆矩阵np.set_printoptions(precision=2)print("Recall metric in the testing dataset: ", cnf_matrix[1,1]/(cnf_matrix[1,0]+cnf_matrix[1,1]))# Plot non-normalized confusion matrixclass_names = [0,1]plt.figure()plot_confusion_matrix(cnf_matrix, classes=class_names, title='Confusion matrix')plt.show()
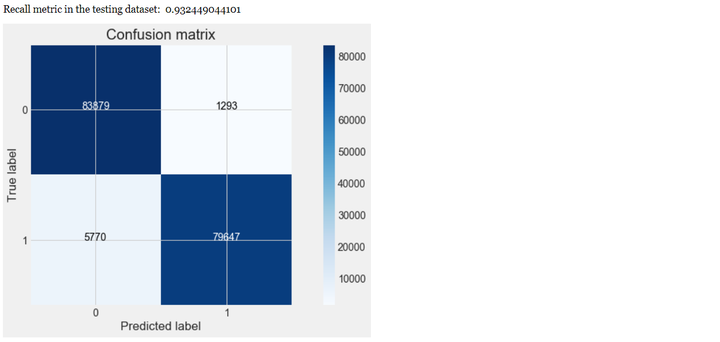
从上可以看出,经过交叉验证训练和参数调优后,模型的性能有较大的提升,recall值从0.80上升到0.93,上升幅度达到16.25%。
- 模型评估
解决不同的问题,通常需要不同的指标来度量模型的性能。例如我们希望用算法来预测癌症是否是恶性的,假设100个病人中有5个病人的癌症是恶性,对于医生来说,尽可能提高模型的查全率(recall)比提高查准率(precision)更为重要,因为站在病人的角度,发生漏发现癌症为恶性比发生误判为癌症是恶性更为严重。
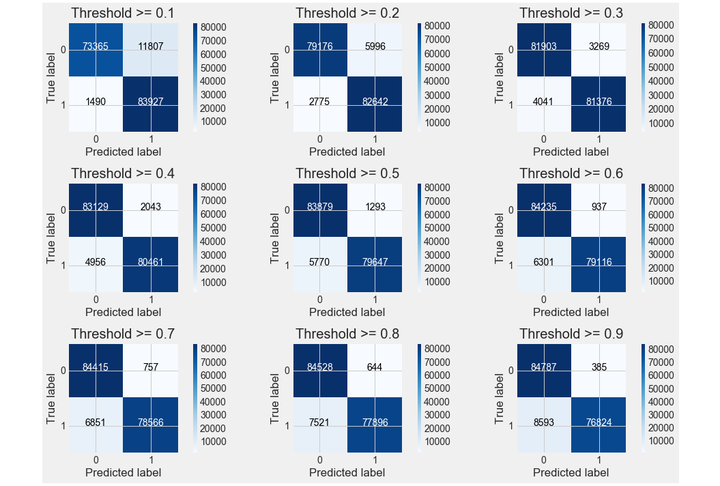
y_pred_proba = grid_search.predict_proba(X_test) #predict_prob 获得一个概率值thresholds = [0.1,0.2,0.3,0.4,0.5,0.6,0.7,0.8,0.9] # 设定不同阈值plt.figure(figsize=(15,10))j = 1for i in thresholds:y_test_predictions_high_recall = y_pred_proba[:,1] > i#预测出来的概率值是否大于阈值plt.subplot(3,3,j)j += 1# Compute confusion matrixcnf_matrix = confusion_matrix(y_test, y_test_predictions_high_recall)np.set_printoptions(precision=2)print("Recall metric in the testing dataset: ", cnf_matrix[1,1]/(cnf_matrix[1,0]+cnf_matrix[1,1]))# Plot non-normalized confusion matrixclass_names = [0,1]plot_confusion_matrix(cnf_matrix, classes=class_names

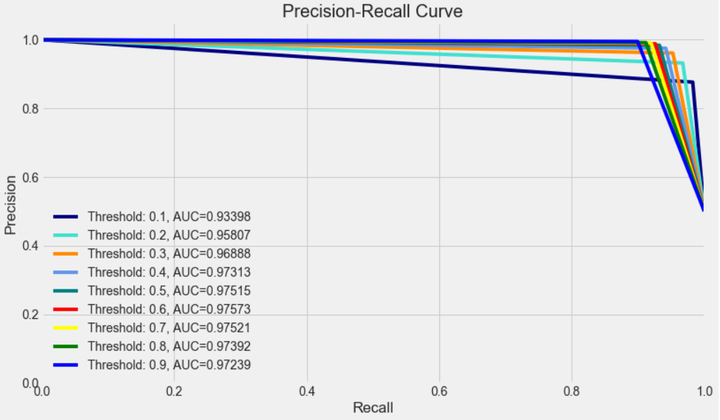
from itertools import cyclethresholds = [0.1,0.2,0.3,0.4,0.5,0.6,0.7,0.8,0.9]colors = cycle(['navy', 'turquoise', 'darkorange', 'cornflowerblue', 'teal', 'red', 'yellow', 'green', 'blue','black'])plt.figure(figsize=(12,7))j = 1for i,color in zip(thresholds,colors):y_test_predictions_prob = y_pred_proba[:,1] > i #预测出来的概率值是否大于阈值precision, recall, thresholds = precision_recall_curve(y_test, y_test_predictions_prob)area = auc(recall, precision)# Plot Precision-Recall curveplt.plot(recall, precision, color=color,label='Threshold: %s, AUC=%0.5f' %(i , area))plt.xlabel('Recall')plt.ylabel('Precision')plt.ylim([0.0, 1.05])plt.xlim([0.0, 1.0])plt.title('Precision-Recall Curve')plt.legend(loc="lower left")
- 最优阈值
precision和recall是一组矛盾的变量。从上面混淆矩阵和PRC曲线可以看到,阈值越小,recall值越大,模型能找出信用卡被盗刷的数量也就更多,但换来的代价是误判的数量也较大。随着阈值的提高,recall值逐渐降低,precision值也逐渐提高,误判的数量也随之减少。通过调整模型阈值,控制模型反信用卡欺诈的力度,若想找出更多的信用卡被盗刷就设置较小的阈值,反之,则设置较大的阈值。
实际业务中,阈值的选择取决于公司业务边际利润和边际成本的比较;当模型阈值设置较小的值,确实能找出更多的信用卡被盗刷的持卡人,但随着误判数量增加,不仅加大了贷后团队的工作量,也会降低误判为信用卡被盗刷客户的消费体验,从而导致客户满意度下降,如果某个模型阈值能让业务的边际利润和边际成本达到平衡时,则该模型的阈值为最优值。当然也有例外的情况,发生金融危机,往往伴随着贷款违约或信用卡被盗刷的几率会增大,而金融机构会更愿意不惜一切代价守住风险的底线。
kaggle 欺诈信用卡预测——Smote+LR的更多相关文章
- kaggle 欺诈信用卡预测——不平衡训练样本的处理方法 综合结论就是:随机森林+过采样(直接复制或者smote后,黑白比例1:3 or 1:1)效果比较好!记得在smote前一定要先做标准化!!!其实随机森林对特征是否标准化无感,但是svm和LR就非常非常关键了
先看数据: 特征如下: Time Number of seconds elapsed between each transaction (over two days) numeric V1 No de ...
- Kaggle 自行车租赁预测比赛项目实现
作者:大树 更新时间:01.20 email:59888745@qq.com 数据处理,机器学习 回主目录:2017 年学习记录和总结 .caret, .dropup > .btn > . ...
- Kaggle网站流量预测任务第一名解决方案:从模型到代码详解时序预测
Kaggle网站流量预测任务第一名解决方案:从模型到代码详解时序预测 2017年12月13日 17:39:11 机器之心V 阅读数:5931 近日,Artur Suilin 等人发布了 Kaggl ...
- Kaggle竞赛 —— 房价预测 (House Prices)
完整代码见kaggle kernel 或 Github 比赛页面:https://www.kaggle.com/c/house-prices-advanced-regression-technique ...
- Kaggle 商品销量预测季军方案出炉,应对时间序列问题有何妙招
https://www.leiphone.com/news/201803/fPnpTdrkvUHf7uAj.html 雷锋网 AI 研习社消息,Kaggle 上 Corporación Favorit ...
- 教程 | Kaggle网站流量预测任务第一名解决方案:从模型到代码详解时序预测
https://mp.weixin.qq.com/s/JwRXBNmXBaQM2GK6BDRqMw 选自GitHub 作者:Artur Suilin 机器之心编译 参与:蒋思源.路雪.黄小天 近日,A ...
- ASHRAE KAGGLE大能源预测(前三名方案总结+相关知识点讲解+python实现)
@ 目录 1 概述 2 处理思想学习 2.1 移除异常值 2.2 缺失值 2.3 目标函数 2.4 特征工程 2.4.1 Savitzky-Golay filter 2.4.2 Bayesian ta ...
- Kaggle 广告转化率预测比赛小结
20天的时间参加了Kaggle的 Avito Demand Prediction Challenged ,第一次参加,成绩离奖牌一步之遥,感谢各位队友,学到的东西远比成绩要丰硕得多.作为新手,希望每记 ...
- Kaggle(一):房价预测
Kaggle(一) 房价预测 (随机森林.岭回归.集成学习) 项目介绍:通过79个解释变量描述爱荷华州艾姆斯的住宅的各个方面,然后通过这些变量训练模型, 来预测房价. kaggle项目链接:ht ...
随机推荐
- qt调用sql server存储过程并获取output参数
最近新做的一个项目需要使用qt5连接另一台机器上的sql server,虽然网上已有类似文章,但还是有些其中很少提及的问题,故在这里汇总下: qt连接sql server可以参考这篇文章: <Q ...
- 阿里八八Alpha阶段Scrum(5/12)
今日进度 叶文滔: 与添加日程界面完成界面对接. 问题困难:发现浮动按钮拖曳存在BUG,无法正确判断拖曳与点击事件,已经修复为普通悬浮按钮. 林炜鸿: 绘制完成添加日程界面. 李嘉群: 1.尝试有关用 ...
- 关于Javascript的des加密
参考文章:https://www.cnblogs.com/MSMXQ/p/4484348.html 需要先下载CryptoJS文件,然后引入其中的两个文件,可以在github中找到. 直接上代码 &l ...
- poi 创建excel数据
public static void main(String[] args) throws Exception { // TODO 设置excel的标题 List<String> exce ...
- apache出现You don’t have permission to access / on this server问题的解决
今天在部署一个系统时,在apache中新开了一个VirtualHost,然后设置了DocumentRoot,等访问时却提示“You don’t have permission to access / ...
- OpenCV——边缘检测入门、Canny边缘检测
边缘检测的一般步骤: 最优边缘检测的三个评价标准: 低错误率:表示出尽可能多的实际边缘,同时尽可能地减少噪声产生的误报: 高定位性:标识出的边缘要与图像实际边缘尽可能接近: 最小响应:图像中的边缘只能 ...
- JS五星级评分效果(类似与淘宝打分效果)
今天晚上研究下 五星级评分效果,类似于淘宝后台评分效果,如下图所示: 思路: 当鼠标移到一颗星的时候 判断当前的索引 当前及当前的索引前面的星星亮起来 每当移到任何一颗星星时候 下面跟随提示 mous ...
- 【转】阿里云Ubuntu系统搭建SVN服务器
##SVN服务器相关软件安装 1.使用SSH远程服务器 (1)对于MAC OS/Liunx的用户直接打开终端输入 ssh 用户名@实例名,例如 ssh root@192.168.1.100 执行上面 ...
- Python2.7-shutil
shutil 模块,高级文件操作模块,支持文件或文件夹的复制和删除 模块方法: shutil.copyfileobj(fsrc, fdst[, length]):将类文件对象(在python中打开的文 ...
- sql语句截取字符串
Postgresql 当中有四种方式获取当前时间. 一:now() 通过now()获取的时间是最完整的时间,包括时区,秒也保留到了6位小数. select now(); ...
