ElasticSearch入门3: Spring Boot集成ElasticSearch

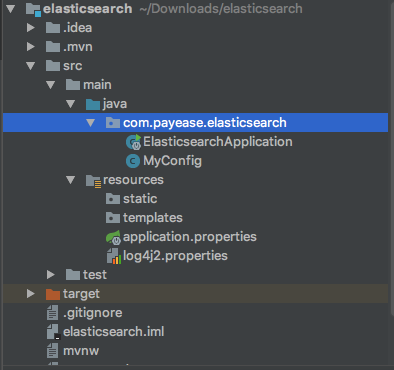
第一步:创建项目elasticsearch 编写pom文件
<?xml version="1.0" encoding="UTF-8"?>

<project xmlns="http://maven.apache.org/POM/4.0.0" xmlns:xsi="http://www.w3.org/2001/XMLSchema-instance"

    xsi:schemaLocation="http://maven.apache.org/POM/4.0.0 http://maven.apache.org/xsd/maven-4.0.0.xsd">

    <modelVersion>4.0.0</modelVersion>

    <groupId>com.payease</groupId>

    <artifactId>elasticsearch</artifactId>

    <version>0.0.1-SNAPSHOT</version>

    <packaging>jar</packaging>

    <name>elasticsearch</name>

    <description>Demo project for Spring Boot</description>

    <parent>

        <groupId>org.springframework.boot</groupId>

        <artifactId>spring-boot-starter-parent</artifactId>

        <version>1.5.9.RELEASE</version>

        <relativePath/> <!-- lookup parent from repository -->

    </parent>

    <properties>

        <project.build.sourceEncoding>UTF-8</project.build.sourceEncoding>

        <project.reporting.outputEncoding>UTF-8</project.reporting.outputEncoding>

        <java.version>1.8</java.version>

        <elasticsearch.version>6.1.1</elasticsearch.version>

    </properties>

    <dependencies>

        <dependency>

            <groupId>org.springframework.boot</groupId>

            <artifactId>spring-boot-starter-web</artifactId>

        </dependency>

        <dependency>

            <groupId>org.springframework.boot</groupId>

            <artifactId>spring-boot-starter-test</artifactId>

            <scope>test</scope>

        </dependency>

        <!-- Elasticsearch核心依赖包 -->

        <dependency>

            <groupId>org.elasticsearch.client</groupId>

            <artifactId>transport</artifactId>

            <version>${elasticsearch.version}</version>

        </dependency>

        <!-- 日志依赖 -->

        <!-- ===================== @Getter @Setter @Slf4j @Data ======================== -->

        <dependency>

            <groupId>org.projectlombok</groupId>

            <artifactId>lombok</artifactId>

        </dependency>

        <dependency>

            <groupId>org.springframework</groupId>

            <artifactId>spring-beans</artifactId>

            <version>4.3.12.RELEASE</version>

        </dependency>

    </dependencies>

    <build>

        <plugins>

            <plugin>

                <groupId>org.springframework.boot</groupId>

                <artifactId>spring-boot-maven-plugin</artifactId>

            </plugin>

        </plugins>

    </build>

</project>
第二步:ElasticSearch配置的构造:创建MyConfig.java文件
package com.payease.elasticsearch;

import org.elasticsearch.client.transport.TransportClient;

import org.elasticsearch.common.settings.Settings;

import org.elasticsearch.common.transport.TransportAddress;

import org.elasticsearch.transport.client.PreBuiltTransportClient;

import org.springframework.context.annotation.Bean;

import org.springframework.context.annotation.Configuration;

import java.net.InetAddress;

import java.net.UnknownHostException;

/**

 * ElasticSearch配置的构造

 * @Created By liuxiaoming

 * @CreateTime 2017/12/27 下午4:41

 **/

@Configuration

public class MyConfig {

    @Bean

    public TransportClient client() throws UnknownHostException{

        //es集群连接

        TransportAddress node = new TransportAddress(

                InetAddress.getByName("localhost"),

                9300

        );

        TransportAddress node1 = new TransportAddress(

                InetAddress.getByName("localhost"),

                9301

        );

        TransportAddress node2 = new TransportAddress(

                InetAddress.getByName("localhost"),

                9302

        );

        //es集群配置(自定义配置) 连接自己安装的集群名称

        Settings settings = Settings.builder()

                .put("cluster.name","xiaoming")

                .build();

        PreBuiltTransportClient client = new PreBuiltTransportClient(settings);

        client.addTransportAddress(node);

        client.addTransportAddress(node1);

        client.addTransportAddress(node2);

        return client;

    }

}
第三步:配置日志文件log4j2.properties
appender.console.type = Console

appender.console.name = console

appender.console.layout.type = PatternLayout

appender.console.layout.pattern = [%t] %-5p %c - %m%n

rootLogger.level = info

rootLogger.appenderRef.console.ref = console
第四步:在ElasticsearchApplication 启动类中编写
package com.payease.elasticsearch;

import lombok.extern.slf4j.Slf4j;

import org.elasticsearch.action.delete.DeleteResponse;

import org.elasticsearch.action.get.GetResponse;

import org.elasticsearch.action.index.IndexResponse;

import org.elasticsearch.action.search.SearchRequestBuilder;

import org.elasticsearch.action.search.SearchResponse;

import org.elasticsearch.action.search.SearchType;

import org.elasticsearch.action.update.UpdateRequest;

import org.elasticsearch.action.update.UpdateResponse;

import org.elasticsearch.client.transport.TransportClient;

import org.elasticsearch.common.xcontent.XContentBuilder;

import org.elasticsearch.common.xcontent.XContentFactory;

import org.elasticsearch.index.query.BoolQueryBuilder;

import org.elasticsearch.index.query.QueryBuilders;

import org.elasticsearch.index.query.RangeQueryBuilder;

import org.elasticsearch.search.SearchHit;

import org.springframework.beans.factory.annotation.Autowired;

import org.springframework.boot.SpringApplication;

import org.springframework.boot.autoconfigure.SpringBootApplication;

import org.springframework.format.annotation.DateTimeFormat;

import org.springframework.http.HttpStatus;

import org.springframework.http.ResponseEntity;

import org.springframework.web.bind.annotation.*;

import java.io.IOException;

import java.util.ArrayList;

import java.util.Date;

import java.util.List;

import java.util.Map;

@SpringBootApplication

@RestController

@Slf4j

public class ElasticsearchApplication {

    @Autowired

    private TransportClient client;

    /*@GetMapping("/")

    public String index(){return "index";}*/

    //单一查询

    @GetMapping("/get/book/novel")

    @ResponseBody

    public ResponseEntity get(@RequestParam(name = "id",defaultValue = "") String id){

        if(id.isEmpty()){

            return new ResponseEntity(HttpStatus.NOT_FOUND);

        }

        GetResponse result = this.client.prepareGet("book", "novel", id).get();

        if(!result.isExists()){

            return new ResponseEntity(HttpStatus.NOT_FOUND);

        }

        return new ResponseEntity(result.getSource(), HttpStatus.OK);

    }

    //新增

    @PostMapping("add/book/novel")

    @ResponseBody

    public ResponseEntity add(

            @RequestParam(name = "title") String title,

            @RequestParam(name = "author") String author,

            @RequestParam(name = "word_count") int wordCount,

            @RequestParam(name = "publish_date")

                    @DateTimeFormat(pattern = "yyyy-MM-dd HH:mm:ss")

                    Date publishDate){

        try {

            XContentBuilder content = XContentFactory.jsonBuilder()

                    .startObject()

                    .field("title", title)

                    .field("author", author)

                    .field("word_count", wordCount)

                    .field("publish_date", publishDate.getTime())

                    .endObject();

            IndexResponse result = this.client.prepareIndex("book", "novel")

                    .setSource(content)

                    .get();

            return new ResponseEntity(result.getId(),HttpStatus.OK);

        }catch (IOException e){

            e.printStackTrace();

            return new ResponseEntity(HttpStatus.INTERNAL_SERVER_ERROR);

        }

    }

    //删除

    @DeleteMapping("delete/book/novel")

    @ResponseBody

    public ResponseEntity delete(@RequestParam(name = "id") String id){

        DeleteResponse result = this.client.prepareDelete("book", "novel", id).get();

        return new ResponseEntity(result.getResult().toString(),HttpStatus.OK);

    }

    public static void main(String[] args) {

        SpringApplication.run(ElasticsearchApplication.class, args);

    }

    //修改

    @PutMapping("update/book/novel")

    @ResponseBody

    public ResponseEntity update(

            @RequestParam(name = "id") String id,

            @RequestParam(name = "title", required = false) String title,

            @RequestParam(name = "author", required = false) String author

    ){

        UpdateRequest update = new UpdateRequest("book", "novel", id);

        try {

            XContentBuilder builder= XContentFactory.jsonBuilder().startObject();

            if (title != null){

                builder.field("title", title);

            }

            if(author != null){

                builder.field("author", author);

            }

            builder.endObject();

            update.doc(builder);

        } catch (IOException e) {

            e.printStackTrace();

            return new ResponseEntity(HttpStatus.INTERNAL_SERVER_ERROR);

        }

        try {

            UpdateResponse result = this.client.update(update).get();

            return new ResponseEntity(result.getResult().toString(), HttpStatus.OK);

        } catch (Exception e) {

            e.printStackTrace();

            return new ResponseEntity(HttpStatus.INTERNAL_SERVER_ERROR);

        }

    }

    //复合查询

    @PostMapping("query/book/novel")

    @ResponseBody

    public ResponseEntity query(

        @RequestParam(name = "author", required = false) String author,

        @RequestParam(name = "title", required = false) String title,

        @RequestParam(name = "gt_word_count", defaultValue = "0") int gtWordCount,

        @RequestParam(name = "lt_word_count", required = false) Integer ltWordCount

    ){

        BoolQueryBuilder boolQuery = QueryBuilders.boolQuery();

        if(author != null){

            boolQuery.must(QueryBuilders.matchQuery("author", author));

        }

        if(title != null){

            boolQuery.must(QueryBuilders.matchQuery("title", title));

        }

        RangeQueryBuilder rangeQuery = QueryBuilders.rangeQuery("word_count").from(gtWordCount);

        if(ltWordCount != null && ltWordCount > 0){

            rangeQuery.to(ltWordCount);

        }

        boolQuery.filter(rangeQuery);

        SearchRequestBuilder builder = this.client.prepareSearch("book")

                .setTypes("novel")

                .setSearchType(SearchType.DFS_QUERY_THEN_FETCH)

                .setQuery(boolQuery)

                .setFrom(0)

                .setSize(10);

            log.info(String.valueOf(builder));

        SearchResponse response = builder.get();

        List<Map<String, Object>> result = new ArrayList<>();

        for (SearchHit hit : response.getHits()){

            result.add(hit.getSourceAsMap());

        }

        return new ResponseEntity(result, HttpStatus.OK);

    }

}
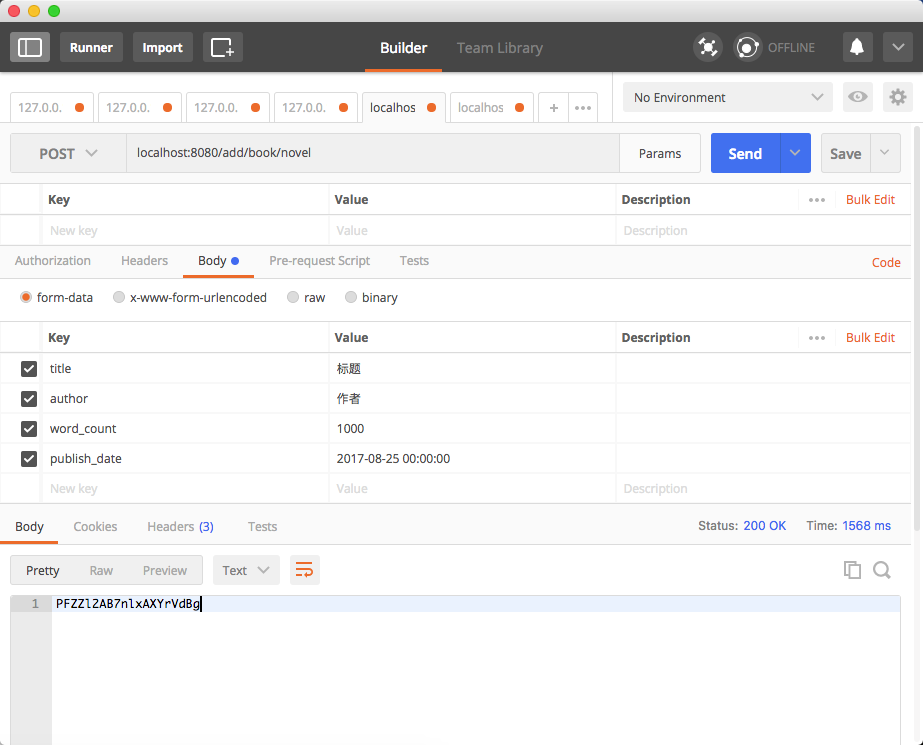
第五步:启动项目 进行postman验证
1.添加操作:
1.1 postman请求: POST localhost:8080/add/book/novel
添加参数,点击send发送请求
得到返回值:PFZZl2AB7nlxAXYrVdBg
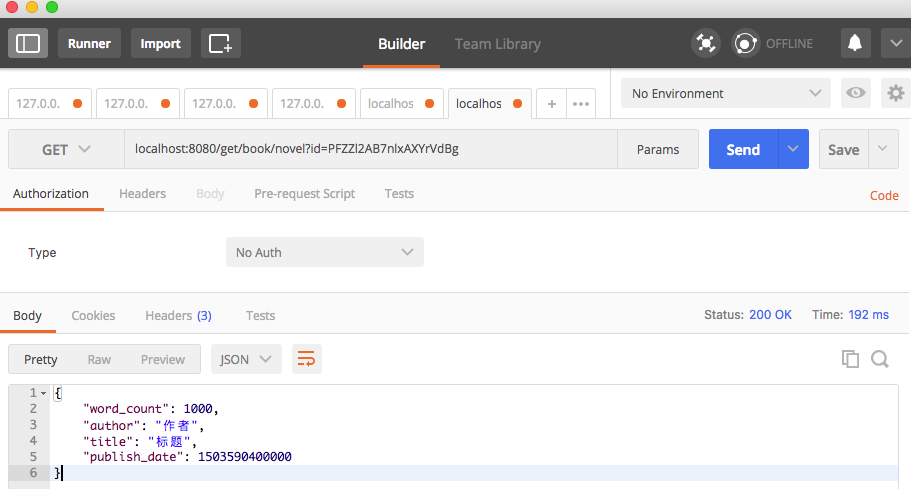
2.单一查询操作:
2.1 postman请求: GET localhost:8080/get/book/novel?id=PFZZl2AB7nlxAXYrVdBg
点击send发送请求
得到响应数据
{

    "word_count": 1000,

    "author": "作者",

    "title": "标题",

    "publish_date": 1503590400000

}
3.删除操作:
3.1 postman请求: DELETE localhost:8080/delete/book/novel?id=PFZZl2AB7nlxAXYrVdBg
点击send发送请求
得到响应数据
DELETED

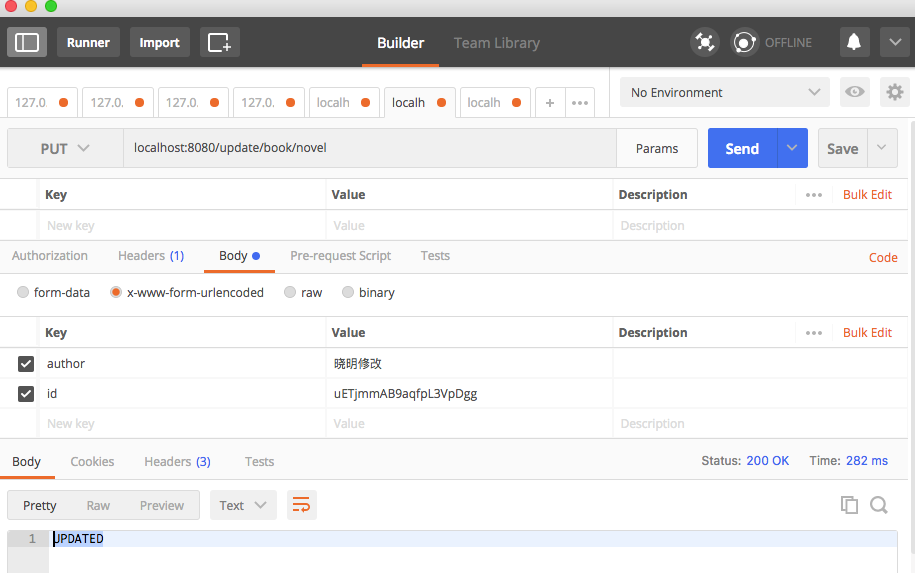
4.修改操作:
4.1 postman请求: PUT localhost:8080/update/book/novel
点击send发送请求
得到响应数据
UPDATED
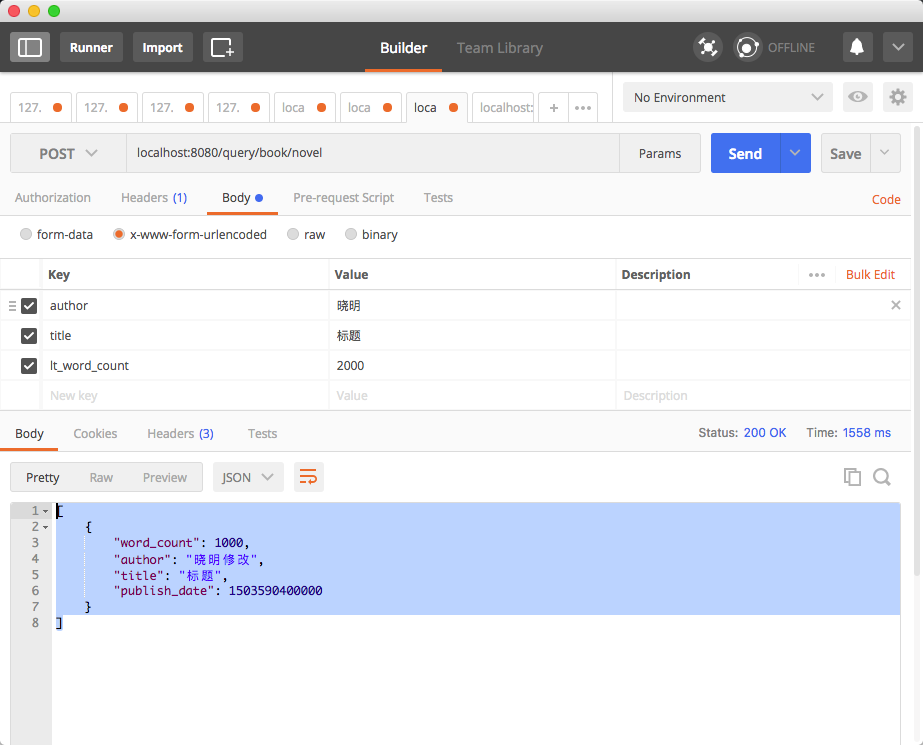
4.复合查询:
4.1 postman请求: POST localhost:8080/query/book/novel
点击send发送请求
得到响应数据
[

    {

        "word_count": 1000,

        "author": "晓明修改",

        "title": "标题",

        "publish_date": 1503590400000

    }

]
4.2 idea控制台打印信息
{

    "from": 0,

    "size": 10,

    "query": {

        "bool": {

            "must": [

                {

                    "match": {

                        "author": {

                            "query": "晓明",

                            "operator": "OR",

                            "prefix_length": 0,

                            "max_expansions": 50,

                            "fuzzy_transpositions": true,

                            "lenient": false,

                            "zero_terms_query": "NONE",

                            "auto_generate_synonyms_phrase_query": true,

                            "boost": 1

                        }

                    }

                },

                {

                    "match": {

                        "title": {

                            "query": "标题",

                            "operator": "OR",

                            "prefix_length": 0,

                            "max_expansions": 50,

                            "fuzzy_transpositions": true,

                            "lenient": false,

                            "zero_terms_query": "NONE",

                            "auto_generate_synonyms_phrase_query": true,

                            "boost": 1

                        }

                    }

                }

            ],

            "filter": [

                {

                    "range": {

                        "word_count": {

                            "from": 0,

                            "to": 2000,

                            "include_lower": true,

                            "include_upper": true,

                            "boost": 1

                        }

                    }

                }

            ],

            "adjust_pure_negative": true,

            "boost": 1

        }

    }

}
ElasticSearch入门3: Spring Boot集成ElasticSearch的更多相关文章
- Kafka 入门和 Spring Boot 集成
目录 Kafka 入门和 Spring Boot 集成 标签:博客 概述 应用场景 基本概念 基本结构 和Spring Boot 集成 集成概述 集成环境 kafka 环境搭建 Spring Boot ...
- Spring Boot 集成 Elasticsearch 实战
最近有读者问我能不能写下如何使用 Spring Boot 开发 Elasticsearch(以下简称 ES) 相关应用,今天就讲解下如何使用 Spring Boot 结合 ES. 可以在 ES 官方文 ...
- Elasticsearch学习(3) spring boot整合Elasticsearch的原生方式
前面我们已经介绍了spring boot整合Elasticsearch的jpa方式,这种方式虽然简便,但是依旧无法解决我们较为复杂的业务,所以原生的实现方式学习能够解决这些问题,而原生的学习方式也是E ...
- Elasticsearch学习(4) spring boot整合Elasticsearch的聚合操作
之前已将spring boot原生方式介绍了,接下将结介绍的是Elasticsearch聚合操作.聚合操作一般来说是解决一下复杂的业务,比如mysql中的求和和分组,由于博主踩的坑比较多,所以博客可能 ...
- Elasticsearch学习(1) Spring boot整合Elasticsearch
本文的Spring Boot版本为1.5.9,Elasticsearch版本为2.4.4,话不多说,直接上代码. 一.启动Elasticsearch 在官网上下载Elasticsearch后,打开bi ...
- spring boot与ElasticSearch的集成
本文主要介绍Spring boot与ElasticSearch的集成,因为Spring boot的教程以及ElasticSearch的学习其他博客可能更优秀,所以建议再看这篇文章前先学习学习一下Spr ...
- ElasticSearch与Spring Boot集成问题
1.None of the configured nodes are available 或者 org.elasticsearch.transport.RemoteTransportException ...
- Spring Boot整合Elasticsearch
Spring Boot整合Elasticsearch Elasticsearch是一个全文搜索引擎,专门用于处理大型数据集.根据描述,自然而然使用它来存储和搜索应用程序日志.与Logstash和K ...
- spring boot 整合 elasticsearch 5.x
spring boot与elasticsearch集成有两种方式.一种是直接使用elasticsearch.一种是使用data中间件. 本文只指针使用maven集成elasticsearch 5.x, ...
随机推荐
- Ubuntu下配置PHP和CakePHP记录
目前在完成一个PayPal的支付页面,需要有PHP的开发环境,同时,在开发时使用了CakePHP的框架,于是就有了下面的情景. 操作环境: OS:ubuntu-14.04.2-desktop-amd6 ...
- Ubuntu 默认启动到命令行 12.04
源文链接:http://my.oschina.net/jackguo/blog/85706 代码: sudo gedit /etc/default/grub 引用: GRUB_CMDLINE_LINU ...
- 20155205 2016-2017-2 《Java程序设计》第8周学习总结
20155205 2016-2017-2 <Java程序设计>第8周学习总结 教材学习内容总结 第十四章 NIO使用频道来衔接数据节点,可以设定缓冲区容量,在缓冲区中对感兴趣的数据区块进行 ...
- 富文本粘贴word文档内容图片处理
公司做的项目要用到文本上传功能. 网上找了很久,大部分都有一些不成熟的问题,终于让我找到了一个成熟的项目. 下面就来看看: 1.打开工程: 对于文档的上传我们需要知道这个项目是否符合我们的初衷. 运行 ...
- day3用户交互,格式化输出,数据类型,流程控制
上节课复习: 1.运行python程序的三步骤:python test.py 1.先启动python解释器 2.将test.py的内容当作普通的字符读入内存 3.python解释器解释执行刚刚读入内存 ...
- Java数据类型、操作符、表达式
基本与C#相同,因C#从Java学的 如操作符 对象的Equals方法,比较两个对象的内容是否相等. ==是比较是否引用同一对象.
- JAVA-部署-摘
一.下载 J2SDK下载http://java.sun.com/j2se/1.4.2/download.html 下载版本是j2sdk-1_4_2_08 ECLIPSE下载http://www.ec ...
- spring整合quartz时间任务调度框架
spring整合quartz框架 1.创建maven工程 2.导入jar包(pom.xml) <dependencies> <dependency> <groupId&g ...
- spring之IOC和DI实现
Spring核心思想 : IOC控制反转 DI依赖注入 AOP切面编程 IOC思想: 场景描述: 在没有加入spring框架之前我们调取业务层时需要创建对象,例如: 接口名 变量名=new 接 ...
- openresty + lua 2、openresty 连接 redis,实现 crud
redis 的话,openresty 已经集成,ng 的话,自己引入即可. github 地址:https://github.com/openresty/lua-resty-redis github ...