ASP.NET导出Excel文件
第一种最常见,并且最简单的方式,直接把GridView导出,导出格式为文本表格形式。
protected void btnSaveExcel_Click(object sender, EventArgs e)

        {

            string FileName = "xxx";

            System.IO.StringWriter objSW = new System.IO.StringWriter();

            System.Web.UI.HtmlTextWriter objHTW = new System.Web.UI.HtmlTextWriter(objSW);

            try

            {

                //設定格式

                Response.Clear();

                Response.Buffer = true;

                Response.AddHeader("content-disposition", string.Format("attachment; filename={0}", FileName));

                Response.ContentType = "application/ms-excel";// "application/vnd.ms-excel";

                Response.Charset = "UTF-8";

                this.EnableViewState = false;                this.GridViewData.RenderControl(objHTW);

                Response.Write(objSW.ToString());

                Response.End();

            }

            catch (Exception ex)

            {

                string aa = ex.Message.ToString();

            }

            finally

            {

                objSW.Close();

                objSW = null;

                objHTW.Close();

                objHTW = null;

            }

        }

///必须重载VerifyRenderingInServerForm, 不然会报错

        public override void VerifyRenderingInServerForm(Control control)

        {

            //base.VerifyRenderingInServerForm(control);

        }
第二种:不用安装Excel,生成原生Excel格式方法
如果你和我一样要实现不调用Excel组件实现Excel数据导出的话,那我严重向你推荐MyXls,MyXls是用C#开源项目,可以应用于asp.net 或者 .net应用程序上。它根据微软公开的Excle文档格式文件(BIFF),以二进制格式直接生成excel文档,支持Excel versions 97 - 2007 。这意味着你可以不用在服务器上安装office就能够以excle格式输出数据库中存储的数据了,这对于许多项目来说都是很有用的
第一步,当然是下在MyXls,地址:http://sourceforge.net/projects/myxls/
第二步,添加引用org.in2bits.MyXls.dll
第三步,实现数据导出,我这里是将一个DataTable作为数据导出,导出后内容格式和DataTable一致,具体代码如下:
        private void Output(DataTable dt)

        {

            org.in2bits.MyXls.XlsDocument doc = new org.in2bits.MyXls.XlsDocument();

            doc.FileName = DateTime.Now.ToString().Replace("-", "").Replace(":", "").Replace(" ", "") + ".xls";//excel文件名称

            org.in2bits.MyXls.Worksheet sheet = doc.Workbook.Worksheets.AddNamed("sheet1");//Excel工作表名称

            org.in2bits.MyXls.Cells cells = sheet.Cells;

            int colnum = dt.Columns.Count;//获取DataTable列数

            for (int i = ; i < colnum; i++)

            {

                cells.Add(, (i + ), dt.Columns[i].Caption.ToString());//导出DataTable列名

            }

            for (int i = ; i < dt.Rows.Count; i++)

            {

                for (int j = ; j < colnum; j++)

                {

                    cells.Add((i + ), (j + ), dt.Rows[i][j].ToString());

                }

            }

            //doc.Save(@"D:\");  //保存到指定位置

            doc.Send();//把写好的excel文件输出到客户端

        }
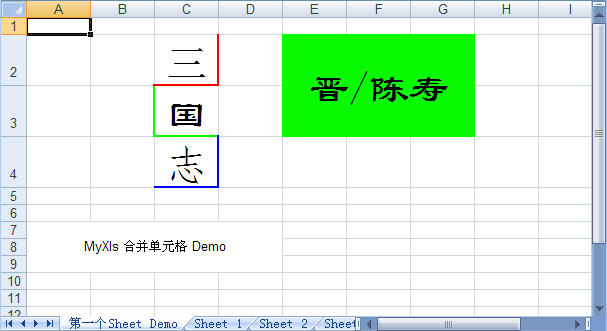
生成多个WorkSheet
XlsDocument xls = new XlsDocument();//新建一个xls文档

xls.FileName = "MyXlsDemo.xls";//设定Excel文件名

xls.SummaryInformation.Author = "Terry Li"; //填加Excel文件作者信息

xls.SummaryInformation.Subject = "MyXls Demo";//填加文件主题信息

xls.DocumentSummaryInformation.Company = "in2bits.org";//填加文件公司信息

string sheetName = "第一个Sheet Demo";#region

string sheetName = "第一个Sheet Demo";

Worksheet sheet = xls.Workbook.Worksheets.Add(sheetName);//填加名为"第一个Sheet Demo"的sheet页

Cells cells = sheet.Cells;//Cells实例是sheet页中单元格(cell)集合

//单元格1-base

Cell cell = cells.Add(, , "三");//设定第2行,第3例单元格的值

cell.HorizontalAlignment = HorizontalAlignments.Centered;//设定文字居中

cell.Font.FontName = "行楷";//设定字体

cell.Font.Height =  * ;//设定字大小(字体大小是以 1/20 point 为单位的)

cell.UseBorder = true;//使用边框

cell.BottomLineStyle = ;//设定边框底线为粗线

cell.BottomLineColor = Colors.Red;//设定颜色为红色

cell.RightLineStyle = ;

cell.RightLineColor = Colors.Red;

//cell的格式还可以定义在一个xf对象中

XF cellXF = xls.NewXF();//为xls生成一个XF实例(XF是cell格式对象)

cellXF.HorizontalAlignment = HorizontalAlignments.Centered;//设定文字居中

cellXF.Font.FontName = "隶书";//设定字体

cellXF.Font.Height =  * ;//设定字大小(字体大小是以 1/20 point 为单位的)

cellXF.UseBorder = true;//使用边框

cellXF.BottomLineStyle = ;//设定边框底线为粗线

cellXF.BottomLineColor = Colors.Green;//设定颜色为绿色

cellXF.LeftLineStyle = ; //设定边框左线为粗线

cellXF.LeftLineColor = Colors.Green;

cell = cells.Add(, , "国", cellXF);//以设定好的格式填加cell

cellXF.Font.FontName = "仿宋_GB2312";

cellXF.BottomLineStyle = ; //设定边框底线为粗线

cellXF.BottomLineColor = Colors.Blue;//设定颜色为蓝色

cellXF.RightLineStyle = ;//设定边框右线为粗线

cellXF.RightLineColor = Colors.Blue;//设定颜色为蓝色

cellXF.LeftLineStyle = ;

cell = cells.Add(, , "志", cellXF);//格式可以多次使用

//ColumnInfo colInfo = new ColumnInfo(xls, sheet);//生成列格式对象

////设定colInfo格式的起作用的列为第2列到第5列(列格式为0-base)

//colInfo.ColumnIndexStart = 1;//起始列为第二列

//colInfo.ColumnIndexEnd = 5;//终止列为第六列

//colInfo.Width = 15 * 256;//列的宽度计量单位为 1/256 字符宽

//sheet.AddColumnInfo(colInfo);//把格式附加到sheet页上(注:AddColumnInfo方法有点小问题,不给把colInfo对象多次附给sheet页)

//colInfo.ColumnIndexEnd = 6;//可以更改列对象的值

//ColumnInfo colInfo2 = new ColumnInfo(xls, sheet);//通过新生成一个列格式对象,才到能设定其它列宽度

//colInfo2.ColumnIndexStart = 7;

//colInfo2.ColumnIndexEnd = 8;

//colInfo2.Width = 20 * 256;

//sheet.AddColumnInfo(colInfo2);

MergeArea meaA = new MergeArea(, , , );//一个合并单元格实例(合并第2行、第5列 到 第3行、第7例)

sheet.AddMergeArea(meaA);//填加合并单元格

cellXF.VerticalAlignment = VerticalAlignments.Centered;

cellXF.Font.FontName = "隶书";

//cellXF.Font.Height = 48 * 20;

//cellXF.Font.Bold = true;

cellXF.Pattern = ;//设定单元格填充风格。如果设定为0,则是纯色填充(无色),1代表没有间隙的实色

cellXF.PatternBackgroundColor = Colors.Red;//填充的底色

cellXF.PatternColor = Colors.Green;//设定填充线条的颜色

cell = cells.Add(, , "晋/陈寿", cellXF);

#endregion

sheet.Cells.Merge(, , , );

cell = cells.Add(, , "MyXls 合并单元格 Demo");

cell.HorizontalAlignment = HorizontalAlignments.Centered;

cell.VerticalAlignment = VerticalAlignments.Centered;

for (int sheetNumber = ; sheetNumber <= ; sheetNumber++)

{

    sheetName = "Sheet " + sheetNumber;

    int rowMin = sheetNumber;

    int rowCount = sheetNumber + ;

    int colMin = sheetNumber;

    int colCount = sheetNumber + ;

    sheet = xls.Workbook.Worksheets.Add(sheetName);

    cells = sheet.Cells;

    for (int r = ; r < rowCount; r++)

    {

        if (r == )

        {

            for (int c = ; c < colCount; c++)

            {

                cells.Add(rowMin + r, colMin + c, "Column" + (c + )).Font.Bold = true;

            }

        }

        else

        {

            for (int c = ; c < colCount; c++)

            {

                int val = r + c;

                cell = cells.Add(rowMin + r, colMin + c, val+ ":51CTO五岁了!");

                if (val %  != )

                {

                    cell.HorizontalAlignment = HorizontalAlignments.Centered;

                    cell.Font.FontName = "Times New Roman";

                    cell.Font.Underline = UnderlineTypes.Double;

                    cell.Font.ColorIndex = ;

                    cell.Rotation = ; //字符倾斜45度

                }

            }

        }

    }

}

xls.Send();//XlsDocument.SendMethods.Inline
效果
该代码出自(http://terryli.blog.51cto.com/704315/392125)
ASP.NET导出Excel文件的更多相关文章
- asp.net 导出excel文件
之前做过winfrom程序的导出excel文件的功能,感觉非常简单.现在试着做asp.net中导出excel的功能,之前用的是Microsoft.Office.Interop.Excel这个对象来实现 ...
- ASP.NETCore -----导出Excel文件并下载
本事例分为nopi(安装DotNetCore.NPOI)下载和EPPlus(EPPlus.Core.dll)下载,其中npoi下载演示的是根据执行的模板进行数据下载 npoi帮助类NpoiExcelU ...
- ASP.NET 导出EXCEL文件处理多对应排列的
这次项目遇到了一个导出excel需要对应排列的问题.本来在做这个项目之前都基本没做过excel导出的菜鸡,这次强行做还是有些忐忑的,加上那个表的结构比较奇特. 废话不多说,先介绍表结构吧 是数据 ...
- ASP.NET 导出excel文件出现乱码的解决办法
string html =TABLE ;//<table>标签,可以是多张表string modified = Regex.Replace(html, "<table &g ...
- 关于asp.net C# 导出Excel文件 打开Excel文件格式与扩展名指定格式不一致的解决办法
-----转载:http://blog.csdn.net/sgear/article/details/7663502 关于asp.net C# 导出Excel文件 打开Excel文件格式与扩展名指定格 ...
- ASP.NET Core导入导出Excel文件
ASP.NET Core导入导出Excel文件 希望在ASP.NET Core中导入导出Excel文件,在网上搜了一遍,基本都是使用EPPlus插件,EPPlus挺好用,但商用需要授权,各位码友若有好 ...
- Asp.net导出Excel续章(自定义合并单元格,非Office组件)
结合上次写的导出Excel方法,这次上头要求我将列头进行一下合并 以前的效果: 改进后的效果: 在上篇文章中写到了Excel的导出方法,这次为了避免在生产环境中使用Office组件,服务器各种权限配置 ...
- asp.net导出excel示例代码
asp.net导出excel的简单方法. excel的操作,最常用的就是导出和导入. 本例使用NPOI实现. 代码:/// <summary> ); ; ...
- [转] Asp.Net 导出 Excel 数据的9种方案
湛刚 de BLOG 原文地址 Asp.Net 导出 Excel 数据的9种方案 简介 Excel 的强大之处在于它不仅仅只能打开Excel格式的文档,它还能打开CSV格式.Tab格式.website ...
随机推荐
- (转载)html中table的使用方法
colspan表示该一储存格向右打通的栏数. rowspan表示该一储存格向下打通的栏数. colspan是表示横向合并单元格,colspan=“3”表示水平合并三个td rowspan是表示竖直 ...
- JavaFx导出文件
导出文件格式可选 protected void handExportDateAction(ActionEvent event) { // ShowDialog.showConfirmDialog(FX ...
- Python模块之configpraser
Python模块之configpraser 一. configpraser简介 用于处理特定格式的文件,其本质还是利用open来操作文件. 配置文件的格式: 使用"[]"内包含 ...
- 使用getParts()上传多个文件
<!DOCTYPE html> <html> <head> <title></title> <meta http-equiv=&quo ...
- 在js中添加新节点
<!DOCTYPE html PUBLIC "-//W3C//DTD HTML 4.01 Transitional//EN" "http://www.w3.org/ ...
- 整数转IP地址
将一个整数,比如1567898765转换为xxx.xxx.xxx.xxx的IP地址的形式, 以下是源代码 union IPNode{ unsigned int addr; struct { unsig ...
- XStream xml 解析框架使用笔记
1. xml的标签可以映射为类.类成员变量 2. 有子标签的标签映射为类,没有子标签的便签映射为类成员变量 3. 类名.类成员变量名如与标签名不一致需要通过注解或代码设置别名 // 类名 @XStre ...
- Redsi和Memcached区别总结
首先谈谈Redis和Memcached它们都是缓存在内存中的,唯一的区别就是Redis它本身会周期性的把 更新的一些数据写入到磁盘或者修改操作写入追加的记录文件中,并且在此基础上实现master-sl ...
- Maven创建工程 WEB
http://www.zuidaima1.com/blog/1618180875144192.htm http://www.zuidaima1.com/blog/1618162161323008.ht ...
- NOIP主要考查范围
基本数据结构 栈 队列 数组 优先队列 中级数据结构 堆(大根堆,小根堆) 并查集和带权并查集 哈希表 高级数据结构 (可选学) 树状数组 线段树 各种其他树 字符串和相关内容 1.KMP 2.各种操 ...