android小知识之圆角ListView
有些东西看多了,就厌烦了:extjs对我这种感觉最为强烈。甚至,有时觉得设计之殇是审美疲劳。
直角看多了,就想看看圆角,不知何时,这几年刮起了一阵阵的圆角设计风:CSS新标准纳入圆角元素,iphone中几乎随处可见圆角设计,也开始出现很多圆角名片了...
今天我们就实现一个圆角的ListView效果。
圆角的设计,我们并不追求到处都用,无处不用,android中有少数界面用直角确实容易显得锋利,和周边界面太过对比而显得不协调,比如大栏目列表,设置等等,而采用圆角实现,则会活泼,轻松的多,也融合的特别好。
1.感觉
实际上在Android中因为SDK中没有默认对圆角的一个完整的支持,需要麻烦自定义设置才能实现完美的圆角效果,所以绝大多数应用都是采用分组直角列表这种样式。
所以我觉得很有必要让大家看看这些少数的不一样的东西,看看有什么不一样的感觉。
先让我们来看两张图片:
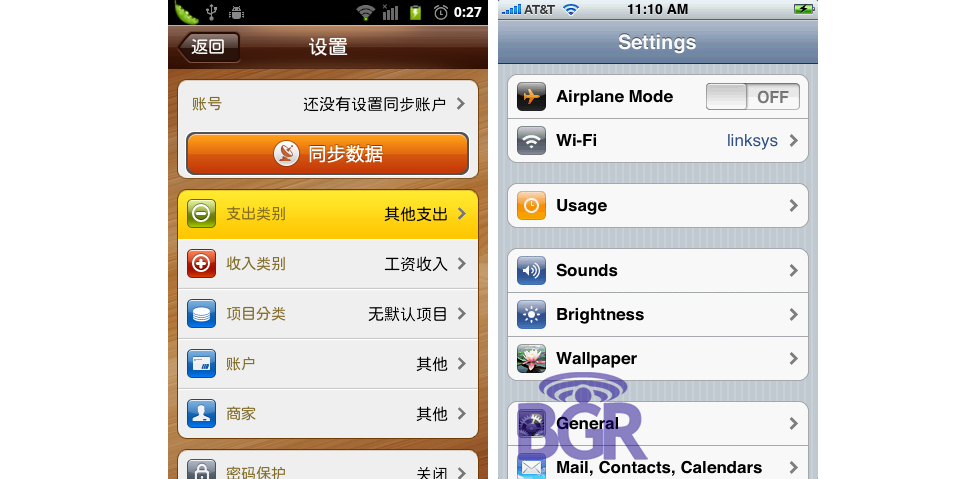
左边的是Android的一个应用的设置界面,右边是iphone系统的设置界面。
ps:上述只是效果,并不是说左边的圆角列表就是用listview是实现的,事实上它是用LinearLayout布局一个一个堆起来的。
2.原理
通过判断ListView上点击的项的位置,我们切换不同的选择器,当然这个切换的动作我们需要定义在重写ListView的onInterceptTouchEvent()方法中。
我把它封装成了一个类
/**

 *

* @ClassName: CornerListView

* @Description: 判断ListView上点击的项的位置,选择不同的位置

* @author ws

* @date 2013-12-11 上午10:53:25

*

 */

public class CornerListView extends ListView {

    public CornerListView(Context context) {

        super(context);

    }

    public CornerListView(Context context, AttributeSet attrs, int defStyle) {

        super(context, attrs, defStyle);

    }

    public CornerListView(Context context, AttributeSet attrs) {

        super(context, attrs);

    }

    @Override

    public boolean onInterceptTouchEvent(MotionEvent ev) {

        switch (ev.getAction()) {

        case MotionEvent.ACTION_DOWN:

            int x = (int) ev.getX();

            int y = (int) ev.getY();

            int itemnum = pointToPosition(x, y);

            if (itemnum == AdapterView.INVALID_POSITION)

                break;

            else {

                if (itemnum == 0) {

                    if (itemnum == (getAdapter().getCount() - 1)) {

                        //只有一项

                        setSelector(R.drawable.app_list_corner_round);

                    } else {

                         //第一项

                        setSelector(R.drawable.app_list_corner_round_top);

                    }

                } else if (itemnum == (getAdapter().getCount() - 1))

                     //最后一项

                    setSelector(R.drawable.app_list_corner_round_bottom);

                else {

                      //中间一项

                    setSelector(R.drawable.app_list_corner_shape);

                }

            }

            break;

        case MotionEvent.ACTION_UP:

            break;

        }

        return super.onInterceptTouchEvent(ev);

    }

}
3.定义选择器
如果只有一项,我们需要四个角都是圆角,app_list_corner_round.xml文件定义如下:
<?xml version="1.0" encoding="utf-8"?>

<shape xmlns:android="http://schemas.android.com/apk/res/android">

    <gradient android:startColor="#B5E7B8"

        android:endColor="#76D37B"

        android:angle="270"/>

    <corners android:topLeftRadius="4dip"

        android:topRightRadius="4dip"

        android:bottomLeftRadius="4dip"

        android:bottomRightRadius="4dip"/>

</shape>
如果是顶部第一项,则上面两个角为圆角,app_list_corner_round_top.xml定义如下:
<?xml version="1.0" encoding="utf-8"?>

<shape xmlns:android="http://schemas.android.com/apk/res/android">

    <gradient android:startColor="#B5E7B8"

        android:endColor="#76D37B"

        android:angle="270"/>

    <corners android:topLeftRadius="4dip"

        android:topRightRadius="4dip"/>

</shape>
如果是底部最后一项,则下面两个角为圆角,app_list_corner_round_bottom.xml定义如下:
<?xml version="1.0" encoding="utf-8"?>

<shape xmlns:android="http://schemas.android.com/apk/res/android">

    <gradient android:startColor="#B5E7B8"

        android:endColor="#76D37B"

        android:angle="270"/>

    <corners android:bottomLeftRadius="4dip"

        android:bottomRightRadius="4dip" />

</shape>
如果是中间项,则应该不需要圆角, app_list_corner_shape.xml定义如下:
<?xml version="1.0" encoding="utf-8"?>

<shape xmlns:android="http://schemas.android.com/apk/res/android">

    <gradient android:startColor="#B5E7B8"

        android:endColor="#76D37B"

        android:angle="270"/>

</shape>
4.背景图片
因为默认的情况下,ListView就要显示一个圆角的边框,这个我们使用一张9patch背景图片来实现app_list_corner_border.9.png:

在这里提示一下,做9patch背景图片的时候,记得把内容区域定义为边框线以内的区域。
5.初步实现
参考前面提供的素材和核心代码,我们初步实现如下
布局文件:
 <?xml version="1.0" encoding="utf-8"?>

 <LinearLayout xmlns:android="http://schemas.android.com/apk/res/android"

     android:id="@+id/set_manageaccout_linearlayout"

     android:layout_width="match_parent"

     android:layout_height="match_parent"

     android:background="@color/gray"

     android:orientation="vertical" >

     <RelativeLayout

         android:id="@+id/content_frame_mycollection_toprelative"

         android:layout_width="match_parent"

         android:layout_height="50dp" >

         <ImageButton

             android:id="@+id/set_manageaccount_imagebutton_back"

             android:layout_width="wrap_content"

             android:layout_height="wrap_content"

             android:layout_centerVertical="true"

             android:layout_margin="10dp"

             android:background="@drawable/content_frame_imagebutton_back" />

         <TextView

             android:id="@+id/content_frame_mycollection_textview_title"

             android:layout_width="wrap_content"

             android:layout_height="wrap_content"

             android:layout_centerHorizontal="true"

             android:layout_centerVertical="true"

             android:text="@string/set_manageaccount_textview_title"

             android:textAppearance="?android:attr/textAppearanceMedium" />

     </RelativeLayout>

         <ImageView

         android:layout_width="match_parent"

         android:layout_height="1dp"

         android:background="@android:color/darker_gray" />

     <ScrollView

         android:layout_width="match_parent"

         android:layout_height="0dp"

         android:layout_weight="1" >

         <LinearLayout

             android:layout_width="match_parent"

             android:layout_height="wrap_content"

             android:orientation="vertical" >

             <com.jzlfapp.model.CornerListView

                 android:id="@+id/set_manageaccount_list1"

                 android:layout_width="match_parent"

                 android:layout_height="wrap_content"

                 android:layout_marginBottom="10dp"

                 android:layout_marginLeft="10dp"

                 android:layout_marginRight="10dp"

                 android:cacheColorHint="@android:color/transparent"

                 android:background="@drawable/bg_setting_item_normal" >

             </com.jzlfapp.model.CornerListView>

             <com.jzlfapp.model.CornerListView

                 android:id="@+id/set_manageaccount_list2"

                 android:layout_width="match_parent"

                 android:layout_height="wrap_content"

                 android:layout_margin="10dp"

                 android:cacheColorHint="@android:color/transparent"

                 android:background="@drawable/bg_setting_item_normal" >

             </com.jzlfapp.model.CornerListView>

         </LinearLayout>

     </ScrollView>

 </LinearLayout>
布局文件
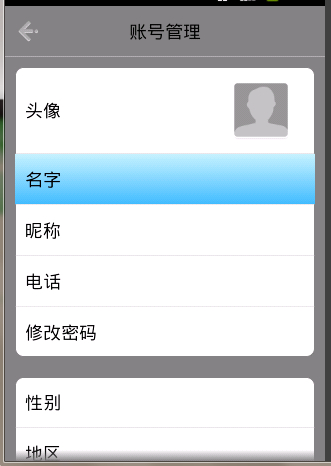
6.效果图
参考资料地址:http://www.cnblogs.com/qianxudetianxia/archive/2011/09/19/2068760.html
android小知识之圆角ListView的更多相关文章
- android小知识之多个listview在同一界面只有item高亮
我的工程里面一个activity有两个有圆角的listview,就是 自定义的 CornerListView继承ListView, 然后 我想圆角的listview A点击之后一个item会高亮 ...
- android小知识之EditText输入框之值监控以及类型限制(数字,英语字母,下划线,是否为星号密码)
1.设置EditText的值监听事件 . <span style="font-size:14px;color:#990000;"> EditText ed=new Ed ...
- Android 小知识
1.判断sd卡是否存在 boolean sdCardExist = Environment.getExternalStorageState().equals(android.os.Environmen ...
- android小知识之SparseArray(HaspMap替换)
最近编程时,发现一个针对HashMap<Integer, E>的一个提示: 翻译过来就是:用SparseArray<E>来代替会有更好性能.那我们就来看看源码中SparseAr ...
- android小知识之邮箱地址输入自动完成
虽然不难,但是容易忘记,做个备忘吧 package com.guet.zhuge; import android.app.Activity; import android.os.Bundle; imp ...
- android小知识之意图(intent)
android中的意图有显示意图和隐式意图两种, 显示意图要求必须知道被激活组件的包和class 隐式意图只需要知道跳转activity的动作和数据,就可以激活对应的组件 A 主activity B ...
- android小知识之自定义通知(toast)
Toast是较为熟悉的通知,但默认方式比较单调,可以根据自己的需求自定义,在统一UI风格的时候可以单独拿出来做一个工具类来使用. 下面我在Fragment中定义的一个按键弹出自定义Toast,在Act ...
- android小知识之中如何获取当前时间
百度整理过来的 [java] view plaincopyprint? import java.text.SimpleDateFormat; SimpleDateFormat format ...
- Android小知识汇总
1.Android Studio 将module编译打包成aar文件,module依赖的 (例如 compile 'com.zhy:autolayout:1.4.3' )不会被打包进入aar文件,应用 ...
随机推荐
- 动态改变ComboBox下拉框的宽度
在C++Builder中有时下拉框的内容比较长,标准长度下根本显示不完,可以调用PostMessage()方法来实现 ::PostMessage(comb->Handle,CB_SETDROPP ...
- 底层由于接收到操作系统的信号而停止(the inferior stopped because it triggered an exception)
QT开发内存管理问题: 在linux上提示:底层由于接收到操作系统的信号而停止: 在windows上提示:the inferior stopped because it triggered an ex ...
- 在VS工程中,添加c/c++工程中外部头文件及库
在VS工程中,添加c/c++工程中外部头文件及库的基本步骤: 1.添加工程的头文件目录:工程---属性---配置属性---c/c++---常规---附加包含目录:加上头文件存放目录. 2.添加文件引用 ...
- mysql utf8_bin跟utf8_general_ci的区别
ci是 case insensitive, 即 "大小写不敏感", a 和 A 会在字符判断中会被当做一样的; bin 是二进制, a 和 A 会别区别对待. 例如你运行: SEL ...
- php5.3 PHP5.4 PHP5.5 新特性/使用PHP5.5要注意的
1.PHP 5.3中的新特性 1.1 PHP 5.3中的新特性 1.1.1. 支持命名空间 (Namespace) 毫无疑问,命名空间是PHP5.3所带来的最重要的新特性. 在PHP5.3中,则只 ...
- project euler 48 Self powers 解决乘法爆long long
题目链接 求 $ 1^1+2^2+\cdots + 1000^{1000} $ %1e10 的结果. 唯一的坑点是会爆longlong, 所以用特殊的乘法. #include <iostream ...
- 分享一个自用的 Inno Setup 软件打包脚本
此脚本支持打包mysql.安装mysql服务.安装windows服务.操作ini文件.操作注册表.高效压缩文件等功能,基本能满足常用的软件打包需求. ;定义各种常量 #define MyAppName ...
- SAR 图像
http://www.dlr.de/hr/en/desktopdefault.aspx/tabid-2326/3776_read-5679/
- CentOS下重新安装yum
1,下载最新的yum-3.2.28.tar.gz并解压 #wget http://yum.baseurl.org/download/3.2/yum-3.2.28.tar.gz#tar xvf yum- ...
- C++ 下 typeof 的实现
现在我们有这样一坨代码: std::vector<int> arr; // ... for(std::vector<int>::iterator iter = arr.begi ...