NIO下_使用示例
一.分散与聚集
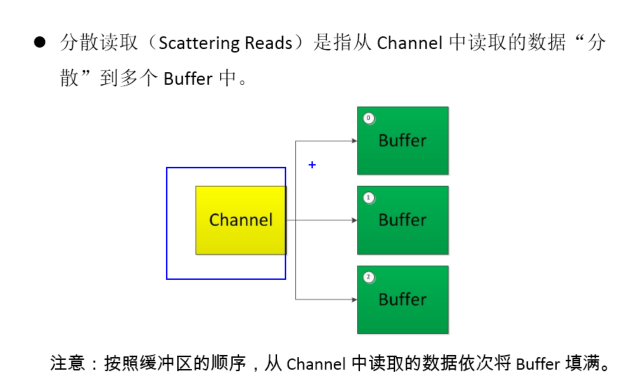
1.分散读取(Scattering Reads):将通道中的数据分散到多个缓冲区中

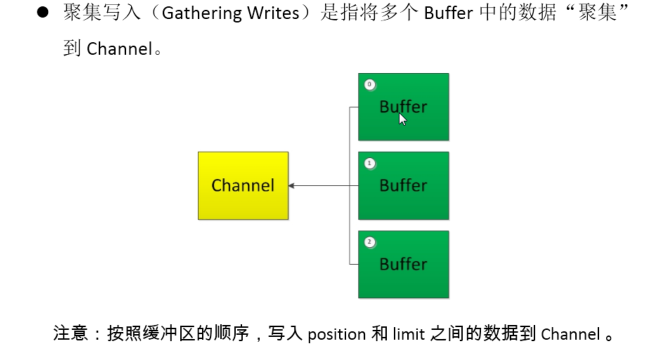
2.聚集写入(Gathering Writes):将多个缓冲区中的数据聚集到通道中

public void test4() throws IOException{
        RandomAccessFile raf1 = new RandomAccessFile("1.txt", "rw");

        //1. 获取通道
        FileChannel channel1 = raf1.getChannel();

        //2. 分配指定大小的缓冲区
        ByteBuffer buf1 = ByteBuffer.allocate(100);
        ByteBuffer buf2 = ByteBuffer.allocate(1024);

        //3. 分散读取
        ByteBuffer[] bufs = {buf1, buf2};
        channel1.read(bufs);

        //4. 聚集写入
        RandomAccessFile raf2 = new RandomAccessFile("2.txt", "rw");
        FileChannel channel2 = raf2.getChannel();

        channel2.write(bufs);
    }
二.字符集Charset
public void test6() throws IOException{

		Charset cs1 = Charset.forName("GBK");

		//获取编码器

		CharsetEncoder ce = cs1.newEncoder();

		//获取解码器

		CharsetDecoder cd = cs1.newDecoder();

		CharBuffer cBuf = CharBuffer.allocate(1024);

		cBuf.put("字符集!");

		cBuf.flip();

		//编码

		ByteBuffer bBuf = ce.encode(cBuf);

		for (int i = 0; i < 12; i++) {

			System.out.println(bBuf.get());

		}

		//解码

		bBuf.flip();

		CharBuffer cBuf2 = cd.decode(bBuf);

		System.out.println(cBuf2.toString());

		System.out.println("------------------------------------------------------");

		Charset cs2 = Charset.forName("UTF-8");

		bBuf.flip();

		CharBuffer cBuf3 = cs2.decode(bBuf);

		System.out.println(cBuf3.toString());

	}
三.NIO的非阻塞式(核心:Selector)
Selector(选择器)是Java NIO中能够检测一到多个NIO通道,并能够知晓通道是否为诸如读写事件做好准备的组件。这样,一个单独的线程可以管理多个channel,从而管理多个网络连接.
1.TCP
eg:客户端与服务端
//客户端

	@Test

	public void client() throws IOException{

		//1. 获取通道

		SocketChannel sChannel = SocketChannel.open(new InetSocketAddress("127.0.0.1", 9898));

		//2. 切换非阻塞模式

		sChannel.configureBlocking(false);

		//3. 分配指定大小的缓冲区

		ByteBuffer buf = ByteBuffer.allocate(1024);

		//4. 发送数据给服务端

		Scanner scan = new Scanner(System.in);

		while(scan.hasNext()){

			String str = scan.next();

			buf.put((new Date().toString() + "\n" + str).getBytes());

			buf.flip();

			sChannel.write(buf);

			buf.clear();

		}

		//5. 关闭通道

		sChannel.close();

	}

	//服务端

	@Test

	public void server() throws IOException{

		//1. 获取通道

		ServerSocketChannel ssChannel = ServerSocketChannel.open();

		//2. 切换非阻塞模式

		ssChannel.configureBlocking(false);

		//3. 绑定连接

		ssChannel.bind(new InetSocketAddress(9898));

		//4. 获取选择器

		Selector selector = Selector.open();

		//5. 将通道注册到选择器上, 并且指定“监听接收事件”

		ssChannel.register(selector, SelectionKey.OP_ACCEPT);

		//6. 轮询式的获取选择器上已经“准备就绪”的事件

		while(selector.select() > 0){

			//7. 获取当前选择器中所有注册的“选择键(已就绪的监听事件)”

			Iterator<SelectionKey> it = selector.selectedKeys().iterator();

			while(it.hasNext()){

				//8. 获取准备“就绪”的是事件

				SelectionKey sk = it.next();

				//9. 判断具体是什么事件准备就绪

				if(sk.isAcceptable()){

					//10. 若“接收就绪”,获取客户端连接

					SocketChannel sChannel = ssChannel.accept();

					//11. 切换非阻塞模式

					sChannel.configureBlocking(false);

					//12. 将该通道注册到选择器上

					sChannel.register(selector, SelectionKey.OP_READ);

				}else if(sk.isReadable()){

					//13. 获取当前选择器上“读就绪”状态的通道

					SocketChannel sChannel = (SocketChannel) sk.channel();

					//14. 读取数据

					ByteBuffer buf = ByteBuffer.allocate(1024);

					int len = 0;

					while((len = sChannel.read(buf)) > 0 ){

						buf.flip();

						System.out.println(new String(buf.array(), 0, len));

						buf.clear();

					}

				}

				//15. 取消选择键 SelectionKey

				it.remove();

			}

		}

	}
2.UDP DatagramChannel
public void send() throws IOException{

		DatagramChannel dc = DatagramChannel.open();

		dc.configureBlocking(false);

		ByteBuffer buf = ByteBuffer.allocate(1024);

		Scanner scan = new Scanner(System.in);

		while(scan.hasNext()){

			String str = scan.next();

			buf.put((new Date().toString() + ":\n" + str).getBytes());

			buf.flip();

			dc.send(buf, new InetSocketAddress("127.0.0.1", 9898));

			buf.clear();

		}

		dc.close();

	}

	@Test

	public void receive() throws IOException{

		DatagramChannel dc = DatagramChannel.open();

		dc.configureBlocking(false);

		dc.bind(new InetSocketAddress(9898));

		Selector selector = Selector.open();

		dc.register(selector, SelectionKey.OP_READ);

		while(selector.select() > 0){

			Iterator<SelectionKey> it = selector.selectedKeys().iterator();

			while(it.hasNext()){

				SelectionKey sk = it.next();

				if(sk.isReadable()){

					ByteBuffer buf = ByteBuffer.allocate(1024);

					dc.receive(buf);

					buf.flip();

					System.out.println(new String(buf.array(), 0, buf.limit()));

					buf.clear();

				}

			}

			it.remove();

		}

	}
四.PIpe管道
Java NIO管道是2个线程之间的单向数据连接。pipe有一个source管道和一个sink管道。数据会被写到sink通道,从source通道读取
public void test1() throws IOException{

		//1. 获取管道

		Pipe pipe = Pipe.open();

		//2. 将缓冲区中的数据写入管道

		ByteBuffer buf = ByteBuffer.allocate(1024);

		Pipe.SinkChannel sinkChannel = pipe.sink();

		buf.put("通过单向管道发送数据".getBytes());

		buf.flip();

		sinkChannel.write(buf);

		//3. 读取缓冲区中的数据

		Pipe.SourceChannel sourceChannel = pipe.source();

		buf.flip();

		int len = sourceChannel.read(buf);

		System.out.println(new String(buf.array(), 0, len));

		sourceChannel.close();

		sinkChannel.close();

	}
NIO下_使用示例的更多相关文章
- 转:HIBERNATE一些_方法_@注解_代码示例---写的非常好
HIBERNATE一些_方法_@注解_代码示例操作数据库7步骤 : 1 创建一个SessionFactory对象 2 创建Session对象 3 开启事务Transaction : hibernate ...
- Spring Boot 2.x 快速入门(下)HelloWorld示例详解
上篇 Spring Boot 2.x 快速入门(上)HelloWorld示例 进行了Sprint Boot的快速入门,以实际的示例代码来练手,总比光看书要强很多嘛,最好的就是边看.边写.边记.边展示. ...
- JavaScript+CSS+DIV实现下拉菜单示例
<!DOCTYPE html> <html> <head> <title>下拉菜单示例</title> <script languag ...
- NET下RabbitMQ实践[示例篇]
在上一篇文章中,介绍了在window环境下安装erlang,rabbitmq-server,以免配置用户,权限,虚拟机等内容. 今天将会介绍如果使用rabbitmq进行简单的消息入队, ...
- linux下shell编程示例-获取进程id
今天初步学习了一下linux下的shell编程,简单记录一下测试用例 1.编辑shell脚本文件如下: #!/bin/bashecho "hello bash linux"echo ...
- python基础15下_迭代器_生成器
print(dir([])) #告诉我列表拥有的所有方法 # 双下方法 # print([1].__add__([2])) print([1]+[2]) ret = set(dir([]))& ...
- Arduino语法详解_含示例详解
Arduino 的程序可以划分为三个主要部分:结构.变量(变量与常量).函数. 结构部分 一.结构 1.1 setup() 1.2 loop() 二.结构控制 2.1 if 2.2 if...else ...
- 『TensotFlow』RNN中文文本_下_暨研究生开学感想
承前 接上节代码『TensotFlow』RNN中文文本_上, import numpy as np import tensorflow as tf from collections import Co ...
- .net测试篇之测试神器Autofixture在几个复杂场景下的使用示例以及与Moq结合
系列目录 为String指定一个值. 在第三节里我们讲了如何使用自定义配置加上一个自定义算法生成一个自定义字符串,然而有些时候我们仅仅是需要某个字段是有意义的,这个时候随便生成的字符串也满足不了我们的 ...
随机推荐
- webkit
HTML, 从HTML文档的开始到结束排列: <meta name="viewport" content="width=device-width, initial- ...
- .netCore数据库迁移
程序包管理器控制台下Nuget 命令: 初始迁移命令: add-migration init -Context DAL.ProductContext 全称:migrations add Initial ...
- struts异常:No result defined for action
问题描述: No result defined for action com.freedom.funitureCityPSIMS.controller.login.CheckAction and re ...
- No grammar constraints (DTD or XML schema).....两种解决方法
方法一:常用方法 关闭XML验证 工具栏:windows => preferences => xml => xml files => validation => In ...
- UML图学习之三 状态图
状态图(Statechart Diagram)主要用于描述一个对象在其生存期间的动态行为,表现为一个对象所经历的状态序列,引起状态转移的事件(Event),以及因状态转移而伴随的动作(Action). ...
- Java中实例方法、类方法和构造方法
类方法,有static修饰符,典型的主函数public static void main(String[] args){}实例方法,就是一般的方法构造方法,没有返回值(就是连void都没有),方法名与 ...
- linux mysql下忘记root密码解决办法
1 修改MySQL的登录设置 # vi /etc/my.cnf 在[mysqld]的中加上一句:skip-grant-tables 2 重新启动mysqld # /etc/init.d/mysqld ...
- python_如何统计序列中元素
问题1: 随机数列[12,5,8,7,8,9,4,8,5,...] 中出现次数最高的3个元素,他们出现的次数 问题2: 对某英文文章的单词,进行词频统计,找出出现次数最搞得10个单词,他们出现的次数是 ...
- 自己写的日志框架--linkinLog4j--日志框架的必要性
OK,在开始研究Log4j的源码之前,我们先来自己模拟一个日志工具,名字就叫linkinlog4j好了. 在软件开发过程中,出现bug总是在所难免:事实上,以我个人经验,即使在实际开发阶段,fix b ...
- 浏览器解析js的顺序
浏览器在读取HTML文件的时候,只有当遇到
