Kinect For Windows V2开发日志七:照片合成与背景消除
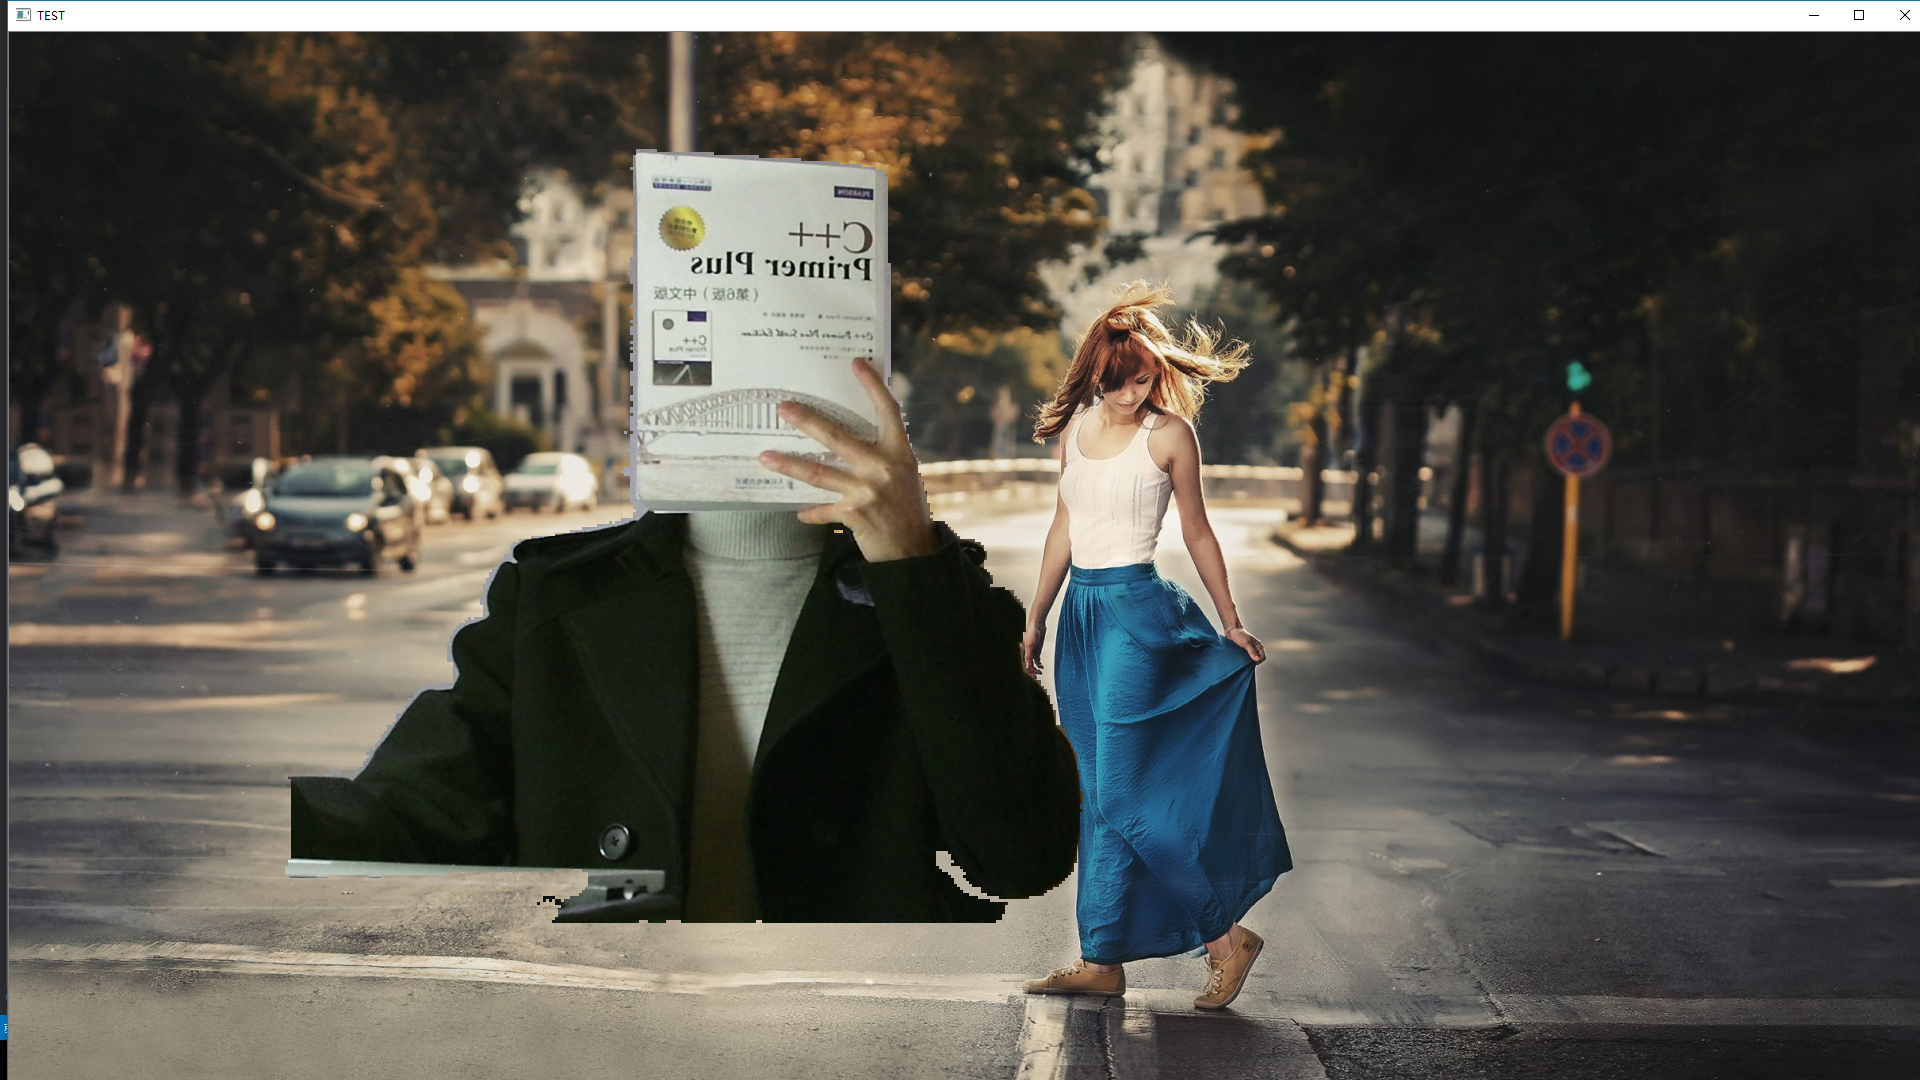
上一篇里讲到了Kinect可以从环境中区分出人体来。因此可以利用这个功能,来把摄像头前的人合成进照片里,和利用Photoshop不同的是,这样合成进去的人是动态且实时的。
简单的思路
BodyIndex用的是深度数据,只能用来判断画面中的点属不属于人体而不能用来直接显示画面,Color图里的数据只能用来显示而没有其他功能。所以如果深度数据能和彩色数据配合的话,就能利用深度数据来识别出彩色数据中的哪些点属于人体。但是深度帧的分辨率是512 x 424,而彩色帧的分辨率是1920 x 1080 ,无法将他们对应起来。然而微软提供了一个叫ICoordinateMapper的类。
简单来说:将彩色图上的点转换到深度图的坐标系中->判断某点是否是人体->是的话从彩色图中取出此点,与背景替换。
代码
//这份代码累死哥了

#include <iostream>

#include <opencv2/imgproc.hpp>

#include <opencv2\highgui.hpp>

#include <Kinect.h>

using	namespace	std;

using	namespace	cv;

int	main(void)

{

	IKinectSensor	* mySensor = nullptr;

	GetDefaultKinectSensor(&mySensor);

	mySensor->Open();

//************************准备好彩色图像的Reader并获取尺寸*******************************

	int	colorHeight = 0, colorWidth = 0;

	IColorFrameSource	* myColorSource = nullptr;

	IColorFrameReader	* myColorReader = nullptr;

	IFrameDescription	* myDescription = nullptr;

	{

		mySensor->get_ColorFrameSource(&myColorSource);

		myColorSource->OpenReader(&myColorReader);

		myColorSource->get_FrameDescription(&myDescription);

		myDescription->get_Height(&colorHeight);

		myDescription->get_Width(&colorWidth);

		myDescription->Release();

		myColorSource->Release();

	}

//************************准备好深度图像的Reader并获取尺寸*******************************

	int	depthHeight = 0, depthWidth = 0;

	IDepthFrameSource	* myDepthSource = nullptr;

	IDepthFrameReader	* myDepthReader = nullptr;

	{

		mySensor->get_DepthFrameSource(&myDepthSource);

		myDepthSource->OpenReader(&myDepthReader);

		myDepthSource->get_FrameDescription(&myDescription);

		myDescription->get_Height(&depthHeight);

		myDescription->get_Width(&depthWidth);

		myDescription->Release();

		myDepthSource->Release();

	}

//************************准备好人体索引图像的Reader并获取尺寸****************************

	int	bodyHeight = 0, bodyWidth = 0;

	IBodyIndexFrameSource	* myBodyIndexSource = nullptr;

	IBodyIndexFrameReader	* myBodyIndexReader = nullptr;

	{

		mySensor->get_BodyIndexFrameSource(&myBodyIndexSource);

		myBodyIndexSource->OpenReader(&myBodyIndexReader);

		myDepthSource->get_FrameDescription(&myDescription);

		myDescription->get_Height(&bodyHeight);

		myDescription->get_Width(&bodyWidth);

		myDescription->Release();

		myBodyIndexSource->Release();

	}

//************************为各种图像准备buffer,并且开启Mapper*****************************

	UINT	colorDataSize = colorHeight * colorWidth;

	UINT	depthDataSize = depthHeight * depthWidth;

	UINT	bodyDataSize = bodyHeight * bodyWidth;

	Mat	temp = imread("test.jpg"),background;			    //获取背景图

	resize(temp,background,Size(colorWidth,colorHeight));	//调整至彩色图像的大小

	ICoordinateMapper	* myMaper = nullptr;			    //开启mapper

	mySensor->get_CoordinateMapper(&myMaper);

	Mat	colorData(colorHeight, colorWidth, CV_8UC4);		//准备buffer

	UINT16	* depthData = new UINT16[depthDataSize];

	BYTE	* bodyData = new BYTE[bodyDataSize];

	DepthSpacePoint	* output = new DepthSpacePoint[colorDataSize];

//************************把各种图像读进buffer里,然后进行处理*****************************

	while (1)

	{

		IColorFrame * myColorFrame = nullptr;

		while (myColorReader->AcquireLatestFrame(&myColorFrame) != S_OK);	//读取color图

		myColorFrame->CopyConvertedFrameDataToArray(colorDataSize * 4, colorData.data, ColorImageFormat_Bgra);

		myColorFrame->Release();

		IDepthFrame * myDepthframe = nullptr;

		while (myDepthReader->AcquireLatestFrame(&myDepthframe) != S_OK);	//读取depth图

		myDepthframe->CopyFrameDataToArray(depthDataSize, depthData);

		myDepthframe->Release();

		IBodyIndexFrame * myBodyIndexFrame = nullptr;				        //读取BodyIndex图

		while (myBodyIndexReader->AcquireLatestFrame(&myBodyIndexFrame) != S_OK);

		myBodyIndexFrame->CopyFrameDataToArray(bodyDataSize, bodyData);

		myBodyIndexFrame->Release();

		Mat	copy = background.clone();					//复制一份背景图来做处理

		if (myMaper->MapColorFrameToDepthSpace(depthDataSize, depthData, colorDataSize, output) == S_OK)

		{

			for (int i = 0; i < colorHeight; ++ i)

				for (int j = 0; j < colorWidth;++ j)

				{

					DepthSpacePoint	tPoint = output[i * colorWidth + j];	//取得彩色图像上的一点,此点包含了它对应到深度图上的坐标

					if (tPoint.X >= 0 && tPoint.X < depthWidth && tPoint.Y >= 0 && tPoint.Y < depthHeight)	//判断是否合法

					{

						int	index = (int)tPoint.Y * depthWidth + (int)tPoint.X;	//取得彩色图上那点对应在BodyIndex里的值(注意要强转)

						if (bodyData[index] <= 5)					//如果判断出彩色图上某点是人体,就用它来替换背景图上对应的点

						{

							Vec4b	color = colorData.at<Vec4b>(i, j);

							copy.at<Vec3b>(i, j) = Vec3b(color[0], color[1], color[2]);

						}

					}

				}

			imshow("TEST",copy);

		}

		if (waitKey(30) == VK_ESCAPE)

			break;

	}

	delete[] depthData;			//记得各种释放

	delete[] bodyData;

	delete[] output;

	myMaper->Release();

	myColorReader->Release();

	myDepthReader->Release();

	myBodyIndexReader->Release();

	mySensor->Close();

	mySensor->Release();

	return	0;

}
详细说明:
SDK中提供了一个叫ICoordinateMapper的类,功能就是坐标系之间的互相转换,用来解决数据源的分辨率不同导致点对应不起来的问题。我们需要的是将彩色图像中的点与深度图像中的点一一对应起来,因此使用其中的MapColorFrameToDepthSpace()这个函数。
首选,需要准备好三种数据源:Color、BodyIndex、Depth,其中前两个是完成功能本来就需要的,第三个是转换坐标系时需要,无法直接把Color的坐标系映射到BodyIndex中,只能映射到Depth中。
然后是读取背景图,读取之后也要转换成Color图的尺寸,这样把Color中的点贴过去时坐标就不用再转换,直接替换就行。接下来也要读取三种Frame,为了易读性,不如把准备工作在前面都做完,在这一步直接用Reader就行。
然后,利用MapColorFrameToDepthSpace(),将彩色帧映射到深度坐标系,它需要4个参数,第1个是深度帧的大小,第2个是深度数据,第3个是彩色帧的大小,第4个是一个DepthSpacePoint的数组,它用来储存彩色空间中的每个点对应到深度空间的坐标。
要注意,这个函数只是完成坐标系的转换,也就是说它对于彩色坐标系中的每个点,都给出了一个此点对应到深度坐标系中的坐标,并不涉及到具体的ColorFrame。
最后,遍历彩色图像,对于每一点,都取出它对应的深度坐标系的坐标,然后把这个坐标放入BodyIndex的数据中,判断此点是否属于人体,如果属于,就把这点从彩色图中取出,跟背景图中同一坐标的点替换。
要注意的是,DepthSpacePoint中的X和Y的值都是float的,用它们来计算在BodyIndex里的坐标时,需要强转成int,不然画面就会不干净,一些不属于人体的地方也被标记成了人体被替换掉。
效果图
背景为一张1920 * 1080的壁纸

Kinect For Windows V2开发日志七:照片合成与背景消除的更多相关文章
- Kinect For Windows V2开发日志一:开发环境的配置
算是正式进军Kinect了,前段时间学的东西现在就忘了,于是从此开始记录一下. 目前为止大部分的学习资料来自于Heresy的博客,写的非常优秀,清晰明了,十分感谢.开发语言为C++,应该会一直使用,但 ...
- Kinect For Windows V2开发日志八:侦测、追踪人体骨架
简介 Kinect一个很强大的功能就是它可以侦测到人体的骨骼信息并追踪,在Kinect V2的SDK 2.0中,它最多可以同时获取到6个人.每个人25个关节点的信息,并且通过深度摄像头,可以同时获取到 ...
- Kinect For Windows V2开发日志六:人体的轮廓的表示
Kinect中带了一种数据源,叫做BodyIndex,简单来说就是它利用深度摄像头识别出最多6个人体,并且用数据将属于人体的部分标记,将人体和背景区别开来.利用这一特性,就可以在环境中显示出人体的轮廓 ...
- Kinect For Windows V2开发日志五:使用OpenCV显示彩色图像及红外图像
彩色图像 #include <iostream> #include <Kinect.h> #include <opencv2\highgui.hpp> using ...
- Kinect For Windows V2开发日志九:侦测并绘制人体骨架
简介 在上一篇<侦测.追踪人体骨架>里,介绍了关节点的使用办法,这一篇记录将关节点与OpenCV结合的绘图方法. 代码 #include <iostream> #include ...
- Kinect For Windows V2开发日志四:使用OpenCV显示深度图像
代码示例: #include <Kinect.h> #include <iostream> #include <opencv2\highgui.hpp> using ...
- Kinect For Windows V2开发日志三:简单的深度读取
代码示例: #include <Kinect.h> #include <iostream> using namespace std; int main(void) { IKin ...
- Kinect For Windows V2开发日志二:Kinect V2的基本参数
以下内容节选自Heresy的博客: 彩色影像:1920 x 1080 @ 30 / 15 FPS(根据环境亮度) 深度影像:512 x 424 @ 30 FPS.16bit 距离值(mm).可侦测 ...
- Kinect for Windows V2开发教程
教程 https://blog.csdn.net/openbug/article/details/80921437 Windows版Kinect SDK https://docs.microsoft. ...
随机推荐
- Tomcat修改网址旁边的小图标
用Tomcat发布时候,往往不希望用IP地址旁边的Tomcat小猫,根据需求利用自己的icon图标. 先将需要的图片转换成icon格式的. 这个网站可以进行icon格式的转换:http://www.c ...
- Redis基本操作-20150608
Redis基本操作-20150608 [http://my.oschina.net/u/241255/blog/206991] Redis是一个开源的使用ANSI C语言编写.支持网络.可基于内存 ...
- Slave延迟很大的优化方法总结(MySQL优化)
[http://www.cstor.cn/textdetail_9146.html] 一般而言,slave相对master延迟较大,其根本原因就是slave上的复制线程没办法真正做到并发.简单说,在m ...
- 从UnitedStack OS 1.0 Preview试用申请问卷调查学习OpenStack
http://www.diaochapai.com/survey/ 您的角色最可能是? * (必填, 多选) OpenStack私有云用户,希望能将OpenStack/UOS用于公司内部私有云 云计算 ...
- hdu 4859 海岸线 最小割
海岸线 题目连接: http://acm.hdu.edu.cn/showproblem.php?pid=4859 Description 欢迎来到珠海! 由于土地资源越来越紧张,使得许多海滨城市都只能 ...
- Codeforces Round #338 (Div. 2) A. Bulbs 水题
A. Bulbs 题目连接: http://www.codeforces.com/contest/615/problem/A Description Vasya wants to turn on Ch ...
- Android中显示网页的多种方式
在android中显示页面主要有两种方式,一种是在Activity里面直接显示网页,另一种是调用浏览器显示网页.方式不同,使用的方法也不同,下面我们分别讲解. 一.在Activity里面直接显示网页 ...
- 微软ASP.NET网站部署指南(4):配置项目属性
1. 综述 有些部署设置能够在项目属性里设置的,而且保持到项目文件中(.csproj或.vbproj). 大多数情况下.你都能够在Visual Studio 选择项目属性Project Proper ...
- Eclipse使用jre的原理与配置
近期要配置Eclipse环境,Mark当中的一些方法. 下载Eclipse SDK之后我们就要关联JRE,由于Eclipse启动须要JRE. Eclipse启动时寻找JRE的顺序: 1.假设eclip ...
- 关于MonoDevelop自动缩进的设置
monoDevelop 下载地址:http://monodevelop.com/Download 下载安装之后,可在unity Edit->Preference->External Too ...
