C#串口介绍以及简单串口通信程序设计实现
C#串口介绍以及简单串口通信程序设计实现
周末,没事干,写个简单的串口通信工具,也算是本周末曾来过,废话不多,直接到主题
串口介绍
串行接口简称串口,也称串行通信接口或串行通讯接口(通常指COM接口),是采用串行通信方式的扩展接口。(至于再详细,自己百度)
串口应用:
工业领域使用较多,比如:数据采集,设备控制等等,好多都是用串口通信来实现!你要是细心的话,你会发现,目前家用国网智能电能表就具备RS485通信总线(串行总线的一种)与RS232可以相互转化(当然一般,非专业的谁也不会闲的蛋疼,趴电表上瞎看,最多也就看看走了多少度电)
RS232 DB9介绍:
1.示意图
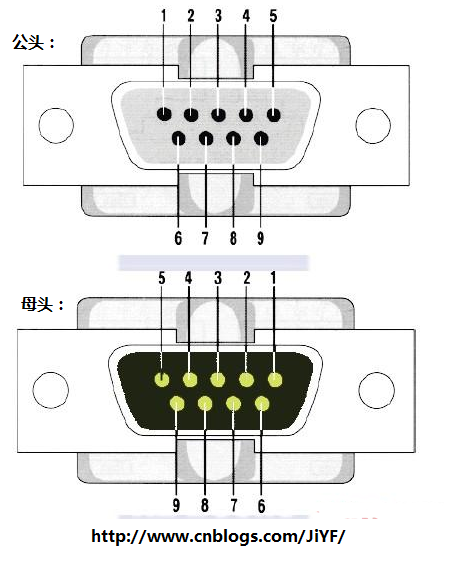
2.针脚介绍:
- 载波检测(DCD)
- 接受数据(RXD)
- 发出数据(TXD)
- 数据终端准备好(DTR)
- 信号地线(SG)
- 数据准备好(DSR)
- 请求发送(RTS)
- 清除发送(CTS)
- 振铃指示(RI)
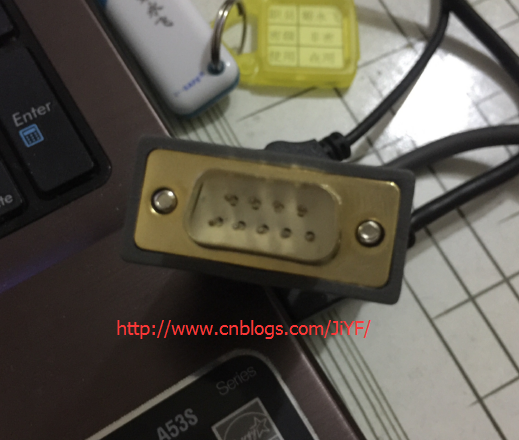
3.实物图:
以下是我购买XX公司的一个usb转串口线:这个头就是一个公头,另一端是一个usb口
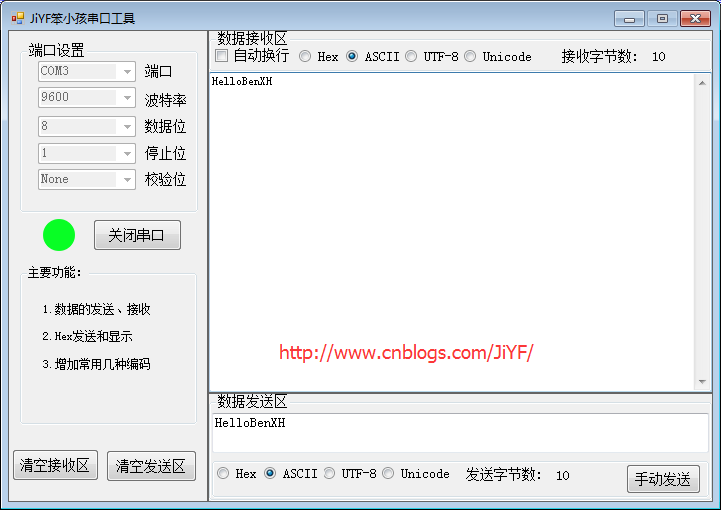
笨小孩串口工具运行图:
1.开启程序

2.发送一行字符串HelloBenXH,直接将针脚的发送和接收链接起来就可以测试了(针脚2 接受数据(RXD) 和3 发出数据(TXD))直接链接,
C#代码实现:采用SerialPort
1.实例化一个SerialPort
1 private SerialPort ComDevice = new SerialPort();
2.初始化参数绑定接收数据事件
 public void init()

         {

             btnSend.Enabled = false;

             cbbComList.Items.AddRange(SerialPort.GetPortNames());

             if (cbbComList.Items.Count > )

             {

                 cbbComList.SelectedIndex = ;

             }

             cbbBaudRate.SelectedIndex = ;

             cbbDataBits.SelectedIndex = ;

             cbbParity.SelectedIndex = ;

             cbbStopBits.SelectedIndex = ;

             pictureBox1.BackgroundImage = Properties.Resources.red;

             ComDevice.DataReceived += new SerialDataReceivedEventHandler(Com_DataReceived);//绑定事件

         }
3.打开串口button事件
 /// <summary>

         /// 打开串口

         /// </summary>

         /// <param name="sender"></param>

         /// <param name="e"></param>

         private void btnOpen_Click(object sender, EventArgs e)

         {

             if (cbbComList.Items.Count <= )

             {

                 MessageBox.Show("没有发现串口,请检查线路!");

                 return;

             }

             if (ComDevice.IsOpen == false)

             {

                 ComDevice.PortName = cbbComList.SelectedItem.ToString();

17                 ComDevice.BaudRate = Convert.ToInt32(cbbBaudRate.SelectedItem.ToString());

18                 ComDevice.Parity = (Parity)Convert.ToInt32(cbbParity.SelectedIndex.ToString());

                 ComDevice.DataBits = Convert.ToInt32(cbbDataBits.SelectedItem.ToString());

                 ComDevice.StopBits = (StopBits)Convert.ToInt32(cbbStopBits.SelectedItem.ToString());

                 try

                 {

                     ComDevice.Open();

                     btnSend.Enabled = true;

                 }

                 catch (Exception ex)

                 {

                     MessageBox.Show(ex.Message, "错误", MessageBoxButtons.OK, MessageBoxIcon.Error);

                     return;

                 }

                 btnOpen.Text = "关闭串口";

                 pictureBox1.BackgroundImage = Properties.Resources.green;

             }

             else

             {

                 try

                 {

                     ComDevice.Close();

                     btnSend.Enabled = false;

                 }

                 catch (Exception ex)

                 {

                     MessageBox.Show(ex.Message, "错误", MessageBoxButtons.OK, MessageBoxIcon.Error);

                 }

                 btnOpen.Text = "打开串口";

                 pictureBox1.BackgroundImage = Properties.Resources.red;

             }

             cbbComList.Enabled = !ComDevice.IsOpen;

             cbbBaudRate.Enabled = !ComDevice.IsOpen;

             cbbParity.Enabled = !ComDevice.IsOpen;

             cbbDataBits.Enabled = !ComDevice.IsOpen;

             cbbStopBits.Enabled = !ComDevice.IsOpen;

         }
4.发送数据
 /// <summary>

         /// 发送数据

         /// </summary>

         /// <param name="sender"></param>

         /// <param name="data"></param>

         public bool SendData(byte[] data)

         {

             if (ComDevice.IsOpen)

             {

                 try

                 {

                     ComDevice.Write(data, , data.Length);//发送数据

                     return true;

                 }

                 catch (Exception ex)

                 {

                     MessageBox.Show(ex.Message, "错误", MessageBoxButtons.OK, MessageBoxIcon.Error);

                 }

             }

             else

             {

                 MessageBox.Show("串口未打开", "错误", MessageBoxButtons.OK, MessageBoxIcon.Error);

             }

             return false;

         }

         /// <summary>

         /// 发送数据button事件

         /// </summary>

         /// <param name="sender"></param>

         /// <param name="e"></param>

         private void btnSend_Click(object sender, EventArgs e)

         {

             byte[] sendData = null;

             if (rbtnSendHex.Checked)

             {

                 sendData = strToHexByte(txtSendData.Text.Trim());

             }

             else if (rbtnSendASCII.Checked)

             {

                 sendData = Encoding.ASCII.GetBytes(txtSendData.Text.Trim());

             }

             else if (rbtnSendUTF8.Checked)

             {

                 sendData = Encoding.UTF8.GetBytes(txtSendData.Text.Trim());

             }

             else if (rbtnSendUnicode.Checked)

             {

                 sendData = Encoding.Unicode.GetBytes(txtSendData.Text.Trim());

             }

             else

             {

                 sendData = Encoding.ASCII.GetBytes(txtSendData.Text.Trim());

             }

             if (this.SendData(sendData))//发送数据成功计数

             {

                 lblSendCount.Invoke(new MethodInvoker(delegate

                 {

                     lblSendCount.Text = (int.Parse(lblSendCount.Text) + txtSendData.Text.Length).ToString();

                 }));

             }

             else

             {

             }

         }

         /// <summary>

         /// 字符串转换16进制字节数组

         /// </summary>

         /// <param name="hexString"></param>

         /// <returns></returns>

         private byte[] strToHexByte(string hexString)

         {

             hexString = hexString.Replace(" ", "");

             if ((hexString.Length % ) != )

                 hexString += " ";

             byte[] returnBytes = new byte[hexString.Length / ];

             for (int i = ; i < returnBytes.Length; i++)

                 returnBytes[i] = Convert.ToByte(hexString.Substring(i * , ).Replace(" ",""), );

             return returnBytes;

         }
5.接收和数据输出
 /// <summary>

         /// 接收数据

         /// </summary>

         /// <param name="sender"></param>

         /// <param name="e"></param>

         private void Com_DataReceived(object sender, SerialDataReceivedEventArgs e)

         {

             byte[] ReDatas = new byte[ComDevice.BytesToRead];

             ComDevice.Read(ReDatas, , ReDatas.Length);//读取数据

             this.AddData(ReDatas);//输出数据

         }

         /// <summary>

         /// 添加数据

         /// </summary>

         /// <param name="data">字节数组</param>

         public void AddData(byte[] data)

         {

             if (rbtnHex.Checked)

             {

                 StringBuilder sb = new StringBuilder();

                 for (int i = ; i < data.Length; i++)

                 {

                     sb.AppendFormat("{0:x2}" + " ", data[i]);

                 }

                 AddContent(sb.ToString().ToUpper());

             }

             else if (rbtnASCII.Checked)

             {

                 AddContent(new ASCIIEncoding().GetString(data));

             }

             else if (rbtnUTF8.Checked)

             {

                 AddContent(new UTF8Encoding().GetString(data));

             }

             else if (rbtnUnicode.Checked)

             {

                 AddContent(new UnicodeEncoding().GetString(data));

             }

             else

             {}

             lblRevCount.Invoke(new MethodInvoker(delegate

             {

                 lblRevCount.Text = (int.Parse(lblRevCount.Text) + data.Length).ToString();

             }));

         }

         /// <summary>

         /// 输入到显示区域

         /// </summary>

         /// <param name="content"></param>

         private void AddContent(string content)

         {

             this.BeginInvoke(new MethodInvoker(delegate

             {

                 if(chkAutoLine.Checked && txtShowData.Text.Length>)

                 {

                     txtShowData.AppendText("\r\n");

                 }

                 txtShowData.AppendText(content);

             }));

         }
6.清空数据区域事件
 /// <summary>

         /// 清空接收区

         /// </summary>

         /// <param name="sender"></param>

         /// <param name="e"></param>

         private void btnClearRev_Click(object sender, EventArgs e)

         {

             txtShowData.Clear();

         }

         /// <summary>

         /// 清空发送区

         /// </summary>

         /// <param name="sender"></param>

         /// <param name="e"></param>

         private void btnClearSend_Click(object sender, EventArgs e)

         {

             txtSendData.Clear();

         }
不足之处,还望见谅!

C#串口介绍以及简单串口通信程序设计实现的更多相关文章
- 使用Java实现简单串口通信
最近一门课要求编写一个上位机串口通信工具,我基于Java编写了一个带有图形界面的简单串口通信工具,下面详述一下过程,供大家参考 ^_^ 一: 首先,你需要下载一个额外的支持Java串口通信操作的jar ...
- 介绍三款串口监控工具:Device Monitoring Studio,portmon,Comspy
在开发上位机下位机通讯程序时,有一个好的监控工具会事半功倍.特在网上找了几款串口监控软件,作了简单对比: 一.Device Monitoring Studio 网址:http://www.hhdsof ...
- VC++编写简单串口上位机程序
VC++编写简单串口上位机程序 转载: http://blog.sina.com.cn/s/articlelist_1809084904_0_1.html VC++编写简单串口上位机程序 串口通信 ...
- 【小梅哥FPGA进阶教程】第九章 基于串口猎人软件的串口示波器
九.基于串口猎人软件的串口示波器 1.实验介绍 本实验,为芯航线开发板的综合实验,该实验利用芯航线开发板上的ADC.独立按键.UART等外设,搭建了一个具备丰富功能的数据采集卡,芯航线开发板负责进行数 ...
- 小草手把手教你 LabVIEW 串口仪器控制——VISA 串口配置
建议大家按我发帖子的顺序来看,方便大家理解.请不要跳跃式的阅读.很多人现在看书,都跳跃式的看,选择性的看,导致有些细节的部分没有掌握到,然后又因为某个细节耽误很多时间.以上只是个人建议,高手可以略过本 ...
- WebRTC介绍及简单应用
WebRTC介绍及简单应用 WebRTC,即Web Real-Time Communication,web实时通信技术.简单地说就是在web浏览器里面引入实时通信,包括音视频通话等. WebRTC实时 ...
- .NET Core微服务之路:利用DotNetty实现一个简单的通信过程
上一篇我们已经全面的介绍过<基于gRPC服务发现与服务治理的方案>,我们先复习一下RPC的调用过程(笔者会在这一节的几篇文章中反复的强调这个过程调用方案),看下图
- (原创)如何使用boost.asio写一个简单的通信程序(一)
boost.asio相信很多人听说过,作为一个跨平台的通信库,它的性能是很出色的,然而它却谈不上好用,里面有很多地方稍不注意就会出错,要正确的用好asio还是需要花一番精力去学习和实践的,本文将通过介 ...
- 串口助手下载-带时间戳的串口助手-极简串口助手-V1.1 自动保存配置参数 能显示收发时间方便调试
1.串口助手下载 2.带时间戳的串口助手,每次收发指令带上了时间戳,方便调试 3.极简串口助手 4.简单易用 高速稳定 5.每次修改的参数都能自动保存,免去了重复配置的工作 下载地址:http://w ...
随机推荐
- Windows的VNC客户端连接Linux无法复制粘贴
问题描述 在Windows里使用VNC客户端远程桌面连接Linux,Linux里的文字信息复制之后无法粘贴到Windows中 解决办法 在Linux中执行命令 vncconfig -nowin& ...
- js 形如 "1,2,3"的操作
查找指定元素在数组中的index. var arr=[1,2,3]; $.inArray(2, arr);//返回1 arr.splice($.inArray(2, arr),1); //从数组中删除 ...
- linux的awk命令解读
转自:http://blog.csdn.net/guoer9973/article/details/44650729 awk是行处理器: 相比较屏幕处理的优点,在处理庞大文件时不会出现内存溢出或是处理 ...
- tp5的学习
1.安装,官网下载 2.访问配置:http://localhost/App/public/ 3.入口文件,项目目录/public // 定义应用目录 define('APP_PATH', __DIR_ ...
- iOS: crush when save Core Data
如果一个页面拥有一个 NSFetchedResultsController 的引用,那么在这个界面将要结束时,一定要 remove 它的 observer - (void)dealloc { //.. ...
- Android 监听屏幕唤醒和关闭的广播
今天希望应用程序的服务运行时,可以监听到屏幕的唤醒.继续百度学习法,连同监听闭幕关闭也一同学习了. 此种情况需要动态注册系统广播.在AndroidManifest.xml中静态注册的实际运行中无效. ...
- Javascript实例教程:querySelector()方法接受一个CSS查询并返回匹配模式的第一个子孙元素,如果没有匹配的元素则返回null。
文章简介:querySelector()方法接受一个CSS查询并返回匹配模式的第一个子孙元素,如果没有匹配的元素则返回null. querySelector()方法接受一个CSS查询并返回匹配模式的第 ...
- Windows 7 完美安装 Visual C++ 6.0
http://wenku.baidu.com/link?url=UiwoH2l4H_IWK6y8JkVNg4slp8gkM_9qudihP0XD4MdMCwm-j1-vINWEjQE1aBCeP121 ...
- 【QT学习】QT GUI应用程序的框架,文件分析
有几个名字,项目名,类名,界面对象名. 1.项目文件 项目名.pro(MyHelloQt.pro) 主要包括项目用到的模块,项目包含哪些源码文件,头文件,窗体文件,生成应用程序的名称. 由QT自动生成 ...
- Ubuntu下用matplotlib作图时显示中文
之前在Ubuntu下用matplotlib作图的时候发现无法正常显示中文,查了一番以后发现是Ubuntu系统和matplotlib库没有共同可显示的中文字体库的原因.用此文章的方法可以解决这一问题. ...