Groovy(java)+Spock+IDEA+maven+Jenkins+SVN+maven-surefire-plugin+maven-surefire-report-plugin/maven-antrun-extended-plugin集成接口测试框架
文章为原创,未经本人授权禁止转载。
一、spock框架环境搭建。
二、基于spock框架的脚本开发。
三、基于spock框架的用例执行并生成HTML报告。
四、集成jenkins生成HTML报告。
五、通过tomcat访问HTML报告。
一、spock框架环境搭建
1、插件:
<plugin>
<groupId>org.apache.maven.plugins</groupId>
<artifactId>maven-compiler-plugin</artifactId>
<version>3.6.1</version>
<configuration>
<source>1.8</source>
<target>1.8</target>
</configuration>
</plugin>
<!-- Optional plugins for using Spock -->
<!-- Only required if names of spec classes don't match default Surefire patterns (`*Test` etc.) -->
<!--使用mvn test命令生成xml和txt结果文件-->
<plugin>
<artifactId>maven-surefire-plugin</artifactId>
<version>2.19.1</version>
<configuration>
<includes>
<!--指定需要执行的测试类路径-->
<include>themis/shenpijieguo/*Spec</include>
</includes>
</configuration>
</plugin>
<!-- Mandatory plugins for using Spock -->
<plugin>
<!-- The gmavenplus plugin is used to compile Groovy code. To learn more about this plugin,
visit https://github.com/groovy/GMavenPlus/wiki -->
<groupId>org.codehaus.gmavenplus</groupId>
<artifactId>gmavenplus-plugin</artifactId>
<version>1.4</version>
<executions>
<execution>
<goals>
<goal>compile</goal>
<goal>testCompile</goal>
</goals>
</execution>
</executions>
</plugin>
<!-- 使用mvn test surefire-report:report 将先生成xml和TXT结果文件,再将xml结果文件转化为HTML报告,该报告排版不好-->
<!--<plugin>-->
<!--<groupId>org.apache.maven.plugins</groupId>-->
<!--<artifactId>maven-surefire-report-plugin</artifactId>-->
<!--<version>2.20</version>-->
<!--<configuration>-->
<!--<showSuccess>true</showSuccess>-->
<!--</configuration>-->
<!--</plugin>-->
<!-- Only required for spock-example build -->
<!--<plugin>-->
<!--<artifactId>maven-deploy-plugin</artifactId>-->
<!--<version>2.5</version>-->
<!--<configuration>-->
<!--<skip>true</skip>-->
<!--</configuration>-->
<!--</plugin>-->
<!-- 用mvn ant生成格式更友好的report -->
<!-- 执行命令为mvn test生成格式更好的HTML报告 -->
<plugin>
<groupId>org.jvnet.maven-antrun-extended-plugin</groupId>
<artifactId>maven-antrun-extended-plugin</artifactId> <!-- //////////// -->
<executions>
<execution>
<id>test-reports</id>
<phase>test</phase> <!-- //////////// -->
<configuration>
<tasks>
<junitreport todir="${basedir}/target/surefire-reports">
<fileset dir="${basedir}/target/surefire-reports">
<include name="**/*.xml" />
</fileset>
<report format="frames" todir="${basedir}/target/surefire-reports" /> <!-- //////////// -->
</junitreport>
</tasks>
</configuration>
<goals>
<goal>run</goal>
</goals>
</execution>
</executions>
<dependencies>
<dependency>
<groupId>org.apache.ant</groupId>
<artifactId>ant-junit</artifactId>
<version>1.10.1</version>
</dependency>
<dependency>
<groupId>org.apache.ant</groupId>
<artifactId>ant-trax</artifactId>
<version>1.8.0</version>
</dependency>
</dependencies>
</plugin>
2、依赖
<!-- Mandatory dependencies for using Spock -->
<dependency>
<groupId>org.spockframework</groupId>
<artifactId>spock-core</artifactId>
<version>1.0-groovy-2.4</version>
</dependency>
<!-- Optional dependencies for using Spock -->
<dependency> <!-- use a specific Groovy version rather than the one specified by spock-core -->
<groupId>org.codehaus.groovy</groupId>
<artifactId>groovy-all</artifactId>
<version>2.4.1</version>
</dependency>
<dependency> <!-- enables mocking of classes (in addition to interfaces) -->
<groupId>cglib</groupId>
<artifactId>cglib-nodep</artifactId>
<version>3.1</version>
<!--<scope>profile.test</scope>-->
</dependency>
<dependency> <!-- enables mocking of classes without default constructor (together with CGLIB) -->
<groupId>org.objenesis</groupId>
<artifactId>objenesis</artifactId>
<version>2.1</version>
<!--<scope>profile.test</scope>-->
</dependency>
<dependency> <!-- only required if Hamcrest matchers are used -->
<groupId>org.hamcrest</groupId>
<artifactId>hamcrest-core</artifactId>
<version>1.3</version>
<!--<scope>profile.test</scope>-->
</dependency>
<dependency>
<groupId>com.h2database</groupId>
<artifactId>h2</artifactId>
<version>1.4.185</version>
</dependency>
<dependency>
<groupId>com.github.rest-driver</groupId>
<artifactId>rest-server-driver</artifactId>
<version>1.1.43</version>
</dependency>
<dependency> <!--mysql 数据库 driver jar-->
<groupId>mysql</groupId>
<artifactId>mysql-connector-java</artifactId>
<version>5.1.6</version>
</dependency>
<!-- Spring jar-->
<dependency>
<groupId>org.springframework</groupId>
<artifactId>spring-core</artifactId>
<version>4.2.3.RELEASE</version>
</dependency>
<dependency>
<groupId>org.springframework</groupId>
<artifactId>spring-aop</artifactId>
<version>4.2.3.RELEASE</version>
<!--<version>${springframework.version}</version>-->
</dependency>
<dependency>
<groupId>org.springframework</groupId>
<artifactId>spring-beans</artifactId>
<version>4.2.3.RELEASE</version>
<!--<version>${springframework.version}</version>-->
</dependency>
<dependency>
<groupId>org.springframework</groupId>
<artifactId>spring-context</artifactId>
<version>4.2.3.RELEASE</version>
<!--<version>${springframework.version}</version>-->
</dependency>
<!--<dependency>-->
<!--<groupId>org.springframework</groupId>-->
<!--<artifactId>spring-context-support</artifactId>-->
<!--<!–<version>${springframework.version}</version>–>-->
<!--</dependency>-->
<dependency>
<groupId>org.springframework</groupId>
<artifactId>spring-expression</artifactId>
<version>4.2.3.RELEASE</version>
</dependency>
<dependency>
<groupId>com.fasterxml.jackson.core</groupId>
<artifactId>jackson-core</artifactId>
<version>2.5.4</version>
</dependency>
<dependency>
<groupId>com.fasterxml.jackson.core</groupId>
<artifactId>jackson-databind</artifactId>
<version>2.5.4</version>
</dependency>
<dependency>
<groupId>com.fasterxml.jackson.core</groupId>
<artifactId>jackson-annotations</artifactId>
<version>2.5.4</version>
</dependency>
<!--读取Excel-->
<dependency>
<groupId>org.apache.poi</groupId>
<artifactId>poi-ooxml</artifactId>
<version>3.10-FINAL</version>
</dependency>
<!--Json-->
<dependency>
<groupId>com.alibaba</groupId>
<artifactId>fastjson</artifactId>
<version>1.1.15</version>
</dependency>
<dependency>
<groupId>com.jayway.jsonpath</groupId>
<artifactId>json-path</artifactId>
<version>2.2.0</version>
</dependency>
<!-- guava -->
<dependency>
<groupId>com.google.guava</groupId>
<artifactId>guava</artifactId>
<version>18.0</version>
</dependency>
<!-- Joda Time-->
<dependency>
<groupId>joda-time</groupId>
<artifactId>joda-time</artifactId>
<version>2.3</version>
</dependency>
<!-- https://mvnrepository.com/artifact/javassist/javassist -->
<dependency>
<groupId>javassist</groupId>
<artifactId>javassist</artifactId>
<version>3.12.1.GA</version>
</dependency>
<!-- // if you don't already have slf4j-api and an implementation of it in the classpath, add this! -->
<dependency>
<groupId>org.slf4j</groupId>
<artifactId>slf4j-api</artifactId>
<version>1.7.13</version>
<scope>test</scope>
</dependency>
<dependency>
<groupId>org.slf4j</groupId>
<artifactId>slf4j-simple</artifactId>
<version>1.7.13</version>
<scope>test</scope>
</dependency>
<!-- https://mvnrepository.com/artifact/junit/junit -->
<dependency>
<groupId>junit</groupId>
<artifactId>junit</artifactId>
<version>4.5</version>
</dependency>
<!--+++++++++++++++++++++++++++++++junit+ant+++++++++++++++++++++++++++++++++++++++++++++++++++++++++++++-->
<!-- https://mvnrepository.com/artifact/org.apache.ant/ant-trax -->
<dependency>
<groupId>org.apache.ant</groupId>
<artifactId>ant-trax</artifactId>
<version>1.8.0</version>
</dependency>
<dependency>
<groupId>org.apache.ant</groupId>
<artifactId>ant-junit</artifactId>
<version>1.10.1</version>
</dependency>
<dependency>
<groupId>org.jvnet.maven-antrun-extended-plugin</groupId>
<artifactId>maven-antrun-extended-plugin</artifactId>
<version>1.43</version>
</dependency>
<!--++++++++++++++++++++++++++++++++++++++testng report++++++++++++++++++++++++++++++++++++++++++++++++++++++-->
<!--<dependency>-->
<!--<groupId>com.relevantcodes</groupId>-->
<!--<artifactId>extentreports</artifactId>-->
<!--<version>2.41.1</version>-->
<!--</dependency>-->
<!--<dependency>-->
<!--<groupId>com.vimalselvam</groupId>-->
<!--<artifactId>testng-extentsreport</artifactId>-->
<!--<version>1.3.1</version>-->
<!--</dependency>-->
<!--<dependency>-->
<!--<groupId>com.aventstack</groupId>-->
<!--<artifactId>extentreports</artifactId>-->
<!--<version>3.0.6</version>-->
<!--</dependency>-->
<!--<!– https://mvnrepository.com/artifact/org.testng/testng –>-->
<!--<dependency>-->
<!--<groupId>org.testng</groupId>-->
<!--<artifactId>testng</artifactId>-->
<!--<version>6.9.10</version>-->
<!--<!– <scope>test</scope> –>-->
<!--</dependency>-->
3、仓库
<repositories>
<!-- Only required if a snapshot version of Spock is used -->
<repository>
<id>spock-snapshots</id>
<url>https://oss.sonatype.org/content/repositories/snapshots/</url>
<snapshots>
<enabled>true</enabled>
</snapshots>
</repository>
</repositories>
<!-- Only required in spock-example build -->
<distributionManagement>
<repository>
<id>foo</id>
<url>file:///fake.repository.to.make.maven.happy</url>
</repository>
<snapshotRepository>
<id>bar</id>
<url>file:///fake.repository.to.make.maven.happy</url>
</snapshotRepository>
</distributionManagement>
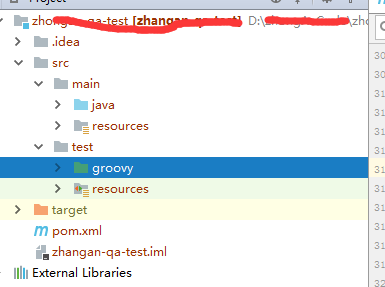
4、创建maven项目,目录结构如下:
二、spock框架的脚本开发
1、创建测试类基类,继承spock框架的抽象类Specification,具体用例测试类继承该基类,在基类中可以对数据库,cookie进行初始化。
/**
* 测试类-基类
* (添加了几个db连接的static属性)
*
* Created by zhf2015 on 16/7/13.
*/
class BaseSpockTest extends Specification {
@Shared static themis_db = CommonUtil.getSqlInstanceOfthemisdb()
/** @Shared static cookie =
* collection.version.Common.getcookie(Common.loginurl,Common.loginparam)
*/
@Shared header_cookie = RestServerDriver.header("Cookie",cookie)
}
2、创建具体测试类,继承上述基类,以下是最简单的写法
package themis.shenpijieguo
import spock.lang.Unroll
import themis.BaseSpockTest
import themis.Common
class applydetailSearchByReportSpec extends BaseSpockTest {
def setupSpec() {
//TODO: 设置每个测试类的环境
}
def setup() {
//TODO: 设置每个测试方法的环境,每个测试方法执行一次
}
@Unroll("该case验证接口url=#url,入参applyStatus=#applyStatus,pageSize=#pageSize,applyId=#applyId,page=#page,ruleId=#ruleId")
def "测试方法1"() {
given: "清理脏数据"
// handleOk &= themis_db.execute('''delete from case_operation_records where id=?''',id);
// and: "添加测试数据"
// handleOk &= themis_db.execute('''delete from case_operation_records where id=?''',id);
println("themis_db:" + themis_db.getConnection().getMetaPropertyValues().toString())
and: "实际值"
def paramStr=""
HashMap paramMap = new HashMap();
paramMap.put("applyStatus",applyStatus)
paramMap.put("pageSize",pageSize)
paramMap.put("page",page)
paramMap.put("ruleId",ruleId)
paramMap.put("applyId",applyId)
Set keySets=paramMap.keySet()
for (String keyName:keySets){
if (paramMap.get(keyName)!=""){
paramStr+="&"+keyName+"="+paramMap.get(keyName)
}
}
paramStr=paramStr.substring(1, paramStr.length())
def reponse = Common.PostUrl(url,paramStr, header_cookie)
// def content = reponse.getContent()
def jsonNodes=reponse.asJson()
println("paramStr:" + paramStr)
println("reponse:" + reponse)
println("jsonNodes:" + jsonNodes)
def r_status = reponse.getStatusCode()
def r_success=jsonNodes.get("success").asText()
def r_errorMsg=jsonNodes.get("errorMsg").asText()
def r_errorCode=jsonNodes.get("errorCode").asText()
def r_attributes=jsonNodes.get("attributes").asText()
def r_attributesJson=jsonNodes.get("attributesJson").asText()
def r_exception=jsonNodes.get("exception").asText()
def r_total=jsonNodes.get("total").asInt()
def r_hasMore=jsonNodes.get("hasMore").asText()
and: "预期值"
//TODO:
expect: "随处可用的断言"
r_status==200&&r_success=="true"&&r_errorMsg==""&&r_errorCode==""&&r_attributes=="null"&&r_attributesJson==""&&r_exception=="null"&&r_total==1&&r_hasMore=="false"
where: "不是必需的测试数据"
index | applyId|ruleId|page|pageSize|applyStatus| url
1 | 10975001|2230012|1|10 |""|Common.hostUrl+"/apply/detailSearchByReport.json"
}
def cleanup() {
//TODO: 清理每个测试方法的环境,每个测试方法执行一次
}
def cleanupSepc() {
//TODO: 清理每个测试类的环境
}
}
三、基于spock框架的用例执行并生成HTML报告
1、采用Junit 执行或者直接运行类文件
import org.junit.runner.RunWith;
import org.junit.runners.Suite;
import org.junit.runners.Suite.SuiteClasses;
import themis.shenpijieguo.applydetailSearchByReportSpec;
import themis.shenpijieguo.applydetailSearchSpec;
@RunWith(Suite.class)
@SuiteClasses({applydetailSearchByReportSpec.class,applydetailSearchSpec.class})
public class JunitTestSuites {
}
2、利用插件中的maven-surefire-plugin+maven-surefire-report-plugin执行生成结果HTML报告:
1)pom.xml文件中maven-surefire-plugin中指定需要执行的测试类
2)使用mvn clean test surefire-report:report命令相当于使用了mvn clean test,mvn surefire-report:report两个命令

3)打开项目路径中\target\site\surefire-report.html文件即为结果报告,报告格式不好,建议使用下面方式执行。

3、利用maven-antrun-extended-plugin插件生成ant 生成的HTML报告
1)在pom.xml中添加maven-surefire-plugin和maven-antrun-extended-plugin
插件
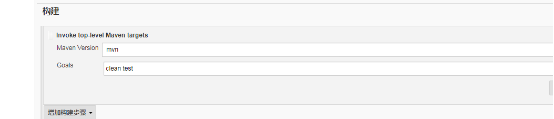
2)使用mvn clean test直接运行。
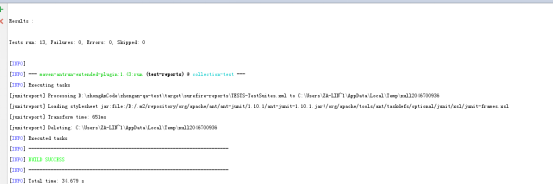
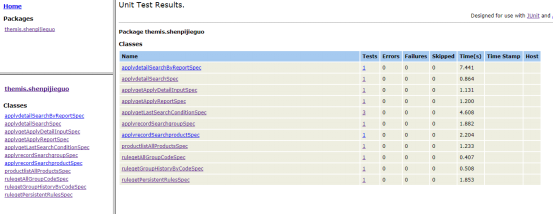
3)打开/target/surefire-reports/index.html文件,显示结果报告
四、集成jenkins生成HTML报告
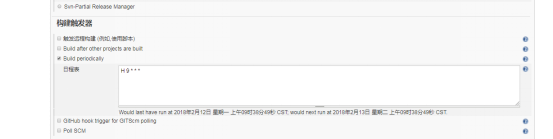
1)使用publish Junit test result插件生成Junit HTML报告.构建自由风格的job,适合结果文件为xml格式
Job设置:
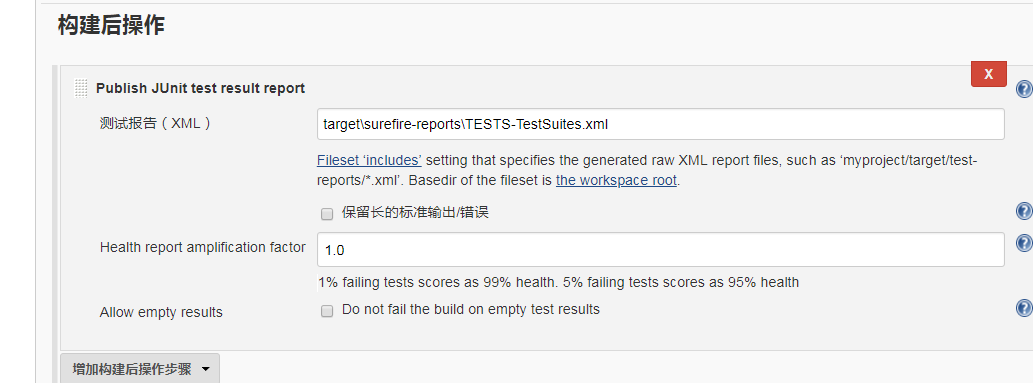
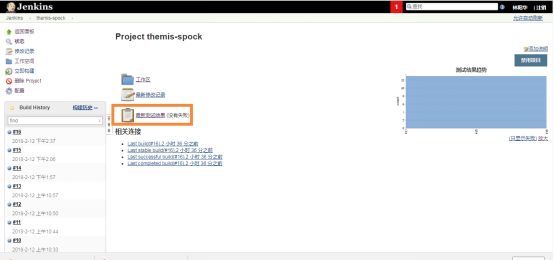
结果报告:

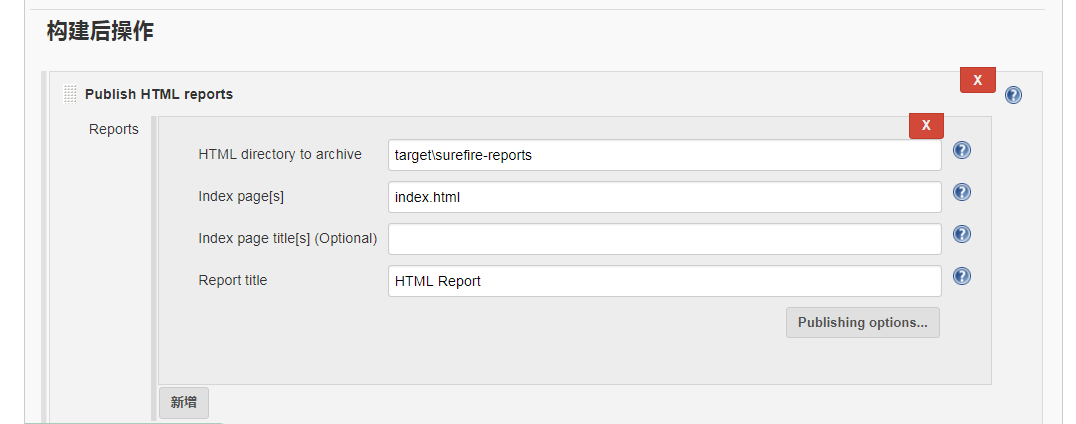
2)使用publish HTML report插件生成ant HTML报告,适合结果文件是HTML格式的方式。
I: Job设置


Ii. 查看报告


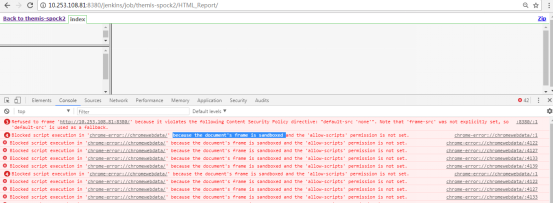
注:ant生成的HTML报告,使用chrome打开时会出现jenkins的安全策略原因导致无法显示,这时可以用IE去显示。
解决办法参考:
https://zhuanlan.zhihu.com/p/28080975
五、通过tomcat访问HTML报告
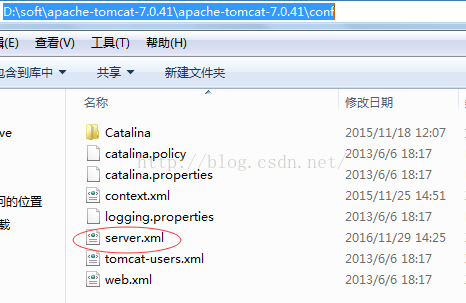
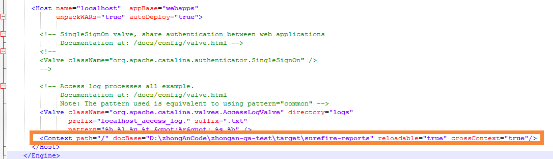
1、修改tomcat服务器conf文件夹下的server.xml文件,添加context标签如下所示
2、增加以下标签,其中docBase为需要访问的外部文件夹路径
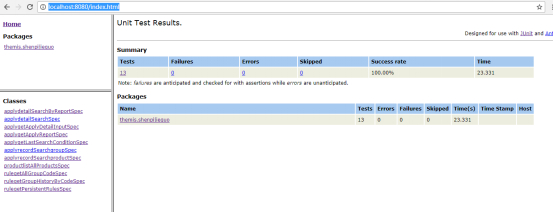
3、启动tomcat服务器,输入url:http://localhost:8080/index.html, 可以访问HTML静态资源。
Groovy(java)+Spock+IDEA+maven+Jenkins+SVN+maven-surefire-plugin+maven-surefire-report-plugin/maven-antrun-extended-plugin集成接口测试框架的更多相关文章
- 搭建基于IDEA+Selenium+Java+TestNG+Maven+Jenkins+SVN的Web端UI自动化测试环境
第一步:工具下载安装配置 JDK安装与配置 IDEA安装与配置 Maven安装与配置 Tomcat部署与配置 Jenkins部署与配置 Svn安装与配置 各浏览器驱动下载与配置 第二步:集成各个工具到 ...
- java+maven+jenkins+svn构建
操作参照:https://blog.csdn.net/qq_34977342/article/details/82346915 1.创建一个自由风格的项目,起名字 2.设置构建项目最大保存数量,与天数 ...
- Selenium+TestNG+Maven+Jenkins+SVN(转载)
转载自:https://blog.csdn.net/u014202301/article/details/72354069 一. 创建Maven项目,下载Selenium和TestNG的依赖(依赖可以 ...
- Jenkins+SVN+Maven+shell 自动化部署实践
JAVA环境中利用Jenkins+svn+maven进行自动化部署实践 一. 前言2 1.介绍jenkins2 1.本地项目打包2 2.通过secureCRT工具,手动传输到服务器2 3.然后 ...
- 自动化测试框架:jmeter + maven+ jenkins
原理:jenkins驱动maven执行,maven驱动jmeter执行 前提条件:windows安装了jmeter.maven.tomcat.jenkins 安装方法参考汇总目录中对应的博文:http ...
- 项目持续集成环境(jenkins + SVN + maven + tomcat)
整体流程 每次SVN上代码有变动,触发自动构建动作,并部署到服务器的tomcat上,具体流程: 1.SVN上提交代码修改 2.maven执行Goals 3.将web工程打成war包 4.关闭服务器的t ...
- 使用Maven+Nexus+Jenkins+Svn+Tomcat+Sonar搭建持续集成环境(二)
前言 上一篇随笔Maven+Nexus+Jenkins+Svn+Tomcat+Sonar搭建持续集成环境(一)介绍maven和nexus的环境搭建,以及如何使用maven和nexus统一管理库 ...
- Jenkins+svn+maven
首先我们在我们的服务器上安装好svn和maven 这里在前两步骤基本上没有啥问题,主要就是在Jenkins的步骤我弄了好长时间,这里记录一下 Jenkins的问题我是在这个网址解决的:http://b ...
- Maven+Nexus+Jenkins+Svn+Tomcat+Sonar搭建持续集成环境(二)
上一篇随笔Maven+Nexus+Jenkins+Svn+Tomcat+Sonar搭建持续集成环境(一)介绍maven和nexus的环境搭建,以及如何使用maven和nexus统一管理库文件和版本,以 ...
随机推荐
- ELK系列--justniffer0.5.12安装报错解决方法
现象: justniffer的0.5.12(安装后显示0.5.13版本)安装过程中需要升级boost至1.46以上版本,同时在make时会出现如下报错: /opt/Python-2.6.6/Pytho ...
- 三:Ionic Framework开发Android应用
第一步:添加Android平台 ionic cordova platform add android 第二步:编译Android应用 中间等待的过程有点长,需要耐心等待,生成的apk此时可以复制至平板 ...
- django使用MySQL时部分配置
若是Django中使用MySQL,需要在项目名文件目录下(而不是应用文件)的__init__.py文件中添加: import pymysqlpymysql.install_as_MySQLdb()
- python链接mysql以及mysql中对表修改的常用语法
MySQL是一个关系型数据库管理系统 ,其体积小.速度快.总体拥有成本低,尤其是开放源码这一特点,一般中小型网站的开发都选择 MySQL 作为网站数据库.在使用过程中不总是和它打交道,导致使用时候都得 ...
- SQL练习总结
[SQL语句练习] 1. 表1: Person +-------------+---------+ | 列名 | 类型 | +-------------+---------+ | PersonId | ...
- STM32通用定时器实现LED灯闪烁
刚才看了一下STM32通用定时器的教程,其实和51的定时器使用差不多.只是因为32的时钟更复杂,可操控的寄存器更多,所以写的时候可能更复杂. 使用通用定时器中断的一般步骤:1.使能定时器时钟 这个需要 ...
- 关于 Unity WebGL 的探索(一)
到今天为止,项目已经上线一个多月了,目前稳定运行,各种 bug 也是有的.至少得到了苹果的两次推荐和 TapTap 一次首页推荐,也算是结项后第一时间对我们项目的一个肯定. 出于各种各样的可描述和不可 ...
- 35、Flask实战第35天:权限设计
二进制及其相关运算 认识二进制 0,1,2,3,4,5,6,7,8,9,10:逢10进1 0,1:逢2进1 二进制转十进制 十进制 二进制 0 0 1 1 2 10 3 11 4 100 255 11 ...
- Linux基础系列-Day7
NFS服务(基于CentOS 7.0) NFS(Network File System),网络文件系统,是linux与linux之间进行文件共享的服务,在NFS应用,本地NFS的客户端可以透明地读写位 ...
- Xamarin开发安装Visual Studio 2015 update2报错的解决办法
Xamarin开发安装Visual Studio 2015 update2报错的解决办法错误信息:update 2 requires a member of the visual studio 201 ...