关于vue的常识问题及解决方法
一.VSCode开发必备插件
1.Beautify:语法高亮;
2.Bracket Pair Colorizer :对括号对进行着色;
3.ESLint:ESLint插件,高亮提示;
4.HTML CSS Support:css提示(支持vue);
5.HTML Snippets:自动帮你输入HTML标签;
6.vetur:目前比较好的Vue语法高亮,快捷提示;
7.vscode-icons:文件图标,方便定位文件;
8.Vue 2 Snippets:API添加了代码片段;
二.页面文件路由跳转文件配置
文件在router文件夹下的index.js下
//首页

import index from '@/components/pages/My/index'

......

routes: [

{

path:'/index',

name:'index',

component:index

}

]
三.跨域解决方法
文件在config文件夹下的index.js下
module.exports = {

dev: {

// Paths

assetsSubDirectory: 'static',

assetsPublicPath: '/',

proxyTable: {

'/api': {

target:'http://192.168.1.240:18080',

changeOrigin: true,

     }

}

},

......
//main.js

import global from './components/global/global';

Vue.prototype.GLOBAL = global;

//global.vue

<script>

// const proxy = 'http://47.92.104.142:8090';

const proxy = '/api';

const userId =12;

const userid =11;

export default

{

proxy,

userId,

userid,

}

</script>
method:'post',

url:this.GLOBAL.proxy+'/app/course/study.do?courseId='+this.courseId+'&userId='+this.GLOBAL.userId,
axios简介:基于 Promise,用于浏览器和 nodejs 的与服务器端通信库。
axios安装:npm install axios --save;
axios引用:import axios from 'axios';
六.vuex的安装使用
1.在项目里安装vux
npm install vux --save;
2.安装vux-loader (这个vux文档似乎没介绍,当初没安装结果报了一堆错误)
npm install vux-loader --save-dev
3.安装less-loader (这个是用以正确编译less源码,否则会出现 ' Cannot GET / ')
npm install less less-loader --save-dev
4.安装yaml-loader (以正确进行语言文件读取, 我没安装似乎也没报错)
npm install yaml-loader --save-dev
5.在build/webpack.base.conf.js 文件进行配置、
'use strict'

const path = require('path')

const utils = require('./utils')

const config = require('../config')

const vueLoaderConfig = require('./vue-loader.conf')

function resolve (dir) {

return path.join(__dirname, '..', dir)

}

//vux的相关配置

const vuxLoader = require('vux-loader')

let webpackConfig = {

entry: {

app: './src/main.js'

},

output: {

path: config.build.assetsRoot,

filename: '[name].js',

publicPath: process.env.NODE_ENV === 'production'

? config.build.assetsPublicPath

: config.dev.assetsPublicPath

},

resolve: {

extensions: ['.js', '.vue', '.json'],

alias: {

'vue$': 'vue/dist/vue.esm.js',

'@': resolve('src'),

}

},

module: {

rules: [

{

test: /\.vue$/,

loader: 'vue-loader',

options: vueLoaderConfig

},

{

test: /\.js$/,

loader: 'babel-loader',

include: [resolve('src'), resolve('test'), resolve('node_modules/webpack-dev-server/client')]

},

{

test: /\.(png|jpe?g|gif|svg)(\?.*)?$/,

loader: 'url-loader',

options: {

limit: 10000,

name: utils.assetsPath('img/[name].[hash:7].[ext]')

}

},

{

test: /\.(mp4|webm|ogg|mp3|wav|flac|aac)(\?.*)?$/,

loader: 'url-loader',

options: {

limit: 10000,

name: utils.assetsPath('media/[name].[hash:7].[ext]')

}

},

{

test: /\.(woff2?|eot|ttf|otf)(\?.*)?$/,

loader: 'url-loader',

options: {

limit: 10000,

name: utils.assetsPath('fonts/[name].[hash:7].[ext]')

}

}

]

},

node: {

// prevent webpack from injecting useless setImmediate polyfill because Vue

// source contains it (although only uses it if it's native).

setImmediate: false,

// prevent webpack from injecting mocks to Node native modules

// that does not make sense for the client

dgram: 'empty',

fs: 'empty',

net: 'empty',

tls: 'empty',

child_process: 'empty'

}

}
module.exports = vuxLoader.merge(webpackConfig, {

plugins: ['vux-ui', 'progress-bar', 'duplicate-style']

})
//notification.vue

<template>

 <div class="notification-top">

 <div class="notification">

 <div>

 <slot name="left"></slot>

 </div>

 <div><slot name="center"></slot></div>

 <div>

 <slot name="right"></slot>

 </div>

 </div>

 </div>

</template>

<script>

</script>

<style>

       .notification-top{

           width: 100%;

           height: 45px;

           line-height: 45px;

           background-color: #3ba4f5;

       }

       .notification{

           width: 92%;

           height: 45px;

           margin: auto;

           display: flex;

           flex-direction: row;

           align-items: center;

           justify-content: space-between;

           position: relative;

       }

       .notification div:nth-child(1){

           width: 12px;

           height: 20px;

           display: flex;

           justify-content: flex-start;

       }

       .notification div:nth-child(1) img{

           width: 100%;

           height: 100%;

       }

       .notification div:nth-child(2){

           font-size: 16px;

           height: 45px;

           color: #fff;

           position: absolute;

           left: 50%;

           transform: translateX(-50%);

           display: -webkit-box;

           -webkit-box-orient: vertical;

           -webkit-line-clamp: 1;

           overflow: hidden;

       }

        .notification div:nth-child(3){

           font-size: 14px;

           color: #fff;

           display: flex;

           justify-content: flex-end;

           align-items: center;

       }

</style>
//其他页面

<notification>

   <img @click="jumpBack" slot="left" class="backWhite" align="center" src="../../../../../static/imgs/Online_course/icon_arrow_left.png"/>

   <span slot="center">{{chapterTitle||chapterstudy.chapterTitle}}</span>

   <span slot="right" @click="section">章节</span>

</notification>

//顶部标题栏

import notification from '@/components/pages/My/notification'

export default {

 components: {

 notification

 },

 ...

}
八.项目开发项目打包上线
第一步:打开项目目录 > config文件夹 > index.js
assetsPublicPath:'/' 改为:assetsPublicPath:'./' (加一个点变为相对路径,有两处都要更改)
注意:此处解决的问题为,项目目录地址我们将绝对地址改为相对地址,不然的话,后台将取不到我们的css以及js,会为空白页面;
然后,我们需要把
productionSourceMap:true改为:productionSourceMap:false
注意:此处为,如果是为true状态,打包完成后会生成一些map文件,虽然map文件帮我们把代码压缩加密了,但是报错的话我们会根本不知道哪里报错了,因此不行,所以我们改成false,这样我们就能准确获取是哪一行报错了;
第二步:打开项目目录 > build文件夹 >utils.js
在图中区域加上
publicPath:'../../',
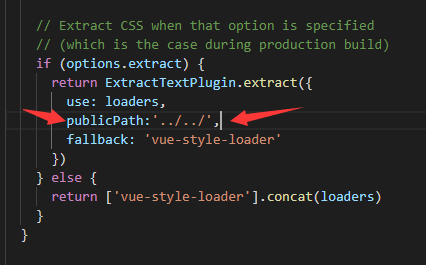
注意:这里是解决项目上线后,背景图片找不到的问题;
第三步:进行打包,输入命令
npm run build
然后你项目里面会多个dist文件,把这个文件给后台放到服务器即可,图片如下:
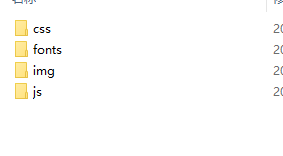
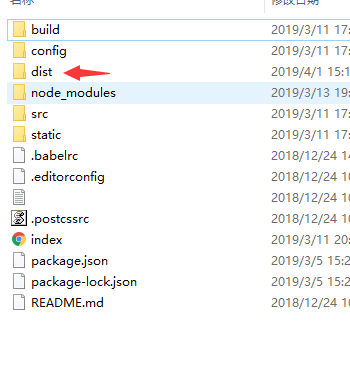 打开dist文件结构为
第四步:上线完成后,你会发现所有接口都是404,对比看一下,发现上线版本还有/api字段,这是因为你没有判断开发环境和生产环境,然后写相应接口;
现在,打开config/dev.env.js 和 config/prod.env.js两个文件
在config/dev.env.js文件中加入一行代码:API_ROOT: ' "/api" '
'use strict'

const merge = require('webpack-merge')

const prodEnv = require('./prod.env')

module.exports = merge(prodEnv, {

  NODE_ENV: '"development"',

  API_ROOT: ' "/api" '//开发环境

})
在config/prod.env.js文件中加入一行代码: API_ROOT: ' "" '
'use strict'

module.exports = {

  NODE_ENV: '"production"',

  API_ROOT: ' "" '//生产环境

}
然后找到你配置接口的地方,process.env是一个全局变量,能够判断当前环境。
const proxy = process.env.API_ROOT;

//登录模块

const requestLogin = proxy+'/login/';//登录页面
这样我们可以判断到如果是开发环境就是有api的,如果是生产环境就是没有api的,如果你没有全局配置接口文件,你就把页面里面的/api改成process.env.API_ROOT即可。
关于vue的常识问题及解决方法的更多相关文章
- Django与Vue语法冲突问题完美解决方法
当我们在django web框架中,使用vue的时候,会遇到语法冲突. 因为vue使用{{}},而django也使用{{}},因此会冲突. 解决办法1: 在django1.5以后,加入了标签: {% ...
- Vue devtool插件安装后无法使用,提示“vue.js not detected”的解决方法
vue devtool下载 极简插件 github vue devtool安装 点击谷歌浏览器箭头所指图标-更多工具-扩展程序 ①:直接将后缀为crx的安装包拖进下图区域即可自动安装 ② ...
- Vue packages version mismatch的解决方法 初来乍到,踩坑日常
初来乍到,踩坑日常 这个问题也是我也是接受别人项目,出现的问题,在下载好依赖后运行的时候报这样的错误 它上面显示两个版本一个vue的版本,一个vue-template-compiler版本,我这边忘了 ...
- vue build错误异常的解决方法
在生成vue项目的时候,出现如下错误 ERROR in static/js/index.d66d806fcdd72b36147b.js from UglifyJs Unexpected token: ...
- vue.js常见的报错信息及其解决方法的记录
1.Vue packages version mismatch 翻译:vue包版本匹配错误 报错样例: 报错原因:通常出现于一些依赖库的更新或者安装新的依赖库之后(可以认为npm update已经成为 ...
- vue 使用v-html指令渲染的富文本无法修改样式的解决方法
最近的vue项目中遇到的问题:v-html渲染的富文本,无法在样式表中修改样式 解决方法: 把需要添加或重置的样式单独放在一个style标签里, 定义为全局样式,代码如下: <style> ...
- vue学习笔记(四)- cmd无法识别vue命令解决方法
解决控制台无法识别vue命令问题 作者:狐狸家的鱼 本文链接:cmd无法识别vue命令解决方法 GitHub:sueRimn 在控制台输入vue会报以下错误: vue : 无法将“vue”项识别为 c ...
- Vue.js devtool插件安装后无法使用的解决办法【最简单有效的解决方法】
在开发vue相关的项目时,使用vue devtools工具是一件极其有趣的事,你所有的操作都马上给你实时反馈. 然而有时候安装好的工具,在chrome中不显示. 在网上找过多次,一直没有找到有效解决方 ...
- Vue+DataTables warning:table id=xxxx -Cannot reinitialize DataTable.报错解决方法
问题描述: 使用DataTables来写列表,用vue来渲染数据,有搜索功能,每次点击搜索就会报错,如下图所示. 问题排查: 找了一系列原因,最后发现是我每次请求完数据之后都会添加分页功能,从而导致了 ...
随机推荐
- Wait--查看等待
--清除等待统计 --===================================================== --清除等待统计 DBCC SQLPERF (N'sys.dm_os_ ...
- LoadRunner10个用户并发测试时分别取不同的参数运行脚本
使用场景,比如说10个用户使用不同的账户名和密码同时并发登录,此时选择如下参数化策略: 参数选择:select next row 选择unique update value on 选择 once 另一 ...
- BP神经网络研究(一)
本随笔参考文章:<BP神经网络详解与实例>(链接: https://pan.baidu.com/s/1e2niIvD9KtLXEqwXtgdXxw 密码: vb8d) 本随笔原创,转发请注 ...
- WebService 常用的设置
1.修改WebService接收长度 <binding name="IAuthServiceSoap11Binding" maxBufferSize="214748 ...
- OCP 12c最新考试题库及答案(071-2)
2019-02-12 16:23:54 2.(4-7) choose the best answer:You need to display the first names of all cust ...
- “全栈2019”Java第七十九章:类中可以嵌套接口吗?
难度 初级 学习时间 10分钟 适合人群 零基础 开发语言 Java 开发环境 JDK v11 IntelliJ IDEA v2018.3 文章原文链接 "全栈2019"Java第 ...
- dict字典;dict的操作
一.字典: 1. 字典 dict 用{}来表示 键值对数据 {key:value} 唯一性 键 都必须是可哈希的 不可变的数据类型就可以当做字典中的键 值 没有任何限制 1.1 字典的创建: ...
- C语言小总结
1.函数 有时程序中要多次实现某一功能,就需要多次重复编写实现此功能的代码,这使程序不精练.因此需要模块化程序设计的思想. 函数的返回值要匹配,若函数有返回值可以不接受,但是函数没有返回值不能接受. ...
- ubuntu14.04安装zabbix
1. apt-get updateapt-get install apache2 mysql-server libapache2-mod-php5 php5-gd php5-mysql php5-co ...
- 循环神经网络RNN原理
一.循环神经网络简介 循环神经网络,英文全称:Recurrent Neural Network,或简单记为RNN.需要注意的是,递归神经网络(Recursive Neural Network)的简写也 ...