【Netty】Netty部分源码分析(启动流程,EventLoop,accept流程,read流程)
源码分析
Netty源码中调用链特别长,且涉及到线程切换等步骤,令人头大:)
1 启动剖析

我们就来看看 netty 中对下面的代码是怎样进行处理的
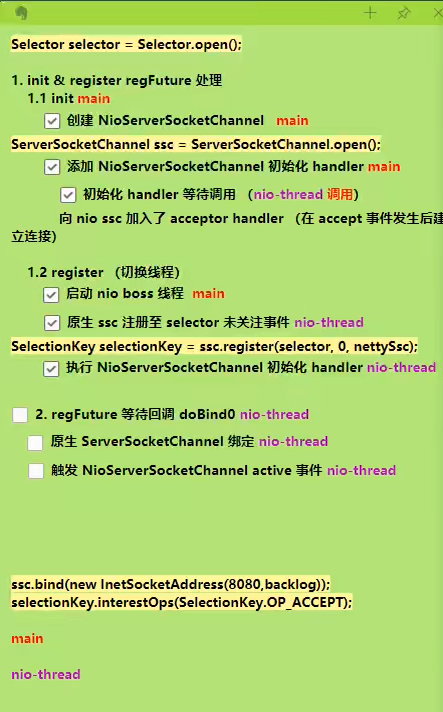
//1 netty 中使用 NioEventLoopGroup (简称 nio boss 线程)来封装线程和 selector

Selector selector = Selector.open();

//2 创建 NioServerSocketChannel,同时会初始化它关联的 handler,以及为原生 ssc 存储 config

NioServerSocketChannel attachment = new NioServerSocketChannel();

//3 创建 NioServerSocketChannel 时,创建了 java 原生的 ServerSocketChannel

ServerSocketChannel serverSocketChannel = ServerSocketChannel.open();

serverSocketChannel.configureBlocking(false);

//4 启动 nio boss 线程执行接下来的操作

//5 注册(仅关联 selector 和 NioServerSocketChannel),未关注事件

SelectionKey selectionKey = serverSocketChannel.register(selector, 0, attachment);

//6 head -> 初始化器 -> ServerBootstrapAcceptor -> tail,初始化器是一次性的,只为添加 acceptor

//7 绑定端口

serverSocketChannel.bind(new InetSocketAddress(8080));

//8 触发 channel active 事件,在 head 中关注 op_accept 事件

selectionKey.interestOps(SelectionKey.OP_ACCEPT);
入口 io.netty.bootstrap.ServerBootstrap#bind
关键代码 io.netty.bootstrap.AbstractBootstrap#doBind
private ChannelFuture doBind(final SocketAddress localAddress) {

	// 1. 执行初始化和注册 regFuture 会由 initAndRegister 设置其是否完成,从而回调 3.2 处代码

    final ChannelFuture regFuture = initAndRegister();

    final Channel channel = regFuture.channel();

    if (regFuture.cause() != null) {

        return regFuture;

    }

    // 2. 因为是 initAndRegister 异步执行,需要分两种情况来看,调试时也需要通过 suspend 断点类型加以区分

    // 2.1 如果已经完成

    if (regFuture.isDone()) {

        ChannelPromise promise = channel.newPromise();

        // 3.1 立刻调用 doBind0

        doBind0(regFuture, channel, localAddress, promise);

        return promise;

    }

    // 2.2 还没有完成

    else {

        final PendingRegistrationPromise promise = new PendingRegistrationPromise(channel);

        // 3.2 回调 doBind0

        //addListener异步,此处切换执行线程到Nio线程

        regFuture.addListener(new ChannelFutureListener() {

            @Override

            public void operationComplete(ChannelFuture future) throws Exception {

                Throwable cause = future.cause();

                if (cause != null) {

                    // 处理异常...

                    promise.setFailure(cause);

                } else {

                    promise.registered();

					// 3. 由注册线程去执行 doBind0

                    doBind0(regFuture, channel, localAddress, promise);

                }

            }

        });

        return promise;

    }

}
关键代码 io.netty.bootstrap.AbstractBootstrap#initAndRegister
final ChannelFuture initAndRegister() {

    Channel channel = null;

    try {

        channel = channelFactory.newChannel();

        // 1.1 初始化 - 做的事就是添加一个初始化器 ChannelInitializer

        init(channel);

    } catch (Throwable t) {

        // 处理异常...

        return new DefaultChannelPromise(new FailedChannel(), GlobalEventExecutor.INSTANCE).setFailure(t);

    }

    // 1.2 注册 - 做的事就是将原生 channel 注册到 selector 上

    ChannelFuture regFuture = config().group().register(channel);

    if (regFuture.cause() != null) {

        // 处理异常...

    }

    return regFuture;

}
关键代码 io.netty.bootstrap.ServerBootstrap#init
// 这里 channel 实际上是 NioServerSocketChannel

void init(Channel channel) throws Exception {

    final Map<ChannelOption<?>, Object> options = options0();

    synchronized (options) {

        setChannelOptions(channel, options, logger);

    }

    final Map<AttributeKey<?>, Object> attrs = attrs0();

    synchronized (attrs) {

        for (Entry<AttributeKey<?>, Object> e: attrs.entrySet()) {

            @SuppressWarnings("unchecked")

            AttributeKey<Object> key = (AttributeKey<Object>) e.getKey();

            channel.attr(key).set(e.getValue());

        }

    }

    ChannelPipeline p = channel.pipeline();

    final EventLoopGroup currentChildGroup = childGroup;

    final ChannelHandler currentChildHandler = childHandler;

    final Entry<ChannelOption<?>, Object>[] currentChildOptions;

    final Entry<AttributeKey<?>, Object>[] currentChildAttrs;

    synchronized (childOptions) {

        currentChildOptions = childOptions.entrySet().toArray(newOptionArray(0));

    }

    synchronized (childAttrs) {

        currentChildAttrs = childAttrs.entrySet().toArray(newAttrArray(0));

    }

    // 为 NioServerSocketChannel 添加初始化器

    p.addLast(new ChannelInitializer<Channel>() {

        @Override

        public void initChannel(final Channel ch) throws Exception {

            final ChannelPipeline pipeline = ch.pipeline();

            ChannelHandler handler = config.handler();

            if (handler != null) {

                pipeline.addLast(handler);

            }

            // 初始化器的职责是将 ServerBootstrapAcceptor 加入至 NioServerSocketChannel

            ch.eventLoop().execute(new Runnable() {

                @Override

                public void run() {

                    pipeline.addLast(new ServerBootstrapAcceptor(

                            ch, currentChildGroup, currentChildHandler, currentChildOptions, currentChildAttrs));

                }

            });

        }

    });

}
关键代码 io.netty.channel.AbstractChannel.AbstractUnsafe#register
public final void register(EventLoop eventLoop, final ChannelPromise promise) {

    // 一些检查,略...

    AbstractChannel.this.eventLoop = eventLoop;

    if (eventLoop.inEventLoop()) {

        register0(promise);

    } else {

        try {

            // 首次执行 execute 方法时,会启动 nio 线程,之后注册等操作在 nio 线程上执行

            // 因为只有一个 NioServerSocketChannel 因此,也只会有一个 boss nio 线程

            // 这行代码完成的事实是 main -> nio boss 线程的切换

            eventLoop.execute(new Runnable() {

                @Override

                public void run() {

                    register0(promise);

                }

            });

        } catch (Throwable t) {

            // 日志记录...

            closeForcibly();

            closeFuture.setClosed();

            safeSetFailure(promise, t);

        }

    }

}
io.netty.channel.AbstractChannel.AbstractUnsafe#register0
private void register0(ChannelPromise promise) {

    try {

        if (!promise.setUncancellable() || !ensureOpen(promise)) {

            return;

        }

        boolean firstRegistration = neverRegistered;

        // 1.2.1 原生的 nio channel 绑定到 selector 上,注意此时没有注册 selector 关注事件,附件为 NioServerSocketChannel

        doRegister();

        neverRegistered = false;

        registered = true;

        // 1.2.2 执行 NioServerSocketChannel 初始化器的 initChannel

        pipeline.invokeHandlerAddedIfNeeded();

        // 回调 3.2 io.netty.bootstrap.AbstractBootstrap#doBind0

        safeSetSuccess(promise);

        pipeline.fireChannelRegistered();

        // 对应 server socket channel 还未绑定,isActive 为 false

        if (isActive()) {

            if (firstRegistration) {

                pipeline.fireChannelActive();

            } else if (config().isAutoRead()) {

                beginRead();

            }

        }

    } catch (Throwable t) {

        // Close the channel directly to avoid FD leak.

        closeForcibly();

        closeFuture.setClosed();

        safeSetFailure(promise, t);

    }

}
关键代码 io.netty.channel.ChannelInitializer#initChannel
private boolean initChannel(ChannelHandlerContext ctx) throws Exception {

    if (initMap.add(ctx)) { // Guard against re-entrance.

        try {

            // 1.2.2.1 执行初始化

            initChannel((C) ctx.channel());

        } catch (Throwable cause) {

            exceptionCaught(ctx, cause);

        } finally {

            // 1.2.2.2 移除初始化器

            ChannelPipeline pipeline = ctx.pipeline();

            if (pipeline.context(this) != null) {

                pipeline.remove(this);

            }

        }

        return true;

    }

    return false;

}
关键代码 io.netty.bootstrap.AbstractBootstrap#doBind0
// 3.1 或 3.2 执行 doBind0

private static void doBind0(

        final ChannelFuture regFuture, final Channel channel,

        final SocketAddress localAddress, final ChannelPromise promise) {

    channel.eventLoop().execute(new Runnable() {

        @Override

        public void run() {

            if (regFuture.isSuccess()) {

                channel.bind(localAddress, promise).addListener(ChannelFutureListener.CLOSE_ON_FAILURE);

            } else {

                promise.setFailure(regFuture.cause());

            }

        }

    });

}
关键代码 io.netty.channel.AbstractChannel.AbstractUnsafe#bind
public final void bind(final SocketAddress localAddress, final ChannelPromise promise) {

    assertEventLoop();

    if (!promise.setUncancellable() || !ensureOpen(promise)) {

        return;

    }

    if (Boolean.TRUE.equals(config().getOption(ChannelOption.SO_BROADCAST)) &&

        localAddress instanceof InetSocketAddress &&

        !((InetSocketAddress) localAddress).getAddress().isAnyLocalAddress() &&

        !PlatformDependent.isWindows() && !PlatformDependent.maybeSuperUser()) {

        // 记录日志...

    }

    boolean wasActive = isActive();

    try {

        // 3.3 执行端口绑定

        doBind(localAddress);

    } catch (Throwable t) {

        safeSetFailure(promise, t);

        closeIfClosed();

        return;

    }

    if (!wasActive && isActive()) {

        invokeLater(new Runnable() {

            @Override

            public void run() {

                // 3.4 触发 active 事件

                pipeline.fireChannelActive();

            }

        });

    }

    safeSetSuccess(promise);

}
3.3 关键代码 io.netty.channel.socket.nio.NioServerSocketChannel#doBind
protected void doBind(SocketAddress localAddress) throws Exception {

    if (PlatformDependent.javaVersion() >= 7) {

        javaChannel().bind(localAddress, config.getBacklog());

    } else {

        javaChannel().socket().bind(localAddress, config.getBacklog());

    }

}
3.4 关键代码 io.netty.channel.DefaultChannelPipeline.HeadContext#channelActive
public void channelActive(ChannelHandlerContext ctx) {

    ctx.fireChannelActive();

	// 触发 read (NioServerSocketChannel 上的 read 不是读取数据,只是为了触发 channel 的事件注册)

    readIfIsAutoRead();

}
关键代码 io.netty.channel.nio.AbstractNioChannel#doBeginRead
protected void doBeginRead() throws Exception {

    // Channel.read() or ChannelHandlerContext.read() was called

    final SelectionKey selectionKey = this.selectionKey;

    if (!selectionKey.isValid()) {

        return;

    }

    readPending = true;

    final int interestOps = selectionKey.interestOps();

    // readInterestOp 取值是 16,在 NioServerSocketChannel 创建时初始化好,代表关注 accept 事件

    if ((interestOps & readInterestOp) == 0) {

        selectionKey.interestOps(interestOps | readInterestOp);

    }

}
2 NioEventLoop 剖析

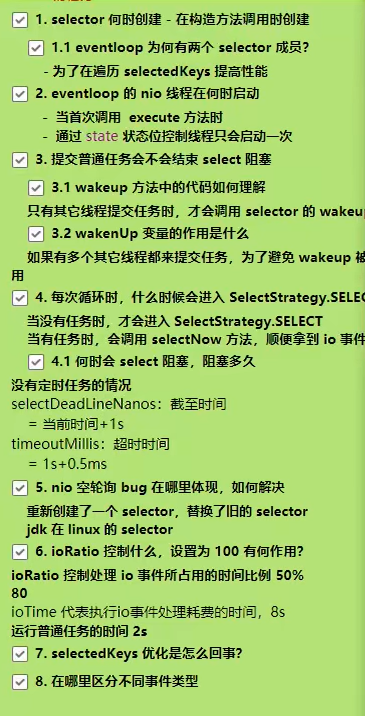
NioEventLoop 线程不仅要处理 IO 事件,还要处理 Task(包括普通任务和定时任务),
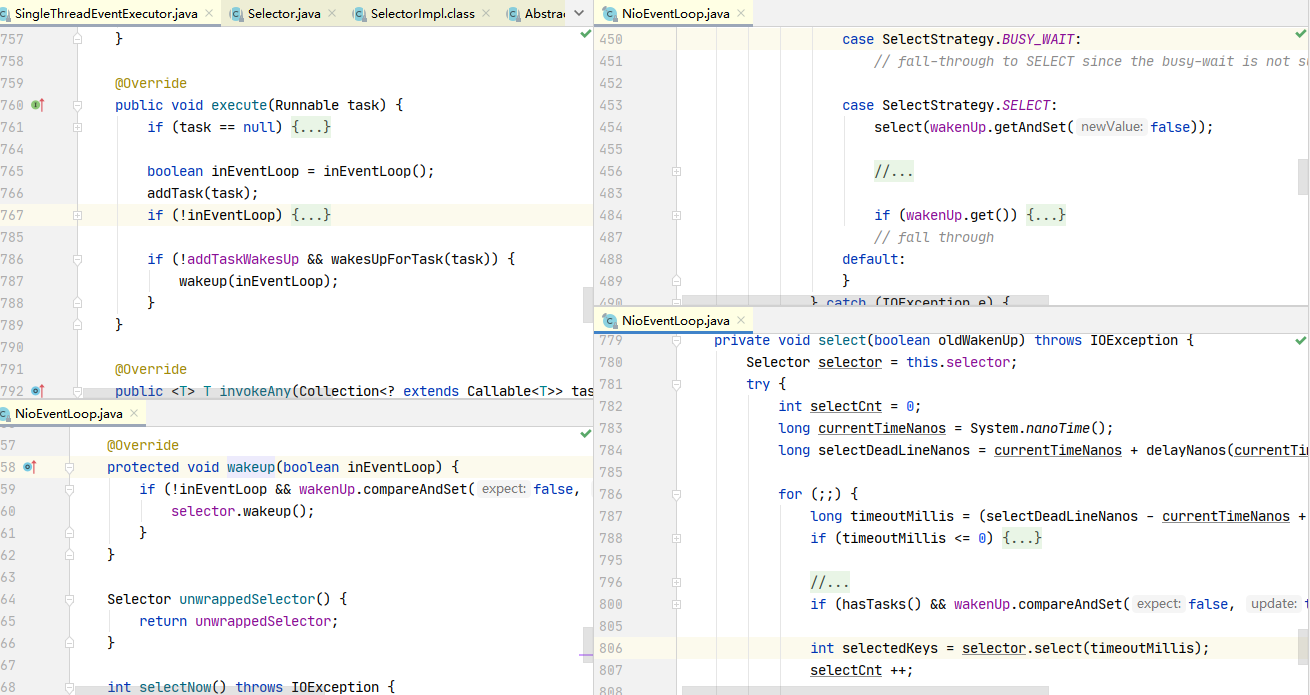
提交任务代码 io.netty.util.concurrent.SingleThreadEventExecutor#execute
public void execute(Runnable task) {

    if (task == null) {

        throw new NullPointerException("task");

    }

    boolean inEventLoop = inEventLoop();

    // 添加任务,其中队列使用了 jctools 提供的 mpsc 无锁队列

    addTask(task);

    if (!inEventLoop) {

        // inEventLoop 如果为 false 表示由其它线程来调用 execute,即首次调用,这时需要向 eventLoop 提交首个任务,启动死循环,会执行到下面的 doStartThread

        startThread();

        if (isShutdown()) {

            // 如果已经 shutdown,做拒绝逻辑,代码略...

        }

    }

    if (!addTaskWakesUp && wakesUpForTask(task)) {

        // 如果线程由于 IO select 阻塞了,添加的任务的线程需要负责唤醒 NioEventLoop 线程

        wakeup(inEventLoop);

    }

}
唤醒 select 阻塞线程io.netty.channel.nio.NioEventLoop#wakeup
@Override

protected void wakeup(boolean inEventLoop) {

    if (!inEventLoop && wakenUp.compareAndSet(false, true)) {

        selector.wakeup();

    }

}
启动 EventLoop 主循环 io.netty.util.concurrent.SingleThreadEventExecutor#doStartThread
private void doStartThread() {

    assert thread == null;

    executor.execute(new Runnable() {

        @Override

        public void run() {

            // 将线程池的当前线程保存在成员变量中,以便后续使用

            thread = Thread.currentThread();

            if (interrupted) {

                thread.interrupt();

            }

            boolean success = false;

            updateLastExecutionTime();

            try {

                // 调用外部类 SingleThreadEventExecutor 的 run 方法,进入死循环,run 方法见下

                SingleThreadEventExecutor.this.run();

                success = true;

            } catch (Throwable t) {

                logger.warn("Unexpected exception from an event executor: ", t);

            } finally {

				// 清理工作,代码略...

            }

        }

    });

}
io.netty.channel.nio.NioEventLoop#run 主要任务是执行死循环,不断看有没有新任务,有没有 IO 事件
protected void run() {

    for (;;) {

        try {

            try {

                // calculateStrategy 的逻辑如下:

                // 有任务,会执行一次 selectNow,清除上一次的 wakeup 结果,无论有没有 IO 事件,都会跳过 switch

                // 没有任务,会匹配 SelectStrategy.SELECT,看是否应当阻塞

                switch (selectStrategy.calculateStrategy(selectNowSupplier, hasTasks())) {

                    case SelectStrategy.CONTINUE:

                        continue;

                    case SelectStrategy.BUSY_WAIT:

                    case SelectStrategy.SELECT:

                        // 因为 IO 线程和提交任务线程都有可能执行 wakeup,而 wakeup 属于比较昂贵的操作,因此使用了一个原子布尔对象 wakenUp,它取值为 true 时,表示该由当前线程唤醒

                        // 进行 select 阻塞,并设置唤醒状态为 false

                        boolean oldWakenUp = wakenUp.getAndSet(false);

                        // 如果在这个位置,非 EventLoop 线程抢先将 wakenUp 置为 true,并 wakeup

                        // 下面的 select 方法不会阻塞

                        // 等 runAllTasks 处理完成后,到再循环进来这个阶段新增的任务会不会及时执行呢?

                        // 因为 oldWakenUp 为 true,因此下面的 select 方法就会阻塞,直到超时

                        // 才能执行,让 select 方法无谓阻塞

                        select(oldWakenUp);

                        if (wakenUp.get()) {

                            selector.wakeup();

                        }

                    default:

                }

            } catch (IOException e) {

                rebuildSelector0();

                handleLoopException(e);

                continue;

            }

            cancelledKeys = 0;

            needsToSelectAgain = false;

            // ioRatio 默认是 50

            final int ioRatio = this.ioRatio;

            if (ioRatio == 100) {

                try {

                    processSelectedKeys();

                } finally {

                    // ioRatio 为 100 时,总是运行完所有非 IO 任务

                    runAllTasks();

                }

            } else {

                final long ioStartTime = System.nanoTime();

                try {

                    processSelectedKeys();

                } finally {

                    // 记录 io 事件处理耗时

                    final long ioTime = System.nanoTime() - ioStartTime;

                    // 运行非 IO 任务,一旦超时会退出 runAllTasks

                    runAllTasks(ioTime * (100 - ioRatio) / ioRatio);

                }

            }

        } catch (Throwable t) {

            handleLoopException(t);

        }

        try {

            if (isShuttingDown()) {

                closeAll();

                if (confirmShutdown()) {

                    return;

                }

            }

        } catch (Throwable t) {

            handleLoopException(t);

        }

    }

}
️ 注意
这里有个费解的地方就是 wakeup,它既可以由提交任务的线程来调用(比较好理解),也可以由 EventLoop 线程来调用(比较费解),这里要知道 wakeup 方法的效果:
- 由非 EventLoop 线程调用,会唤醒当前在执行 select 阻塞的 EventLoop 线程
- 由 EventLoop 自己调用,会本次的 wakeup 会取消下一次的 select 操作
参考下图

io.netty.channel.nio.NioEventLoop#select
private void select(boolean oldWakenUp) throws IOException {

    Selector selector = this.selector;

    try {

        int selectCnt = 0;

        long currentTimeNanos = System.nanoTime();

        // 计算等待时间

        // * 没有 scheduledTask,超时时间为 1s

        // * 有 scheduledTask,超时时间为 `下一个定时任务执行时间 - 当前时间`

        long selectDeadLineNanos = currentTimeNanos + delayNanos(currentTimeNanos);

        for (;;) {

            long timeoutMillis = (selectDeadLineNanos - currentTimeNanos + 500000L) / 1000000L;

            // 如果超时,退出循环

            if (timeoutMillis <= 0) {

                if (selectCnt == 0) {

                    selector.selectNow();

                    selectCnt = 1;

                }

                break;

            }

            // 如果期间又有 task 退出循环,如果没这个判断,那么任务就会等到下次 select 超时时才能被执行

            // wakenUp.compareAndSet(false, true) 是让非 NioEventLoop 不必再执行 wakeup

            if (hasTasks() && wakenUp.compareAndSet(false, true)) {

                selector.selectNow();

                selectCnt = 1;

                break;

            }

            // select 有限时阻塞

            // 注意 nio 有 bug,当 bug 出现时,select 方法即使没有时间发生,也不会阻塞住,导致不断空轮询,cpu 占用 100%

            int selectedKeys = selector.select(timeoutMillis);

            // 计数加 1

            selectCnt ++;

            // 醒来后,如果有 IO 事件、或是由非 EventLoop 线程唤醒,或者有任务,退出循环

            if (selectedKeys != 0 || oldWakenUp || wakenUp.get() || hasTasks() || hasScheduledTasks()) {

                break;

            }

            if (Thread.interrupted()) {

               	// 线程被打断,退出循环

                // 记录日志

                selectCnt = 1;

                break;

            }

            long time = System.nanoTime();

            if (time - TimeUnit.MILLISECONDS.toNanos(timeoutMillis) >= currentTimeNanos) {

                // 如果超时,计数重置为 1,下次循环就会 break

                selectCnt = 1;

            }

            // 计数超过阈值,由 io.netty.selectorAutoRebuildThreshold 指定,默认 512

            // 这是为了解决 nio 空轮询 bug

            else if (SELECTOR_AUTO_REBUILD_THRESHOLD > 0 &&

                    selectCnt >= SELECTOR_AUTO_REBUILD_THRESHOLD) {

                // 重建 selector

                selector = selectRebuildSelector(selectCnt);

                selectCnt = 1;

                break;

            }

            currentTimeNanos = time;

        }

        if (selectCnt > MIN_PREMATURE_SELECTOR_RETURNS) {

            // 记录日志

        }

    } catch (CancelledKeyException e) {

        // 记录日志

    }

}
处理 keys io.netty.channel.nio.NioEventLoop#processSelectedKeys
private void processSelectedKeys() {

    if (selectedKeys != null) {

        // 通过反射将 Selector 实现类中的就绪事件集合替换为 SelectedSelectionKeySet

        // SelectedSelectionKeySet 底层为数组实现,可以提高遍历性能(原本为 HashSet)

        processSelectedKeysOptimized();

    } else {

        processSelectedKeysPlain(selector.selectedKeys());

    }

}
io.netty.channel.nio.NioEventLoop#processSelectedKey
private void processSelectedKey(SelectionKey k, AbstractNioChannel ch) {

    final AbstractNioChannel.NioUnsafe unsafe = ch.unsafe();

    // 当 key 取消或关闭时会导致这个 key 无效

    if (!k.isValid()) {

        // 无效时处理...

        return;

    }

    try {

        int readyOps = k.readyOps();

        // 连接事件

        if ((readyOps & SelectionKey.OP_CONNECT) != 0) {

            int ops = k.interestOps();

            ops &= ~SelectionKey.OP_CONNECT;

            k.interestOps(ops);

            unsafe.finishConnect();

        }

        // 可写事件

        if ((readyOps & SelectionKey.OP_WRITE) != 0) {

            ch.unsafe().forceFlush();

        }

        // 可读或可接入事件

        if ((readyOps & (SelectionKey.OP_READ | SelectionKey.OP_ACCEPT)) != 0 || readyOps == 0) {

            // 如果是可接入 io.netty.channel.nio.AbstractNioMessageChannel.NioMessageUnsafe#read

            // 如果是可读 io.netty.channel.nio.AbstractNioByteChannel.NioByteUnsafe#read

            unsafe.read();

        }

    } catch (CancelledKeyException ignored) {

        unsafe.close(unsafe.voidPromise());

    }

}
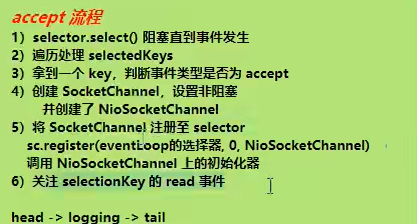
3 accept 剖析

nio 中如下代码,在 netty 中的流程
//1 阻塞直到事件发生

selector.select();

Iterator<SelectionKey> iter = selector.selectedKeys().iterator();

while (iter.hasNext()) {

    //2 拿到一个事件

    SelectionKey key = iter.next();

    //3 如果是 accept 事件

    if (key.isAcceptable()) {

        //4 执行 accept

        SocketChannel channel = serverSocketChannel.accept();

        channel.configureBlocking(false);

        //5 关注 read 事件

        channel.register(selector, SelectionKey.OP_READ);

    }

    // ...

}
先来看可接入事件处理(accept)
io.netty.channel.nio.AbstractNioMessageChannel.NioMessageUnsafe#read
public void read() {

    assert eventLoop().inEventLoop();

    final ChannelConfig config = config();

    final ChannelPipeline pipeline = pipeline();

    final RecvByteBufAllocator.Handle allocHandle = unsafe().recvBufAllocHandle();

    allocHandle.reset(config);

    boolean closed = false;

    Throwable exception = null;

    try {

        try {

            do {

				// doReadMessages 中执行了 accept 并创建 NioSocketChannel 作为消息放入 readBuf

                // readBuf 是一个 ArrayList 用来缓存消息

                int localRead = doReadMessages(readBuf);

                if (localRead == 0) {

                    break;

                }

                if (localRead < 0) {

                    closed = true;

                    break;

                }

				// localRead 为 1,就一条消息,即接收一个客户端连接

                allocHandle.incMessagesRead(localRead);

            } while (allocHandle.continueReading());

        } catch (Throwable t) {

            exception = t;

        }

        int size = readBuf.size();

        for (int i = 0; i < size; i ++) {

            readPending = false;

            // 触发 read 事件,让 pipeline 上的 handler 处理,这时是处理

            // io.netty.bootstrap.ServerBootstrap.ServerBootstrapAcceptor#channelRead

            pipeline.fireChannelRead(readBuf.get(i));

        }

        readBuf.clear();

        allocHandle.readComplete();

        pipeline.fireChannelReadComplete();

        if (exception != null) {

            closed = closeOnReadError(exception);

            pipeline.fireExceptionCaught(exception);

        }

        if (closed) {

            inputShutdown = true;

            if (isOpen()) {

                close(voidPromise());

            }

        }

    } finally {

        if (!readPending && !config.isAutoRead()) {

            removeReadOp();

        }

    }

}
关键代码 io.netty.bootstrap.ServerBootstrap.ServerBootstrapAcceptor#channelRead
public void channelRead(ChannelHandlerContext ctx, Object msg) {

    // 这时的 msg 是 NioSocketChannel

    final Channel child = (Channel) msg;

    // NioSocketChannel 添加  childHandler 即初始化器

    child.pipeline().addLast(childHandler);

    // 设置选项

    setChannelOptions(child, childOptions, logger);

    for (Entry<AttributeKey<?>, Object> e: childAttrs) {

        child.attr((AttributeKey<Object>) e.getKey()).set(e.getValue());

    }

    try {

        // 注册 NioSocketChannel 到 nio worker 线程,接下来的处理也移交至 nio worker 线程

        childGroup.register(child).addListener(new ChannelFutureListener() {

            @Override

            public void operationComplete(ChannelFuture future) throws Exception {

                if (!future.isSuccess()) {

                    forceClose(child, future.cause());

                }

            }

        });

    } catch (Throwable t) {

        forceClose(child, t);

    }

}
又回到了熟悉的 io.netty.channel.AbstractChannel.AbstractUnsafe#register 方法
public final void register(EventLoop eventLoop, final ChannelPromise promise) {

    // 一些检查,略...

    AbstractChannel.this.eventLoop = eventLoop;

    if (eventLoop.inEventLoop()) {

        register0(promise);

    } else {

        try {

            // 这行代码完成的事实是 nio boss -> nio worker 线程的切换

            eventLoop.execute(new Runnable() {

                @Override

                public void run() {

                    register0(promise);

                }

            });

        } catch (Throwable t) {

            // 日志记录...

            closeForcibly();

            closeFuture.setClosed();

            safeSetFailure(promise, t);

        }

    }

}
io.netty.channel.AbstractChannel.AbstractUnsafe#register0
private void register0(ChannelPromise promise) {

    try {

        if (!promise.setUncancellable() || !ensureOpen(promise)) {

            return;

        }

        boolean firstRegistration = neverRegistered;

        doRegister();

        neverRegistered = false;

        registered = true;

        // 执行初始化器,执行前 pipeline 中只有 head -> 初始化器 -> tail

        pipeline.invokeHandlerAddedIfNeeded();

        // 执行后就是 head -> logging handler -> my handler -> tail

        safeSetSuccess(promise);

        pipeline.fireChannelRegistered();

        if (isActive()) {

            if (firstRegistration) {

                // 触发 pipeline 上 active 事件

                pipeline.fireChannelActive();

            } else if (config().isAutoRead()) {

                beginRead();

            }

        }

    } catch (Throwable t) {

        closeForcibly();

        closeFuture.setClosed();

        safeSetFailure(promise, t);

    }

}
回到了熟悉的代码 io.netty.channel.DefaultChannelPipeline.HeadContext#channelActive
public void channelActive(ChannelHandlerContext ctx) {

    ctx.fireChannelActive();

	// 触发 read (NioSocketChannel 这里 read,只是为了触发 channel 的事件注册,还未涉及数据读取)

    readIfIsAutoRead();

}
io.netty.channel.nio.AbstractNioChannel#doBeginRead
protected void doBeginRead() throws Exception {

    // Channel.read() or ChannelHandlerContext.read() was called

    final SelectionKey selectionKey = this.selectionKey;

    if (!selectionKey.isValid()) {

        return;

    }

    readPending = true;

	// 这时候 interestOps 是 0

    final int interestOps = selectionKey.interestOps();

    if ((interestOps & readInterestOp) == 0) {

        // 关注 read 事件

        selectionKey.interestOps(interestOps | readInterestOp);

    }

}
4 read 剖析

再来看可读事件 io.netty.channel.nio.AbstractNioByteChannel.NioByteUnsafe#read,注意发送的数据未必能够一次读完,因此会触发多次 nio read 事件,一次事件内会触发多次 pipeline read,一次事件会触发一次 pipeline read complete
public final void read() {

    final ChannelConfig config = config();

    if (shouldBreakReadReady(config)) {

        clearReadPending();

        return;

    }

    final ChannelPipeline pipeline = pipeline();

    // io.netty.allocator.type 决定 allocator 的实现

    final ByteBufAllocator allocator = config.getAllocator();

    // 用来分配 byteBuf,确定单次读取大小

    final RecvByteBufAllocator.Handle allocHandle = recvBufAllocHandle();

    allocHandle.reset(config);

    ByteBuf byteBuf = null;

    boolean close = false;

    try {

        do {

            byteBuf = allocHandle.allocate(allocator);

            // 读取

            allocHandle.lastBytesRead(doReadBytes(byteBuf));

            if (allocHandle.lastBytesRead() <= 0) {

                byteBuf.release();

                byteBuf = null;

                close = allocHandle.lastBytesRead() < 0;

                if (close) {

                    readPending = false;

                }

                break;

            }

            allocHandle.incMessagesRead(1);

            readPending = false;

            // 触发 read 事件,让 pipeline 上的 handler 处理,这时是处理 NioSocketChannel 上的 handler

            pipeline.fireChannelRead(byteBuf);

            byteBuf = null;

        }

        // 是否要继续循环

        while (allocHandle.continueReading());

        allocHandle.readComplete();

        // 触发 read complete 事件

        pipeline.fireChannelReadComplete();

        if (close) {

            closeOnRead(pipeline);

        }

    } catch (Throwable t) {

        handleReadException(pipeline, byteBuf, t, close, allocHandle);

    } finally {

        if (!readPending && !config.isAutoRead()) {

            removeReadOp();

        }

    }

}
io.netty.channel.DefaultMaxMessagesRecvByteBufAllocator.MaxMessageHandle#continueReading(io.netty.util.UncheckedBooleanSupplier)
public boolean continueReading(UncheckedBooleanSupplier maybeMoreDataSupplier) {

    return

           // 一般为 true

           config.isAutoRead() &&

           // respectMaybeMoreData 默认为 true

           // maybeMoreDataSupplier 的逻辑是如果预期读取字节与实际读取字节相等,返回 true

           (!respectMaybeMoreData || maybeMoreDataSupplier.get()) &&

           // 小于最大次数,maxMessagePerRead 默认 16

           totalMessages < maxMessagePerRead &&

           // 实际读到了数据

           totalBytesRead > 0;

}
【Netty】Netty部分源码分析(启动流程,EventLoop,accept流程,read流程)的更多相关文章
- Netty 核心组件 Pipeline 源码分析(二)一个请求的 pipeline 之旅
目录大纲: 前言 针对 Netty 例子源码做了哪些修改? 看 pipeline 是如何将数据送到自定义 handler 的 看 pipeline 是如何将数据从自定义 handler 送出的 总结 ...
- 《深入探索Netty原理及源码分析》文集小结
<深入探索Netty原理及源码分析>文集小结 https://www.jianshu.com/p/239a196152de
- apiserver源码分析——启动流程
前言 apiserver是k8s控制面的一个组件,在众多组件中唯一一个对接etcd,对外暴露http服务的形式为k8s中各种资源提供增删改查等服务.它是RESTful风格,每个资源的URI都会形如 / ...
- Symfony2源码分析——启动过程2
文章地址:http://www.hcoding.com/?p=46 上一篇分析Symfony2框架源码,探究Symfony2如何完成一个请求的前半部分,前半部分可以理解为Symfony2框架为处理请求 ...
- Yarn源码分析之MRAppMaster上MapReduce作业处理总流程(二)
本文继<Yarn源码分析之MRAppMaster上MapReduce作业处理总流程(一)>,接着讲述MapReduce作业在MRAppMaster上处理总流程,继上篇讲到作业初始化之后的作 ...
- Yarn源码分析之MRAppMaster上MapReduce作业处理总流程(一)
我们知道,如果想要在Yarn上运行MapReduce作业,仅需实现一个ApplicationMaster组件即可,而MRAppMaster正是MapReduce在Yarn上ApplicationMas ...
- quartz2.x源码分析——启动过程
title: quartz2.x源码分析--启动过程 date: 2017-04-13 14:59:01 categories: quartz tags: [quartz, 源码分析] --- 先简单 ...
- Zookeeper 源码分析-启动
Zookeeper 源码分析-启动 博客分类: Zookeeper 本文主要介绍了zookeeper启动的过程 运行zkServer.sh start命令可以启动zookeeper.入口的main ...
- Android7.0 Phone应用源码分析(三) phone拒接流程分析
本文主要分析Android拒接电话的流程,下面先来看一下拒接电话流程时序图 步骤1:滑动按钮到拒接图标,会调用到AnswerFragment的onDecline方法 com.android.incal ...
- Android7.0 Phone应用源码分析(四) phone挂断流程分析
电话挂断分为本地挂断和远程挂断,下面我们就针对这两种情况各做分析 先来看下本地挂断电话的时序图: 步骤1:点击通话界面的挂断按钮,会调用到CallCardPresenter的endCallClicke ...
随机推荐
- TS 基础及在 Vue 中的实践:TypeScript 都发布 5.0 版本啦,现在不学更待何时!
大家好,我是 Kagol,OpenTiny 开源社区运营,TinyVue 跨端.跨框架组件库核心贡献者,专注于前端组件库建设和开源社区运营. 微软于3月16日发布了 TypeScript 5.0 版本 ...
- 职场「OKR」,魔幻又内卷
个人习惯称之为[O-KR-KPI]组合: 01 从进厂实习那天开始,就接触了KPI的概念: 互联网公司,年初入职,可能因为那天是周五,又赶上月底,少不了要把KPI搬出来折腾一番: 天时,地利,人和: ...
- 常用注解-SpringBoot请求
SpringBoot请求 常用注解及作用范围: @Controller :[类]需要返回一个视图(themleaf),加注解4@ResponseBody等于注解2 @RestController:[类 ...
- Java 8 中需要知道的4个函数式接口-Function、Consumer、Supplier、Predicate
前言 Java 8 中提供了许多函数式接口,包括Function.Consumer.Supplier.Predicate 等等.这 4 个接口就是本篇将要分享的内容,它们都位于 java.util.f ...
- [Linux]常用命令之【YUM】
1 YUM的简介 什么是yum源? Yum(全称为 Yellow dog Updater, Modified)是一个在Fedora.RedHat/RHEL.SUSE以及CentOS等Linux发行版中 ...
- C# System.ObjectDisposedException: Cannot access a disposed object, A common cause of thiserror is disposing a context that was resolved from dependency injection and then later trying touse...
项目中使用了依赖注入,这个错误在我项目中的原因:在async修饰的异步方法中,调用执行数据库操作的方法时,没有使用await关键字调用,因为没有等待该调用,所以在调用完成之前将继续执行该方法.因此,已 ...
- Ubuntu系统Flameshot使用问题
Ubuntu系统Flameshot使用问题 系统:Ubuntu22.04 问题:使用Flameshot,每次都会先截取整个屏幕,提示需要先分享,再使用Flameshot的功能 安装Flameshot ...
- Go语言微服务框架go-micro(入门)
Micro用于构建和管理分布式系统,是一个工具集,其中go-micro框架是对分布式系统的高度抽象,提供分布式系统开发的核心库,可插拔的架构,按需使用 简单示例 编写protobuf文件: synta ...
- Redis 报”OutOfDirectMemoryError“(堆外内存溢出)
Redis 报错"OutOfDirectMemoryError(堆外内存溢出) "问题如下: 一.报错信息: 使用 Redis 的业务接口 ,产生 OutOfDirectMemor ...
- SpringBoot 使用 Sa-Token 完成权限认证
一.设计思路 所谓权限认证,核心逻辑就是判断一个账号是否拥有指定权限: 有,就让你通过. 没有?那么禁止访问! 深入到底层数据中,就是每个账号都会拥有一个权限码集合,框架来校验这个集合中是否包含指定的 ...
