基于ModelArts进行流感患者密接排查
摘要:针对疫情期间存在的排查实时性差、排查效率低、无法追踪密接者等问题,可以使用基于YOLOv4的行人检测、行人距离估计、多目标跟踪的方案进行解决。
本文分享自华为云社区《基于ModelArts进行流感患者密接排查》,作者:HWCloudAI。
目前流感病毒患者密接难以排查,尤其是在人流量大的区域,进行排查需要消耗大量人力且需要等待。针对疫情期间存在的排查实时性差、排查效率低、无法追踪密接者等问题,可以使用基于YOLOv4的行人检测、行人距离估计、多目标跟踪的方案进行解决。
1)利用行人重识别技术实现流感病毒患者及密接者识别功能;
2)结合Stereo-vision以及YOLO算法实现患者的真实密切接触鉴别;
3)利用SORT多目标跟踪算法绘制出患者及密接者的行动轨迹;
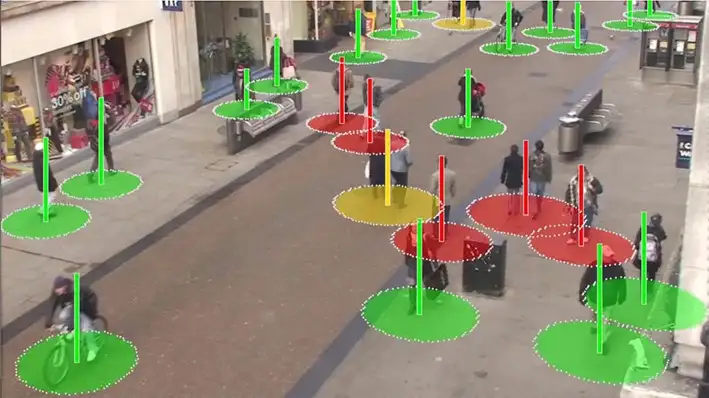
该系统可以有效提高防疫效率,减轻经济与防疫压力,提高安全性。
今天将带大家了解 通过华为云ModelArts的 DeepSocial-COVID-19社会距离监测案例实现AI排查新冠密接。
点击链接进入到AI Gallery的“DeepSocial-COVID-19社会距离监测”案例页面,点击Run in ModelArts,即可进入ModelArts Jupyter运行环境,此处需要选用GPU的规格。
注:以下步骤所涉及的代码都已经写好,直接点击代码前面的箭头,让其自动运行即可。
步骤一:从华为云对象存储服务(OBS)拷贝案例所需代码。
# 下载代码和数据

import moxing as mox

mox.file.copy_parallel('obs://obs-aigallery-zc/clf/code/DeepSocial','DeepSocial')

# 引入依赖

from IPython.display import display, Javascript, Image

from base64 import b64decode, b64encode

import os

import cv2

import numpy as np

import PIL

import io

import html

import time

import matplotlib.pyplot as plt

%matplotlib inline
步骤二:在本地编译YOLO。
需要根据运行环境修改Makefile 如是否有GPU等
如果编译报错:/bin/sh:nvcc not found
解决方式(参考):
1)查看nvcc可执行文件的路径
which nvcc
2)修改Makefile文件中的NVCC=nvcc,把nvcc替换为上面查询到的nvcc可执行文件的路径,如:/usr/local/cuda/bin/nvcc
NVCC=/usr/local/cuda/bin/nvcc
%cd DeepSocial

!make
步骤三:使用Darknet的python接口
# import darknet functions to perform object detections

from darknet2 import *

# load in our YOLOv4 architecture network

network, class_names, class_colors = load_network("cfg/yolov4.cfg", "cfg/coco.data", "DeepSocial.weights")

width = network_width(network)

height = network_height(network)

# darknet helper function to run detection on image

def darknet_helper(img, width, height):

 darknet_image = make_image(width, height, 3)

 img_rgb = cv2.cvtColor(img, cv2.COLOR_BGR2RGB)

 img_resized = cv2.resize(img_rgb, (width, height),

                              interpolation=cv2.INTER_LINEAR)

  # get image ratios to convert bounding boxes to proper size

 img_height, img_width, _ = img.shape

 width_ratio = img_width/width

 height_ratio = img_height/height

  # run model on darknet style image to get detections

 copy_image_from_bytes(darknet_image, img_resized.tobytes())

  detections = detect_image(network, class_names, darknet_image)

 free_image(darknet_image)

 return detections, width_ratio, height_ratio
步骤四:使用SORT来实时跟踪目标
!pip install filterpy

from sort import *

mot_tracker = Sort(max_age=25, min_hits=4, iou_threshold=0.3)
步骤五:输入设置
Input            = "OxfordTownCentreDataset.avi" # 需要检测的适配

ReductionFactor = 2   # 采样因子

calibration      = [[180,162],[618,0],[552,540],[682,464]] # 相机标定的参数
步骤六:DeepSocial参数设置和函数引入
from deepsocial import *

######################## Frame number

StartFrom = 0

EndAt = 500                       #-1 for the end of the video

######################## (0:OFF/ 1:ON) Outputs

CouplesDetection = 1                # Enable Couple Detection

DTC = 1                # Detection, Tracking and Couples

SocialDistance = 1

CrowdMap = 1

# MoveMap = 0

# ViolationMap = 0

# RiskMap = 0

######################## Units are Pixel

ViolationDistForIndivisuals = 28

ViolationDistForCouples = 31

####

CircleradiusForIndivsual = 14

CircleradiusForCouples = 17

########################

MembershipDistForCouples = (16 , 10) # (Forward, Behind) per Pixel

MembershipTimeForCouples = 35        # Time for considering as a couple (per Frame)

######################## (0:OFF/ 1:ON)

CorrectionShift = 1                    # Ignore people in the margins of the video

HumanHeightLimit = 200                  # Ignore people with unusual heights

########################

Transparency        = 0.7

######################## Output Video's path

Path_For_DTC = os.getcwd() + "/DeepSOCIAL DTC.mp4"

Path_For_SocialDistance = os.getcwd() + "/DeepSOCIAL Social Distancing.mp4"

Path_For_CrowdMap = os.getcwd() + "/DeepSOCIAL Crowd Map.mp4"

def extract_humans(detections):

 detetcted = []

 if len(detections) > 0: # At least 1 detection in the image and check detection presence in a frame

 idList = []

        id = 0

 for label, confidence, bbox in detections:

 if label == 'person':

 xmin, ymin, xmax, ymax = bbox2points(bbox)

                id +=1

 if id not in idList: idList.append(id)

 detetcted.append([int(xmin), int(ymin), int(xmax), int(ymax), idList[-1]])

 return np.array(detetcted)

def centroid(detections, image, calibration, _centroid_dict, CorrectionShift, HumanHeightLimit):

    e = birds_eye(image.copy(), calibration)

 centroid_dict = dict()

 now_present = list()

 if len(detections) > 0:

 for d in detections:

            p = int(d[4])

 now_present.append(p)

 xmin, ymin, xmax, ymax = d[0], d[1], d[2], d[3]

            w = xmax - xmin

            h = ymax - ymin

            x = xmin + w/2

            y = ymax - h/2

 if h < HumanHeightLimit:

 overley = e.image

 bird_x, bird_y = e.projection_on_bird((x, ymax))

 if CorrectionShift:

 if checkupArea(overley, 1, 0.25, (x, ymin)):

 continue

 e.setImage(overley)

 center_bird_x, center_bird_y = e.projection_on_bird((x, ymin))

 centroid_dict[p] = (

 int(bird_x), int(bird_y),

 int(x), int(ymax),

 int(xmin), int(ymin), int(xmax), int(ymax),

 int(center_bird_x), int(center_bird_y))

                _centroid_dict[p] = centroid_dict[p]

 return _centroid_dict, centroid_dict, e.image

def ColorGenerator(seed=1, size=10):

 np.random.seed = seed

    color=dict()

 for i in range(size):

        h = int(np.random.uniform() *255)

        color[i]= h

 return color

def VisualiseResult(_Map, e):

    Map = np.uint8(_Map)

 histMap = e.convrt2Image(Map)

 visualBird = cv2.applyColorMap(np.uint8(_Map), cv2.COLORMAP_JET)

 visualMap = e.convrt2Image(visualBird)

 visualShow = cv2.addWeighted(e.original, 0.7, visualMap, 1 - 0.7, 0)

 return visualShow, visualBird, histMap
步骤七:推理过程
cap = cv2.VideoCapture(Input)

frame_width = int(cap.get(3))

frame_height = int(cap.get(4))

height, width = frame_height // ReductionFactor, frame_width // ReductionFactor

print("Video Reolution: ",(width, height))

if DTC: DTCVid = cv2.VideoWriter(Path_For_DTC, cv2.VideoWriter_fourcc(*'X264'), 30.0, (width, height))

if SocialDistance: SDimageVid = cv2.VideoWriter(Path_For_SocialDistance, cv2.VideoWriter_fourcc(*'X264'), 30.0, (width, height))

if CrowdMap: CrowdVid = cv2.VideoWriter(Path_For_CrowdMap, cv2.VideoWriter_fourcc(*'X264'), 30.0, (width, height))

colorPool = ColorGenerator(size = 3000)

_centroid_dict = dict()

_numberOFpeople = list()

_greenZone = list()

_redZone = list()

_yellowZone = list()

_final_redZone = list()

_relation = dict()

_couples = dict()

_trackMap = np.zeros((height, width, 3), dtype=np.uint8)

_crowdMap = np.zeros((height, width), dtype=np.int)

_allPeople = 0

_counter = 1

frame = 0

while True:

 print('-- Frame : {}'.format(frame))

 prev_time = time.time()

    ret, frame_read = cap.read()

 if not ret: break

    frame += 1

 if frame <= StartFrom: continue

 if frame != -1:

 if frame > EndAt: break

 frame_resized = cv2.resize(frame_read,(width, height), interpolation=cv2.INTER_LINEAR)

    image = frame_resized

    e = birds_eye(image, calibration)

    detections, width_ratio, height_ratio = darknet_helper(image, width, height)

    humans = extract_humans(detections)

 track_bbs_ids = mot_tracker.update(humans) if len(humans) != 0 else humans

    _centroid_dict, centroid_dict, partImage = centroid(track_bbs_ids, image, calibration, _centroid_dict, CorrectionShift, HumanHeightLimit)

 redZone, greenZone = find_zone(centroid_dict, _greenZone, _redZone, criteria=ViolationDistForIndivisuals)

 if CouplesDetection:

        _relation, relation = find_relation(e, centroid_dict, MembershipDistForCouples, redZone, _couples, _relation)

        _couples, couples, coupleZone = find_couples(image, _centroid_dict, relation, MembershipTimeForCouples, _couples)

 yellowZone, final_redZone, redGroups = find_redGroups(image, centroid_dict, calibration, ViolationDistForCouples, redZone, coupleZone, couples , _yellowZone, _final_redZone)

 else:

        couples = []

 coupleZone = []

 yellowZone = []

 redGroups = redZone

 final_redZone = redZone

 if DTC:

 DTC_image = image.copy()

        _trackMap = Apply_trackmap(centroid_dict, _trackMap, colorPool, 3)

 DTC_image = cv2.add(e.convrt2Image(_trackMap), image)

 DTCShow = DTC_image

 for id, box in centroid_dict.items():

 center_bird = box[0], box[1]

 if not id in coupleZone:

                cv2.rectangle(DTCShow,(box[4], box[5]),(box[6], box[7]),(0,255,0),2)

                cv2.rectangle(DTCShow,(box[4], box[5]-13),(box[4]+len(str(id))*10, box[5]),(0,200,255),-1)

                cv2.putText(DTCShow,str(id),(box[4]+2, box[5]-2),cv2.FONT_HERSHEY_SIMPLEX,.4,(0,0,0),1,cv2.LINE_AA)

 for coupled in couples:

            p1 , p2 = coupled

 couplesID = couples[coupled]['id']

 couplesBox = couples[coupled]['box']

            cv2.rectangle(DTCShow, couplesBox[2:4], couplesBox[4:], (0,150,255), 4)

            loc = couplesBox[0] , couplesBox[3]

            offset = len(str(couplesID)*5)

 captionBox = (loc[0] - offset, loc[1]-13), (loc[0] + offset, loc[1])

            cv2.rectangle(DTCShow,captionBox[0],captionBox[1],(0,200,255),-1)

 wc = captionBox[1][0] - captionBox[0][0]

 hc = captionBox[1][1] - captionBox[0][1]

            cx = captionBox[0][0] + wc // 2

            cy = captionBox[0][1] + hc // 2

 textLoc = (cx - offset, cy + 4)

            cv2.putText(DTCShow, str(couplesID) ,(textLoc),cv2.FONT_HERSHEY_SIMPLEX,.4,(0,0,0),1,cv2.LINE_AA)

 DTCVid.write(DTCShow)

 if SocialDistance:

 SDimage, birdSDimage = Apply_ellipticBound(centroid_dict, image, calibration, redZone, greenZone, yellowZone, final_redZone, coupleZone, couples, CircleradiusForIndivsual, CircleradiusForCouples)

 SDimageVid.write(SDimage)

 if CrowdMap:

        _crowdMap, crowdMap = Apply_crowdMap(centroid_dict, image, _crowdMap)

        crowd = (crowdMap - crowdMap.min()) / (crowdMap.max() - crowdMap.min())*255

 crowd_visualShow, crowd_visualBird, crowd_histMap = VisualiseResult(crowd, e)

 CrowdVid.write(crowd_visualShow)

    cv2.waitKey(3)

print('::: Analysis Completed')

cap.release()

if DTC: DTCVid.release(); print("::: Video Write Completed : ", Path_For_DTC)

if SocialDistance: SDimageVid.release() ; print("::: Video Write Completed : ", Path_For_SocialDistance)

if CrowdMap: CrowdVid.release() ; print("::: Video Write Completed : ", Path_For_CrowdMap)
步骤八:展示结果
from IPython.display import HTML

outpath = "DeepSOCIAL DTC.mp4"

mp4 = open(outpath,'rb').read()

data_url = "data:video/mp4;base64," + b64encode(mp4).decode()

HTML("""

<video width=400 controls>

 <source src="%s" type="video/mp4">

</video>

""" % data_url)
<iframe src="https://obs-aigallery-zc.obs.cn-north-4.myhuaweicloud.com/clf/code/DeepSocial/DeepSOCIAL%20DTC.mp4" scrolling="no" border="0" frameborder="no" framespacing="0" allowfullscreen="true" height=450 width=800> </iframe> <iframe src="https://obs-aigallery-zc.obs.cn-north-4.myhuaweicloud.com/clf/code/DeepSocial/DeepSOCIAL%20Social%20Distancing.mp4" scrolling="no" border="0" frameborder="no" framespacing="0" allowfullscreen="true" height=450 width=800> </iframe>
如果想要更好的效果,如何进行优化呢?
1.使用精确度更高的检测算法YOLOv7,使用追踪效果更好的Deep SORT;
2.使用更多数据进行训练
本次介绍就到这里啦,大家快去Gallery实操一下吧!
基于ModelArts进行流感患者密接排查的更多相关文章
- 实践案例丨基于ModelArts AI市场算法MobileNet_v2实现花卉分类
概述 MobileNetsV2是基于一个流线型的架构,它使用深度可分离的卷积来构建轻量级的深层神经网,此模型基于 MobileNetV2: Inverted Residuals and Linear ...
- Hadoop完全分布式环境搭建(二)——基于Ubuntu16.04设置免密登录
在Windows里,使用虚拟机软件Vmware WorkStation搭建三台机器,操作系统Ubuntu16.04,下面是IP和机器名称. [实验目标]:在这三台机器之间实现免密登录 1.从主节点可以 ...
- SM2国密证书合法性验证
通常我们遇到过的X509证书都是基于RSA-SHA1算法的,目前国家在大力推行国密算法,未来银行发行的IC卡也都是基于PBOC3.0支持国密算法的,因此我们来学习一下如何验证SM2国密证书的合法性.至 ...
- Linux中SSH服务基于key认证实践
众所周知ssh是目前较可靠,专为远程登录会话和其他网络服务提供安全性的协议,它默认工作在tcp的22号端口,具体实现的软件有:openssh(centos默认安装的),dropbear.ssh协议目前 ...
- Modelarts与无感识别技术生态总结(浅出版)
[摘要] Modelarts技术及相关产业已成为未来AI与大数据重点发展行业模式之一,为了促进人工智能领域科学技术快速发展,modelarts现状及生态前景成为研究热点.笔者首先总结modelarts ...
- 华为云ModelArts 2.0全面升级,革新传统AI开发模式
[中国,上海,9月20日] 在HUAWEI CONNECT 2019期间,华为云EI服务产品部总经理贾永利宣布--华为云AI重装升级,并重磅发布一站式AI开发管理平台ModelArts 2.0. 现场 ...
- 自动驾驶轻松开发?华为云ModelArts赋能智慧出行
作为战略新兴产业,人工智能已经开始广泛应用于多个领域.近几年,科技公司.互联网公司等各领域的企业纷纷布局自动驾驶.那么,自动驾驶技术究竟发展得如何了?日前,华为云携手上海交通大学创新中心举办的华为云人 ...
- 本科阶段就挑战自动驾驶开发?华为云ModelArts帮你轻松实现!
欢迎添加华为云小助手微信(微信号:HWCloud002 或 HWCloud003),输入关键字"加群",加入华为云线上技术讨论群:输入关键字"最新活动",获取华 ...
- 快快使用ModelArts,零基础小白也能玩转AI!
摘要: 走过路过不要错过,看Copy攻城狮如何借力华为云ModelArts玩转AI. "自2018年10月发布以来,ModelArts累计服务了众多行业十几万开发者,通过基础平台的完备性和面 ...
- “体检医生”黑科技|让AI开发更精准,ModelArts更新模型诊断功能
摘要:华为云AI开发平台ModelArts黑科技加持AI研发,让模型开发更高效.更简单,降低AI在行业的落地门槛.全面的可视化评估以及智能诊断功能,使得开发者可以直观了解模型各方面性能,从而进行针对性 ...
随机推荐
- SpringBoot自动配置原理解析
1: 什么是SpringBoot自动配置 首先介绍一下什么是SpringBoot,SpringBoost是基于Spring框架开发出来的功能更强大的Java程序开发框架,其最主要的特点是:能使程序开发 ...
- CF1523D Love-Hate 题解
抽象化题意: 一共有 \(m\) 个元素,给定 \(n\) 个集合,每个集合的元素不超过 \(15\) 个,求出一个元素个数最多的集合 \(S\) 是至少 \(\lceil \dfrac{n}{2} ...
- 关于.net4.0使用WhenAny实现Task超时机制
.net4.0想要使用await/async语法糖必须要引用: Microsoft.Bcl Microsoft.Bcl.Async Microsoft.Bcl.Build 可以从nuget引用此三个包 ...
- redis 怎么样查看key的大小,多大的key才算大key?
查看key大小的命令 # 格式memory usage [key-name]# 例如:我要查 yino_hash_key 这个key的大小,就在命令行中输入 memory usage yino_has ...
- 服务器没有开放3306端口 远程访问MySQL数据库方法
一.前言 当装有MySQL的服务器为了防止数据库被黑,提高安全性,把3306端口禁止掉,禁止对外访问,我之前写过一篇是借助跳板机的SSH隧道来访问实现安全,这种情况依然需要开放3306端口和使用一 ...
- 阿里云上的rds 的隔离级别read committed 而不是repeatable-read设置原因
阿里云上的rds 的隔离级别 是read committed ,而不是原生mysql的"可重复读(repeatable-read)",他们是基于什么原因这样设置的? show va ...
- Kubernetes:kube-apiserver 之鉴权
kubernetes:kube-apiserver 系列文章: Kubernetes:kube-apiserver 之 scheme(一) Kubernetes:kube-apiserver 之 sc ...
- 2022 暑期 DP 极限单兵计划
前言 LJ 认为我的 DP 是我的一大弱项,便精心为我准备了 毒瘤DP 12 题(然后发现原来给的 T1 是个树套树,就变成 毒瘤DP 11 题 感谢 LJ 教练..... 为了方便复习,代码均格式化 ...
- GMAC网卡Fixed-Link模式
GMAC网卡Fixed-Link模式 GMAC fixed-link固定链接模式,mac与对端的连接方式是写死的,通常用于mac to mac(不排除mac to phy的情况).内核要支持fixed ...
- C/C++ Zlib库封装MyZip压缩类
Zlib是一个开源的数据压缩库,提供了一种通用的数据压缩和解压缩算法.它最初由Jean-Loup Gailly和Mark Adler开发,旨在成为一个高效.轻量级的压缩库,其被广泛应用于许多领域,包括 ...