MQTT研究之EMQ:【SSL双向验证】
EMQ是当前MQTT中,用于物联网领域中比较出色的一个broker,今天我这里要记录和分享的是关于SSL安全通信的配置和注意细节。
环境:
1. 单台Linux CentOS7.2系统,安装一个EMQTTD的实例broker。
2. emq的版本2.3.11。
3. 客户端分为mosquitto_pub,以及MQTT.fx 1.7.1的subscriber。
4. 证书是通过openssl(version:1.0.2k-fips)生成的,rootCA是自签名的,subscriber和publisher的证书是通过rootCA签署的。
1、CA根证书的生成
[root@ws3 certs]# openssl req -x509 -new -days 3650 -keyout ca.key -out rootCA.crt -nodes

Generating a  bit RSA private key

.....................+++

.........................................................................................................................+++

writing new private key to 'ca.key'

-----

You are about to be asked to enter information that will be incorporated

into your certificate request.

What you are about to enter is what is called a Distinguished Name or a DN.

There are quite a few fields but you can leave some blank

For some fields there will be a default value,

If you enter '.', the field will be left blank.

-----

Country Name ( letter code) [XX]:CN

State or Province Name (full name) []:Hubei

Locality Name (eg, city) [Default City]:Wuhan

Organization Name (eg, company) [Default Company Ltd]:abcdefg

Organizational Unit Name (eg, section) []:Tkcloud

Common Name (eg, your name or your server's hostname) []:10.95.197.3

Email Address []:
2、为server端生成证书
a. 生成私有秘钥
[root@ws3 certs]# openssl genrsa -out server.key 2048

Generating RSA private key,  bit long modulus

...................................................+++

............+++

e is  (0x10001)
b. 生成证书请求csr文件
[root@ws3 certs]# openssl req -new -key server.key -out server.csr

You are about to be asked to enter information that will be incorporated

into your certificate request.

What you are about to enter is what is called a Distinguished Name or a DN.

There are quite a few fields but you can leave some blank

For some fields there will be a default value,

If you enter '.', the field will be left blank.

-----

Country Name ( letter code) [XX]:CN

State or Province Name (full name) []:Hubei

Locality Name (eg, city) [Default City]:Wuhan

Organization Name (eg, company) [Default Company Ltd]:abcdefg

Organizational Unit Name (eg, section) []:Cloud

Common Name (eg, your name or your server's hostname) []:10.95.197.3

Email Address []:

Please enter the following 'extra' attributes

to be sent with your certificate request

A challenge password []:

An optional company name []:
c. 生成证书
[root@ws3 certs]# openssl ca -in server.csr -out server.crt -cert rootCA.crt -keyfile ca.key -days 3650

Using configuration from /etc/pki/tls/openssl.cnf

/etc/pki/CA/index.txt: No such file or directory

unable to open '/etc/pki/CA/index.txt'

:error::system library:fopen:No such file or directory:bss_file.c::fopen('/etc/pki/CA/index.txt','r')

:error::BIO routines:FILE_CTRL:system lib:bss_file.c::
错误分析:
缺乏/etc/pki/CA/index.txt,对应的创建一个空文件即可。
再次执行证书生成过程:
[root@ws3 certs]# openssl ca -in server.csr -out server.crt -cert rootCA.crt -keyfile ca.key -days 3650

Using configuration from /etc/pki/tls/openssl.cnf

/etc/pki/CA/serial: No such file or directory

error while loading serial number

:error::system library:fopen:No such file or directory:bss_file.c::fopen('/etc/pki/CA/serial','r')

:error::BIO routines:FILE_CTRL:system lib:bss_file.c::
错误分析:
缺乏/etc/pki/CA/serial文件,对应的创建这个文件。
再次执行上述生成指令:
[root@ws3 certs]# openssl ca -in server.csr -out server.crt -cert rootCA.crt -keyfile ca.key -days 3650

Using configuration from /etc/pki/tls/openssl.cnf

unable to load number from /etc/pki/CA/serial

error while loading serial number

:error:0D066096:asn1 encoding routines:a2i_ASN1_INTEGER:short line:f_int.c::
错误分析:
缺乏序号数据,是没有序号数据。写入1,保存后,继续执行上述过程。
[root@ws3 certs]# openssl ca -in server.csr -out server.crt -cert rootCA.crt -keyfile ca.key -days 3650

Using configuration from /etc/pki/tls/openssl.cnf

unable to load number from /etc/pki/CA/serial

error while loading serial number

:error:0D066096:asn1 encoding routines:a2i_ASN1_INTEGER:short line:f_int.c::
错误分析:
写的数据格式不对,需要写入两位的01格式,保存后继续运行。
[root@ws3 certs]# openssl ca -in server.csr -out server.crt -cert rootCA.crt -keyfile ca.key -days 3650

Using configuration from /etc/pki/tls/openssl.cnf

Check that the request matches the signature

Signature ok

Certificate Details:

        Serial Number:  (0x1)

        Validity

            Not Before: Jan  ::  GMT

            Not After : Jan  ::  GMT

        Subject:

            countryName               = CN

            stateOrProvinceName       = Hubei

            organizationName          = abcdefg

            organizationalUnitName    = Cloud

            commonName                = 10.95.197.3

        X509v3 extensions:

            X509v3 Basic Constraints:

                CA:FALSE

            Netscape Comment:

                OpenSSL Generated Certificate

            X509v3 Subject Key Identifier:

                :F2:F6:::DB:1A::B7:::::A0:FE:DB:6F::A9:DE

            X509v3 Authority Key Identifier:

                keyid:DF:2F:DC:D6::2A::C0:D0::6C:::A8:::F4:9B:EB:DD

Certificate is to be certified until Jan  ::  GMT ( days)

Sign the certificate? [y/n]:y

 out of  certificate requests certified, commit? [y/n]y

Write out database with  new entries

Data Base Updated
CA这个信息为FALSE,表明这个证书不是根证书。
上面的rootCA.crt是根证书,看看内容:
[root@ws3 certs]# openssl x509 -text -in rootCA.crt -noout

Certificate:

    Data:

        Version:  (0x2)

        Serial Number:

            db::ba:::::

    Signature Algorithm: sha256WithRSAEncryption

        Issuer: C=CN, ST=Hubei, L=Wuhan, O=abcdefg, OU=Tkcloud, CN=10.95.197.3

        Validity

            Not Before: Jan  ::  GMT

            Not After : Dec  ::  GMT

        Subject: C=CN, ST=Hubei, L=Wuhan, O=abcdefg, OU=Tkcloud, CN=10.95.197.3

        Subject Public Key Info:

            Public Key Algorithm: rsaEncryption

                Public-Key: ( bit)

                Modulus:

                    ::b4:::5b:c6::b4::1c:5f:::b8:

                    bf:8a:9b:e1:fa::::::2b:6e::b9::

                    a2:1c::::da:fb:5b::6b:db:bd::cd::

                    :ca::3e:2f:bb:c3:b5::4d:c9:d6:9c:1b:b9:

                    :::e8:ed:5a:d9:ca:::4e:7d:e6::8f:

                    7e:::::9c::d4:ff::c4:aa:dc:dd:de:

                    :::e2:9c:3d:::4d:d1:5a::ea:b8::

                    :1e:b8::a3:6f::ba:b2::::5c:8b:0b:

                    d3::be:a1::e6::::cf::::3a::

                    f0:e1:c8:::1e:cf:fb:4a:ee:5a:a9:7d:bc::

                    d2:fe:2c:f5:8f:a4:b2:cc:::d2:9d:a0:d2:2e:

                    4e:4f:e7::6c:0d:::::b6:7c:::f6:

                    e9:c6::5e::ea::::2d::e2:f2:bf::

                    ::7e::cf:bd:2a::::c1:8f:c5::9e:

                    :f8::::::c3::2f:b4:fc:d2:::

                    cb:0c:dd:6f:ef:9f:5d:::4e::2b::2e:3a:

                    :8e:c9::f0:7c:::a3:ac:f7::9d:::

                    e7:f9

                Exponent:  (0x10001)

        X509v3 extensions:

            X509v3 Subject Key Identifier:

                AB:2E::BE::CB:A1::A4:::A8:CB::2A:3F:ED:4C:1E:

            X509v3 Authority Key Identifier:

                keyid:AB:2E::BE::CB:A1::A4:::A8:CB::2A:3F:ED:4C:1E:

            X509v3 Basic Constraints:

                CA:TRUE

    Signature Algorithm: sha256WithRSAEncryption

         4c::ad::4f:9d:e6:c3:f2:::::4f:::da:1c:

         c4:d7:::0f:1a:d6:2b:e8:8e:9d::6e:::ee:b0:c2:

         ::2e:e2:eb:2e:c0:a7::ba::dc:b6:::f9:7d:ff:

         :dc:dc::d3:aa::2a:fe:f4::c7:0e:f8:2e:de:2d::

         a0:a1:f5::f1:cc:8f:2f::fe:0c::6d:de::ff::8c:

         ::::ea:2b:b1:7d:ac:e4:b4:c0:e7:::::da:

         :::::0a:6d:3d:a5:de::9b:be::ef:d0:f4:2a:

         a0:db::6e:6c:bf:f6:fb:a7:3f:1c:4b:bd:c6:6c:9f::3b:

         d3:d3:b3:7f:ce:b8::::c1::8e::c2::d1::ee:

         ::e2::a7:0c::3a:b9:::c6::::::e7:

         ed::fc::d9:7e::f8:a3::8a:a2:::b5:e0:0e:9d:

         4d:3a:b6::::0d::ac:::0b::::::c8:

         0d:ea:ed::e9:ff:4a:3e:e5::::e2::::f1::

         :d9:6b:5b::bf::7f:ad:0d:2f::d6:fb::a4:e5::

         1c:::de
证书生成完毕后,查看上面创建的index.txt以及serial文件:
[root@ws3 certs]# vi /etc/pki/CA/index.txt

V       290114143842Z                 unknown /C=CN/ST=Hubei/O=abcdefg/OU=Cloud/CN=10.95.197.3
[root@ws3 certs]# vi /etc/pki/CA/serial
注意:起初index.txt是空的,证书创建成功后,写入了一条记录。serial文件,起初是01,然而,现在变成了02.
3. 为客户端生成证书
这里,省略生成私钥,以及证书请求的过程,重点关注基于根证书rootCA.crt生成证书的过程。
[root@ws3 certs]# openssl ca -in client.csr -out client.crt -cert rootCA.crt -keyfile ca.key

Using configuration from /etc/pki/tls/openssl.cnf

Check that the request matches the signature

Signature ok

Certificate Details:

        Serial Number:  (0x2)

        Validity

            Not Before: Jan  ::  GMT

            Not After : Jan  ::  GMT

        Subject:

            countryName               = CN

            stateOrProvinceName       = Hubei

            organizationName          = abcdefg

            organizationalUnitName    = cloud

            commonName                = client

        X509v3 extensions:

            X509v3 Basic Constraints:

                CA:FALSE

            Netscape Comment:

                OpenSSL Generated Certificate

            X509v3 Subject Key Identifier:

                D7:A0:::::1F:E1:::EA::::3A:A5::7D:5B:

            X509v3 Authority Key Identifier:

                keyid:DF:2F:DC:D6::2A::C0:D0::6C:::A8:::F4:9B:EB:DD

Certificate is to be certified until Jan  ::  GMT ( days)

Sign the certificate? [y/n]:y

 out of  certificate requests certified, commit? [y/n]y

Write out database with  new entries

Data Base Updated
客户证书只有1年(不加参数-days的话,默认是1年),而服务端证书时候10年的有效期。
4. 验证双向SSL的通信过程。
1). 配置emqtt
## Path to a file containing the user certificate.

##

## See: http://erlang.org/doc/man/ssl.html

##

## Value: File

#listener.ssl.external.certfile = /etc/emqttd/certs/cert.pem

listener.ssl.external.certfile = /opt/certs/server.crt

## Path to the file containing PEM-encoded CA certificates. The CA certificates

## are used during server authentication and when building the client certificate chain.

##

## Value: File

## listener.ssl.external.cacertfile = /etc/emqttd/certs/cacert.pem

listener.ssl.external.cacertfile = /opt/certs/rootCA.crt

## The Ephemeral Diffie-Helman key exchange is a very effective way of

## ensuring Forward Secrecy by exchanging a set of keys that never hit

## the wire. Since the DH key is effectively signed by the private key,

## it needs to be at least as strong as the private key. In addition,

## the default DH groups that most of the OpenSSL installations have

## are only a handful (since they are distributed with the OpenSSL

## package that has been built for the operating system it’s running on)

## and hence predictable (not to mention,  bits only).

## In order to escape this situation, first we need to generate a fresh,

## strong DH group, store it in a file and then use the option above,

## to force our SSL application to use the new DH group. Fortunately,

## OpenSSL provides us with a tool to do that. Simply run:

## openssl dhparam -out dh-params.pem

##

## Value: File

## listener.ssl.external.dhfile = /etc/emqttd/certs/dh-params.pem

## A server only does x509-path validation in mode verify_peer,

## as it then sends a certificate request to the client (this

## message is not sent if the verify option is verify_none).

## You can then also want to specify option fail_if_no_peer_cert.

## More information at: http://erlang.org/doc/man/ssl.html

##

## Value: verify_peer | verify_none

listener.ssl.external.verify = verify_peer

## Used together with {verify, verify_peer} by an SSL server. If set to true,

## the server fails if the client does not have a certificate to send, that is,

## sends an empty certificate.

##

## Value: true | false

listener.ssl.external.fail_if_no_peer_cert = true
上述几个红色的部分,是涉及SSL通信要用到的。单双向验证的核心参数是listener.ssl.external.verify = verify_peer,这里是双向验证,即服务端要向客户端发起身份验证工作。verify_none表示服务端不对客户端进行身份验证。
2). 这里消费者客户端使用的是MQTT.fx客户端工具(1.7.1),跑在windows机器上。
a. 按照下面的config.jpg图片显示内容,配置好相关信息。
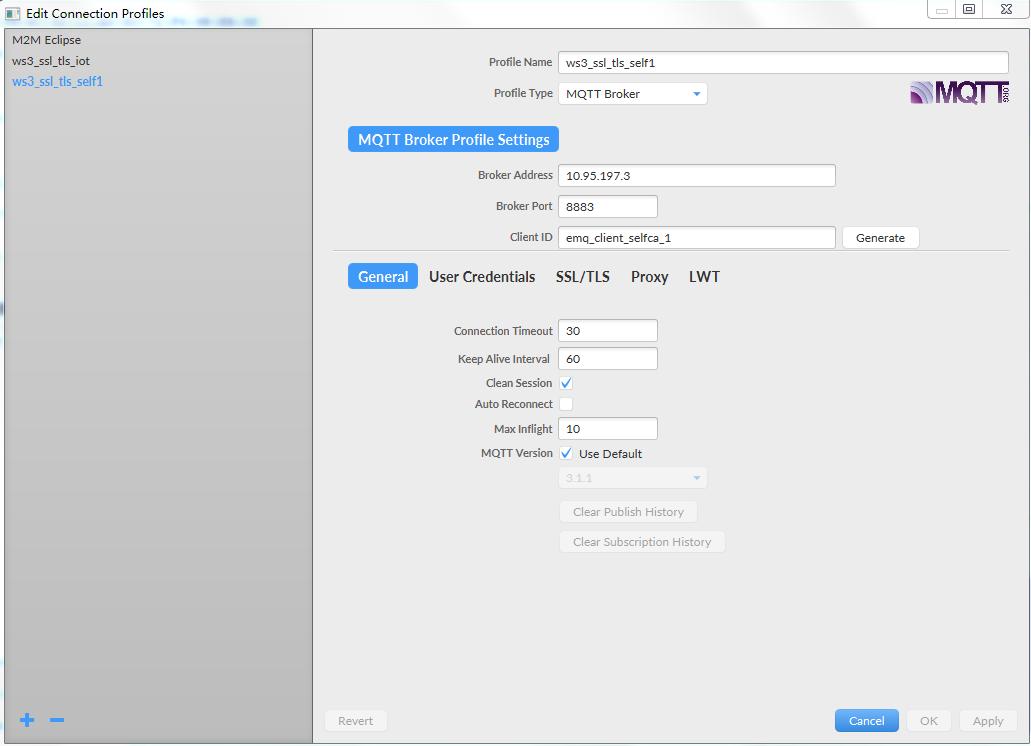
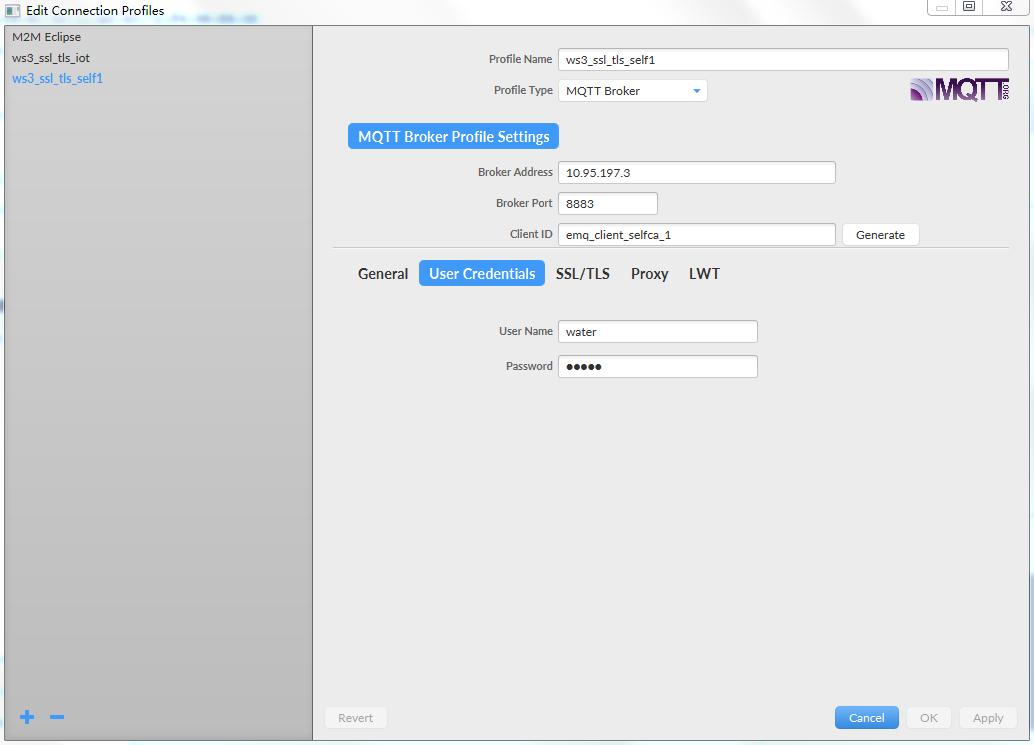
emqtt配置了用户身份认证,是通过用户名和密码做的。必须输入上述参数。
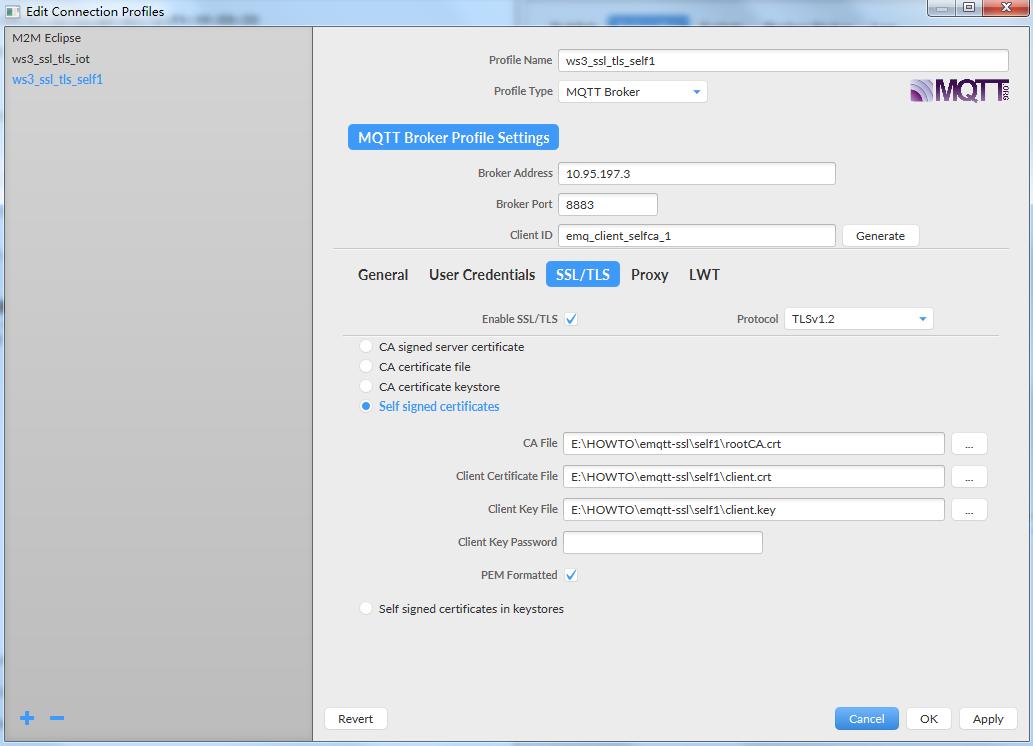
上图中配置的证书相关的参数对应的文件,就是前面生成的证书相关文件,copy到了MQTT.fx所在的windows机器上了。
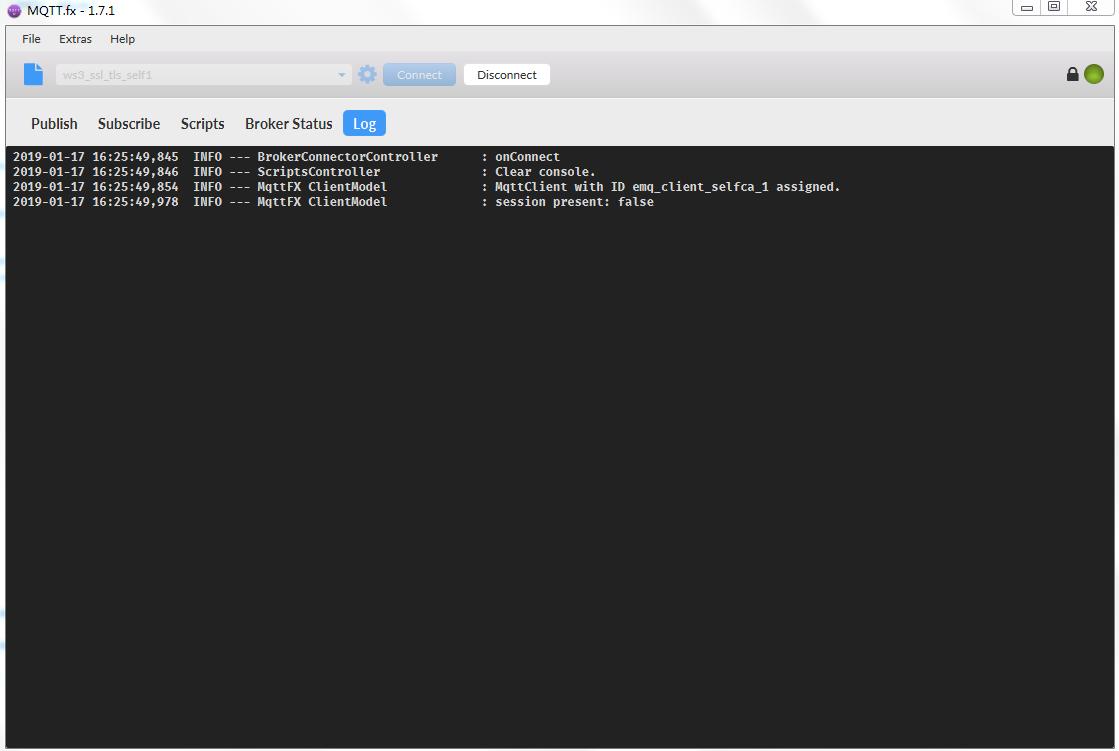
b. 按照图connection.jpg点击connect即可,如图所示表示连接成功。
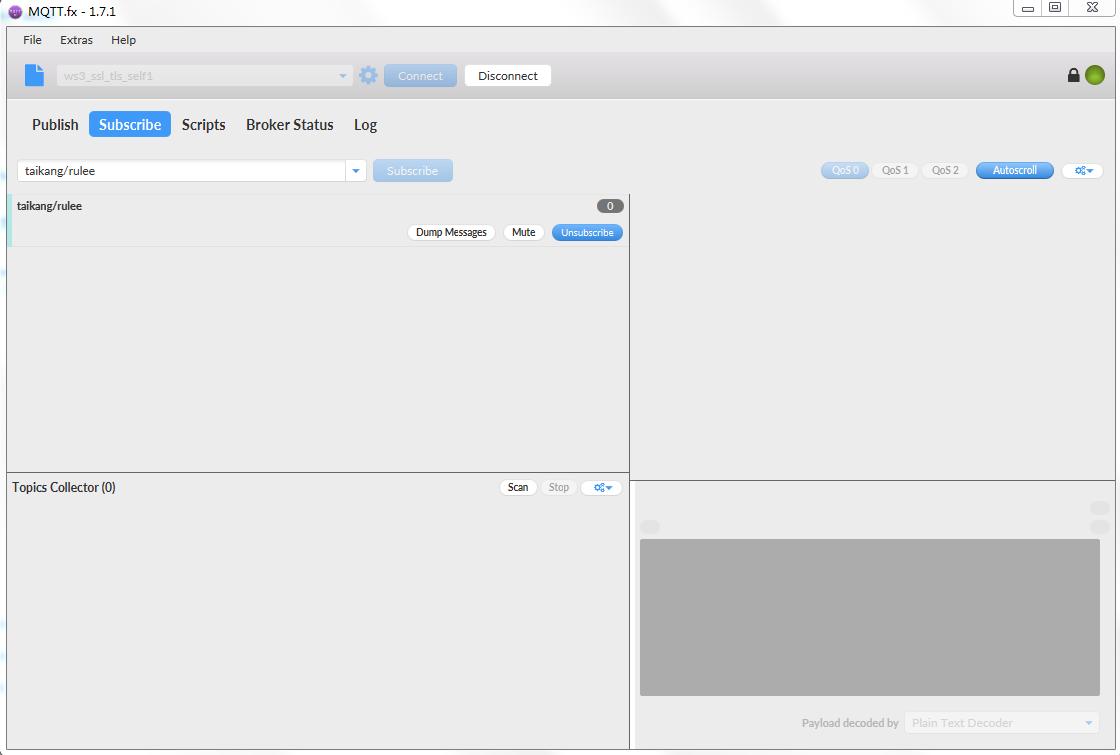
c. 按照图片subscribe.jpg所示,进行订阅。
3). 消息生产者跑在Linux机器上,通过mosquitto_pub实现。
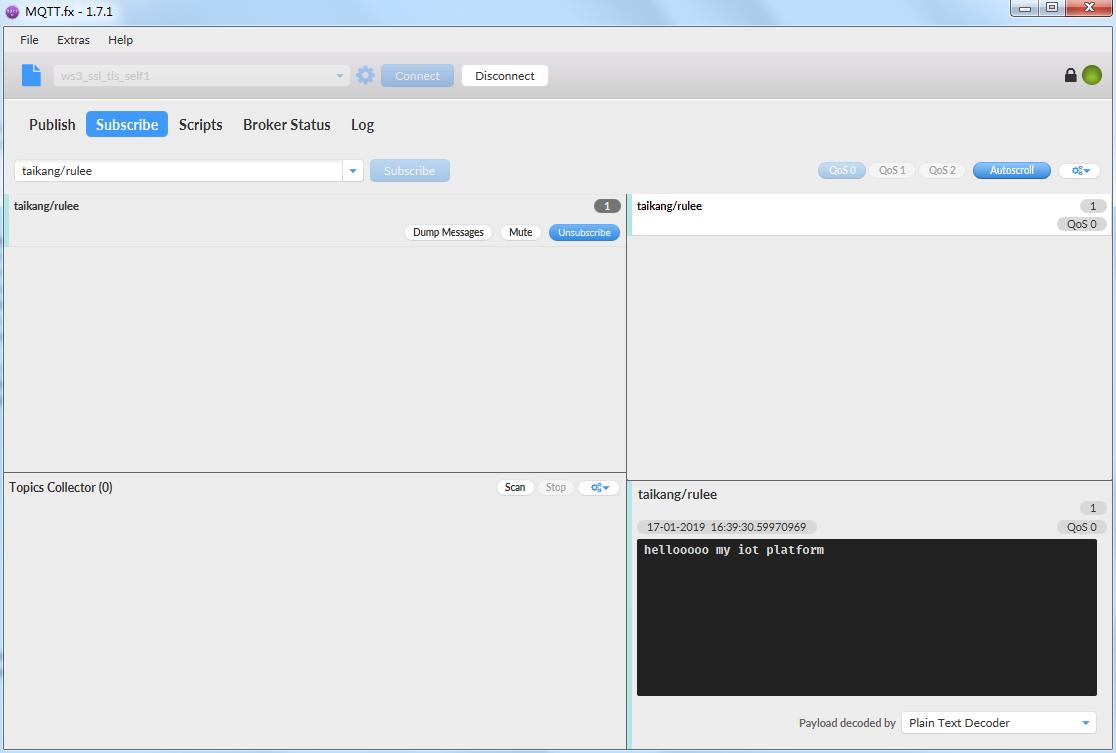
[root@ws3 certs]# mosquitto_pub -h 10.95.197.3 -t taikang/rulee --cafile /opt/certs/rootCA.crt --cert /opt/certs/client.crt --key /opt/certs/client.key -u water -P water -m "hellooooo my iot platform"
此时,MQTT.fx客户端上收到了刚才发送的数据,结果如下图.
4). 这里,基于上面listener.ssl.external.verify = verify_peer (broker要验证client的身份)做些方向测试验证,主要验证是不是双向验证逻辑。
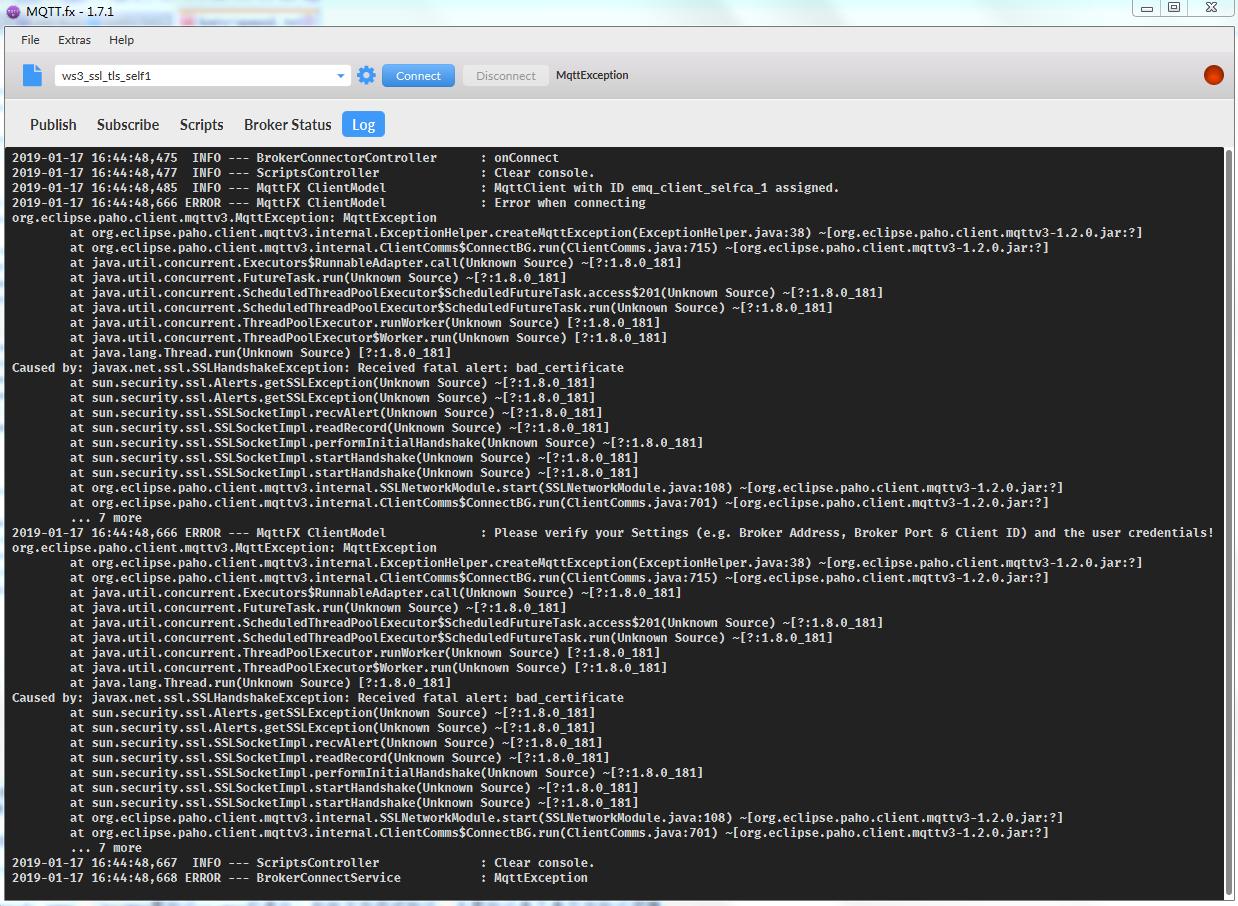
a. MQTT.fx上,将证书中client.key换成其他的key,和client.crt不配对的,看能否建立连接。效果如图下图. 而且,配置中根证书,客户证书,客户私钥,这三个任何一个配置不匹配,会出现不同的错误信息,自行尝试验证。
b. Mosquitto_pub端,选择将cert的参数选成另外一个证书,和上述的client.key不匹配即可,错误如下:
[root@ws3 certs]# mosquitto_pub -h 10.95.197.3 -t taikang/rulee --cafile /opt/certs/rootCA.crt --cert /etc/emqttd/certs/client-cert.pem --key /opt/certs/client.key -u water -P water -m "hellooooo5" -d

Error: Unable to load client key file "/opt/certs/client.key".

OpenSSL Error: error:0B080074:x509 certificate routines:X509_check_private_key:key values mismatch

Unable to connect (A TLS error occurred.).
从上面a和b两边的测试验证,说明自行生成的客户端和服务端证书,在emqtt配置成双向验证的情况下,工作是符合设定的业务逻辑的。
下一篇博文,将从wireshark抓包的角度分析SSL通信模式下,单向验证和双向验证,在SSL/TLS消息流上的差异。
MQTT研究之EMQ:【SSL双向验证】的更多相关文章
- MQTT研究之EMQ:【SSL证书链验证】
1. 创建证书链(shell脚本) 客户端证书链关系: rootCA-->chainca1-->chainca2-->chainca3 ca caCert1 caCert2 caCe ...
- MQTT研究之EMQ:【EMQ之HTTP认证/访问控制】
今天进行验证的逻辑是EMQ的http的Auth以及ACL的逻辑. 首先,参照HTTP插件认证配置的说明文档进行基本的配置, 我的配置内容如下: ##-------------------------- ...
- MQTT研究之EMQ:【CoAP协议应用开发】
本博文的重点是尝试CoAP协议的应用开发,其中包含CoAP协议中一个重要的开源工具libcoap的安装和遇到的问题调研.当然,为了很好的将EMQ的CoAP协议网关用起来,也调研了下EMQ体系下,CoA ...
- MQTT研究之EMQ:【JAVA代码构建X509证书【续集】】
openssl创建私钥,获取公钥,创建证书都是比较简单的,就几个指令,很快就可以搞定,之所以说简单,是因为证书里面的基本参数配置不需要我们组装,只需要将命令行里面需要的几个参数配置进去即可.但是呢,用 ...
- MQTT研究之EMQ:【wireshark抓包分析】
基于上篇博文[SSL双向验证]的环境基础,进行消息的具体梳理. 环境基础信息: . 单台Linux CentOS7.2系统,安装一个EMQTTD的实例broker. . emq的版本2.3.11. . ...
- 请给你的短信验证码接口加上SSL双向验证
序言 去年年底闲来几天,有位同事专门在网上找一些注册型的app和网站,研究其短信接口是否安全,半天下来找到30来家,一些短信接口由于分析难度原因,没有继续深入,但差不多挖掘到20来个,可以肆意被调用, ...
- Netty实现SSL双向验证完整实例
Netty实现SSL双向验证完整实例 博客分类: netty nettyssl自签证书 一.证书准备 要使用ssl双向验证,就必须先要生成服务端和客户端的证书,并相互添加信任,具体流程如下(本人调试 ...
- MQTT研究之EMQ:【JAVA代码构建X509证书】
这篇帖子,不会过多解释X509证书的基础理论知识,也不会介绍太多SSL/TLS的基本信息,重点介绍如何用java实现SSL协议需要的X509规范的证书. 之前的博文,介绍过用openssl创建证书,并 ...
- MQTT研究之EMQ:【EMQX使用中的一些问题记录(2)】
我的测试环境: Linux: CentOS7 EMQX:V3.2.3 题外话: 这里主要介绍Websocket的支持问题. 对ws的支持比较正常,但是对wss的支持,调了较长的时间,没有成功. Jav ...
随机推荐
- 安装mavlink遇到的问题(future找不到)
从官网下载mavlink(git clone https://github.com/mavlink/mavlink.git) 然后进入mavlink 目录执行 git submodule update ...
- day16 面向对象二
类的成员之变量 1. 实例变量. 对象.xxx = xxx 2. 类变量. 直接写在类中的变量就是类变量. 类变量一般用类名来访问. 对象中共性的属性提取出来. 例: class A: a = 1 # ...
- 使用iframe框架后的页面跳转时目标页面变为iframe的子页面的问题
<frameset rows="4,200,10,*,120" cols="*" framespacing="0" framebord ...
- 精进之路之JMM
JMM (Java Memory Model) java内存模型 Java内存模型的抽象 Java线程之间的通信由Java内存模型(本文简称为JMM)控制,JMM决定一个线程对共享变量的写入何时对另一 ...
- react中Redux应用框架学习
1. 最普通的react-redux 2.应用context的傻瓜组件和聪明组件的redux框架 3. 精简版react-redux,利用react-redux模块的redux(推荐) 4.多个模 ...
- vsftpd 的端口模式以及端口映射问题
开个blog ,写一下关于vsftp 端口映射的一些坑 内容繁多,改日再更.
- 【原创】Arduino、arm、树莓派与单片机
Arduino是一个由开源软件环境支持的开源硬件原型平台.包含硬件(各种型号Arduino板)和软件(Arduino IDE).集成开发环境是Arduino IDE ,编写和编译sketch后通过US ...
- linux 计划任务 访问某个URL
1.进入crontab文件的编写状态: crontab -e 2.进入编辑器后,按下 “ i ” 键,进入编辑模式,在编辑模式下,我们写上我们这次需要访问执行的脚本: 59 23 * * * /usr ...
- django用MySQL数据库链接
在使用的过程中出现了没有mysqld.sock这个文件的情况,无法连接到mysql数据库. 几经周折,设置路径,改文件夹的权限,也都无济于事,只有重新安装mysql服务器,第一次尝试还是失败,服务器安 ...
- Oracle编码
三.解决数据库乱码原理特辑内容 3.1 前言 在解决数据库乱码问题中,涉及到三个方面的字符集:1.oracel server端的字符集:2.oracle client端的字符集:3.dmp文件的字符集 ...
